Securely Clone IDE Hard Drive to SATA (SSD) in Windows 11, 10, 8, 7
- IDE vs SATA: Why clone IDE hard drive to SATA SSD?
- Find out a proper IDE to SATA cloner-Qiling Disk Master
- Step-by-Step: How to clone IDE hard drive to SATA in Windows OS
- Step 1. Set the SATA drive to IDE mode
- Step 2. Start cloning IDE hard drive to SATA via Qiling Disk Master
- Step 3. Boot from the SATA SSD
- Conclusion
IDE vs SATA: Why clone IDE hard drive to SATA SSD?
IDE (also known as PATA, Serial ATE) and SATA (or Serial ATA) are two types of interface standards for connecting storage devices. While IDE is a parallel connector, SATA is a serial connector, and as a newer standard, SATA was designed to overcome the limitations of IDE. As a result, SATA has the technologies that IDE can't provide, giving it several advantages over IDE, including [insert advantages here].
● Faster speed: The IDE interface has a much slower data transferring speed of up to 133 MB/S compared to SATA, which can reach speeds of up to 6 GB/S. This significant difference highlights why IDE is no longer sufficient for modern computing needs.
● Better performance: SATA is more suitable for performing intense I/O tasks than IDE, and IDE should be used for less intense tasks to prevent slowing down the computer.
● Better compatibility: IDE (Integrated Drive Electronics) is an outdated technology that cannot run on modern operating systems like Windows 11, 10, and 8, making it difficult to use advanced and even basic programs. In contrast, SATA (Serial Advanced Technology Attachment) can run on these newer operating systems, providing a more convenient and efficient way to operate programs.
● Easier connection: An IDE (Integrated Drive Electronics) interface requires a jumper setting to function properly. If the jumper is set incorrectly, the IDE drive will not be recognized by the system.
SATA hard drives have largely replaced IDE due to their advantages, but if your computer with an IDE hard drive is running slowly, you can try cloning the IDE hard drive to an SSD with a SATA port. However, this process can be tricky, especially when it comes to avoiding boot issues in Windows 11/10/8/7. Fortunately, this article provides a solution to help you securely clone your IDE hard drive to a SATA drive without encountering any boot problems.
Find out a proper IDE to SATA cloner-Qiling Disk Master
Cloning an IDE hard drive requires a more complex process than a simple copy-and-paste operation, as it involves copying not just the files but also the underlying data structures that enable the system to access and find those files. This includes the Master Boot Record (MBR) and file allocation table, which are essential for the system to boot correctly. A simple copy-and-paste operation would not suffice, as it would only copy the files on the surface, leaving the system unable to boot from the new hard disk.
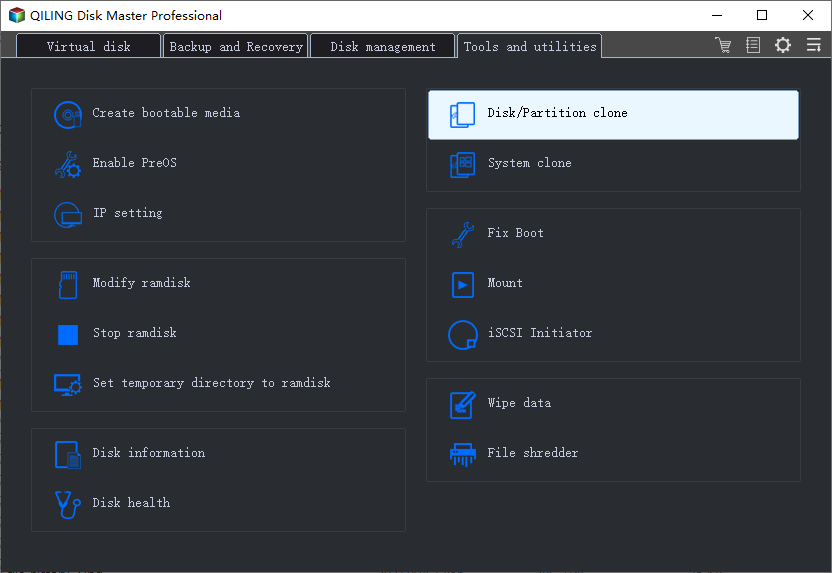
Therefore, I recommend you to use IDE to SATA cloner named Qiling Disk Master Professional, which provides various features to meet different demands:
● Full-featured: A great hard drive cloner should be able to clone larger drives to smaller ones, as well as clone specific partitions to different disks, catering to various cloning needs.
● Bootable clone: A great IDE to SATA cloner allows users to clone both data and system disks, keeping the cloned data valid. If it clones a system disk, all boot-related data must be cloned, or the cloned drive won't boot.
● Compatible: The cloning software should be able to support various Windows operating systems, including Windows 11, 10, 8, 7, Vista, and XP, ensuring a successful clone regardless of the user's operating system.
● Intuitive and easy-to-use: The system should have a user-friendly interface that is easy to understand for both beginners and experienced users, making it simple to perform cloning tasks.
● Partition alignment: A good IDE to SATA cloner should support partition alignment, which can improve data reading and writing speed on an SSD drive after cloning, enhancing overall computer performance.
Step-by-Step: How to clone IDE hard drive to SATA in Windows OS
To clone an IDE hard drive to a SATA hard drive, connect the SATA hard drive to your PC and launch the Qiling Disk Master Demo version. Then, follow the steps provided to see a detailed guide on how to complete the cloning process.
✍ Note: If your computer motherboard doesn't support SATA, you'll need to get an IDE-to-SATA adapter or connector to connect it.
Step 1. Set the SATA drive to IDE mode
Some older operating systems may not recognize SATA hard drives, which are newer than IDE drives. If your SATA drive is not being recognized by the system, you can try setting it to IDE mode to resolve the issue.
1. If you use Windows 8 and later systems. To restart your computer, press and hold the "Shift" key and click "Restart". If you're using Windows 7 or an older system, restart your computer and press the "F8" key immediately.
2. Navigate the following path in the window:
Troubleshoot>Advanced Option>Startup Settings>Restart
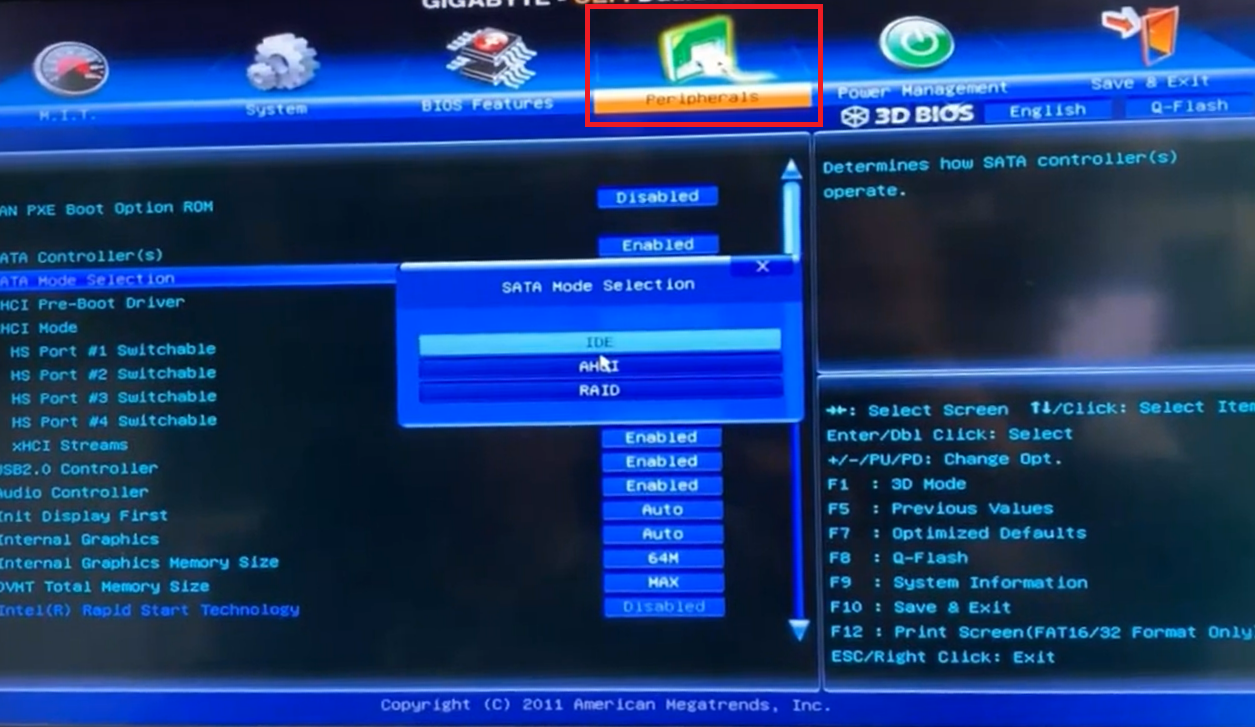
3. When the computer restarts, press the "Delete/F2" to enter BIOS, select an option such as "Advanced", "Integrated Peripherals" or "Main" or a similar option. And switch SATA mode to IDE.
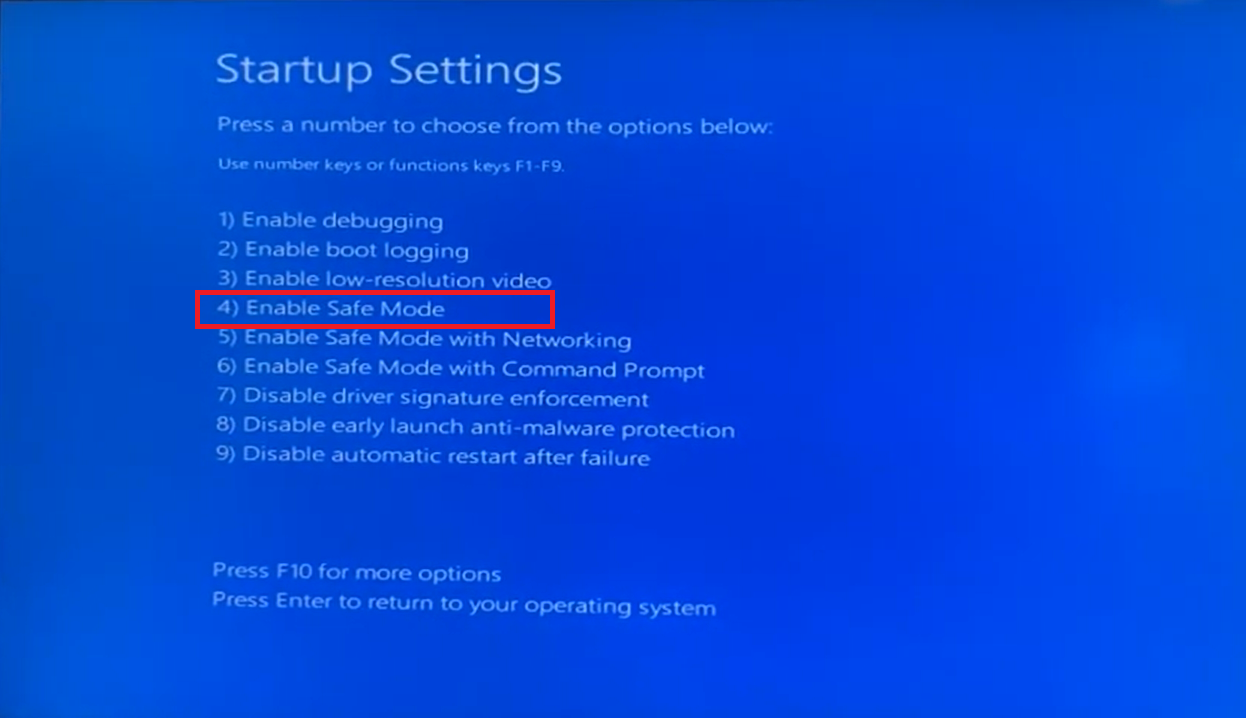
4. Press "4/F4" to select "Enable Safe Mode".
5. Just restart your computer and finish the operation.
Step 2. Start cloning IDE hard drive to SATA via Qiling Disk Master
The IDE hard drive is now recognized by your computer. Next, open Qiling Disk Master and start the cloning process to transfer the contents of the IDE hard drive to a SATA drive.
✍ Attentions:
- Please back up your data from the SATA hard drive using Qiling Disk Master before cloning, as the data will be deleted after the process.
- Using a GPT partition table and UEFI boot mode can significantly improve the performance of a SATA SSD when used as a bootable disk. In fact, Microsoft now requires UEFI and GPT for Windows 11 upgrades. However, before cloning your MBR system disk to a GPT SATA SSD, it's essential to verify that your motherboard supports UEFI boot mode, as you'll need to switch your BIOS to UEFI afterwards.
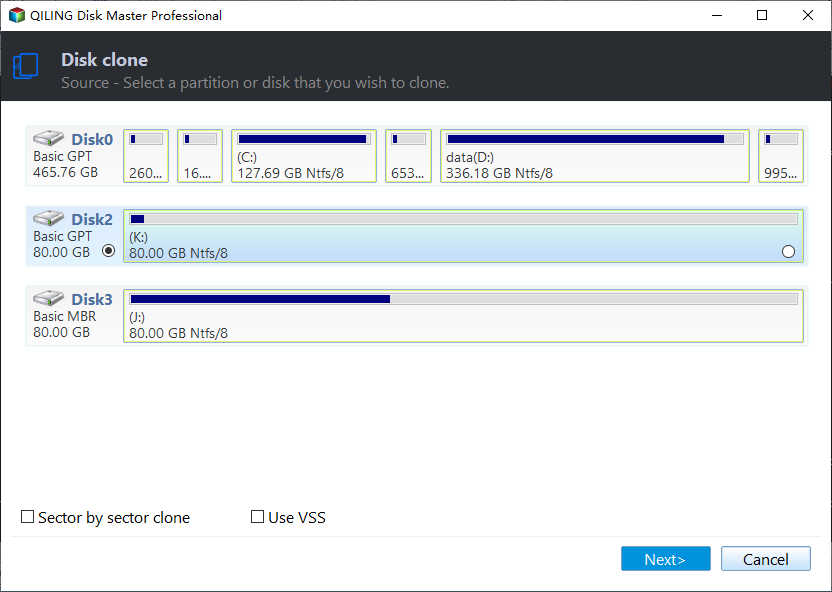
Step 1. Click "Clone" in the main interface, and select "Clone Disk".
Step 2. Choose the IDE hard disk as the source disk and click "Next".
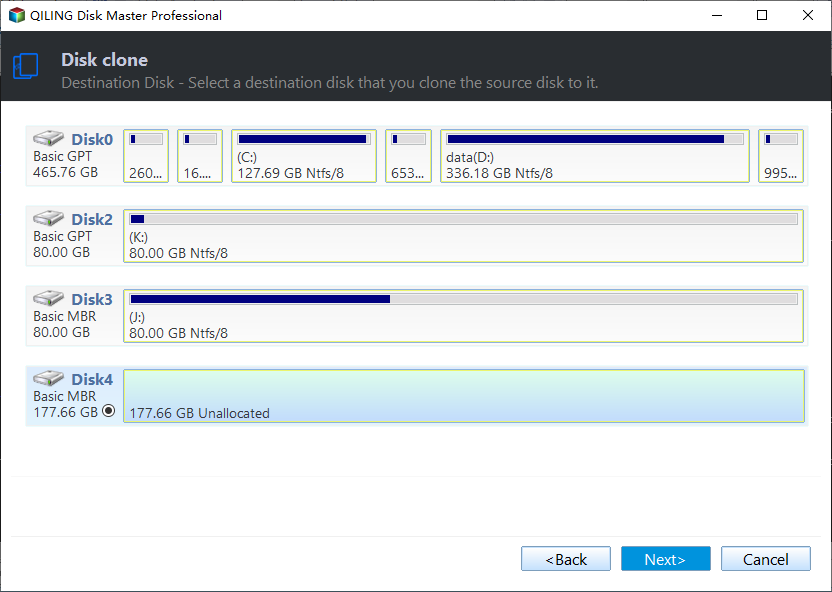
Step 3. Select the SATA drive as the destination disk, and then click "Next".
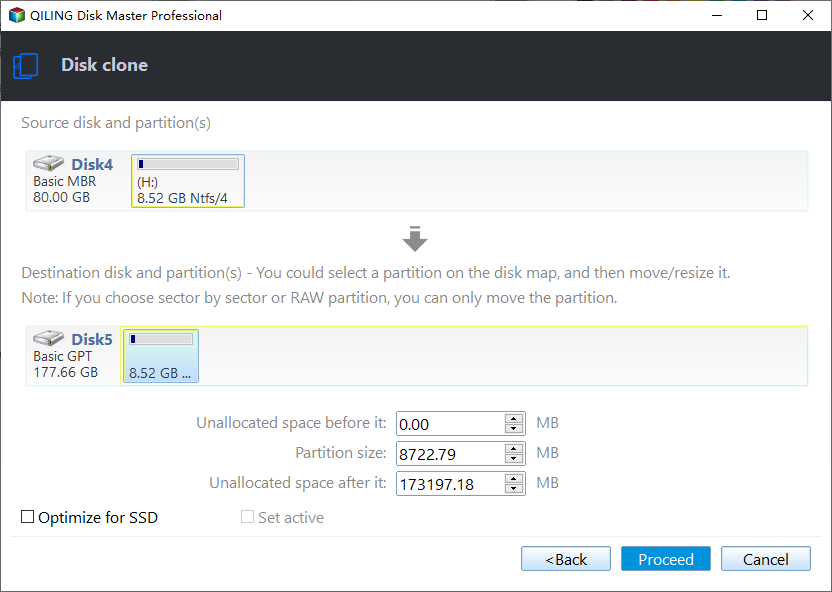
Step 4. You can check the source and destination disk in the next window or change to "Sector to Sector clone", and click the "Confirm" button to continue if there is no problem.
Here, you can also adjust the partition size on the destination disk or tick "4k alignment" to improve the reading and writing speed of the SSD if the destination disk is an SSD.
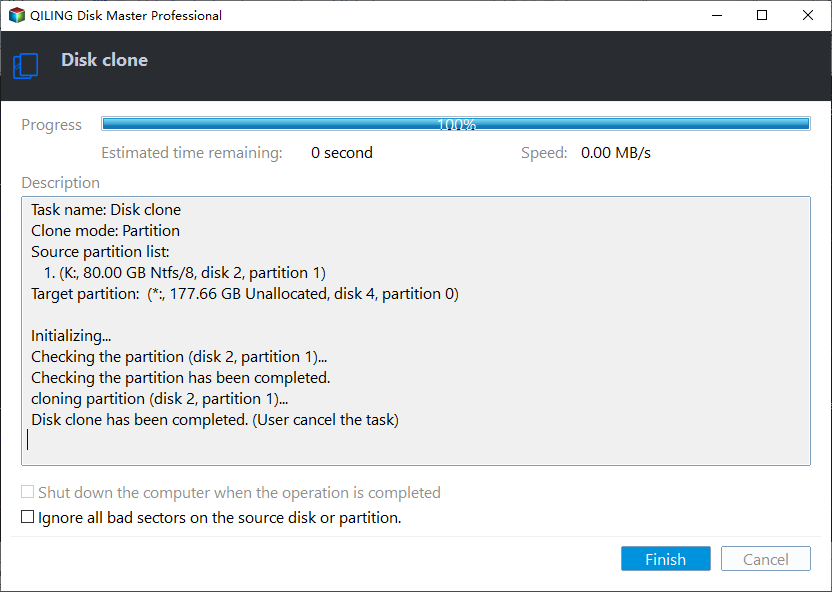
Step 5. In the main interface, click "Proceed" to start transferring data from IDE to SATA.
Step 3. Boot from the SATA SSD
To set the SATA SSD as the boot drive, follow these steps and restart your computer afterwards. To set the SATA SSD as the boot drive, follow these steps and restart your computer afterwards.
Step 1. During the process of restarting, long press "F2" to "Enter Setup".
Step 2. And "Change boot order" then set the cloned SATA SSD drive as boot drive.

Step 3. Press "Enter". Now you can boot the computer from the SATA successfully.
Conclusion
To clone an IDE hard drive to a SATA drive and boot a PC from the cloned SATA drive in Windows 11/10/8/7, you can use Qiling Disk Master. This tool not only assists in cloning hard drives but also offers additional features to manage your computer and disk, such as migrating the OS to an SSD or HDD, and securely wiping data on an SSD.
You can clone an IDE to SATA drive on a Windows Server operating system using Qiling Partition Assistant Server Edition.
Related Articles
- Cloned Hard Drive or SSD Won't Boot - How to Fix?
If you find the cloned hard drive/SSD won't boot after you clone your Windows 7/8/10/11 hard drive to another HDD or SSD, you can try the solutions listed in this post to make the cloned hard drive bootable successfully. - Freeware to Clone/Copy Partition to Another Drive (SSD/HDD) in Windows 10/8/7
With the free Qiling Disk Master Standard, you can easily clone partition to another drive or disk in Windows 11, 10, 8, 7. It also allows you to clone C drive to another drive effectively. - Best Free Alternative to XXClone for Windows 10/8/7
You will find the best alternative to XXClone and XXClone Pro alternative, just see the details to clone hard drive to SSD without losing data in Windows 10, 8, 7.