Comprehensive Guide: How to Recover Permanently Deleted Photos Free?
- Where do permanently photos go?
- How to recover permanently deleted photos free?
- Case A. How to recover permanently deleted photos from hard drives free?
- Solution 1. Recover permanently deleted photos from hard drives via Windows File Recovery
- Solution 2. Recover permanently deleted photos from hard drives via photo recovery software
- Case B. How to perform iPhone permanently deleted photo recovery?
- Solution 1. Recover permanently deleted photos from iPhone 13/14 via iTunes backup
- Solution 2. Recover permanently deleted photos from iPhone 13/14 using iPhone photo recovery software
- Relevant Q&A for photo recovery
Where do permanently photos go?
If you've deleted a file on your Windows or iPhone, the Windows OS or iOS will automatically send the deleted file to the Recycle Bin or the Recently Deleted folder, respectively. This is where deleted files go on computers and iOS devices.
When you permanently delete photos on Windows or iPhone, they are not actually deleted, but rather moved to a hidden folder or location on the device. On Windows, permanently deleted files are sent to the Recycle Bin, where they remain until they are manually deleted or the Recycle Bin is emptied. On iPhone, deleted photos are moved to the Recently Deleted album, where they remain for 30 days before being permanently deleted.

Before data coverage, permanently deleted image files still exist on the hard drive because the deletion process only removes the pointers to the file's location, not the file itself.
Photos without file paths can be difficult to locate on Windows OS, making photo recovery tools a top choice to retrieve them.
How to recover permanently deleted photos free?
To recover permanently deleted photos for free, you can use various solutions depending on whether you're on a PC or an iOS device. For PCs, you can try using data recovery software, while for iOS devices, you can use iCloud Photo Library or third-party apps like PhoneRescue or Deep Data Recovery. However, it's essential to note that the likelihood of recovering deleted photos decreases over time, so it's best to act quickly.
- After losing data, it's best to refrain from taking or storing new pictures on Windows or iPhone, as this could overwrite the deleted or lost photos.
Case A. How to recover permanently deleted photos from hard drives free?
If you're looking to recover permanently deleted photos from hard drives, consider trying out specialized photo recovery software. This type of software is designed to scan your hard drive and retrieve deleted files, including photos, that were previously thought to be lost forever. By using a reliable photo recovery tool, you may be able to recover your cherished memories and get them back on your device.
Solution 1. Recover permanently deleted photos from hard drives via Windows File Recovery
You can recover permanently deleted photos for free using Windows File Recovery, a free photo recovery software.
Windows File Recovery is a free tool from Microsoft that can recover deleted or lost files from various storage devices, including internal and external hard drives, USB sticks, SD cards, and SSDs, without any cost.
The free feature of the service has several limitations.
- Notes:✎...
- Windows File Recovery is only compatible with Windows 10 and later versions.
- The command to use Winfr is in the format: winfr source-drive: destination-drive: [/mode] [/switches] where you specify the source and destination drives, and optionally select a mode and/or switches based on your needs. This is because Winfr is a command-line tool that doesn't have a graphical user interface.
- To recover deleted photos, ensure the source drive, where the permanently deleted photos are stored before data loss, is different from the destination drive, where the recovered photos will be stored after data recovery.
- Four The four modes (Extensive, Regular, Segment, and Signature) can support four file systems: NTFS, FAT, exFAT, and ReFS.
To select the mode and switches you need, consider the type of project you're working on and the level of complexity involved. If you're building a simple circuit, a single-pole, single-throw (SPST) switch might be sufficient.
Step 1. To open Windows File Explorer, press the keys "Win + E", then click on "This PC" and right-click on the hard drive containing the desired photos before data loss, and select "Properties".
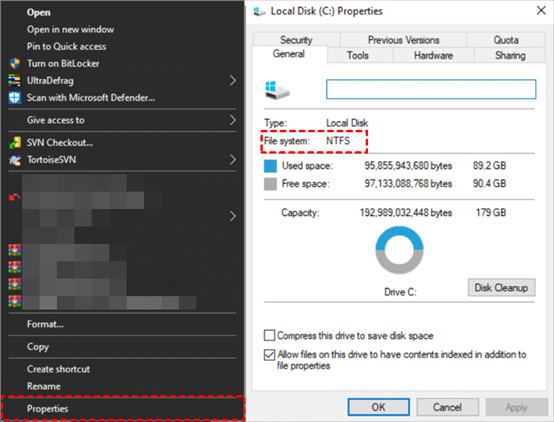
Step 2. After determining the file system of your chosen hard drive and understanding the data loss scenarios, select a recommended mode. This will help ensure the recovery process is tailored to your specific situation, maximizing the chances of successful data retrieval.
|
File system |
Scenarios |
mode |
|
NTFS |
Deleted recently |
Regular |
|
NTFS |
Deleted for a while |
Extensive |
|
NTFS |
Formatted disk |
Extensive |
|
NTFS |
corrupted disk |
Extensive |
|
FAT and exFAT |
Any |
Extensive |
Step 3. Choose some switches you want from the following form.
|
Switch |
Description |
The supported modes are: |
|
/y: |
Recover specific extension groups, comma-separated |
Signature |
|
/p: |
To save a log file of the recovery operation in a different location, you can specify a custom location for the log file in the recovery environment. For example, you can save the log file to D:\logfile, which is different from the default location on the recovery drive. |
All |
|
/a |
Overrides user prompts, which is useful in a script file. |
All |
|
/u |
Recovers undeleted files, for example, from the Recycle Bin. |
NTFS Segment |
|
/k |
Recovers system files. |
NTFS Segment |
|
/g |
Recovers files without primary data streams. |
NTFS Segment |
|
/e |
This switch removes the default filter on file types to keep results manageable and focus on user files. |
NTFS Segment |
|
/e: |
Specifies which file types are filtered. |
NTFS Segment |
Step 4. To download Windows File Recovery, click "Get" on the Microsoft Store, then install and open it on your Windows 10/11 computer.

Step 5. To recover PNG files from the C drive and save them in the E drive, you can use a file recovery software like Disk Drill or Deep Data Recovery Wizard. First, download and install the software, then select the C drive as the source location and the E drive as the destination location.
To open the command prompt window, press the Windows key + R, type "cmd" and press Enter. Then, type "winfr C: E: /n \Users \UserName\Pictures \ *.PNG" and press Enter, replacing "UserName" with your actual username.
Step 6. Press "y" to start deleted photo recovery on Windows 10/11. To stop the process, press Ctrl + C keys.
Solution 2. Recover permanently deleted photos from hard drives via photo recovery software
Windows File Recovery is not suitable for non-tech users and does not offer a 100% guarantee of recovering deleted files.
Consider using a more convenient photo recovery tool like Deep Data Recovery instead, which offers a powerful yet user-friendly interface that eliminates the need to recover deleted files using the command line.
- ★Functionalities & compatibility below:
- Recover deleted or lost Word documents, Excel, PPT, PDF, photos, videos, audio, folders, compressed files, and over 200 types of data from hard drives, USB drives, SD cards, and other storage devices.
- Retain the original format for the deleted/lost data.
- During scanning, you can search your needed photos by tying their filenames in the search bar or wait to find all the deleted and other lost files on your computers after Quick Scan and Deep Scan.
- Support NTFS, exFAT, FAT32, and ReFS file systems.
Download Deep Data Recovery on your Windows computer to recover lost image files.
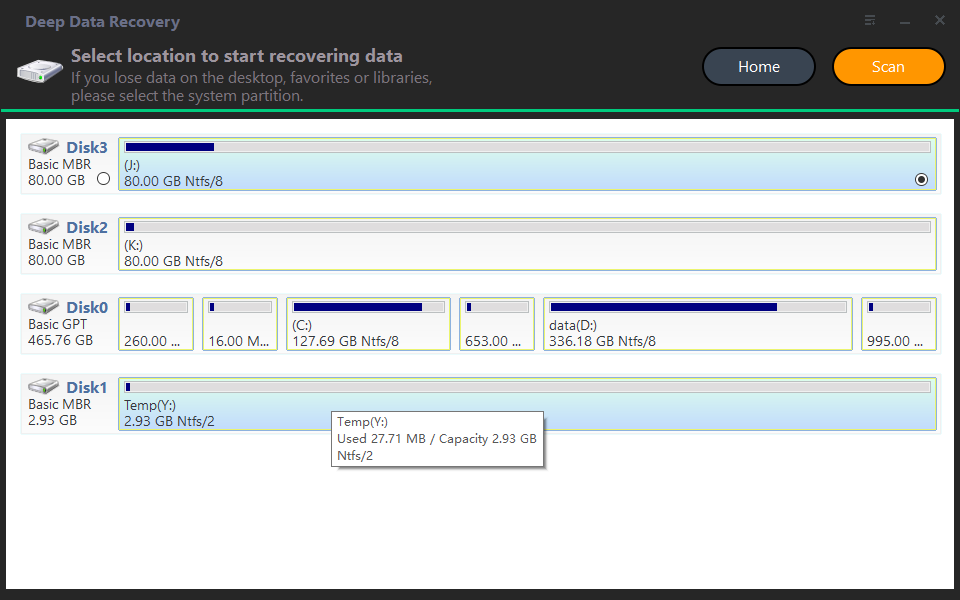
Step 1. Launch Deep Data Recovery on your PC, and hover the mouse over the partition that contains the image files you want to restore, then click Scan.
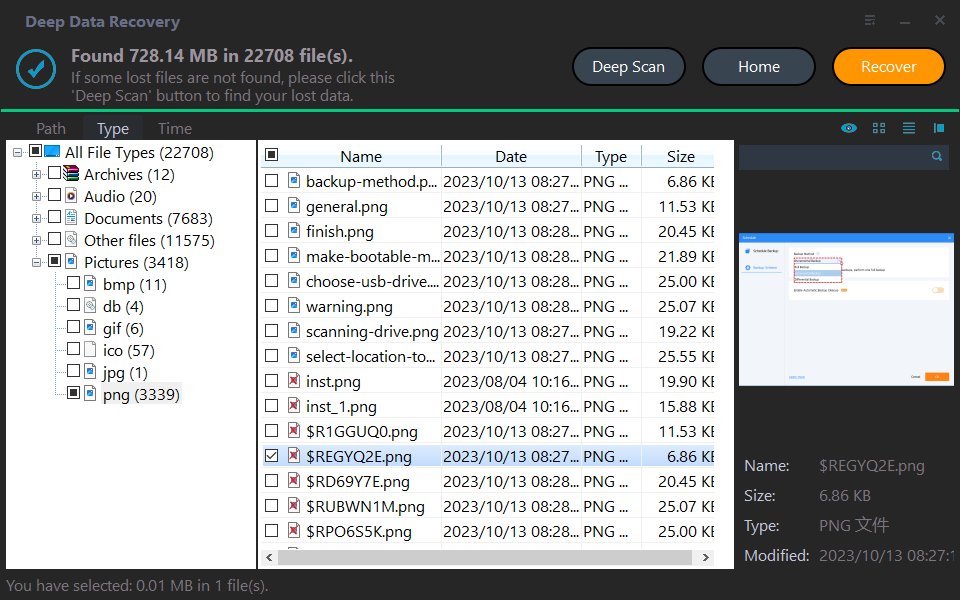
Step 2. Search When performing a Quick Scan or Deep Scan, you have the option to review your desired photos or wait to see all the deleted and Raw files. This allows you to identify and recover specific photos you want to keep, or view all the files that were previously deleted or not properly saved.

Step 3. To recover deleted photos, go to the "Deleted Files" or "Raw files" folder, select the desired photos, click "Recover", and save them in a new location.
Case B. How to perform iPhone permanently deleted photo recovery?
For iOS devices, you can recover permanently deleted photos for free using either the traditional method or an alternative approach. The traditional way involves using built-in iPhone features or third-party apps to recover deleted photos, while the alternative way offers a more comprehensive solution using specialized software.
Solution 1. Recover permanently deleted photos from iPhone 13/14 via iTunes backup
To recover permanently deleted photos from an iPhone, you can use the conventional method of restoring from iCloud or iTunes backups, which is free and doesn't require any payment. This method allows you to recover deleted photos without needing any additional software or tools.
To recover permanently deleted photos from iPhone, ensure your iTunes backup includes the desired image files, and you're ready to begin the recovery process.
- Notes:✎...
- If you've enabled iCloud Photos, your iTunes backup won't be able to contain the same photos.
- You cannot view all your files and restore the photos you need before the restoration process begins.
- The selected iTunes backup will completely replace all existing data on the iPhone.
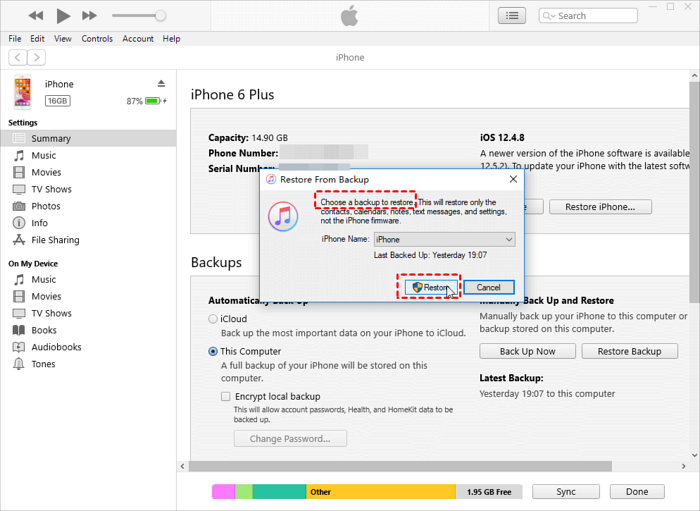
Step 1. Run the latest iTunes and connect your iPhone to your PC, then click on the left side "iPhone" tab.

Step 2. Select "Restore Backup" after clicking the "Summary" button.
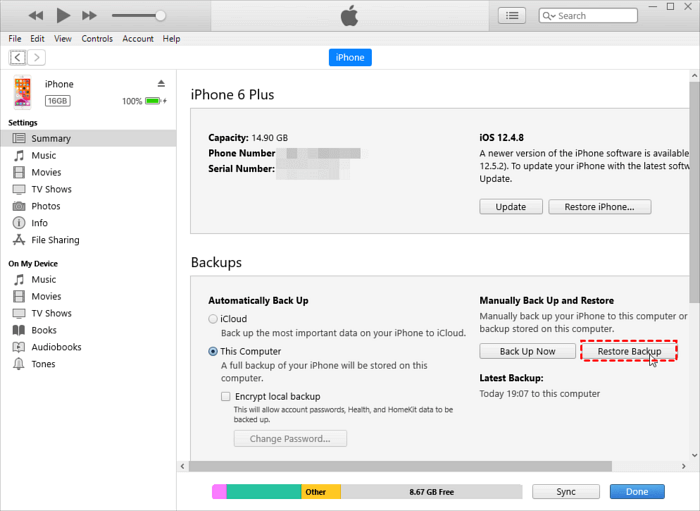
Step 3. To restore an iTunes backup, select the desired backup and click the "Restore" button. The size of the backup will affect the restoration process, so be patient while waiting.
Solution 2. Recover permanently deleted photos from iPhone 13/14 using iPhone photo recovery software
No, you cannot recover deleted photos on your iPhone after 30 days if you never made backups. Once the 30-day window passes, the deleted photos are permanently lost and cannot be recovered, even with iCloud backups. To recover deleted photos, you need to have made a backup within the 30-day window, either through iCloud or iTunes.
If you've permanently deleted photos from your iPhone without a backup, you can try using a data recovery tool like Deep Data Recovery for iOS to potentially recover them.
- ★Key features:
- With a bootable iPhone, everyone is ready to begin the iPhone data recovery process.
- There's no need to reset your iPhone and restore from backups or erase all content and settings on your iOS devices.
- Before recovery, you can preview all the iPhone data and choose your lost images, and then the recovery process can restore selected data back to your iPhone.
- Recover a wide range of data from your iPhone, including photos, videos, contacts, notes, reminders, WeChat history, call history, calendars, voice memos, and more.
- This app supports various iPhone, iPad, and iPod Touch models and is compatible with iOS 10.0 and later versions.
To recover permanently deleted photos from your iPhone 11 pro, 12, 13, or 14, download Qiling Data Recovery for iOS on your Windows device.
Relevant Q&A for photo recovery
To recover permanently deleted photos for free, follow the methods specific to your device: for Windows, use built-in tools like File Explorer or third-party software like Deep Data Recovery Wizard; for iPhone, utilize the built-in Photos app or third-party apps like PhoneRescue or Qiling Disk Master. Additionally, consider these tips: regularly back up your photos, use cloud storage services like Google Photos or iCloud, and avoid deleting photos permanently to minimize the need for recovery.
If you've synced or backed your needed photos to Google Drive, you can try to recover permanently deleted photos by seeking help from the administrator or contacting Google Drive Help.
Regular backups are the best data loss prevention measure. For Windows, you can protect your photos by making a file backup via Qiling Disk Master.
For iOS devices, you can make a separate Photos Backup using FoneTool, and also restore your iPhone from a full/selective backup made by FoneTool without losing data.
Related Articles
- A Complete Guide to Recover Deleted Files
This guide explains how to recover deleted files on Windows 10/11, Mac, iPhone, Android, SD cards, USB flash drives, and Google Drive. - How to Recover Latest Windows Update Deleted Files (21H2/2004)
Windows updates do not intentionally delete files from your hard drive, SD card, or SSD. However, users often experience missing files after updating to Windows 10 or 11. Professional solutions are available to help restore lost documents and missing files. - Restore Missing Fonts After Windows 10 Creator Update
If you're experiencing missing fonts after the Windows 10 Creator update, don't worry! This article provides a quick fix and reliable solutions to restore the installed fonts on your computer. Follow the steps to resolve the issue and have your fonts back in no time. - Restore Overwritten/Replaced/Saved-over XLS/CSV Files
If your Excel file saved as XLS or CSV format got overwritten, replaced or saved-over by a new file, don't worry. This page will show you how to restore overwritten, replaced or saved-over XLS/CSV files in Windows 10/8/7 with simple clicks. - How to Recover Deleted Hidden Photos on Computer/Mac
If you're looking to recover deleted hidden photos, we have a suitable tool for photo recovery of hidden files on your computer or Mac. - How to Recover Deleted Photos from Windows 8 Computer
To recover permanently deleted photos in Windows 8, follow the steps outlined in the Windows 8 picture recovery article, which provides a step-by-step guide on how to recover deleted photos efficiently.