How to Format the C Drive in Windows 10 Without Erasing the Wrong Disk
Windows normally prevents you from formatting the partition it is running from. That protection is intentional: removing the active Windows file system would stop the operating system from working. To format that partition, start the computer from separate installation or recovery media.
Formatting deletes access to the partition's existing files. It does not reinstall Windows by itself, repair a physically damaged disk, or guarantee that old information cannot be recovered. Decide whether your real goal is reinstalling Windows, fixing a storage problem, or disposing of the computer before proceeding.
Prepare a usable backup before formatting
Save documents, browser exports, email archives, application databases, and license details to another physical device. Open several saved files to check the copy. Cloud-only files must be downloaded before a local backup can include their contents. Record your BitLocker recovery key if encryption is enabled.
Step 1. Connect an external backup disk with enough free space. Open Qiling Disk Master and choose File Backup. Use a system or disk backup instead if you need the ability to restore installed Windows and applications.

Step 2. Expand the folder tree and select the files and directories you need to retain. Check folders belonging to other user accounts with the appropriate permission. There is no need to use Add File or Add Folder buttons.

Step 3. Select a destination on the external disk, not C: or another partition you intend to delete. Review the chosen contents and destination, then click Proceed.
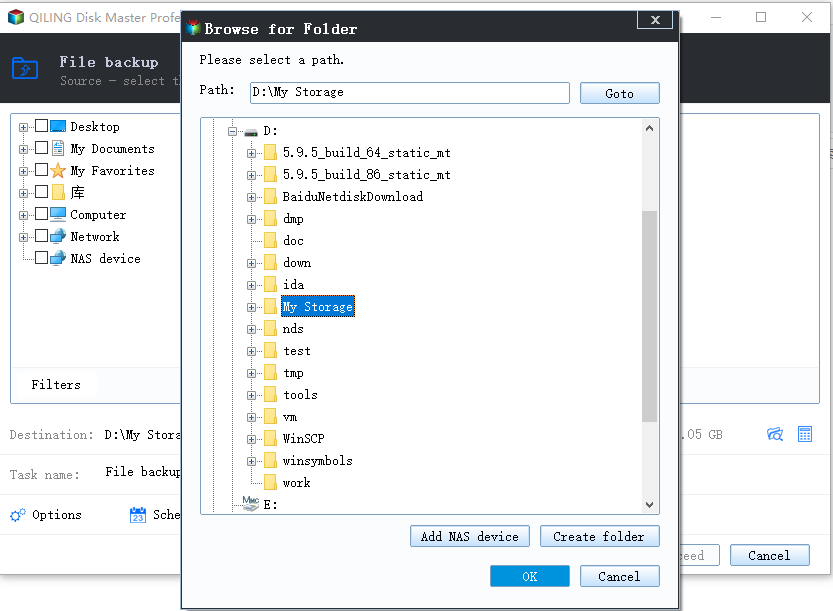
Step 4. Wait for completion and check that the backup is accessible through the restore function. Safely disconnect the backup disk before opening the Windows installation partition screen.
Format the Windows partition from installation media
Step 1. Prepare authorized Windows installation media on another USB drive. Creating that USB may erase it. Choose an operating system supported by your hardware; standard Windows 10 support has ended, so consider security-update eligibility before reinstalling it.
Step 2. Shut down, connect the installer USB, and use the manufacturer's one-time boot menu to start it. Keep the original UEFI or legacy boot mode unless you have planned a disk-layout conversion.
Step 3. Start Windows Setup and follow the language, edition, and licensing prompts. Select the custom installation option to reach the partition list. Do not click Delete or Format until you have identified the correct physical disk.
Step 4. Match the Windows partition by disk capacity, partition size, and the layout recorded before restarting. Drive letters in a recovery environment can differ from those used inside Windows. EFI, Recovery, and Microsoft Reserved partitions are not interchangeable with the large Windows partition.
Step 5. Select only the intended Windows partition, choose Format, and confirm the data-loss warning. If you cannot identify it confidently, cancel and inspect the disk rather than guessing.
Step 6. To reinstall, select the formatted partition and continue Setup. Formatting alone leaves no usable Windows installation on that partition. Allow Setup to restart and avoid starting the USB installer again during the first reboot.
When deleting every partition is a different operation
Deleting all partitions on one disk creates unallocated space and lets Setup create a new layout, but it also removes data volumes and recovery partitions on that disk. It is not required simply to format the Windows partition. Disconnect unrelated disks where practical to reduce selection mistakes.
Do not use DiskPart clean as a substitute for formatting C:. It removes the selected disk's partition information rather than acting on only the Windows volume. If your goal is confidential-data disposal, use an appropriate verified sanitization method instead of relying on a quick format.
Check the new installation before restoring files
Install network and storage drivers from the hardware manufacturer, check activation, and apply the updates available under your support plan. Reconnect the backup disk only after the correct Windows installation starts successfully. Reinstall applications from trusted sources and restore documents into the new user folders.
If formatting fails with repeated input/output errors or the disk disappears, stop retrying. Test its connection and health; replacing an unreliable drive is safer than repeatedly installing Windows on failing hardware.
Related Articles
- Check Bad Sectors in Windows 10
Distinguish file-system errors from physical drive faults before attempting repairs. - Install Windows 10 on a GPT Partition
Match the installer boot mode to the destination disk's GPT layout.
Products
Articles & Tutorials
- Data Recovery
- Data Backup
- File Recovery
- File Backup
- File synchronize
- System Backup and Restore
- Disk and Partition Clone
- Technical articles
- Disk Master Help
- Windows Deleted File and Disk Recovery Tutorials
- Windows File and Data Recovery Tutorials
- More Windows Tutorials for Install, Security, Files, and PC Tips
- Windows Boot, Repair, and Recovery Environment Tutorials
- Windows Backup Tutorials
- Windows Restore Tutorials
- Windows Clone and Migration Tutorials
- Windows Server Backup, Recovery, and Management Tutorials
- Windows Disk, Partition, and Storage Management Tutorials