How to Use Volume Shadow Copy in Windows 10 Correctly
Content of this article:
- What is Volume Shadow Copy?
- How to use Volume Shadow Copy in Windows 10/8/7
- How to easily backup files and folders in Windows 10 with VSS
- Further reading: Windows Elevation of Privilege Vulnerability
- Wrapping things up
What is Volume Shadow Copy?
Volume Shadow Copy (VSS) is a Microsoft Windows technology that allows you to take backup copies or snapshots of computer files or volumes, whether they're in use or not. The process involves the VSS service, requester, writer, and provider, and can be set up to run automatically or manually.
Shadow Copies can be created on local and external volumes using Windows' VSS technology, allowing for backup and restore capabilities. In Windows 7, this can be done via the Backup and Restore feature or by creating System Restore Points, while in Windows 8 and 10, the File History feature can be used for this purpose.
Shadow copies give you a chance to restore deleted files or folders. In Windows 7, you can use the "Previous Versions" tab, but this feature was removed for local volumes in Windows 8. However, you can use ShadowExplorer in Windows 8/8.1/10 to look through old shadow copies and restore files.
How to use Volume Shadow Copy in Windows 10/8/7
Many users are concerned about using Windows 10/8/7 Shadow Copy, but it's not a mystery. You can easily enable Volume Shadow Copy, disable it, and restore deleted files or folders, making it a useful feature for many users.
Situation 1: Enable Volume Shadow Copy in Windows 10/8/7
#1: Enable Volume Shadow Copy using system restore points
Step 1. In the System Properties window, type "Create a restore point" in the search box and select it. Then, choose a drive and click Configure.
Step 2. In the new window, tick Turn on system protection and click Apply to enable.

Step 3. Click Create to enable volume shadow copy in Windows 10.
# 2: Turn on Volume Shadow Copy using task scheduler
To customize volume shadow copy in Windows 10 with a specific time, you can use Task Scheduler. This allows you to enable shadow copy in Windows 10 at a specific time, following a step-by-step process.
Step 1. Open Task Scheduler. You can click Start, type task scheduler and select it from the list.
Step 2. Click Create Task and then specify a name for the task (eg: ShadowCopy).

Step 3. To create a new trigger, click on the "Triggers" tab and select the "New..." option at the bottom, then choose a setting from the options provided, such as one time, daily, weekly, or monthly.

Step 4. To enable shadow copy, click the "Actions" tab, select "New...", and under the "Program or script" option, type "wmic" and input the argument "shadowcopy call create Volume=C:\". This will create a new shadow copy volume on the specified drive, in this case, drive C:.

When running program items using VSS technology, you may encounter a volume shadow copy error in Windows 10. First, check if the Volume Shadow Copy service is started in Services. If it's not running, the volume shadow copy service won't work, causing the program to fail to create a snapshot for your volume.
Situation 2: Restore deleted files or folders via Shadow Copy
# 1: Use Windows Restore Previous Versions feature in Windows 7
Step 1. To restore a file or folder to a previous state, navigate to the item you want to restore and right-click on it, then select "Restore Previous Versions" from the drop-down menu. Alternatively, you can also select "Properties" and click on the "Previous Versions" tab.

Step 2. Select the correct version of file or folder to restore.
In this window, you have 3 options: Open, Copy, Restore.
● The Open button will navigate to the location where the file or folder is stored.
● The Copy button enables you to duplicate a file or folder and move it to another location on your computer, including external hard drives.
● The Restore button allows you to restore a file or folder to its original location, replacing the current version with the restored one.
Tip on there are no previous versions available issue:
One of the possible reasons why you receive this error is that the volume shadow service is disabled. You can manually enable it in task manager by the following steps.
Right-To enable the Volume Shadow Copy service, click on the Start button, select Task Manager, and click on the "Services" tab at the bottom. Then, find "Volume Shadow Copy" in the list and double-click on it.
# 2: Use Shadow Explorer in Windows 8/10
Step 1. Download ShadowExplorer utility, install and launch it. Then, select the drive and date to restore file or folder.
Step 2. Right-click the file or folder to restore and pitch on Export option.

Step 3. Specify the location to save the previous version of file or folder. Wait and check the previous file or folder.
Situation 3: Disable Volume Shadow Copy in Windows 10/8/7
Step 1. To access the System Properties window, search for "Create a restore point" on your computer. Select a drive and click "Configure" to proceed.
Step 2. Tick Disable system protection and click Apply > OK to exit this window.
Once system protection is disabled, all system restore points and volume shadow copies are deleted.
How to easily backup files and folders in Windows 10 with VSS
The volume shadow copy can be useful for backing up files or volumes, but a reliable backup software like Qiling Disk Master Standard is still needed to ensure the process is trustworthy. This software can also be used to backup system or disk, providing flexibility in backup options.
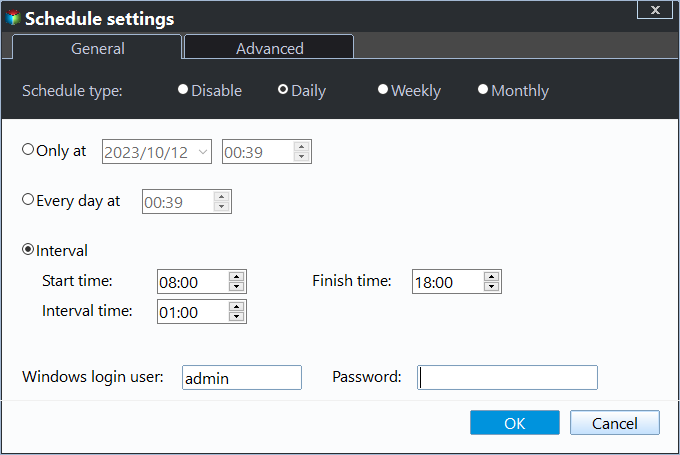
❤ You can schedule backups to occur at regular intervals, like daily, weekly, or monthly, to ensure your files are securely saved.
❤ In addition to scheduling backups, you can also back up only modified files or folders using incremental backup.
❤ To avoid interrupting or restarting your computer during the backup process, you can enable Microsoft VSS (Volume Shadow Copy Service) or Qiling Backup Service.
❤ The software supports all file systems, including NTFS, FAT32, FAT16, and others, and is compatible with various devices, such as external hard drives, flash drives, cloud drives (e.g. OneDrive), NAS, and more.
❤ This software can be used on all Windows systems, including Windows 11, 10, 8, 7, XP, and Vista.
To create a file backup, let's get started. If you want to backup specific files and folders, you can use "Partition Backup", "System Backup", or "Disk Backup" depending on your needs.
Step 1. Connect the storage device where you want to store the files or folders you want to backup, and ensure it can be detected. Download and open the software, then click on "Backup" > "File Backup" to proceed.

Step 2. Click Files or Folders to select files or folders to backup.

Step 3. Click where the arrow points and select a path to save the files and folders.

Step 4 (Optional). Click Options > Backup Mode and you can see Use Microsoft VSS is selected by default under Backup Service.
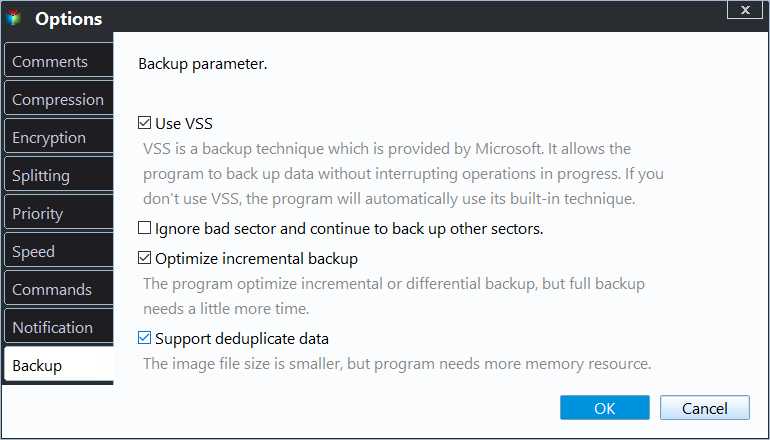
You can set up settings for scheduled backups, such as daily, weekly, or monthly backups, and also choose to do incremental backups. It's recommended to enable the option to wake the computer 2 minutes before the task starts.
• Microsoft VSS backup service may not always work as expected, such as only backing up files in NTFS partitions. Fortunately, this software can step in and provide a reliable alternative, Qiling Backup Service, which can backup files in partitions with other file systems and address other shortcomings of the VSS service.
• The software offers a wide range of advanced features, including the ability to create and manage multiple projects, collaborate with team members in real-time, and track progress and milestones. Additionally, it provides tools for data analysis and visualization, as well as integration with other software and services. professional Automatic backup solutions can be implemented using various features such as USB Plug in, which automatically backs up files to/from a flash drive when it's plugged in, and Differential Backup, which only saves changes made since the last backup. Additionally, Backup Scheme can be used to create a structured backup plan, ensuring that critical data is protected and easily recoverable in case of a disaster. These features can be used separately or in combination to provide a robust and efficient backup system.
• If you want to backup multiple Windows computers, you can use the built-in Windows Backup feature, which allows you to create a backup of multiple computers at once, or use a third-party backup software like Qiling Disk Master, which can also backup multiple computers with a single license.Create bootable mediaThe Qiling Disk Master can be created on a portable device using the Qiling Disk Master tool, supported by the Tech and Tech Plus edition, allowing it to be used on any target PC without installation.
Step 5. Afterward, confirm the operation and click Proceed to backup files or folders.
Further reading: Windows elevation of privilege vulnerability
Microsoft released a privilege vulnerability issue on July 20, 2021, due to overly permissive Access Control Lists (ACLs) on multiple system files, including the Security Accounts Manager (SAM) database.
The vulnerability allows an attacker to run arbitrary code with SYSTEM privileges, enabling them to install programs, view, change or delete data, or create new accounts with full user rights, given the ability to execute code on a victim system.
Microsoft has announced a security vulnerability, identified as CVE, which affects Windows users. They have outlined two methods to fix the issue and have provided a list of affected Windows versions. The company promises to update the CVE as the investigation progresses, ensuring that users are kept informed of the latest developments.
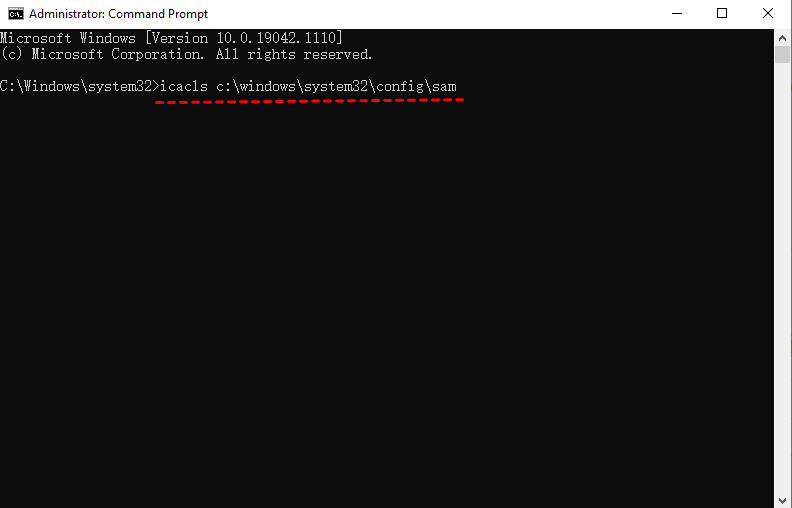
Step 1. To check if your computer is affected, open the Command Prompt as an administrator, type `icacls c:\windows\system32\config\sam` and hit Enter. If you get a response like `BUILTIN\Users:(I)(RX)`, it means unprivileged users can read the SAM file, which may indicate that your system is vulnerable to attack.
Step 2. If your computer is affected, check if there are any shadow copies on your computer. Type `vssadmin list shadows` and hit Enter.
Step 3. Block unprivileged users from accessing to sensitive registry files. You can use cmd or powershell.
- To change the inheritance permissions for all files in the Windows System32 Config folder, type the command "icacls %windir%\system32\config\*.* /inheritance:e" and press Enter in the Command Prompt.
icacls %windir%\system32\config\sam /remove "Users"
icacls %windir%\system32\config\security /remove "Users"
icacls %windir%\system32\config\system /remove "Users"
- To open PowerShell with priority, type the command `icacls $env:windir\system32\config\*.* /inheritance:e` and press Enter. This will allow you to access the system's configuration files.
Step 4. To delete shadow copies on your computer, type the command `vssadmin delete shadows /for=C: /quiet` and press Enter. If you have other partitions or volumes, repeat the command and replace C: with their respective drive letters (e.g.
Step 5. To check if there are still copies of a deleted file left, type the command vssadmin list shadows and press Enter. If the response is "No items found that satisfy the query", it means all copies have been deleted.
Step 6. Restart your computer and create a system restor point in the System Properties window.
After making the changes, the newly created shadow copies should have read-write permissions. You can also check if your computer is affected again using the icacls command.
Wrapping things up
This article provides guidance on enabling Volume Shadow Copy in Windows 10/8/7, restoring, or disabling it, and also offers a solution to easily backup files with VSS using free backup software - Qiling Disk Master Standard.
With this solution, you can enjoy the benefits of VSS while overcoming its limitations, such as deleted shadow copies due to high disk usage on Windows 10, and also take advantage of additional features like daily incremental backups and image file compression.
For advanced users, a professional version is available, offering features like Backup Scheme to delete old backup images and Universal Restore to restore Windows backups to different hardware. This software can help prevent data loss by creating a backup.
Related Articles
- What is VSS Backup and How to Create a Backup under VSS
If you want to learn more about VSS backup, continue to read below and learn what it means, how it works, and the top 2 ways to create VSS copy backup. - The Solutions to VSS Insufficient Storage Error
Many users may have encountered the VSS insufficient storage error to create either the shadow copy storage file or other shadow copy data when using Windows Backup and Restore or other software. This article will show you how to fix this VSS error. - Solved: Windows Backup Failed to Read from the Shadow Copy
Learn how to fix the error: Windows backup failed while trying to read from the Shadow Copy on one of the volumes being backed up when you backup using Windows tool. - Safely Move Downloads from C Drive to D Drive
Here's a tutorial about how to move downloads from C drive to D drive to free up to release your D drive. - How to Copy Files Using Command Prompt in Windows 7?
Learn how to copy files using Command Prompt in Windows 7 with simple steps from this page. Also, you can use an easier way to transfer files. - Copy User Profile in Windows 7 to Another Computer |3 Solutions
If you don't know how to copy user profile from Windows 7 to another computer, like Windows 7/8/10/11 etc, please read this article patiently to learn 3 helpful methods.