[Solved]: Laptop Slow After Windows 11 Update
- Why is my laptop slow after Windows 11 update?
- How can I speed up my laptop after installing Windows 11?
- │ Solution 1. Free up RAM
- │ Solution 2. Run Troubleshoot
- │ Solution 3. Run SFC and DISM
- │ Solution 4. Delete temporary files
- │ Solution 5. Perform Disk Defrag
- │ Solution 6. Extend system drive
- │ Solution 7. Upgrade Windows 11 hard disk
- Conclusion
Why is my laptop slow after Windows 11 update?
Microsoft released Windows 11 on October 5, 2021, featuring a new UI and usability improvements.
There's been a heated discussion about whether Windows 11 makes computers slower. Many users have noticed their laptops slowing down after the update, which is frustrating. However, it's not actually the case. As the successor to Windows 10, Windows 11 builds on its predecessor and introduces optimizations and innovations, which means it requires a more powerful configuration to run smoothly.
In general, the reasons that cause Windows 11 to run slowly on a laptop are the following:
● Hardware failure or malware infection
● Excessive RAM usage
● Damaged file system
● Incompatible driver or application
● HDD aging
● Not enough space on C drive
● Lots of fragmented files
● Poor laptop configuration
To fix a slow Lenovo/Dell/Acer/HP laptop after a Windows 11 update, you can try various troubleshooting steps. Firstly, restart your laptop in Safe Mode to disable any recently installed drivers or software that might be causing the issue.
How can I speed up my laptop after installing Windows 11?
To make Windows 11 run faster on your laptop, consider updating your drivers, disabling unnecessary startup programs, and closing resource-intensive apps. Additionally, enabling the "Show me the background picture on the sign-in screen" option, disabling animations, and turning off the "Show recently opened items in the Jump List" feature can also help improve performance. Furthermore, adjusting your laptop's power settings, running a disk cleanup, and ensuring your laptop has sufficient RAM can also contribute to a smoother experience.
│ Solution 1. Free up RAM
RAM is Random-Access Memory, equivalent to the data dynamic buffer when Windows 11 is running, determines the smoothness of the operating system at runtime. The capacity of RAM plays a crucial role in this, and freeing up RAM is beneficial for speeding up Windows 11 on a laptop.
▶ 1.1 Disable Startup applications
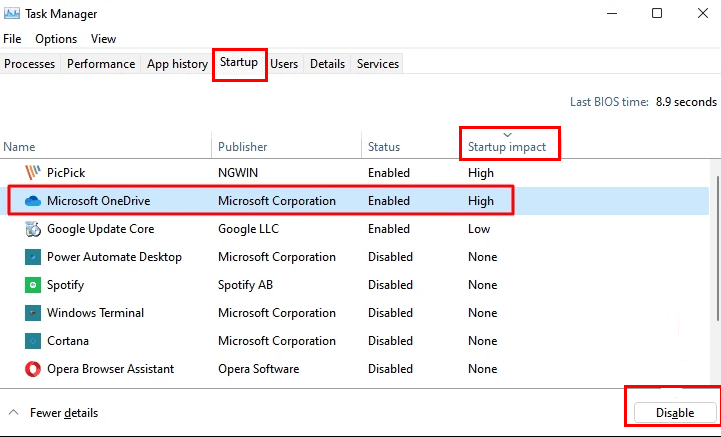
To improve laptop performance, disable unnecessary programs from the Startup tab of the Task Manager, as too many apps launching after power on can slow down the laptop by taking up memory in the background.
To optimize startup programs, select "Startup" in Task Manager, then click "Startup impact" to view programs by their impact on system performance. From there, right-click on any unnecessary programs and choose "Disable" to prevent them from running at startup. This will help free up system resources and improve overall performance.
▶ 1.2 Turn off Visual Effects
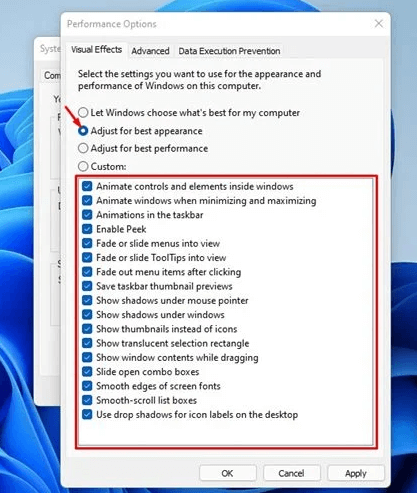
Windows 11's Visual Effects can consume a lot of RAM resources and slow down devices with less than 4GB of RAM, so it's best to disable them.
Step 1. To access the Advanced System Settings, follow these steps: Enter the Advanced System Settings, and then click the "View advanced system settings" option.
Step 2. To access the Performance settings, go to System Properties, click on the Advanced tab, and then click on Settings under Performance.
Step 3. You can also select "Adjust for best appearance" or check or uncheck the following visual elements as needed.
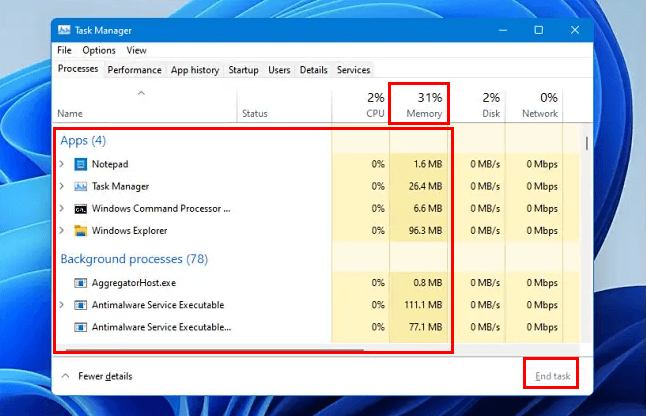
▶ 1.3 Monitor RAM usage
To monitor laptop RAM usage, open the Task Manager, select the "Processes" tab, and click "Memory" to see which programs are taking up space. If unnecessary programs are consuming RAM, they can be closed to free up space.
│ Solution 2. Run Troubleshoot
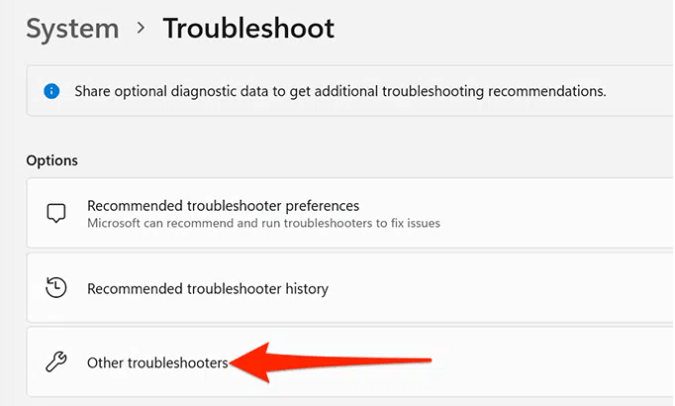
If your laptop is experiencing lag or slowdown after upgrading to Windows 11, it could be due to an update error. You can check for this using the built-in Troubleshooter in Windows 11. This tool can help identify and resolve any issues related to the update.
Step 1. Open "Settings" and go to "System", click "Other troubleshooters".
Step 2. Here, run "Windows Updates".
│ Solution 3. Run SFC and DISM
Corrupted system files can also be one of the reasons why Windows 11 is slow. But luckily you can use the command prompt to fix it.
Step 1. Open CMD as administrator.
Step 2. In the new window, type sfc /scannow and press Enter.
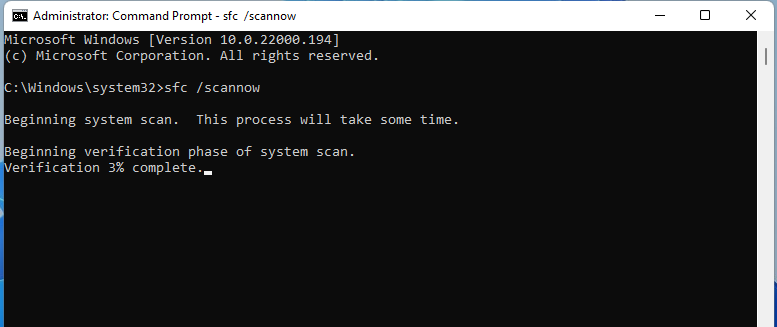
Step 3. Once done, type the following commands one after the other and press Enter:
● DISM /Online /Cleanup-Image /CheckHealth
● DISM /Online /Cleanup-Image /ScanHealth
● DISM /Online /Cleanup-Image /RestoreHealth
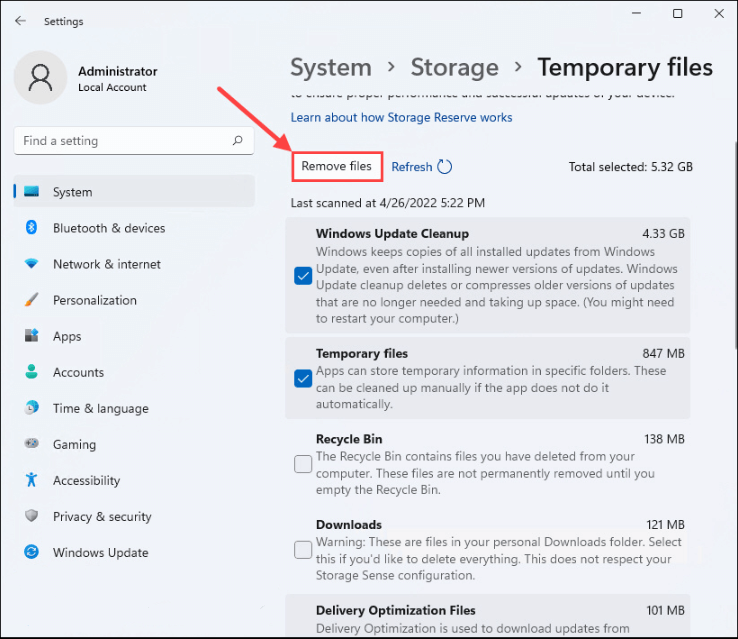
│ Solution 4. Delete temporary files
Temporary files created by programs can accumulate and take up a lot of storage space, making Windows 11 slow. Deleting these temporary files is a smart way to free up space and improve system performance.
Step 1. To access the Storage settings in Windows 11, navigate to the Start menu and search for "Storage settings". Once found, click on it to open the Storage settings window, where you can manage your device's storage usage and settings.
Step 2. Select "Temporary files". Next, click "Remove files".
│ Solution 5. Perform Disk Defrag
Due to repeated installation and removal, many fragmented files will appear on the hard disk, slowing it down. Defragmentation, the process of rearranging discontinuous data, can improve speed by shortening search time.
Steps 1. To defragment and optimize drives on Windows 10, type "Defragment and Optimize Drives" in the search box and open the resulting app. This will allow you to run the built-in Disk Defragmenter and Disk Cleanup tools, which can help improve the performance of your computer by reorganizing and removing unnecessary files.
Step 2. Here you can see the fragmentation status of the HDD and analyze and optimize it. This allows you to check how much space is being used and identify areas where files are scattered across the drive, which can slow down your computer.

│ Solution 6. Extend system drive
Making sure the boot partition has enough free space is an effective way to speed up your Windows 11 laptop. If your system partition is running low on space, you can use free unused space from other partitions, such as your D drive, to extend it.
I recommend Qiling Disk Master Professional, a powerful third-party tool, for you. Its "Allocate Free Space" feature allows you to add unallocated space to C from other drives without losing any data. You can download the demo version to see how to fix laptop slow after Windows 11 update.
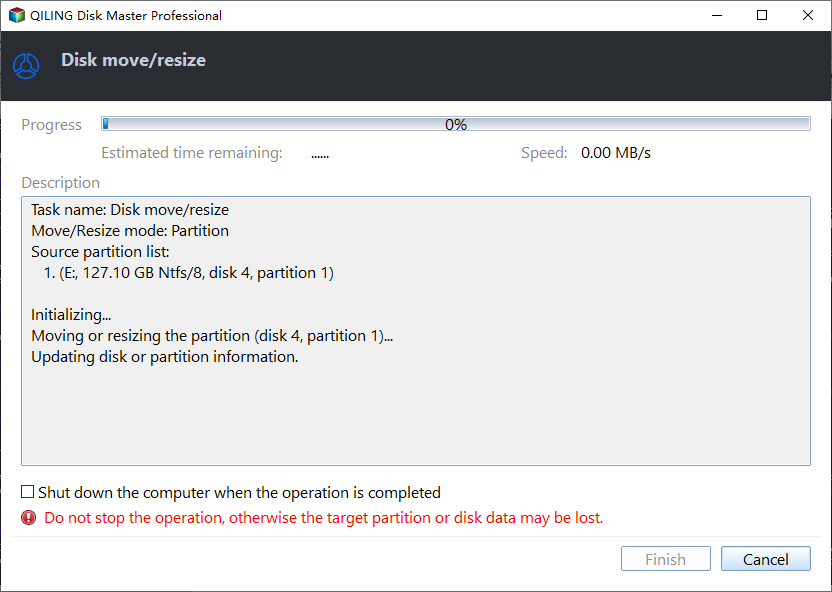
Step 1. Open the drive, and you will see enough free space on drive D. Right click on it and choose the "Move / resize" button.
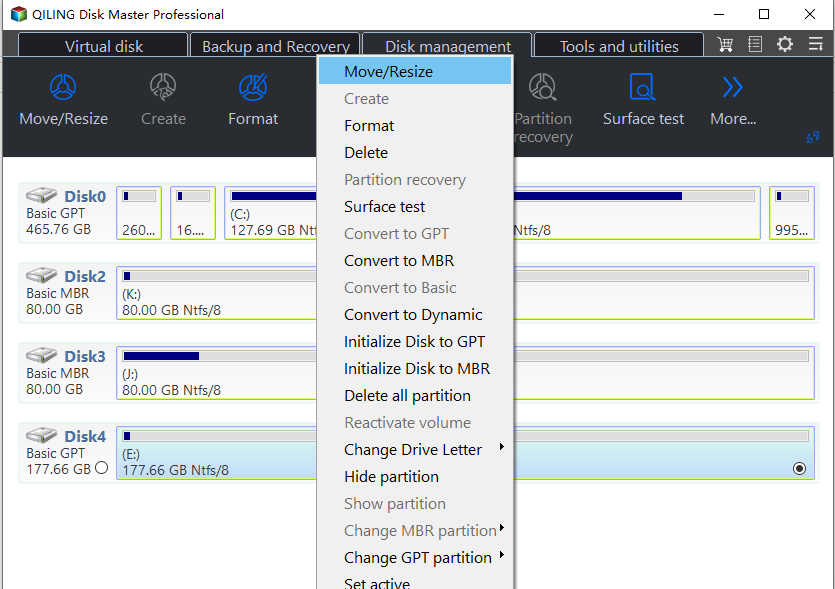
Step 2. The following picture will show up. It will give you the detail. Choose the size and destination drive you want.
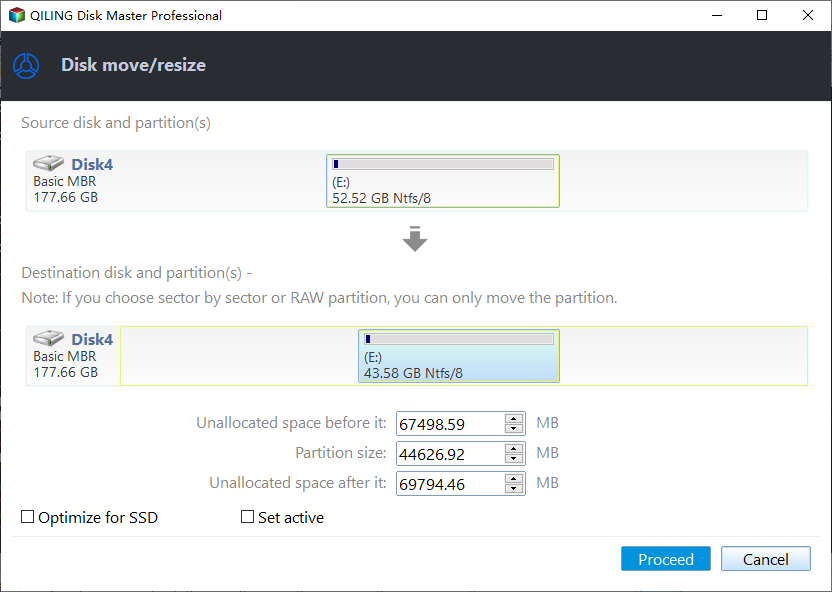
Step 3. Click "Apply" to submit the operations.
│ Solution 7. Upgrade Windows 11 hard disk
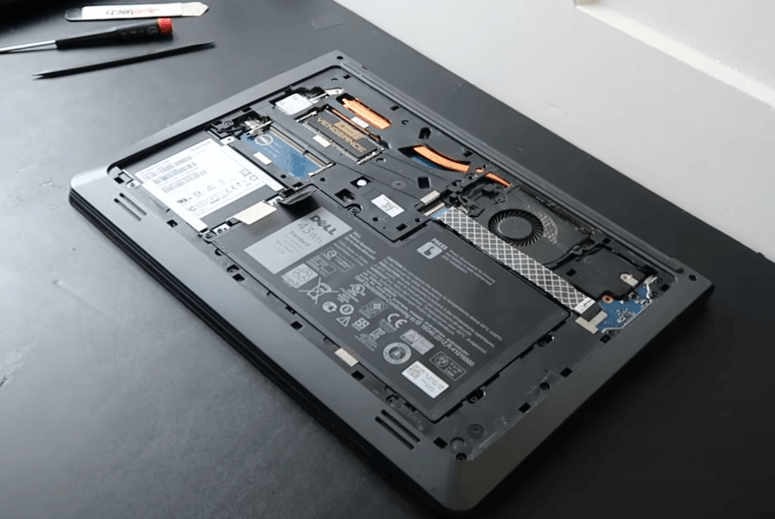
If your HDD has been used for a long time, its performance will degrade as it ages, but you can improve it by replacing it with a faster SSD, which is ideal for gamers due to its faster read speeds, lower temperatures, and higher durability.
Qiling Disk Master Professional can help upgrade a hard drive to a solid state drive (SSD) by cloning the entire hard drive to the SSD, allowing for a successful Windows 11 boot without reinstalling.
Preparation:
✍ To connect the SSD to the laptop, prepare a SATA to USB adapter, which will enable the SSD to be recognized by the laptop through the USB port.
✍ To ensure compatibility with both UEFI and Legacy BIOS boot modes, it's recommended to match the partition style of the SSD with that of the HDD. If necessary, convert the SSD to either MBR or GPT to maintain consistency. This will help avoid any potential issues that may arise from changing the boot mode after cloning.
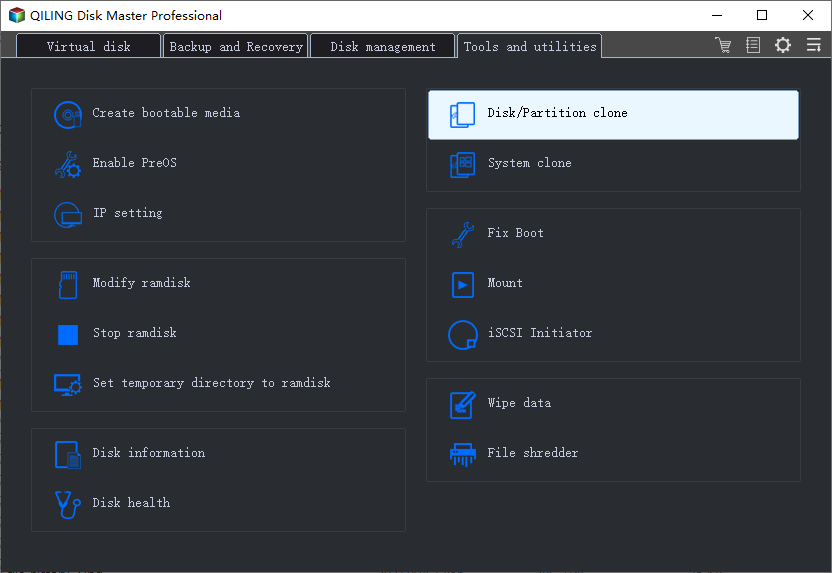
Step 1. Click "Clone" in the main interface, and select "Clone Disk".
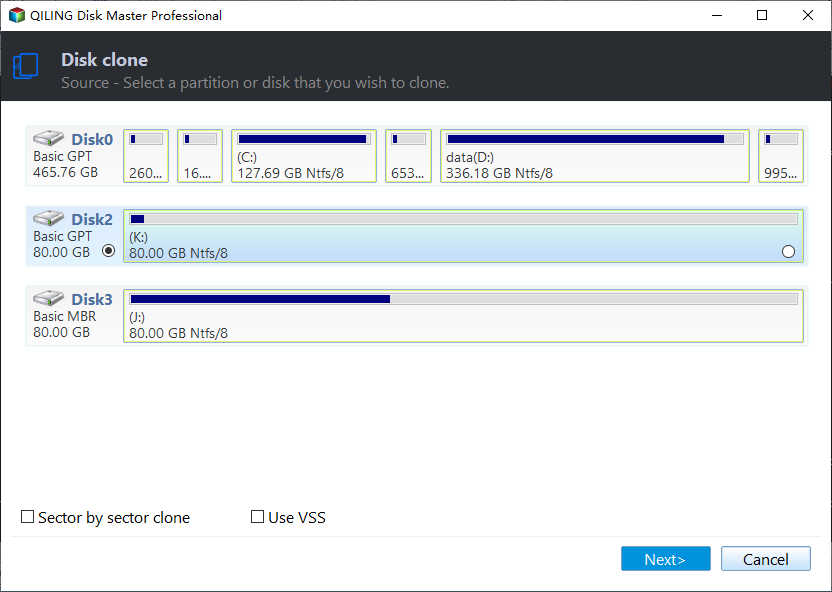
Step 2. To begin the Windows 11 installation process, select the Windows 11 hard disk as the source disk and click "Next".
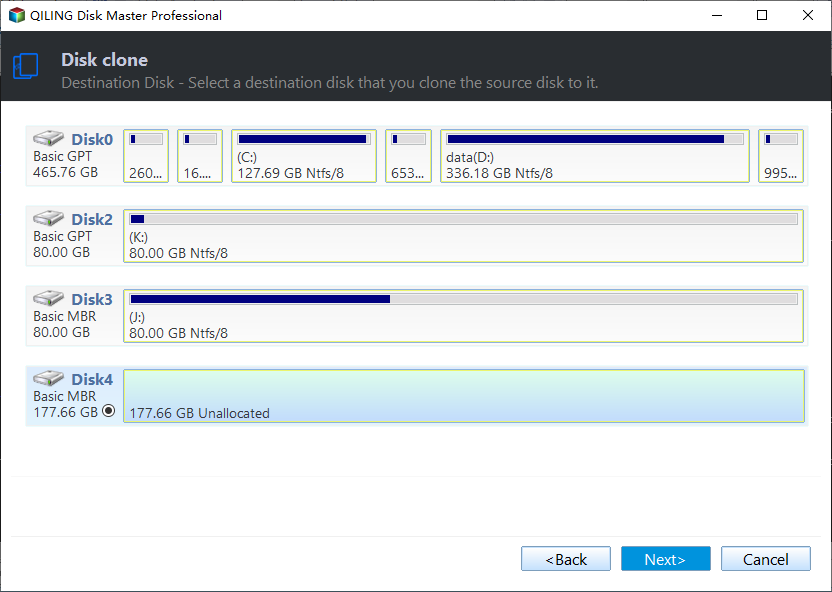
Step 3. Select the SSD drive as the destination disk, and then click "Next".
Step 4. First, select the source and destination disks in the Clonezilla window, then you can check the source and destination disk in the next window or change to "Sector to Sector clone", and click the "Confirm" button to continue if there is no problem.
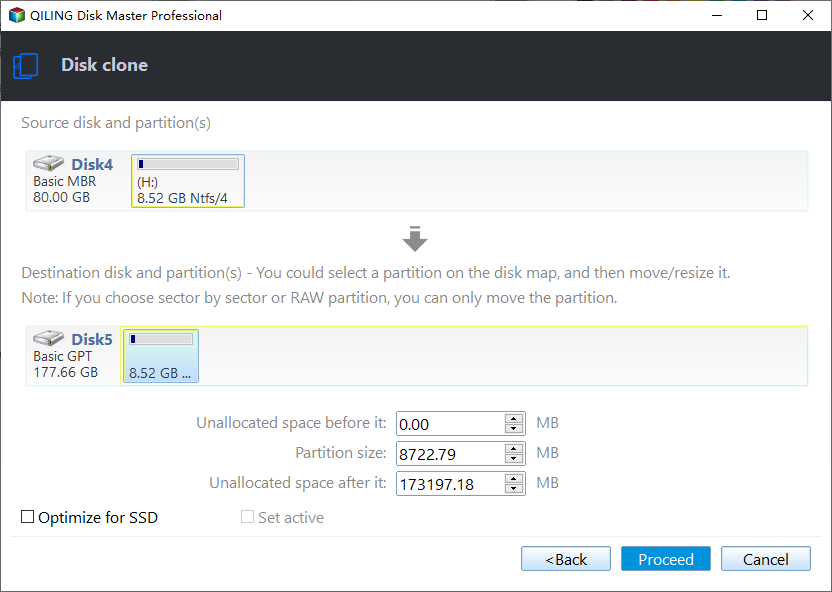
Here, you can also adjust the partition size on the destination disk or tick "4k alignment" to improve the reading and writing speed of the SSD.
Step 5. After returning to the main interface, check the pending operation and click "Apply" and "Proceed" to commit the operation.
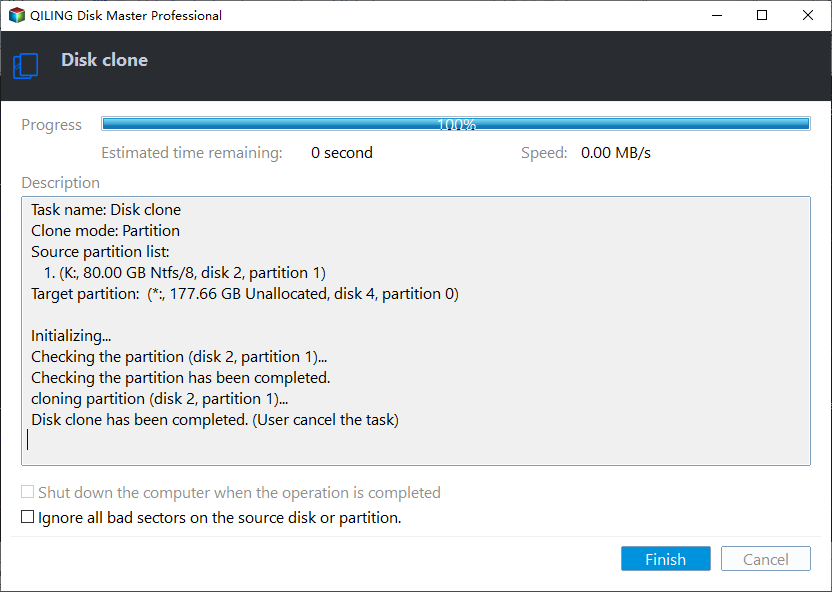
After cloning the old HDD to the SSD, you can now install the SSD on the laptop and boot it.
Conclusion
If your laptop is slow after the Windows 11 update, don't worry - there are ways to fix it. You can try various methods to see which one works best for you, or consider rolling back to Windows 10 if you're not satisfied with Windows 11. The full guide is available, listing multiple solutions to help you get your laptop running smoothly again.
Related Articles
- Clone Windows Server 2011 to New Hard Drive with Two Methods
You will learn how to clone Windows Server 2011 system drive to new hard drive without reinstalling everything, two ways in total and apply to both WHS and SBS Edition. - Acronis True Image WD Edition Clone Not Working - Try These Fixes
Acronis True Image WD Edition Clone Not Working - Try These Fixes: this guide summarizes the key steps, practical tips, and safer options so you can finish the task clearly and avoid common mistakes. - 4 Best Alternative Cloning Software to Samsung Data Migration (2024 Pick)
Samsung Data Migration is a tool that allows you to transfer data from one Samsung drive to another, but it only supports Samsung drives. To transfer data from one drive to another, regardless of the manufacturer, alternative cloning software can be used instead. - How to Clone EFI Partition to Another Drive on Windows 11/10/8/7
If you're looking for a reliable way to clone your EFI partition to another drive, Qiling Disk Copy is a great option. This tool allows you to easily clone your EFI system partition and securely copy it to another drive, making it a convenient solution for your needs. - Full Guide: Migrate Windows/Mac OS from Slow HDD to Fast SSD Drives
Want to speed up your Windows/Mac computer and enjoy better performance? You can start a fresh installation onto SSD drive or directly migrate OS to SSD drive. - How to Mirror a Hard Drive to SSD without Losing Data [2 Ways]
Learn how to mirror a hard drive to external hard drive (HDD or SSD) easily in Windows 7, 8, 8.1, 10, 11 with the best hard disk cloning software - Qiling Disk Master.