How to enable Network Boot or PXE Boot in BIOS
When to enable Network Boot or PXE Boot
When using Qiling PXE or Qiling Image Deploy, you may need to enter the BIOS settings on client computers and configure them to boot from the network. After Network Boot or PXE Boot is enabled, the client computers can start from the PXE server in your LAN.
For deployment environments, compare network boot preparation with a Windows Deployment Services alternative.
To set up client computers in a LAN for network boot, follow the steps below. The example uses GIGABYTE BIOS, but the option names may vary by motherboard or computer model.
Configure PXE boot in BIOS
Enter BIOS:
Start the client computers, and then press the BIOS hotkey. The hotkey is usually F8 or DEL, but it depends on the computer model.
Set boot mode for UEFI BIOS: Click Bios Features -> CSM Support -> Boot Mode Selection. Press Enter on "Boot Mode Selection", and then choose "UEFI and Legacy" or "Legacy Only" in the pop-up window. If your BIOS does not support UEFI, you can skip this step.
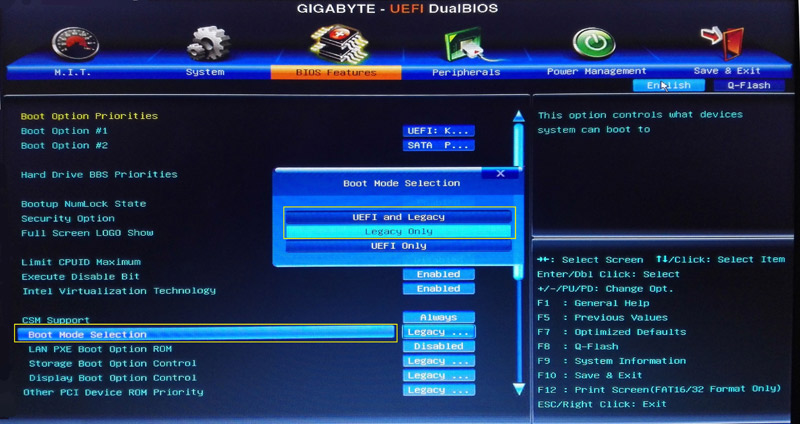
Enable the PXE boot (Network boot) option
Use the down arrow key to select "LAN PXE Boot Option ROM", and change its status from "Disabled" to "Enabled". (Note: Network boot is also called PXE boot).
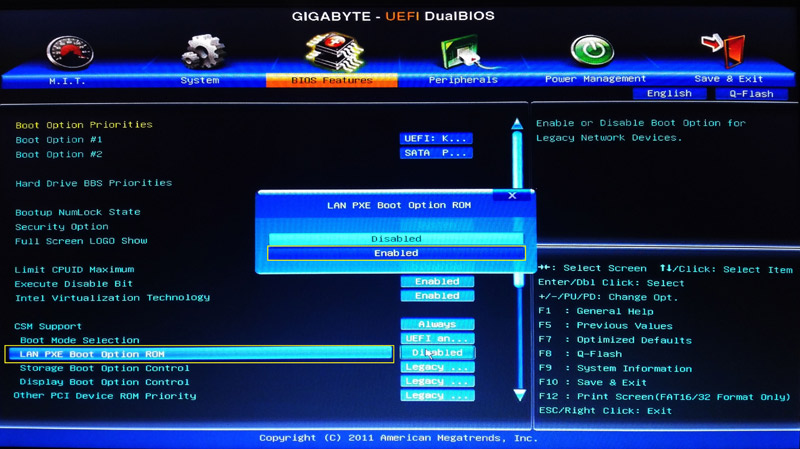
Set the first boot device:
Set the PXE option as the first boot device. Select "Boot Option # 1" under "Boot Option Priorities", choose "Realtek PXE B02 D00", and press Enter.
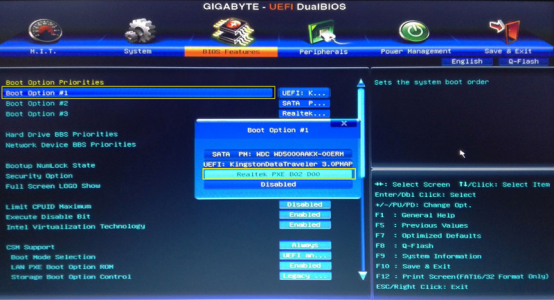
Alternative to setting the first boot device:
Alternatively, reboot the computer and press the boot menu hotkey, usually F12 or F11. In the boot menu, select "Realtek PXE B02 D00" and press Enter to confirm.
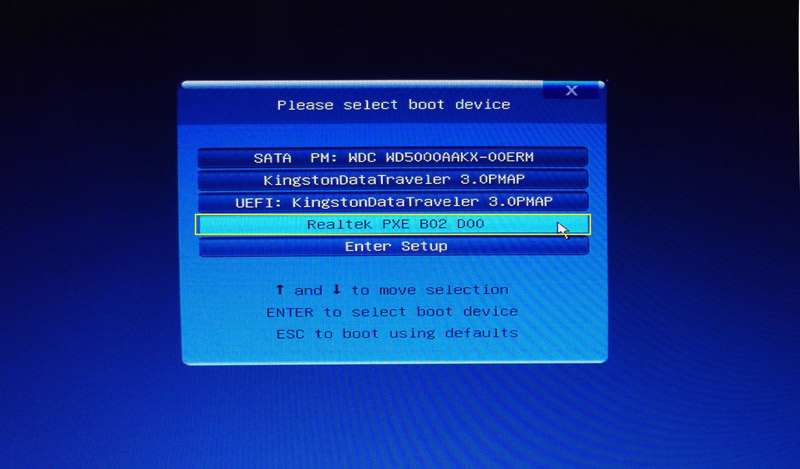
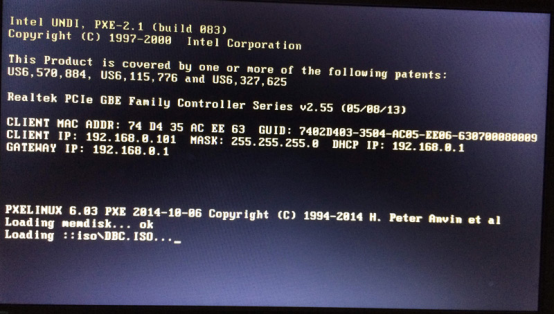
When the computer boots from the PXE network, the network boot screen will appear. The process may take a few minutes, depending on your network speed and the size of the bootable image file.
Related Articles
- Reset SSD to Factory Settings: Secure, Simple, Complete
Reset SSD to factory settings can be a simple and secure task through the diverse methods provided in this article, and erased SSD data can never be recovered. - The Best Way for Samsung Data Migration to Clone OS Only
To find the best way for Samsung Data Migration clone OS only, you can read this article carefully and learn the easiest way and the specific tutorial. - What's Taking Up Space on My Hard Drive in Windows 10? Here are 14 Fixes!
This article answers what is taking up space on my hard drive in Windows 10 and provide 14 solutions to free up disk space. Please read on. - 3 Ways to Fix Windows Won't Install on SSD or HDD
There are 3 situations where Windows 11/10/8/7 won't install on SSD. Learn the step-by-step guide to make it right. - How to Recover Deleted Files from PS4 Easily
Learn how to Recover Deleted Files from PS4 Easily with clear steps, key checks, and practical tips. - How to Recover Files from a Crashed Hard Drive in Windows 7/8/10?
You will learn how to recover files from a crashed hard drive quickly using hard drive data recovery software - Qiling Disk Master Standard or TextDisk.
Products
Articles & Tutorials
- Data Recovery
- Data Backup
- File Recovery
- File Backup
- File synchronize
- System Backup and Restore
- Disk and Partition Clone
- Technical articles
- Disk Master Help
- Windows Deleted File and Disk Recovery Tutorials
- Windows File and Data Recovery Tutorials
- More Windows Tutorials for Install, Security, Files, and PC Tips
- Windows Boot, Repair, and Recovery Environment Tutorials
- Windows Backup Tutorials
- Windows Restore Tutorials
- Windows Clone and Migration Tutorials
- Windows Server Backup, Recovery, and Management Tutorials
- Windows Disk, Partition, and Storage Management Tutorials