Best Dell Data Migration Tool - Dell Migrate or Qiling Disk Master
- In Need of Dell Data Migration Tool
- What Is the Dell Data Migration Tool?
- How to Perform Dell Transfer Data to New Computer
- Perform Dell Migrate and Erase Process with Data Assistant
- Dell Transfer Files from Old to New Computer with Qiling Disk Master
- How to Transfer Dell Operating System (OS) to New Computer
- Verdict
In Need of Dell Data Migration Tool
Dell computers serve thousands of users around the world due to their great performance and properties. Users would like to perform a direct file transfer from one PC to another in different situations, such as transferring files between colleagues in an office, sharing files between family members, or transferring large files between friends.
- Simply transfer files old PC to new PC for upgrading.
- Share files between computers, such as transferring files between a laptop and desktop.
- Make duplications as backups in case data loss unexpectedly.
- Transfer operating system to new computer without reinstalling.
- ...
Many reasons may not be listed here because causes are different under all kinds of conditions. However, to perform Dell data migration easily, you may focus on the process rather than the reasons.
What Is the Dell Data Migration Tool?
Dell provides a data migration tool called Dell Data Assistant, which helps transfer files and settings from an old PC to a new Dell PC.
The Dell Migration Wizard is only available for Inspiron, Inspiron G Series, XPS, and Alienware PCs in certain regions and requires a $49 purchase, which must be made before migrating files and settings. For more information, refer to Dell's official document.
You could consider using a powerful Dell data transfer tool from a third-party company, such as Qiling Disk Master, to transfer your files.Qiling Disk Master Professional provides a way to protect not only files but also the operating system and everything on the disk from ransomware attacks and other types of malware, and it continuously monitors and protects data.
How to Perform Dell Transfer Data to New Computer
To transfer data from your old Dell computer to a new one, you can use either the Dell Data Assistant or Qiling Disk Master. Both tools can help you migrate your files, but if you need to transfer your operating system, you should use Qiling Disk Master. Follow the step-by-step guide in the next part for assistance with the operating system transfer.
Perform Dell Migrate and Erase Process with Data Assistant
The Dell Data Assistant is used to migrate data to a new computer and erase it on the old one. Before starting, please check the notifications in the following: 1) Ensure the old computer is powered off and the new computer is powered on. 2) Ensure the new computer has enough storage space to hold the data from the old computer.
- Dell Data Assistant allows users to easily transfer their files, settings, and even applications from their old device to their new one, making the transition process much smoother. This includes moving applications, which is not the case with some other tools.
- The old computer must be Windows 7 or later and the new computer must be Windows 10 or later.
- To set up the remote connection, you need to sign in with the administrator on both computers and ensure they are connected to the same local network.
- Close all applications running in the background, such as browsers, control panels, system settings, and any other programs that may interfere with the migration process, to ensure a smooth transition.
To migrate and erase a Dell system, follow these steps: first, create a backup of all data to an external drive or cloud storage to avoid any potential data loss; next, download and install the Dell Migration and Erase tool from the official Dell website; then, run the tool and follow the on-screen instructions to migrate your data to the new system; after that, erase the original system by selecting the option to completely remove all data and settings; finally, verify that the original system has been completely erased and that the new system is up and running with all your migrated data.
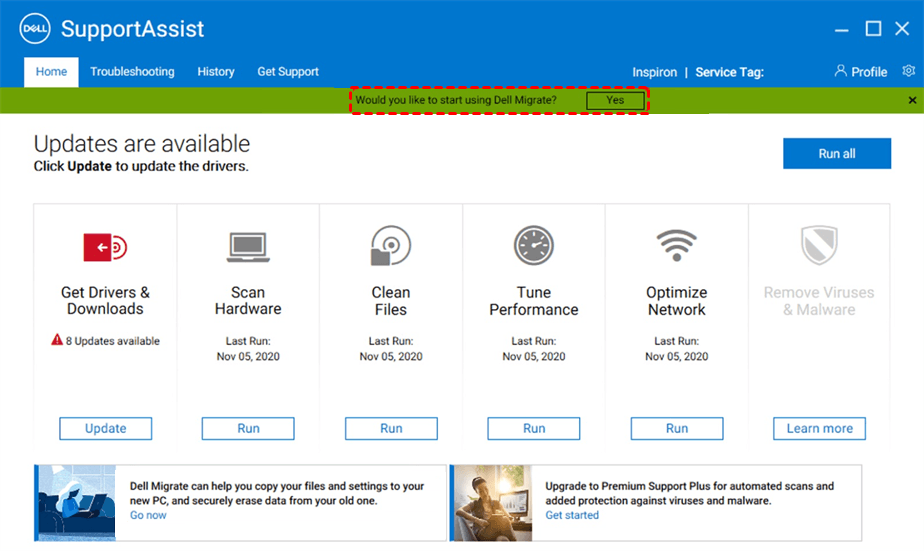
1. To access Dell SupportAssist, type SupportAssist in the search box and select it from the result list.
2. Click Yes to start using Dell Migrate and then Let's get started, it will start to search for your files and settings on the old PC.
3. If you recognize and trust the network, click "Trust network" and it will guide you through the process of downloading and installing Dell Data Assistant on your old computer. Just follow the instructions.
4. Run Dell Data Assistant on the old computer and it will check if your computer meets all the pre-requisites. To connect both computers, click on "Trust Network" and then "Let's get started". Once both computers are identified, a verification code will be generated on the original computer, which is then required on the new computer for secure data migration.
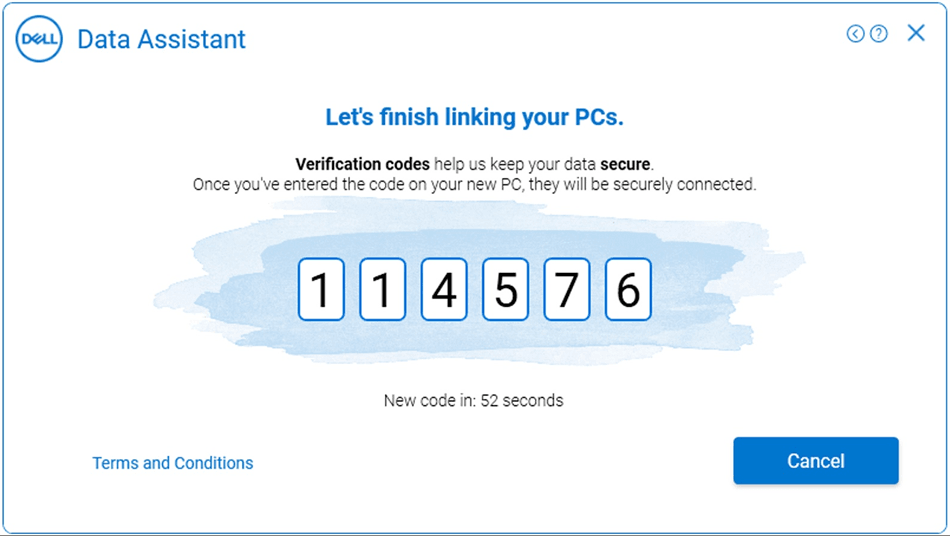
5. To proceed, enter the verification code on the new computer. Once paired, it will turn green. If the user profiles are the same, it will search for files and settings to be migrated. If not, you can choose to continue or log in with the same Windows user profile.
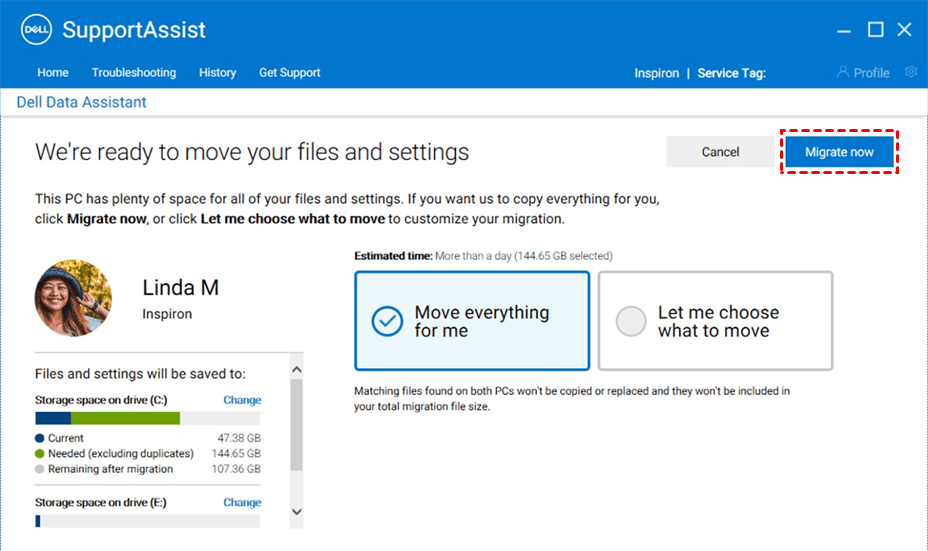
6. After searching, click Move everything for me and Migrate now on the new computer. And you can also select Let me choose what to move instead.
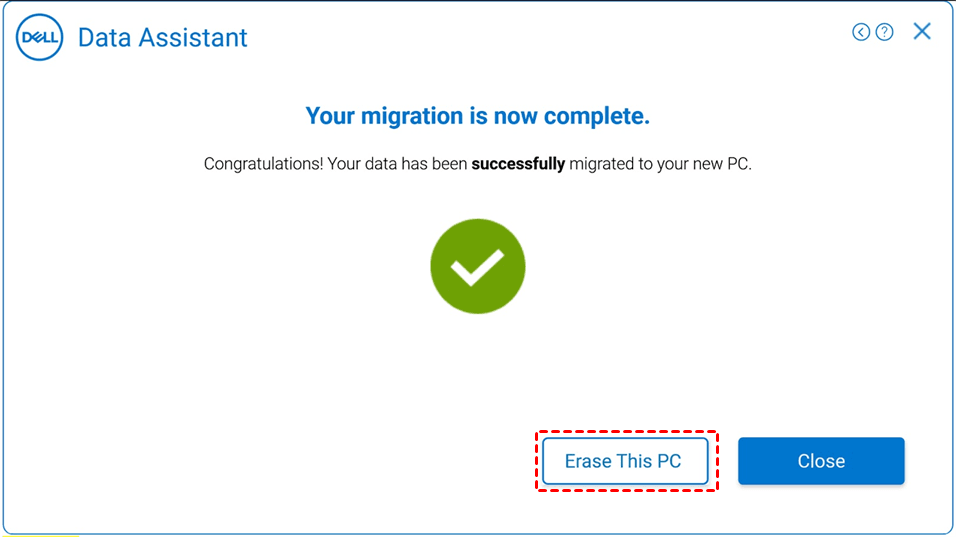
7. Wait until the Dell Migrate is complete, then check the migration results summary. If you want to get rid of your old computer, click "Erase this PC" and follow the instructions to complete the process.
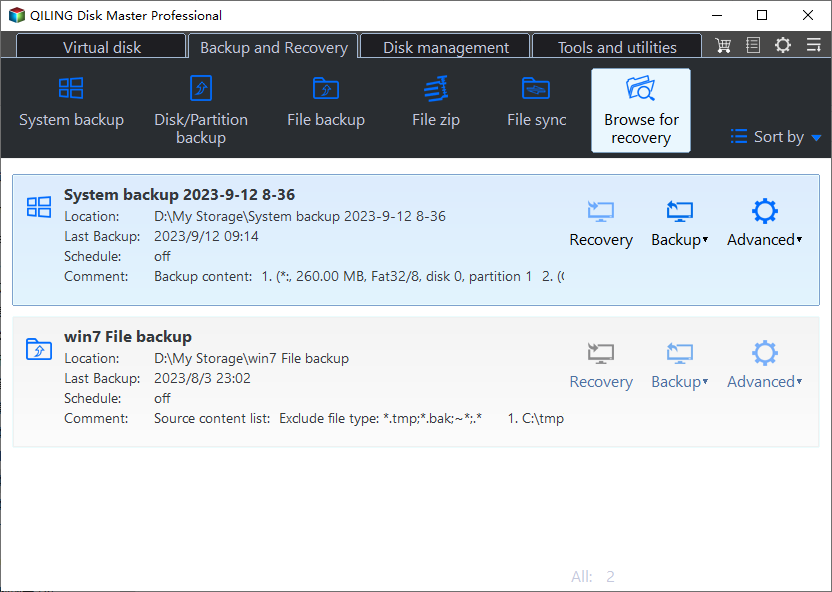
Dell Transfer Files from Old to New Computer with Qiling Disk Master
Here, you can use the File Sync feature in Qiling Disk Master Professional to transfer Dell files from an old computer to a new one. This feature allows you to select the files and folders you want to transfer and sync them between the two computers, ensuring a seamless transition of your data. You can choose the way to transfer files by selecting the files and folders you want to transfer and sync them between the two computers, ensuring a seamless transition of your data.
- Share or NAS device: You can directly transfer files to a new computer by creating a shared folder on it, or you can download files from NAS if you're using it.
- External Disk or USB drive: Transferring files from an old computer to a new one can be a hassle, often requiring you to physically move files to external devices and then transfer them to the new computer.
- Cloud Drive: Similar to NAS, you need to download files to a new computer after transferring to the cloud drive.
To transfer data from an old Dell computer to a new one, download a free trial of a data transfer software and try it out. It supports Windows 11, 10, 8.1/8, 7, XP, and Vista.
Compared to Dell Data Assistant, this tool is more flexible and comprehensive, allowing users not only to transfer user profiles from old to new computers, but also to migrate the operating system or entire disk with ease. To move the system, proceed to the next part.
Preparations:
- Make sure the involved computers are in the same network segment in LAN.
- To set up the new computer, you need to have a shared folder on it. If there isn't a shared folder available, you can create one by following the steps on the shared folder synchronization page.
Detailed steps:
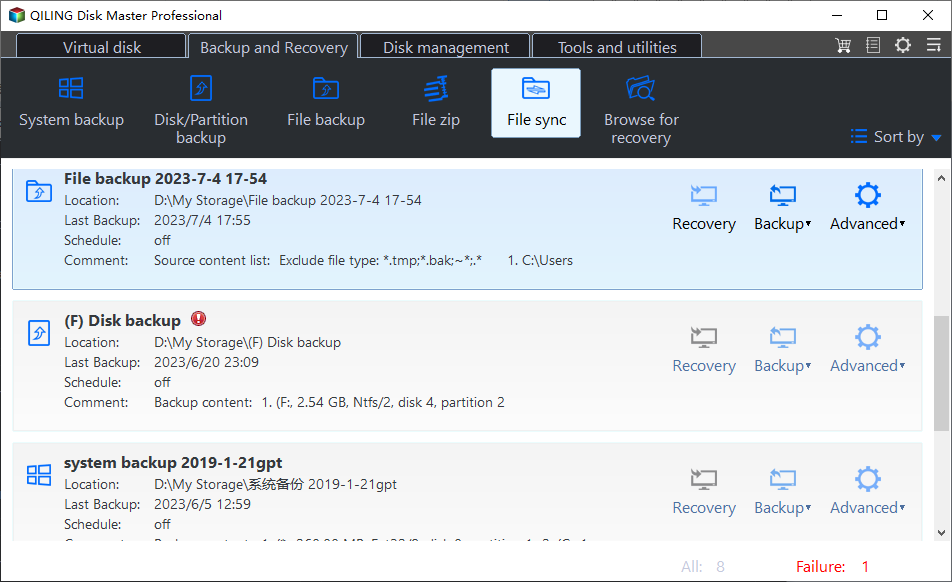
1. Install Qiling Disk Master Professional on the old computer you'll transfer files from, then go to the Backup tab and click on File Sync to transfer data to the new computer.
2. Click "Folder" and then "Computer" (or "This PC") to find the local files you'd like to transfer.
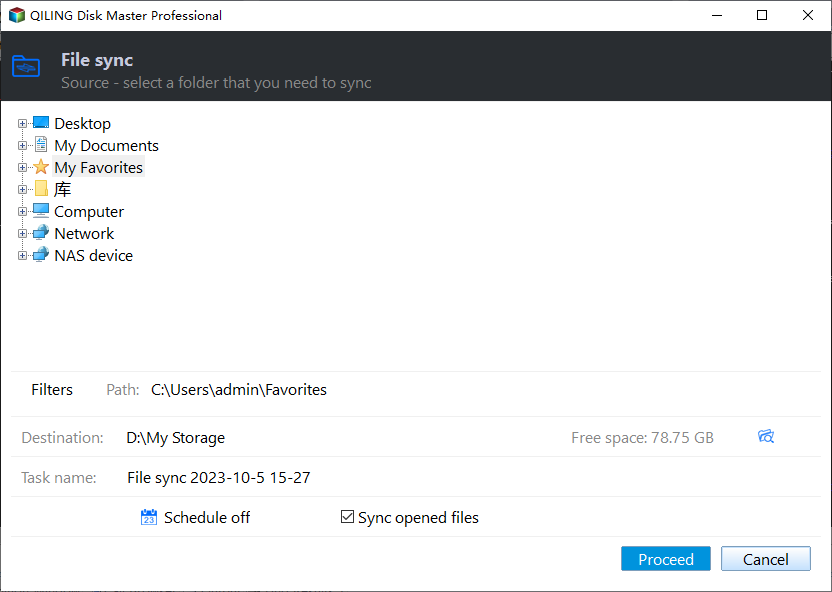
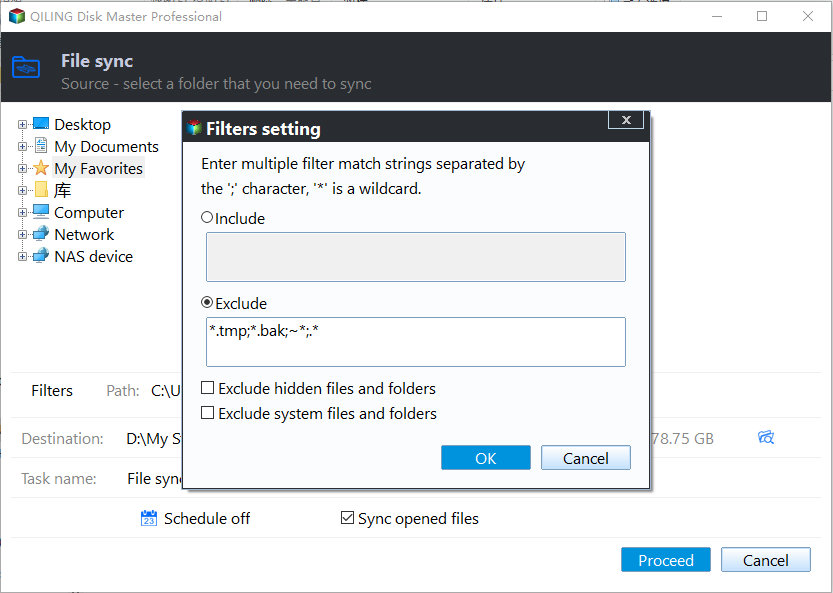
3. To include or exclude specific files from selected folders, click the folder you've chosen, then click the funnel-shaped button on the right side. This will allow you to specify which files to include or exclude from the selected folder.
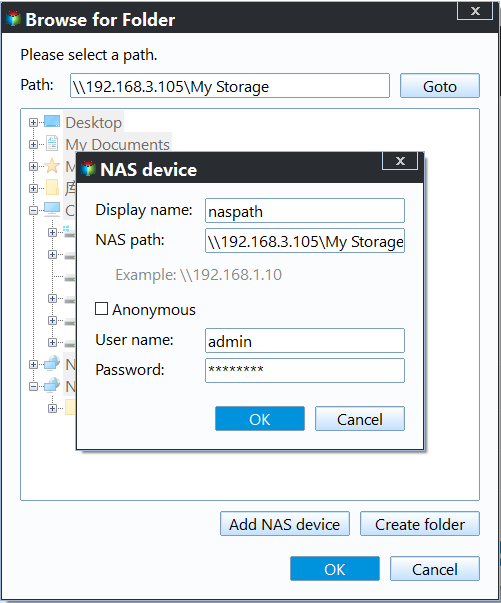
4. To add a shared folder from another computer, click on the interface where the arrow points, then click on "Add Share or NAS Device". Enter the network path of the shared folder on the new computer and select it. Click "OK" to confirm.
5. Confirm you add all the files and folders you want and click Proceed to perform Dell data migration.
Tips:
- To share files with multiple computers on the same LAN, use one computer as a central hub and allow other users to access it. This way, you can easily share files with all computers connected to the same network.
- This software allows for continuous data protection, and its sync task can be configured with various options, including daily, weekly, monthly, event-trigger, or USB plug-in, for flexible scheduling.
- You can still transfer data using File Backup or Cloud Backup, which compresses data into an image file, making it tamper-proof before restoring.
How to Transfer Dell Operating System (OS) to New Computer
Consider using Disk Backup and Restore feature in Qiling Disk Master to move operating system and other data on the disk, which works perfectly for moving hard drive to a new computer with dissimilar hardware. This feature allows you to create a backup of your disk and restore it on the new computer, making the transition seamless.
Step 1. Create Image for Dell Hard Drive
To create a backup image of the current hard drive with Windows installed, save the backup image on an external hard drive or network path that can be accessed in WinPE on bare metal. If necessary, connect the external drive to complete the process.
1. In Qiling Disk Master, click Backup and then Disk Backup to migrate the operating system only, or select System Backup.
2. To backup a hard drive, select the drive you want to backup by clicking on "Disks", then choose a path to store the disk image backup, preferably an external drive, and click "Next".
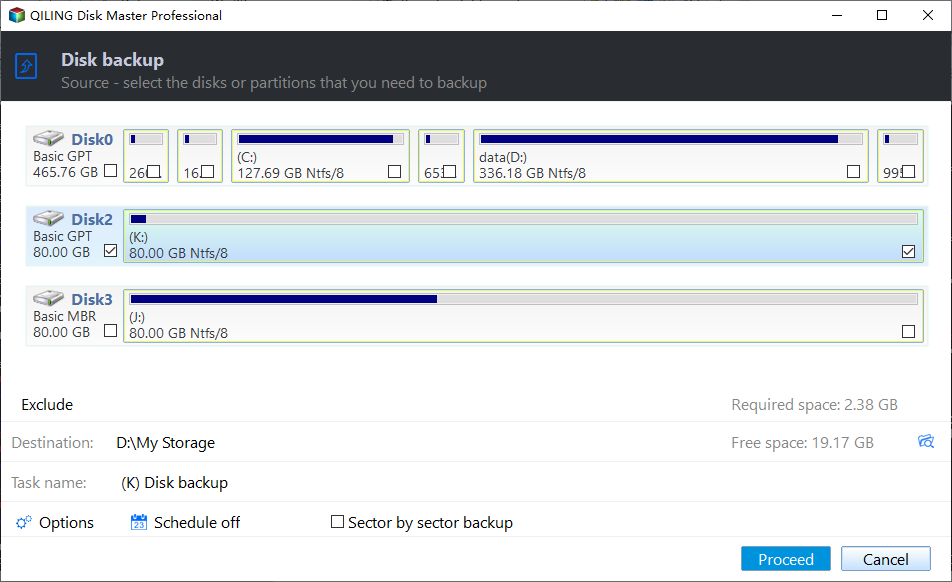
3. In the Operation Summary window, confirm the correct disk is selected and click Proceed, to avoid data loss.
Step 2. Create A Bootable Device
Insert a USB flash drive (more than 13GB in size) or CD/DVD disc into your Dell computer.
2. In Qiling Disk Master, click Tools > Create Bootable Media.
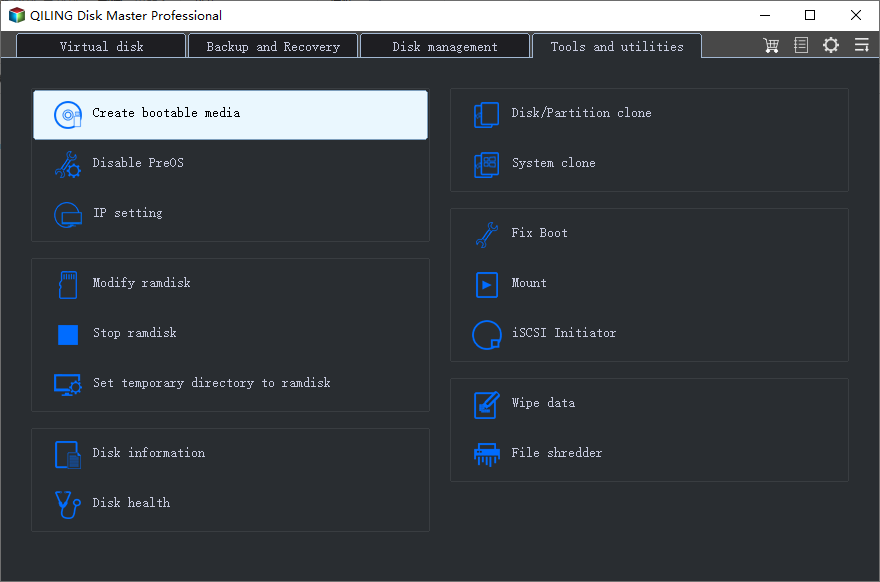
3. Choose bootable disc type (Windows PE recommended) and select the storage media - USB Boot Device. The process of creating a bootable device will begin. This may take a few minutes to complete, depending on the size of the device and the operating system being installed.
Step 3. Restore Image to New Computer
To restore the disk image to a new machine, first shut down the new machine. This is because the target hard drive will be overwritten, so it's essential to back up any important files beforehand. Once the new machine is powered off, you can proceed with the restoration process.
1. To restore your system, insert the bootable media you created and the external storage with the backup image, and follow the on-screen instructions to complete the restoration process.
2. Turn on the computer, press Del or F2 to enter BIOS, change the boot priority to the bootable media, and then press F10 to save and exit BIOS.
3. Once logged in, you'll see a loaded Qiling Disk Master. Click Restore and then Select Image File to select the disk image.
4. Select restore the entire disk and then the hard drive on the new computer as the destination.
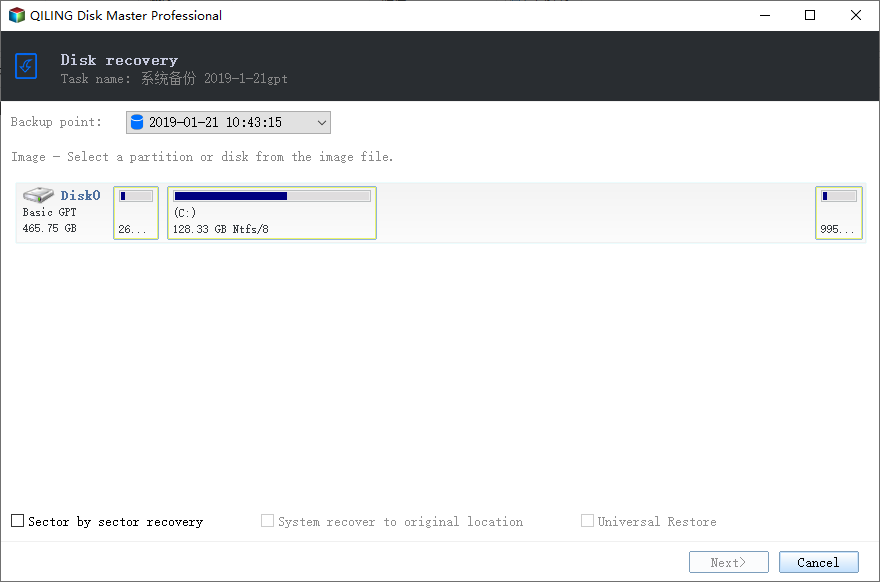
5. Confirm that you select the correct disks and be sure the Universal Restore option is checked by default if your new computer has dissimilar hardware. Click Proceed to perform Dell OS migration.
Tips:
- The Universal Restore feature in Qiling Disk Master only installs drivers required for system startup, and other drivers like video, sound card, NIC, display drivers, etc. need to be installed manually after restoration.
- If your Dell computer is using Windows Server 2008, 2012, 2012 R2, 2016, 2019, 2022, etc, you can use Qiling Disk Master Server for data and OS migration. The steps for Dell data and OS migration are the same as described above.
Verdict
Dell Data Assist and Qiling Disk Master are both good choices for Dell data migration, but Qiling Disk Master is more flexible and comprehensive, offering various methods for file transfer and also supporting partition, system, and disk operations.
You can still use the old computer's backup for continuous data protection on the new computer, following the 3-2-1 backup strategy to ensure multiple backups for disaster recovery, minimizing the risk of data loss and system downtime.
Related Articles
- Why Is My Windows 10 Backup Taking So Long? (Here's the Answer)
Windows 10 backup is taking too long, and you're wondering why. This article will explore the possible reasons behind the slow backup process and provide an alternative to the default Windows 10 backup solution. - How to Backup External Hard Drive to Synology NAS (2024 Easiest Way)
To ensure efficient data protection, follow our step-by-step guide on how to backup your external hard drive to a Synology NAS. This will help safeguard your valuable data on your NAS device. - How to Backup Onedrive to Synology NAS - 3 Effective Ways
If you're looking for a way to back up OneDrive to your Synology NAS, this guide provides a solution. It outlines three working methods to ensure your OneDrive files are safely backed up to your Synology NAS, with step-by-step instructions provided. - How to Backup Files to QNAP NAS (Quick & Easy)👍
For many QNAP NAS users, backing up files to their NAS can be a daunting task. Fortunately, there are three simple methods to complete this task, which can be learned from this post to ensure your important files are safely stored on your QNAP NAS. - Create Lenovo G50 Recovery Disk by Qiling Disk Master
You will learn how to perform Lenovo g50 recovery disk creation with built-in Recovery Drive or third-party recovery media creator. - Lenovo G50 Recovery Key: Press F12 Enter Recovery Environment
Use Lenovo g50 recovery key to enter into recovery environment. Either press F12 when starting up computer or directly press novo button next power port.