10 Effective Ways to Recover Unsaved & Deleted Word Document
- Can I recover unsaved Word document?
- How to recover unsaved Word document in Windows 10 or 11
- Solution 1. Recover unsaved Word dococument via AutoRecover
- Solution 2. Recover unsaved data from Document Recovery
- Solution 3. Recover unsaved Word documents from Word backup file
- Solution 4. Retrieve unsaved Word document from temp folder
- Solution 5. Restore unsaved Word document from OneDrive
- How to recover deleted Word document in Windows 10 or 11
- Solution 1: Recover Word document not saved from Recycle Bin
- Solution 2: Recover lost Word document with Backup and Restore
- Solution 3: Recover deleted Word document with Deep Data Recovery
- Solution 4: Recover Deleted Word document with Previous version
- Solution 5. Recover lost Word document with CMD
- 5 tips to avoid losing your Word files
- Q&A about Word document recovery
- Summary
Can I recover unsaved Word document?
You can create, edit, and do more in a Word document, but unexpected situations like crashes, shut downs, system crashes, power outages, or virus attacks can cause your Word documents to be unsaved, and you may also accidentally close your Word document without saving changes.
Fortunately, you can easily recover unsaved Word documents, whether you're using Word 2007, 2013, 2016, 2019, 2020, 2021, or on Mac, and this article offers 5 easy and quick methods to do so. Additionally, if you accidentally delete a Word document, you can still get it back quickly with 5 other methods.
How to recover unsaved Word document
To recover an unsaved Word document in Windows 10 or 11, you can utilize the AutoSave feature, which automatically saves a copy of your document. Alternatively, you can look for a backup file (.wbk), temporary file, or check the Recycle Bin, OneDrive, or other storage locations for a saved version of your document. This approach can help you retrieve your work even if you forgot to save it.
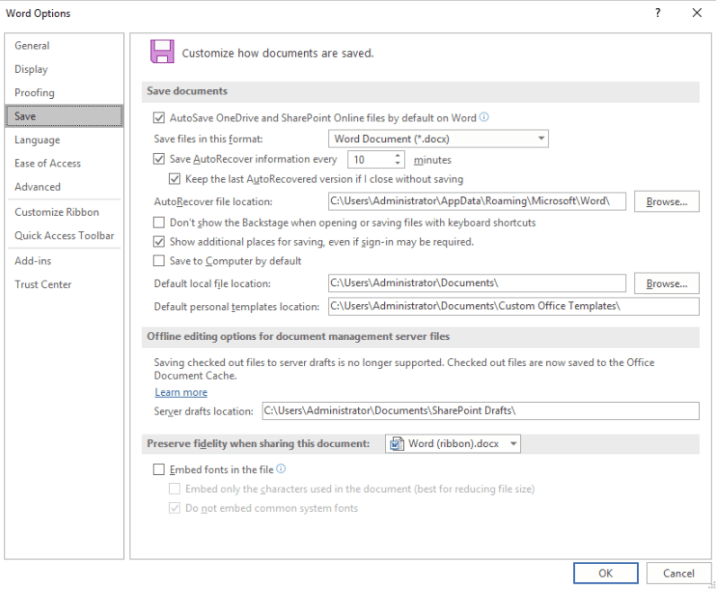
Solution 1. Recover unsaved Word dococument via AutoRecover
Word automatically searches for AutoRecover files every time you close and open it, displaying the found data in the Document Recovery pane. If the pane is not visible, you can manually open the AutoRecover file location to access the files.
- Word saves AutoRecover information every 10 minutes.
- The possible AutoRecover file location are: C:\Users\username\AppData\Roaming\Microsoft\Office\AutoRecover, C:\Users\username\AppData\Local\Microsoft\Office\15.0\Word\AutoRecover, C:\Users\username\AppData\Local\Microsoft\Office\16.0\Word\AutoRecover, C:\Users\username\AppData\Local\Microsoft\Office\Word\AutoRecover, C:\Users\username\AppData\Local\Temp\msoffice.
▶ C:\Users\username\AppData\Local\Microsoft\Office\UnsavedFiles.
▶ C:\Users\AppData\Roaming\Microsoft\Word
- If you can't find the unsaved Word document, you'll need to locate the AutoRecover file location in the Word options. This will allow you to recover your work from the AutoRecover file.
▶ From 2010-2021: To access the Word options, click on "File" in the top left corner of the screen and select "Options". From the Word Options window, click on "Save" in the left-hand menu, then select "AutoRecover file location" and click on "Browse" to open the file location.
▶ In 2007: To access an unsaved Word document, click the Microsoft Office button, select Word Options, and then click Save. This will allow you to locate the document's file path and open it by clicking Browse.
- The AutoRecover file use .asd file extenstion.
To recover an unsaved Word document in 2013, 2016, 2019, 2020, 2021, or any other version, follow these steps using a newer version of Word as an example. Take the newer version of Word document as an example, and follow the steps below: The steps for previous versions are similar.
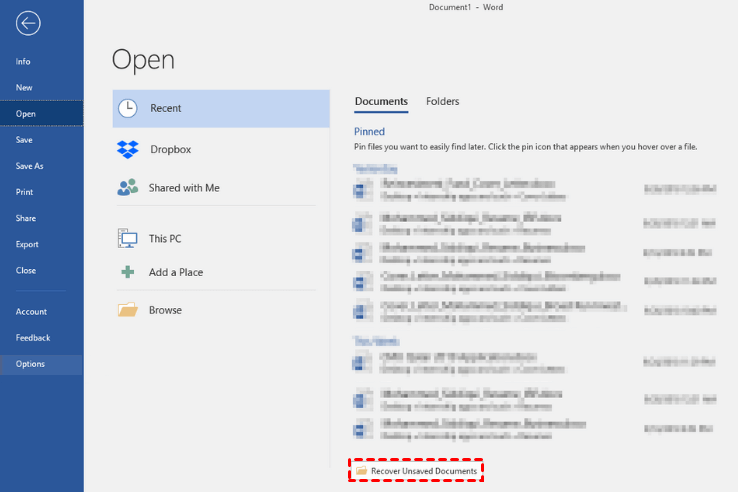
Step 1. Start the unsaved Word document. Click File > Open > Recent > Documents and select Recover Unsaved Documents.
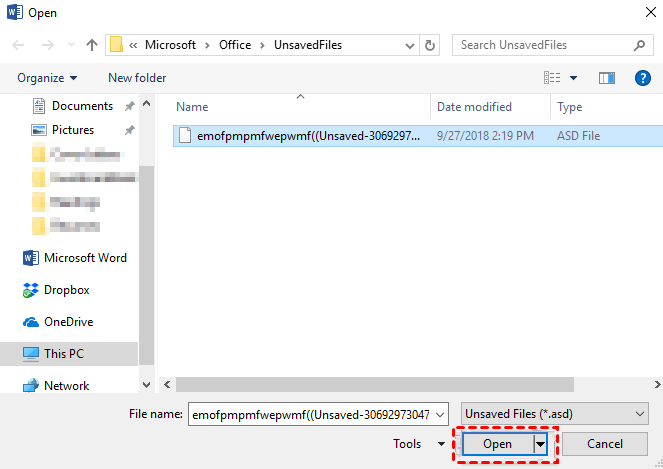
Step 2. It will redirect you to the UnsavedFiles folder. Choose the unsaved Word document and click Open.
Step 3. Click File > Save as > Browse and select a new location to save your Word document.
Tips:
- PowerPoint and Excel also include the AutoRecover feature, allowing you to easily recover unsaved files for both applications.
- Microsoft advises against relying solely on AutoRecover to save files, instead recommending users to manually save files using the Save icon or Ctrl + S key.
Solution 2. Recover unsaved data from Document Recovery
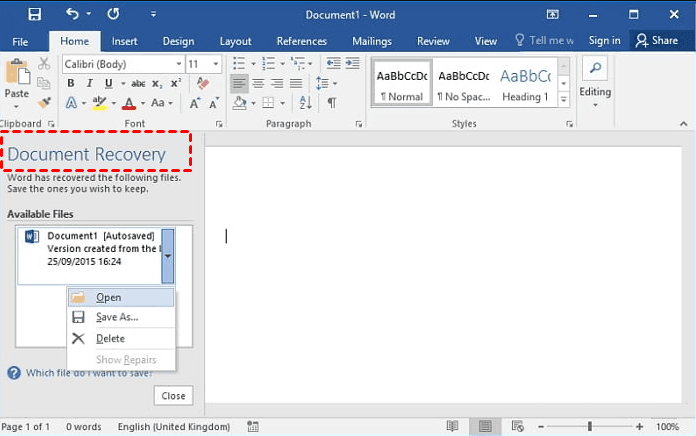
If Word crashes or closes abruptly, it will automatically search for unsaved documents when reopened, displaying them on the Document Recovery Panel.
Step 1. Open the previously unsaved Word document. You will then see a "Document Recovery" pane on the left.
Step 2. Check the unsaved Word document in the Documents Recovery pane, double-click to open it, or click Save as and select a location to save your Word document.
Note: In Microsoft 365, if you lose an unsaved Word document, you'll see a message bar in Word stating that the file is temporarily stored on your computer. To recover the document, open Word, check the file's content, and click Save to restore it. This will save the file and prevent it from being deleted.
Solution 3. Recover unsaved Word documents from Word backup file
Word also provides users with a backup feature, allowing them to create a copy of their Word files every time they save changes, with the copied file having a .wbk file extension.
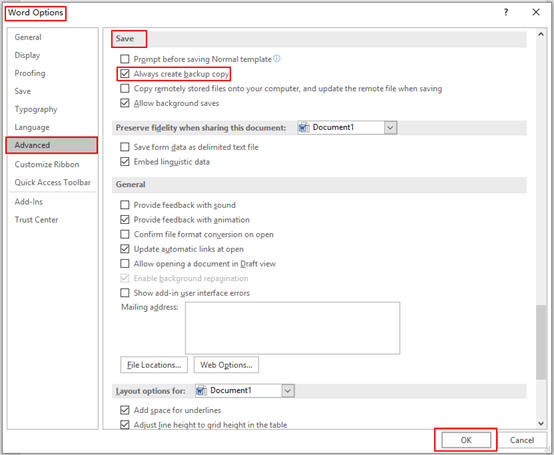
Step 1. Check if the Always create backup copy feature is activated.
- Start Word and click File > Options > Advanced.
- Locate the Save feature and check that the option "Always create backup copy" is selected.
Step 2. If your Word has the backup feature activated, go to the following path and check the Word file with a .wbk file extension.
- C:\Users\username\AppData\Roaming\Microsoft\Word
- C:\Users\AppData\Local\Microsoft\Office\UnsavedFiles
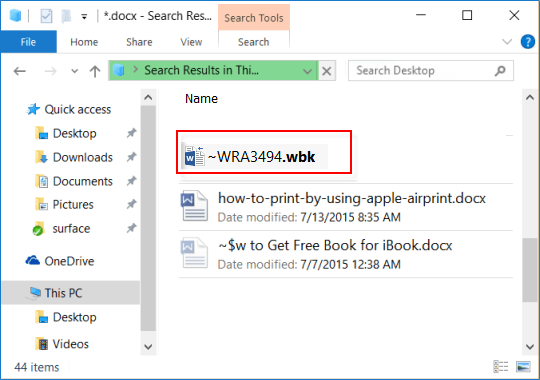
Note: Replace the "username" with your own.
Step 3. Open the .wbk file and check the content in it. Save it if this is your unsaved Word file.
Tip: If you want to prevent data loss, consider using free backup software like Qiling Disk Master Standard to make an exact copy of your files, rather than relying on the backup feature that only saves your changes.
Solution 4. Retrieve unsaved Word document from temp folder
If you're sure AutoSave is enabled, you can still recover files from the temp folder, including Word documents, as the temp files aren't deleted right away.
Step 1. Open Windows Explorer. Input the Temp folder folder location (C:\Users\username\AppData\Local\Temp) and click Enter to access it.
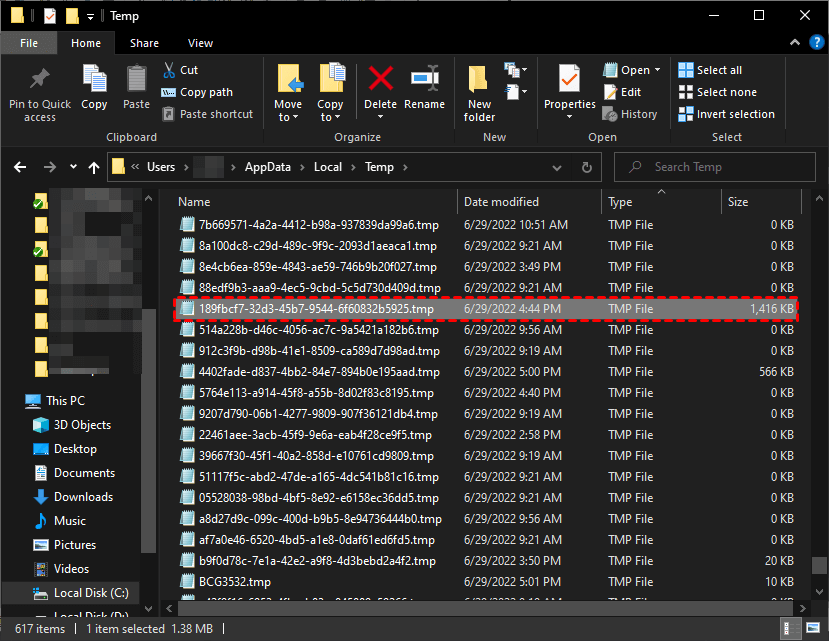
Step 2. Check the modified date and size of the Word documents to find the unsaved one, and then open it to verify its content.
Solution 5. Restore unsaved Word document from OneDrive
If you've backed up a Word document to OneDrive, you can restore it if you've lost unsaved changes. Additionally, when you open a Word document from OneDrive, any changes you make will also be saved to OneDrive.
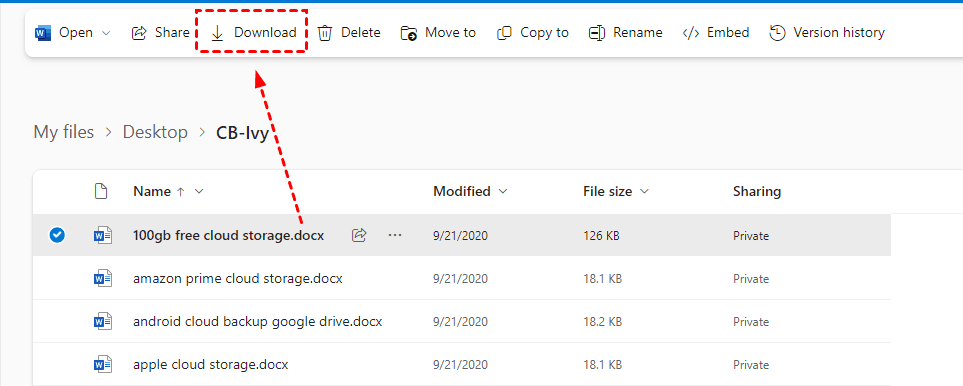
Step 1. Go to https://onedrive.com/ and log in with your Microsoft OneDrive account.
Step 2. Go to the folder with the unsaved Word file, select the file you want to recover, and click the "Download" button to restore the Word file to your computer.
Note: If you use Shift + Delete to delete a Word document, you can go to the OneDrive Recycle Bin, select the document, and click "Restore" at the top to recover it.
How to recover deleted Word document in Windows 10 or 11
Deleting a file, whether it's a saved Word document or an unsaved draft, can be a major cause of data loss in Word. However, there are 5 easy and quick methods to recover a mistakenly deleted file, allowing you to get your data back in no time.
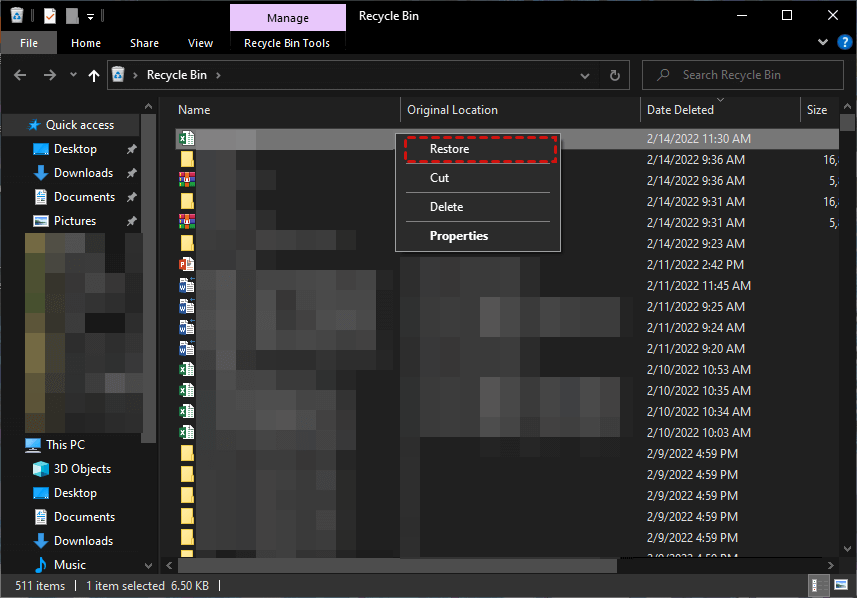
Solution 1: Recover Word document not saved from Recycle Bin
If you delete a Word document but don't empty the Recycle Bin, you can undo the deletion by going to the Recycle Bin, right-clicking on the deleted Word document, and selecting "Restore" or "Restore to" followed by the original location. This will restore the deleted document to its original location.
Step 1. Double-click Recycle Bin icon to open it. Then, locate the unsaved files in Recycle Bin.
Step 3. Right-click the deleted Word document and click Restore to restore deleted files from Recycle Bin to their original location.
Note: If you empty the Recycle Bin or permanently delete your Word file, you may not find it in the Recycle Bin. To recover a deleted Word document, check the article on recovering deleted files from the Recycle Bin.
Solution 2: Recover lost Word document with Backup and Restore
Backup and Restore is a built-The Windows backup utility, also known as Backup and Restore (Windows 7) in later versions, is a built-in tool that helps you backup and restore files. It was first introduced in Windows 7 and has been retained in subsequent versions, including Windows 8, 10, and 11. This utility can be useful for creating a file backup in advance, providing a safeguard against potential data loss.
Step 1. Navigate to Control Panel > System and Security and select Backup and Restore (Windows 7). Then, click Restore my files.
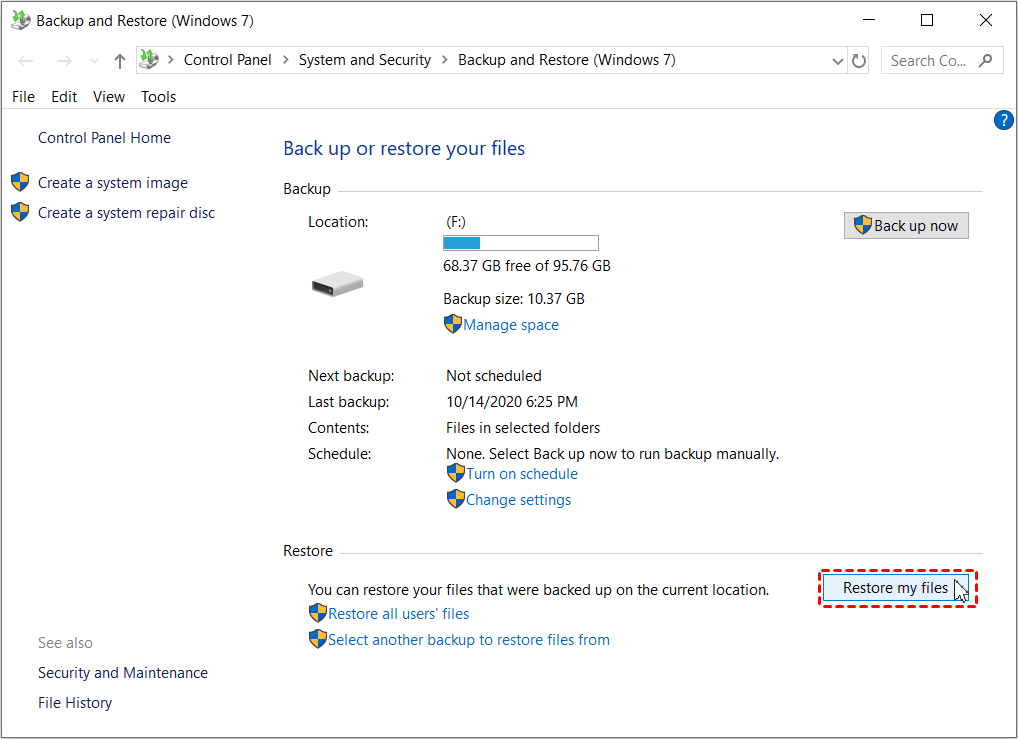
Note: To access the Backup and Restore (Windows 7) utility on Windows 11, go to Settings > System > Storage > Advanced Storage options > Backup options, scroll down to Looking for an older backup, and click Go to Backup and Restore (Windows 7).
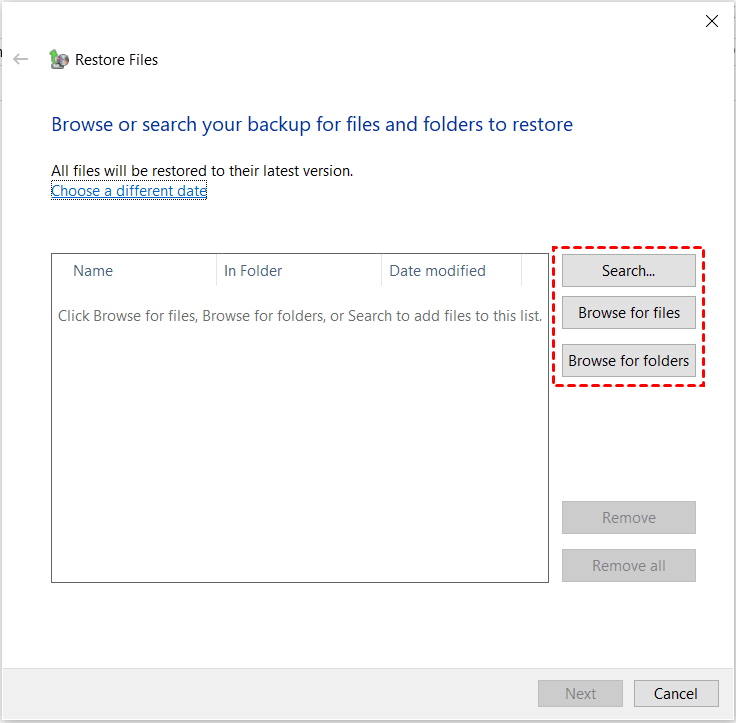
Step 2. In the Restore Files window, you can search or browse for files and folders to restore.
- Search: You can use the "Restore" feature in the file explorer to select the deleted files you want to restore. Simply type part of the name of the files in the search bar and select the files you want to restore.
- Browse for files: To recover deleted files, choose "Browse for files", locate the folder or file you want to restore, and select it.
- Browse for folders: select the entire folder with deleted files.
Step 3. To restore deleted files from the Recycle Bin, select a location where you want to restore the files from the Recycle Bin, choosing either the original location or browsing to a new one, and then click the "Proceed" button.
Note: If you don't have a file backup, create one after recovery. To do this, refer to the instructions on how to back up files to an external hard drive.
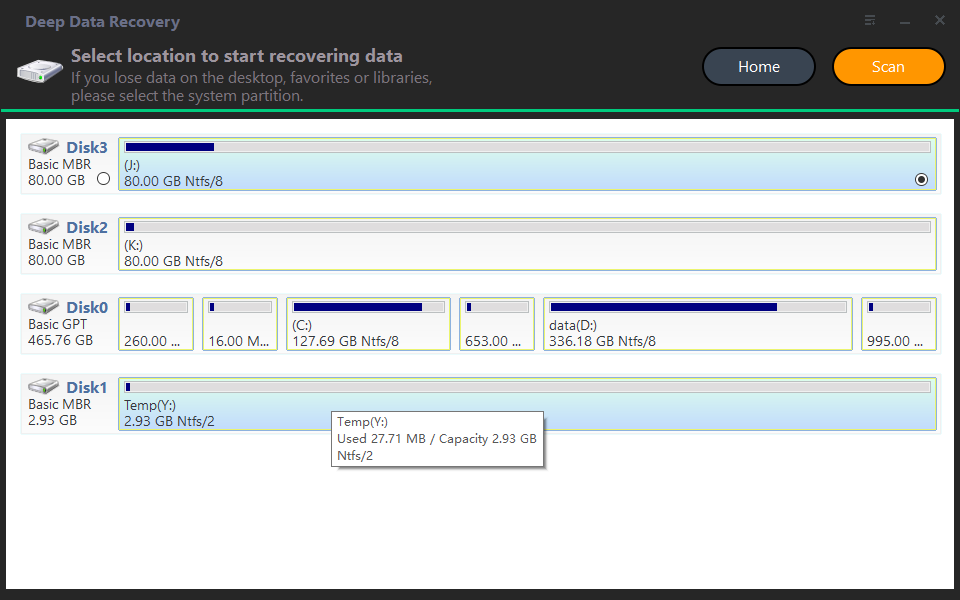
Solution 3: Recover deleted Word document with Deep Data Recovery
Deep Data Recovery is a reliable Windows data recovery software that can help recover deleted Word documents in various Windows versions, including Windows 7, 8, 10, 11, and Windows Server.
- Restore deleted files, including Word documents and over 200+ file types, like Excel, PowerPoint, images, and videos.
- Recover deleted files from any storage device, including healthy, corrupted, or formatted disks, USB drives, SD cards, and more, using data recovery software or services.
- Automatically scan deleted files with quick Scan and deep scan method.
- Keep the recovered files with their original file format, name, path and quality.
- Recover files with a high success rate and fast speed
Download and recover deleted Word documents easily. To recover unlimited Word files, upgrade Deep Data Recovery to the professional or technician edition.
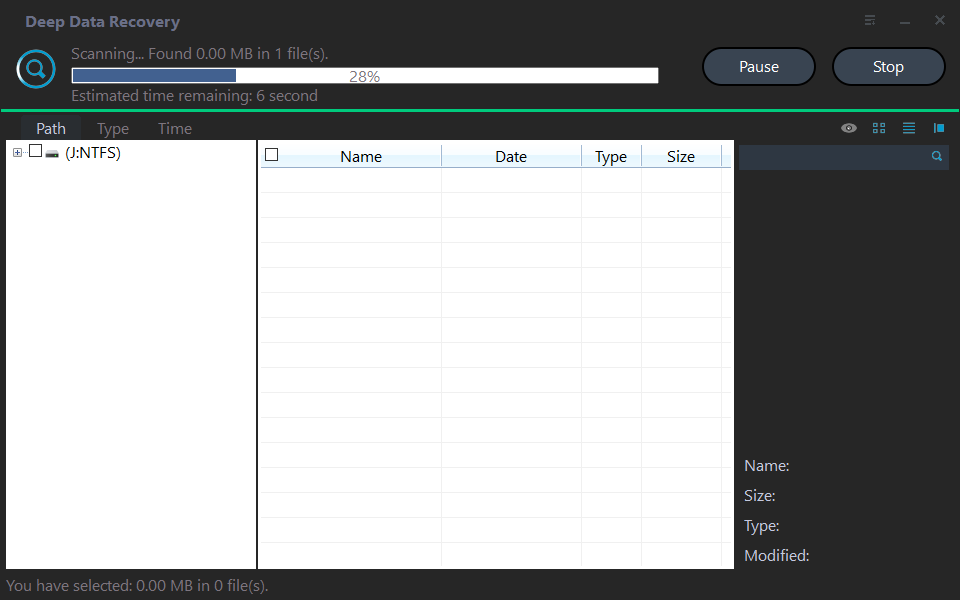
Step 1. Install and run Windows data recovery software - Deep Data Recovery. Hover the mouse over the drive where lost Word files are located and click Scan.
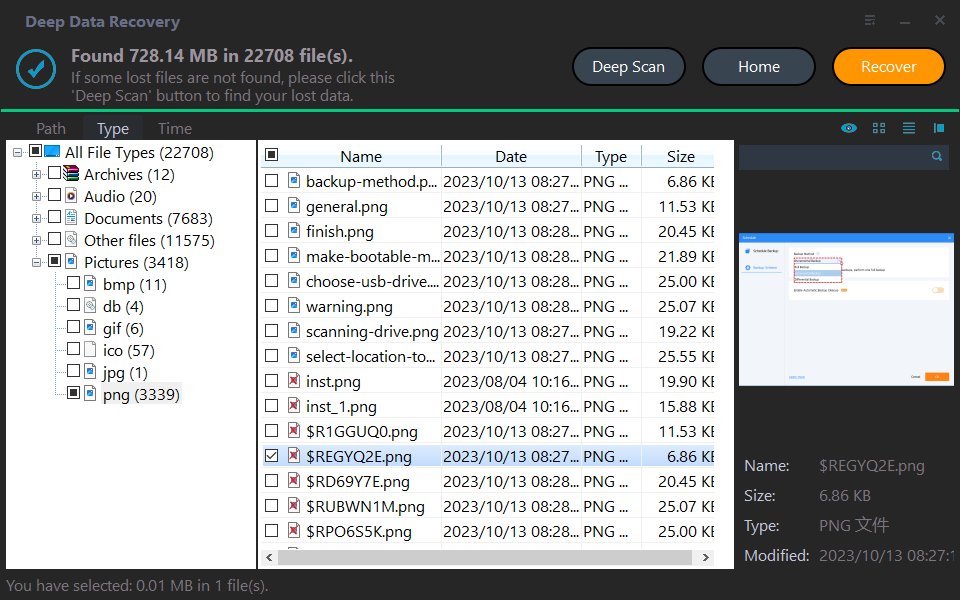
Step 2. The software will start a quick scan and a deep scan to find deleted files, including Word documents, and allow previewing or direct selection for recovery.
You can also use the Filter feature to search Word files to locate deleted files faster, which has 3 options including "File Name", "File Path", and "File Size".
- Type: The local drive will contain various file types, including images, videos, documents, emails, web pages, and compressed files, among others.
- Data Modified: The software supports various time period options, including today, yesterday, last 7 days, last 30 days, and a custom option for recovering deleted files at a specific time period.
- Size: The tool enables you to filter file sizes in various ranges, from less than 128KB to 1MB, 1MB to 512MB, and above 512MB, or even set a custom range.
To recover a deleted Word document, click on "Filter" and select "Type", then choose "Documents". Next, input "DOCX" in the "Search for files or folders" box, and it will list all deleted Word documents in the following window.
Step 3. Select the deleted Word files and click on "Recover files" to restore deleted Word documents, which will display the number of files and total file size.
Notes:
- You can choose to restore Word files to their original location or a new location.
- Except for Word files, you could also use it to restore deleted ZIP files, Excel files, PPT, etc. shortly in one paragraph.
- You can still recover deleted files in Windows Server 2016, 2019, 2022, etc.
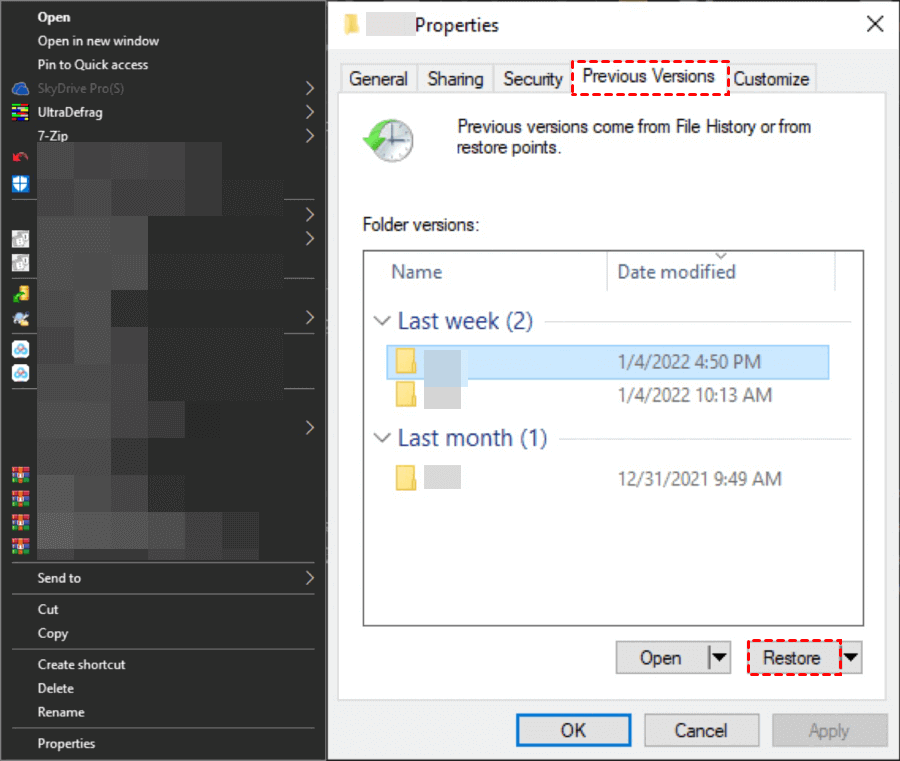
Solution 4: Recover Deleted Word document with Previous version
If you have System Restore enabled or have created a file backup with File History, you can restore deleted Word files using the "Previous versions" feature.
Step 1. Start Windows Explorer. Locate the folder containing the deleted Word file.
Step 2. Right-click the folder and select Properties > Previous Version.
Step 3. Select the folder version you delete and click Restore to restore deleted Word file to previous version.
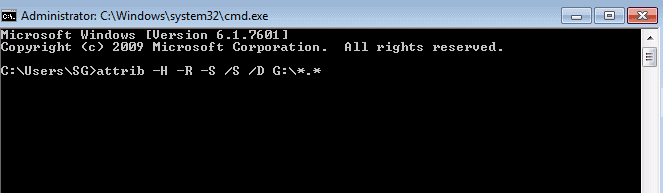
Solution 5. Recover lost Word document with CMD
If you think your Word file has been hidden instead of deleted, you can try running the chkdsk command to check for any disk errors and the attrib command to remove any hidden or read-only attributes that might be preventing you from accessing the file. This might help recover your lost Word file.
Step 1. Type cmd in the search box and select Run as administrator.
Step 2. Type chkdsk G: /f and press Enter in the command prompt window.
Step 3. To search for deleted Word files on a specific drive, you can use the command `attrib -h -r -s /s /d G:\*.*` and press Enter. Replace 'G:' with the actual drive letter where the deleted Word file is located. This command will search recursively through the entire drive for files with the Word extension (e.
5 tips to avoid losing your Word files
To prevent losing important Word files, follow these tips carefully.
- Be sure the AutoSave and AutoRecover feature is enabled. If you're experiencing issues with Microsoft Word not saving your documents, you can try checking the AutoRecover settings to see if it's enabled. To do this, click on File > Options > Save, and make sure the box next to "Save AutoRecover information" is checked.
- Create a copy of your Word files automatically. You can choose to enable the "Always create backup copy" option in Word or use a free backup software like Qiling Disk Master Standard, which offers a "File Backup" feature and allows you to customize the backup time period and delete old images.

- Take a few minutes to check if the Recycle Bin contains important files before emptying.
- Keep your anti-virus software always turn on. It helps to avoid infections with malware and viruses, resulting in data loss, and also helps to protect against unauthorized access to your personal data.
- Get a surge protector. A power outage is a common root cause of unsaved Word documents in Windows 10 or 11, leading to lost work.
Q&A about Word document recovery
✍ Does Word keep backup files?
Microsoft's AutoSave feature saves backed-up files in the default folder, which can be one of the following paths: C:\Users\{username}\AppData\Roaming\Microsoft\Autosave, C:\Users\{username}\AppData\Local\Microsoft\Autosave, or C:\Users\{username}\AppData\Local\Temp\Microsoft\Autosave.
- C:\Users\Username\AppData\Local\Microsoft\Word
- C:\Users\Username\AppData\Local\Temp
- C:\Users\Username\AppData\Local\Microsoft\Office\UnsavedFiles
✍ Can you Save Word to Cloud?
You can save a Word document to OneDrive, Microsoft's cloud storage service, by clicking File > Save as and selecting OneDrive. This will allow you to access your document from any device with an internet connection. To do this, you'll need to log in with your OneDrive account. Once saved, any changes made to the document will also be saved to OneDrive. Simply type a name for your Word file and click Save to complete the process.
✍ Why does my Word document not AutoSave?
The Word document is not saved because the AutoSave option is disabled, or the changes made are less than 10 minutes, causing it to not be saved.
To back up changes in a Word file, you can use Qiling Disk Master Standard. Its File Backup feature helps you back up Word files and other important data regularly.
✍ How to turn on AutoRecover in Word for Mac
To set up automatic recovery in Word, open the file, go to the top menu, select "Preferences" > "Save", and then check the box next to "Save Auto-Recovery information" to set the duration for recovered files.
✍ How to recover unsaved Word document on Mac
If you have enabled AutoRecovery on your Mac, you can recover your Word document by looking for it in the Finder. Additionally, you can also try recovering from the Trash folder, Temp folder, or using Time Machine.
Summary
Learn how to recover unsaved and deleted Word documents in Windows 10 or 11, with methods also applicable to Windows 7, 8, 8.1, and Windows Server. The article provides 10 methods to retrieve lost Word documents, covering various scenarios and file recovery techniques. Whether you need to recover unsaved work or retrieve deleted Word files, these methods can help you recover your lost documents and minimize data loss.
Word documents can be recovered even if they weren't saved, and the most effective method involves using backup software or data recovery software, especially if you've created a file backup in advance.
Related Articles
- 9 Effective Ways to Recover Deleted Files from Recycle Bin
How to recover deleted files from Recycle Bin after emptying? Please refer to this post for step-by-step instructions on restoring deleted files from Recycle Bin on Windows 10/11. - SanDisk Memory Card Repair Tool Free Download for Windows/Mac
SanDisk memory card repair tool from Qiling allows you to recover data from corrupted, write-protected, or inaccessible SanDisk memory SD card/USB/hard drive or other brands of storage devices. You can free download this software to restore data and follow the methods to repair corrupted devices and remove write protection on your storage devices. - Fix SanDisk SD Card Unable to Format/Won't Format Error [2022]
Are you being unable to format the SanDisk SD card? This page explains the causes of SanDisk SD card unable to format error and guide you to format SanDisk successfully without losing any data with practical fixes. - Ultimate Guide on SD Card Recovery in 2022
SD cards are widely used due to their high data transmission speed and hot-swappable features, which often lead to data loss problems. If you accidentally delete files on your SD card, you can use various recovery methods and SD recovery software to help recover deleted files. - How to Recover Deleted Photos from Transcend SD Card
To recover deleted photos from a Transcend SD card, follow a 3-step guide that works on both Mac and Windows PC. - How to Recover Deleted Photos/Pictures from Computer in Windows 10
You can restore deleted pictures, including permanently deleted photos, from Windows 10 by following a detailed guide. Additionally, you can download free Windows 10 photo recovery software to recover deleted photos from your computer.