Disk Management Tools for Windows 11
Windows 11 includes Disk Management, Settings storage tools, and DiskPart, but each tool has limits. A visual partition tool is useful when you need a preview before applying disk changes.
Understand the problem
Choose the tool based on the task. Simple drive letter changes are fine in Disk Management, while resizing, moving, copying, or repairing partitions may require clearer guidance.
- Confirm the exact disk, partition, drive letter, file system, boot mode, or Windows version before changing settings.
- Back up or recover important files before formatting, deleting, resizing, converting, reinstalling, or cleaning a drive.
- For boot or installation tasks, check BIOS or UEFI mode, disk style, boot order, and device compatibility first.
Use Windows built-in tools
Start with the built-in tool that matches the job.
- Use Settings for storage cleanup and default save locations.
- Use Disk Management for drive letters, basic formatting, shrinking, and simple extensions.
- Use DiskPart only when you understand the disk and partition numbers.
- Use Windows Terminal commands for advanced checks, not for guessing.
- Back up data before any operation that changes partitions.
Use Qiling tools for guided steps
 Qiling Disk Master
Resize, create, format, copy, or check Windows 11 partitions with a preview before changes are applied.
Function. Resize or move the partition with preview
Step 1. Open Qiling Disk Master and check the disk map. Identify the Windows 11 partition by drive letter, capacity, file system, and position.
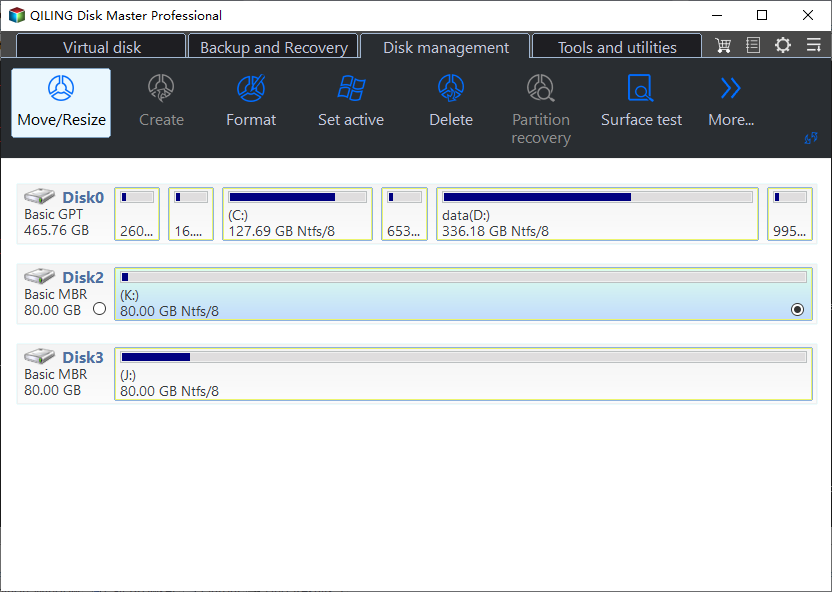
Step 2. Select the partition that needs adjustment and click Resize/Move. If another partition blocks the target space, move or resize it first in the preview.
Step 3. Drag the border or enter the exact size to adjust partition size or position based on the available space. Keep enough free space for Windows updates, temporary files, and application data.
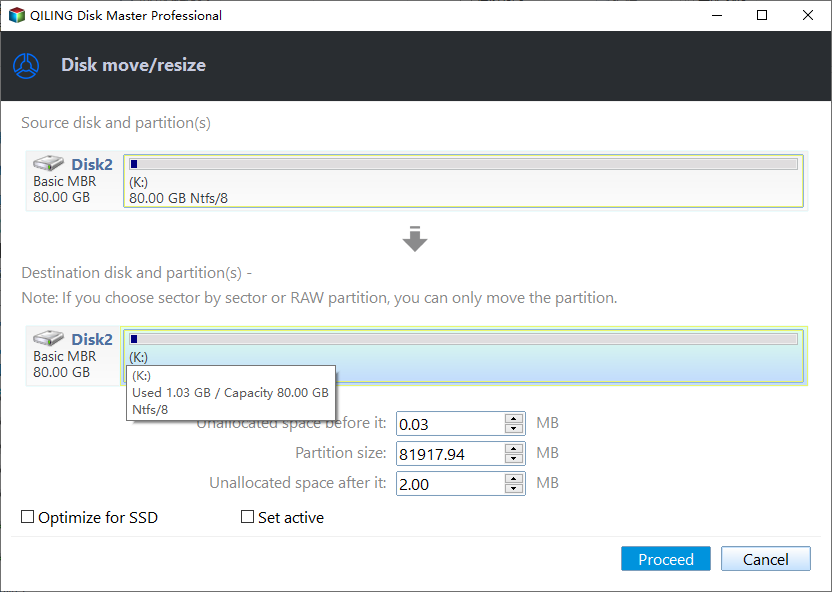
Step 4. Review the pending operations in order. Confirm that the correct disk and partition will be changed.
Step 5. Click Proceed and wait for the operation to finish. Do not interrupt the computer while partitions are being moved or resized.
Check the result
After using any tool, reopen Disk Management and File Explorer. Confirm that the drive letter, capacity, file system, and file access match the intended result.
Related Articles
-
Windows 10 Disk Management
Learn common disk tasks in the Windows Disk Management console. -
Resize Partition
Resize partitions with a guided preview when built-in tools are limited.
Products
Articles & Tutorials
- Data Recovery
- Data Backup
- File Recovery
- File Backup
- File synchronize
- System Backup and Restore
- Disk and Partition Clone
- Technical articles
- Disk Master Help
- Windows Deleted File and Disk Recovery Tutorials
- Windows File and Data Recovery Tutorials
- More Windows Tutorials for Install, Security, Files, and PC Tips
- Windows Boot, Repair, and Recovery Environment Tutorials
- Windows Backup Tutorials
- Windows Restore Tutorials
- Windows Clone and Migration Tutorials
- Windows Server Backup, Recovery, and Management Tutorials
- Windows Disk, Partition, and Storage Management Tutorials