How to Format a Drive as Ext4 from Windows Safely
Ext4 is a common Linux file system. A dual-boot setup, Linux data drive, or Linux installation may need an Ext4 volume, while Windows' usual File Explorer and Disk Management format menus do not offer Ext4. This does not mean that the disk is broken.
Formatting changes the file system and erases the selected partition's existing contents. Windows also does not natively provide ordinary Ext4 file browsing, so choose the format based on where the drive will be used. For a drive shared between Windows and Linux, exFAT may be simpler if both systems and all applications support it.
Check the destination and choose the right method
Step 1. In Disk Management, identify the physical disk and intended partition by model, capacity, and current layout. Record whether it contains Windows boot, recovery, or data partitions.
Step 2. For a new Linux installation, the Linux installer can normally create and format its own Ext4 partition during setup. This avoids formatting the wrong volume from Windows. Leave the intended free space unallocated and select it carefully in the installer.
Step 3. For a separate Linux data volume, use a trusted tool that explicitly supports Ext4. Do not type format fs=ext4 in Windows DiskPart; it is not a supported file-system option there.
Back up files before formatting
Step 1. Connect a separate destination drive with enough free space. In Qiling Disk Master, open Backup and Recovery and choose File Backup. Confirm that Windows can open the files on the partition you plan to format before using this method.

Step 2. In the source tree, expand the drive you intend to format and check the files or folders to keep. Check that you have selected the source partition, not the separate backup drive. If Windows cannot read the existing Ext4 files, stop here and copy them from a Linux environment instead; an empty folder view does not mean the partition is empty.

Step 3. Use the destination selector to choose a folder on the separate physical drive, then confirm the folder selection. Do not save the backup to any partition on the disk you will format.
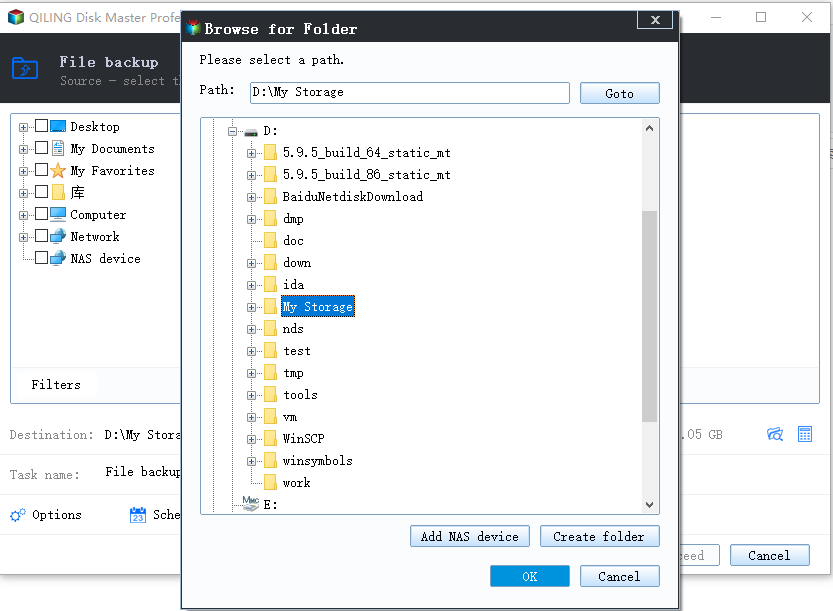
Step 4. Review the selected source and destination, click Proceed, and wait for the backup to finish. Verify that the backup can restore a sample file before formatting. Keep the backup drive disconnected while selecting the partition to format so you cannot erase it by mistake.
Format with a Linux live environment
Step 1. After verifying the backup, obtain the official GParted Live image and write it to a spare USB drive. Creating the bootable USB erases that USB, so check its capacity and identity before writing the image. Disconnect the backup drive, but leave the disk you intend to format connected.
Step 2. Boot the computer from the GParted Live USB and select GParted Live (Default settings). Complete the startup prompts until the GParted partition window opens.
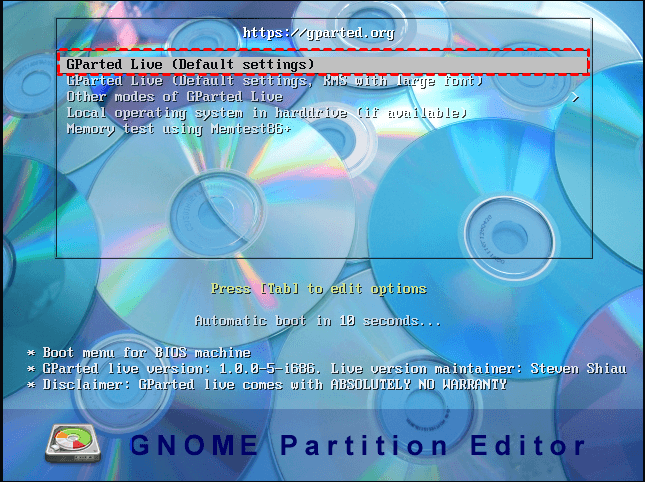
Step 3. In GParted, use the device selector at the upper right to choose the physical disk by its model and capacity. Compare its partition sizes and file systems with the layout you recorded in Windows. Linux names such as /dev/sda do not correspond reliably to Windows drive letters. Stop if you cannot identify the intended disk and partition with confidence.
Step 4. Select only the intended data partition. If it shows a mount indicator, right-click it and choose Unmount first. Do not format the EFI System Partition, the Windows partition, or a recovery partition.
Step 5. Right-click the unmounted data partition and choose Format to > ext4. This queues the operation; it has not erased the partition yet. Review the pending operation, including the device name and partition size, before continuing. If ext4 is unavailable, stop rather than choosing another format.
Step 6. Choose Edit > Apply All Operations, read the data-loss warning, and confirm Apply only when the target is correct. Wait for the operation to finish without removing the drive or interrupting power.
Step 7. In Linux, mount the new Ext4 partition, check its capacity, then create and reopen a test file. Reconnect the backup drive and restore the saved files only after that test succeeds. Windows may display the Ext4 partition as unrecognized because it cannot natively browse Ext4.
Use a Windows Ext4 formatter only when supported
A Windows partition tool may offer Ext4 even though Windows itself does not. Check the installed Qiling Disk Master edition and version rather than assuming Ext4 support.
Step 1. With the backup verified and disconnected, open the partition view. Match the target disk and non-system partition to the model, capacity, and layout you recorded earlier. Right-click that partition and open Format. The image below shows where to open the command; it does not establish that Ext4 is available in every edition.
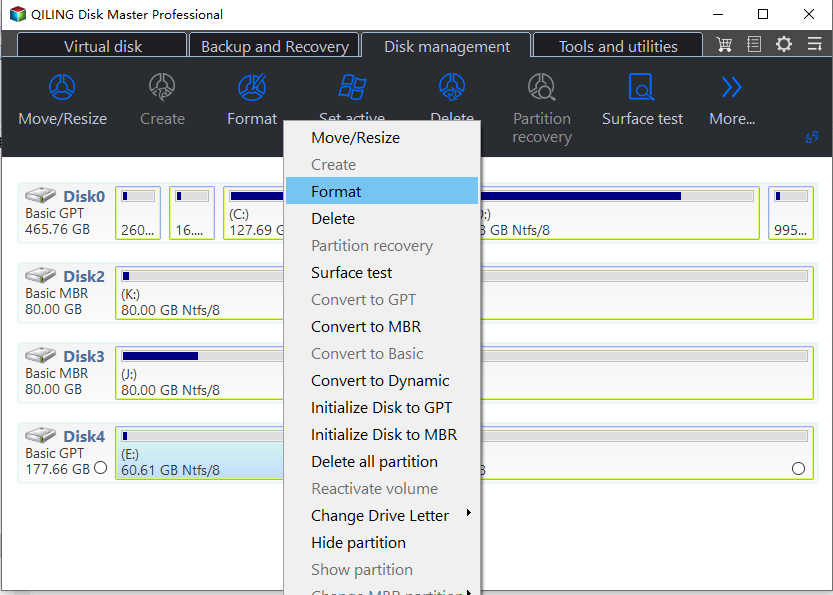
Step 2. Inspect the file-system choices. Select Ext4 only if the installed product explicitly lists it for this partition. If it does not, cancel the dialog and use the GParted Live method above.
Step 3. Recheck the disk and partition shown in the confirmation, acknowledge that formatting erases existing data, and click Proceed to run the operation. Wait for completion before disconnecting the disk.
Step 4. Boot Linux, mount the Ext4 partition, and write and reopen a test file before restoring the backup. Formatting cannot recover missing files or repair a failing drive.
Related Articles
- Copy an Ext4 Partition
Preserve an existing Linux partition before changing its layout. - Change an Ext3 Volume to NTFS
Plan a file-system change around backup and compatibility checks.
Products
Articles & Tutorials
- Data Recovery
- Data Backup
- File Recovery
- File Backup
- File synchronize
- System Backup and Restore
- Disk and Partition Clone
- Technical articles
- Disk Master Help
- Windows Deleted File and Disk Recovery Tutorials
- Windows File and Data Recovery Tutorials
- More Windows Tutorials for Install, Security, Files, and PC Tips
- Windows Boot, Repair, and Recovery Environment Tutorials
- Windows Backup Tutorials
- Windows Restore Tutorials
- Windows Clone and Migration Tutorials
- Windows Server Backup, Recovery, and Management Tutorials
- Windows Disk, Partition, and Storage Management Tutorials