Install Windows 11 on a GPT Disk: Preparation, Setup, and Checks
A standard Windows 11 installation uses UEFI and a GPT system disk. GPT describes how partitions are recorded; it is not the same thing as the NTFS file system inside the Windows volume. Formatting a volume as NTFS does not convert an MBR disk to GPT.
Choose whether you are upgrading the existing installation or performing a clean installation before opening the disk-deletion options in Setup.
Check hardware and decide what must be preserved
Confirm the PC meets the requirements for the intended Windows 11 release, including a supported processor, TPM 2.0, UEFI/Secure Boot capability, memory, and storage. GPT alone does not make unsupported hardware compatible.
- Run the official compatibility check available for your upgrade route and record any failed requirement.
- Use
msinfo32to check firmware mode. Open Disk Management and inspect the system disk's partition style under its disk properties. - Record the target disk model, capacity, and existing data partitions. Save BitLocker recovery information before firmware or partition changes.
- If applications and settings must remain, assess a supported in-place upgrade. A clean USB installation is a separate choice that requires reinstalling applications.
Create a disk image before replacing the installation
Qiling Disk Master can preserve the current disk layout as an image. Store it externally so that setup cannot erase the only recovery copy.
Step 1. Connect a backup disk with sufficient free space. Open Backup and Recovery > Disk/Partition backup.
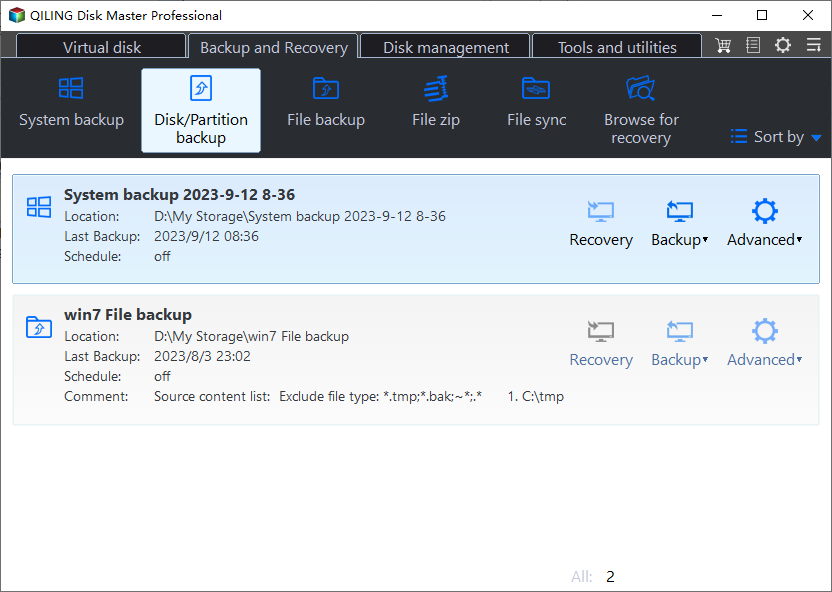
Step 2. Select the existing Windows disk and its required boot and recovery partitions. Review the physical disk selection rather than selecting only the C: volume.
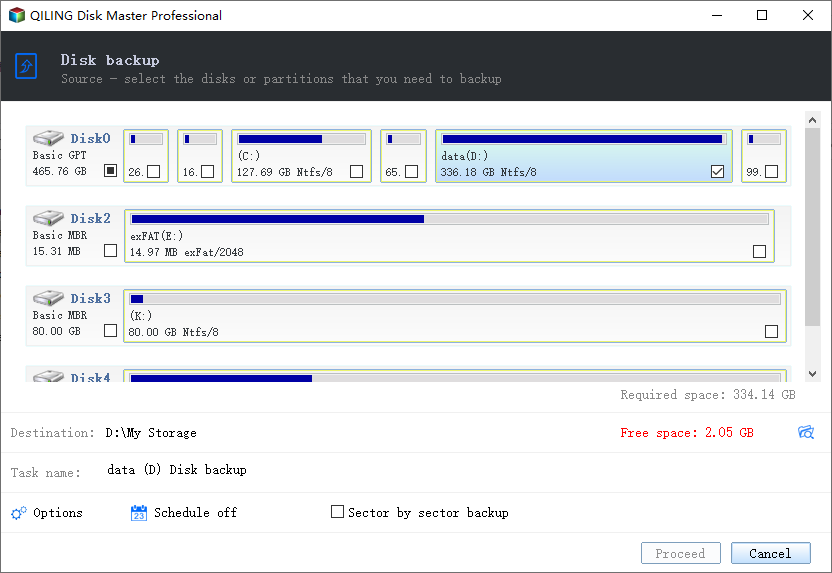
Step 3. Select a destination on the external drive, review the task, and click Proceed. Keep compatible recovery media and verify access to the image before proceeding.
Also keep readily accessible copies of essential personal files. Restoring a whole old disk image later can replace the new installation rather than merely add documents to it.
Run Setup in UEFI mode and choose the target carefully
- Create official Windows 11 installation media on a separate USB drive. Disconnect the backup disk and unrelated storage once preparation is complete.
- Start the PC's one-time boot menu and select the UEFI entry for that USB. Use the model's documented firmware settings.
- Follow the language, edition, and licensing prompts. Choose the clean-installation route only if that is your intended plan.
- Match the destination disk to your recorded capacity and layout. On a new blank disk, choose its unallocated space and let Setup create the required partitions.
- For a used disk that you deliberately intend to erase completely, delete only that disk's partitions after verifying the backup. If any partition must remain, stop and plan that selective installation separately.
- Continue setup and allow the restarts. Avoid repeatedly starting the installer again after the system begins booting from the internal disk.
If Setup reports that the selected disk is not GPT, do not delete data just to remove the message. An existing compatible Windows system may qualify for Microsoft's MBR2GPT workflow; validation and backup must come first. See the MBR2GPT documentation for its scope and requirements.
Understand the partitions and verify the new installation
A typical UEFI installation has a small EFI System Partition, a Microsoft Reserved partition, the Windows partition, and a recovery partition. Their exact sizes can vary. They are not extra user drives that need letters or manual cleanup.
After setup, confirm BIOS Mode is UEFI in System Information, check Windows activation and encryption recovery-key storage, and install the correct device drivers. Run Windows Update, then verify network, audio, and storage operation.
Restore personal data selectively and open important files. Keep the pre-installation image until the new installation is stable and a new backup has been created. If the disk remains invisible in Setup, investigate storage drivers instead of issuing destructive disk commands.
Related Articles
- Understand UEFI and GPT Setup
Review how firmware mode relates to the Windows system disk. - Windows 11 Installation Failed
Use the actual setup failure stage to narrow down the cause.
Products
Articles & Tutorials
- Data Recovery
- Data Backup
- File Recovery
- File Backup
- File synchronize
- System Backup and Restore
- Disk and Partition Clone
- Technical articles
- Disk Master Help
- Windows Deleted File and Disk Recovery Tutorials
- Windows File and Data Recovery Tutorials
- More Windows Tutorials for Install, Security, Files, and PC Tips
- Windows Boot, Repair, and Recovery Environment Tutorials
- Windows Backup Tutorials
- Windows Restore Tutorials
- Windows Clone and Migration Tutorials
- Windows Server Backup, Recovery, and Management Tutorials
- Windows Disk, Partition, and Storage Management Tutorials