How to Delete System Junk Files in Windows 10 (Available for Windows 11)
Why we should delete system junk files?
Deleting system junk files is a crucial task that keeps computers in good condition. It's a common topic when discussing what maintains a computer's health. If you're unsure about its importance, this article will clarify the matter.
Using a computer for an extended period can lead to the accumulation of system junk files, including duplicates, temporary files, and registry entries. Regularly deleting these unnecessary files not only frees up disk space, but also improves your computer's performance, making it run faster and more efficiently.

How to delete system junk files in Windows 10, 8, 7, and 11
To delete system junk files successfully, you have four options: using Microsoft Total PC Cleaner, running the Disk Cleanup tool, employing a third-party junk files cleaner, or utilizing the built-in Storage feature.
▶ Option 1. Microsoft Total PC Cleaner
You can get Microsoft Total PC Cleaner for free from the Microsoft Store, which works on Windows 10 and above, and helps clean up system junk files to speed up your PC.
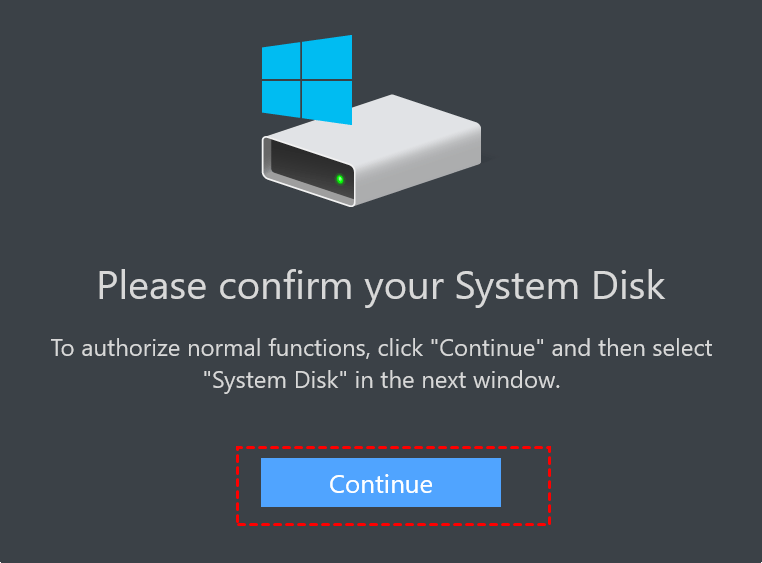
Step 1. To use Microsoft Total PC Cleaner, install it on your Windows 10 PC and open it. The main interface will appear, and you can proceed by clicking on "Continue".
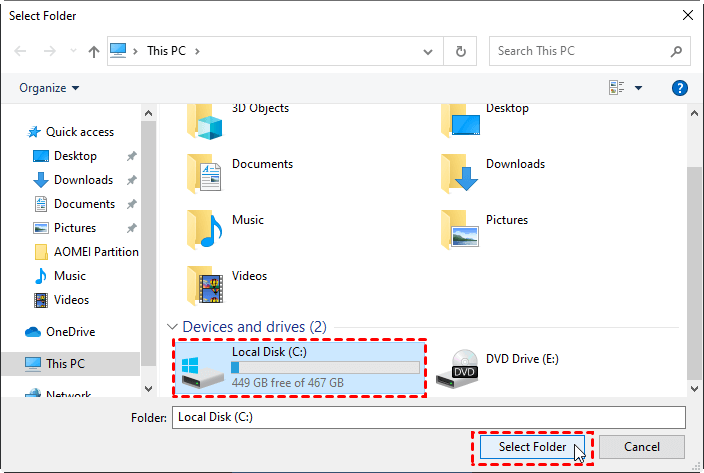
Step 2. Select the system partition (usually the C drive) and click on "Select Folder".
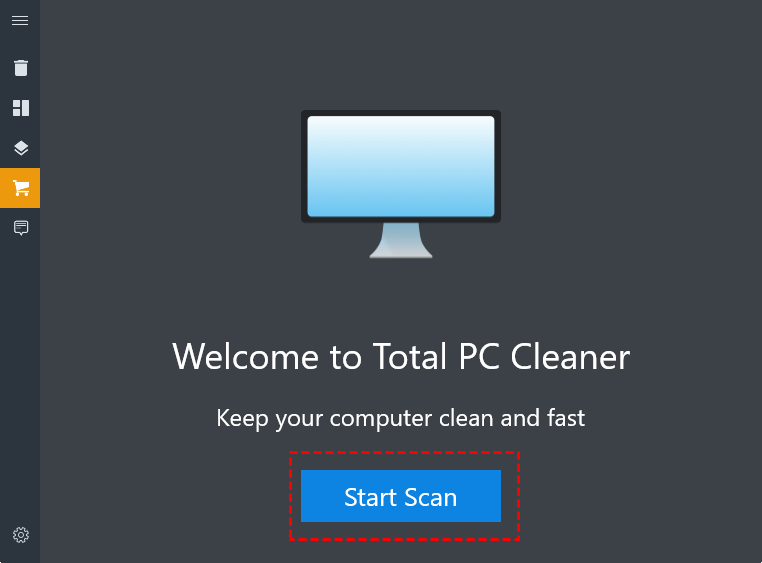
Step 3. Run the tool by clicking "Start Scan" in the new window that pops up.
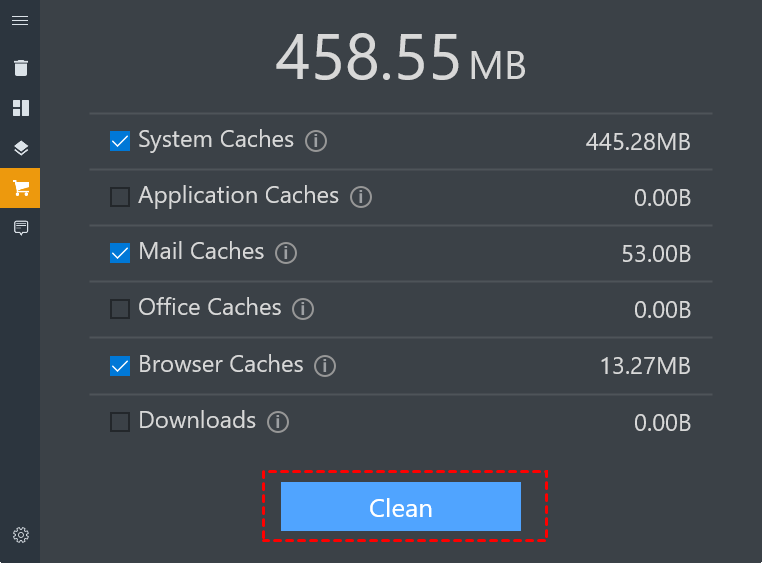
Step 4. Wait for a few seconds, then the scan results will be displayed. You can click "Clean" to remove system junk files.
▶ Option 2. Disk Cleanup
Disk Cleanup is a Windows built-in tool that can delete Windows 10 junk files without installation, allowing users to clean junk files on different drives, especially helpful when dealing with a large amount of junk files on the system disk.
Step 1. Click"This PC" on the desktop.
Step 2. Right-click the system disk and select"Properties".
Step 3. Click Disk Clean-up under General option.
Step 4. Check the junk files and click"OK".

▶ Option 3. Free system junk files cleaner
To clean up system junk files on Windows 10, 8, 7, and 11, you can use Qiling Disk Master Standard, a tool that scans and removes all types of junk files, including system and registry junk files, and automatically classifies them for easy deletion. By clicking "Clean All", you can quickly and easily remove all identified junk files.
Note: Upgrading to the Pro Edition unlocks additional features, including the ability to delete large files and move installed apps to another drive without reinstalling, freeing up space and enhancing overall system performance.
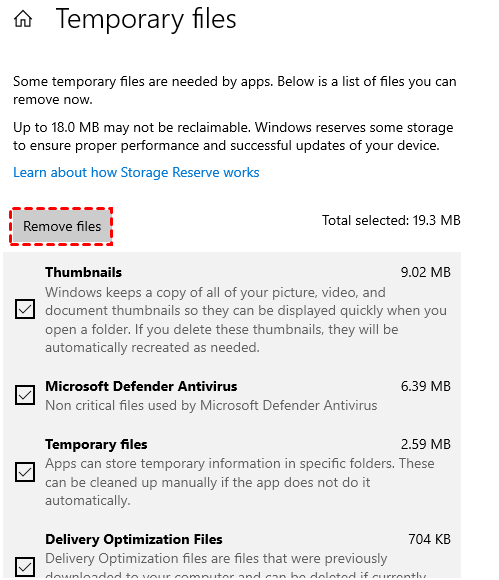
▶ Option 4. Storage feature
For Windows 10 and above, users can also try cleaning up system junk files using the Storage feature, but it only includes temporary files.
Step 1. To access storage settings, open the Start bar and navigate to "Settings" > "System" > "Storage".
Step 2. After that, click"Temporary files".

Step 3. Then, click"Remove files"to remove all temporary files.
Conclusion
This guide provides a comprehensive look at how to delete system junk files in Windows 10 and other operating systems, offering 4 different options to do so.
Qiling Disk Master can remove many kinds of system junk files and also provides flexible disk partition management, making it useful for both cleanup and daily storage maintenance.
Related Articles
- A Powerful PC Junk Cleaner for Windows 10 And 11
How to make the computer run faster? An excellent PC junk cleaner for Windows 10 can help you, which can remove all kinds of junk files to free up more space and improve computer performance. - Paragon Migrate OS to SSD Review [Pros & Cons]
This passage provides a detailed review of Paragon Migrate OS to SSD, covering its pros and cons. It also highlights the best alternative, Qiling Disk Master, for migrating Windows OS to SSD. - Top 3 Best Partition Resizer Portable Review: Pros and Cons
If you're looking for the best portable partition resizer, you've come to the right place. This article introduces three portable resize tools and compares them from multiple aspects, providing you with a comprehensive guide to make an informed decision. - How to Partition SSD From BIOS [2024 New Guide]
To partition an SSD from BIOS, follow these steps: Enter the BIOS settings by pressing the designated key (usually F2, F12, or Del) when your computer starts. Navigate to the “Boot” or “Storage” section and select the SSD as the first boot device. Save the changes and exit the BIOS settings. - Change Windows Password Using Command Prompt - 2 Ways
Learn how to change a Windows password with Command Prompt and review another straightforward option if the command-line method is not suitable. - Tutorial: Check Disk Space on Windows 10 Using CMD 2024
Do you know how to check disk space on Windows via CMD? CMD is a disk utility built-in in Windows. This article provides a full tutorial to check disk space in Windows 10 CMD. Dive into learning.