Move Users Folder to Another Drive in Windows Server 2012
- The case: how do I move Users folder to another drive in Windows Server 2012?
- What is Users folder and why to move it to another drive?
- How to move Users folder to another drive in Windows Server 2012
- Copy Users folder to another drive with Qiling Disk Master Server
- #2: Move user profile to another drive with Windows built-in feature
- Summary
The case: how do I move Users folder to another drive in Windows Server 2012?
Yes, you can move the entire user folder to another drive with 2 effective methods. And I'll introduce you to more about the User folder and why move it to another drive. Please continue to see below for details.
Page Contents:
- What is Users folder and why to move it to another drive?
- How to move Users folder to another drive in Windows Server 2012
- Summary
What is Users folder and why to move it to another drive?
The User folder is a special folder on the C: drive that contains settings and subfolders for each Windows account, such as Documents, Pictures, and Desktop, and requires permission to access other users' folders.
In Windows Server 2012, as the data in the Users folder grows, many users opt to relocate it to another drive. This decision is primarily driven by two main reasons.
- Folders can be easily lost due to hard drive failure and operating system corruption.
- You can free up space on your C: drive and improve your PC's performance by uninstalling unused programs, deleting temporary files, and cleaning up the recycle bin. This will help declutter your computer and make it run more smoothly.
To move the user profile to a different drive, you can either use the built-in Windows feature called "Move User Profile" or use a third-party tool like FolderSync. This allows you to relocate the user profile folder to a different drive, such as an external hard drive, and keep all your settings and files in one place. This is especially useful for upgrading to a new computer or consolidating data from multiple devices. Simply follow the instructions provided in the article to complete the process.
How to move Users folder to another drive in Windows Server 2012
Moving the Users folder to another drive is a straightforward process, as long as you take the right approach. There are two efficient methods to consider, allowing you to relocate this folder to a different drive with ease.
Copy Users folder to another drive with Qiling Disk Master Server
Qiling Disk Master Server is a reliable and easy-to-use file sync software that enables you to move your Users folder to a different drive, offering numerous benefits through its features.
✧ 4 Sync Solution: You can use "File Sync" to sync files between different folders, drives, or even computers, and also sync local folders to cloud services like OneDrive, Google Drive, and Dropbox.
✧ Scheduled sync: You can set automatic sync based on a specified time, events, or devices, making it easy to sync data between 2 servers automatically.
✧ Compatibility: This professional software runs smoothly on Windows Server 2003, 2008, 2011, 2012, 2016, 2019, 2022 (including R2) and all Windows PC systems, including SBS 2003, 2008, and 2011.
The simple steps and intuitive interface of this software make it effortless to use. You can easily move the Users folder to another drive in Windows Server 2012 using a quick guide, and the same steps can also be applied to move the Users folder to another drive in Windows Server 2012 R2/2016/2019/2022.
Step 1. Install and open this software. Choose Backup tab page. Then click File Sync.
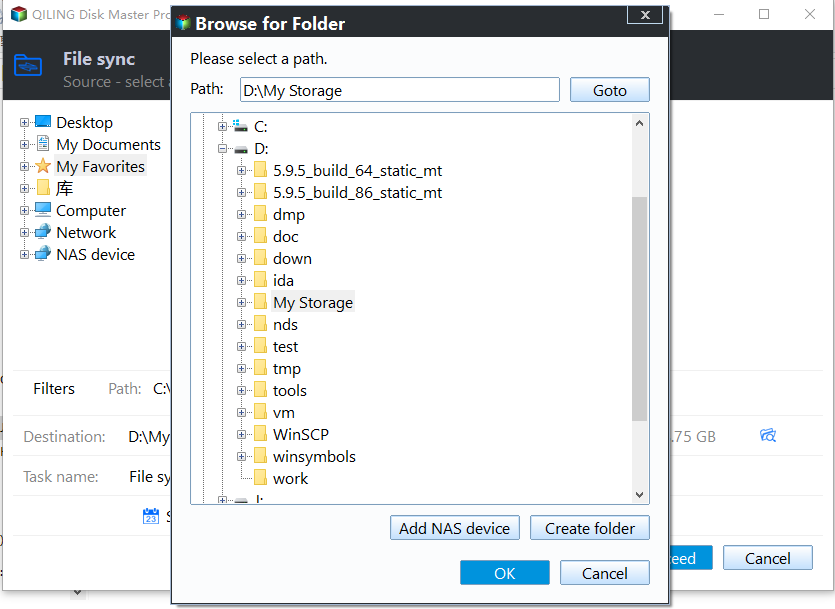
Step 2. Edit the task name as per your need. Click Folder to add the Users folder that needs to be synced.
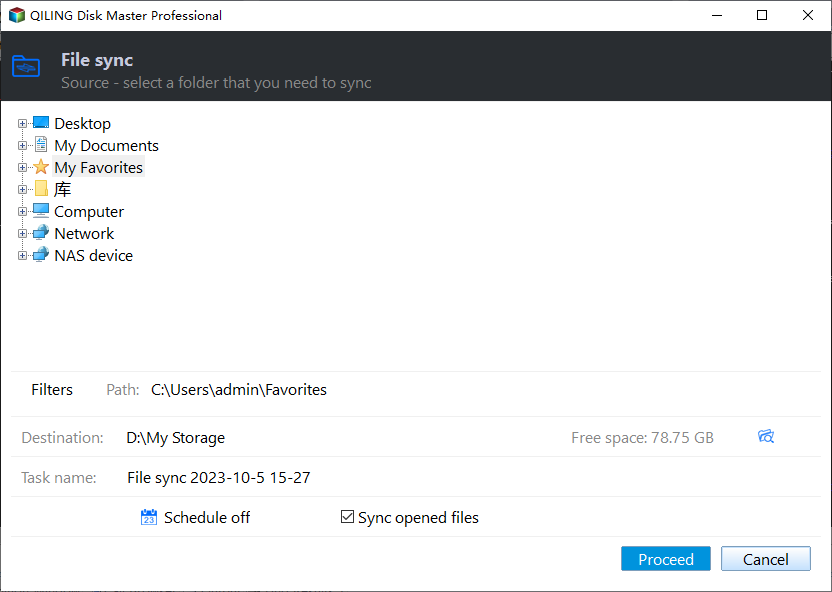
Step 3. In Windows Server 2012, select the destination drive (e.g. E:\My Backups), then click Proceed to move the users folder to the chosen drive.
★ When the sync operation is in progress, you can click the Settings icon in the lower-left corner and select what you want the computer to do on completion, such as shutting down, restarting, or putting the computer to sleep.Shut down PC, Restart PC, Hibernate and Sleep.
★ Do not change the folder name of the source, otherwise the software will not be able to sync it anymore.
★ You can choose to backup user profile automatically by storing the most frequently used data in the User folder, which is a convenient option.Schedule Sync The feature allows you to set reminders at specific intervals, giving you a heads up on upcoming events. You have 5 options to choose from: Daily, Weekly, Monthly, Event triggers, or USB plug in.
★ You can still try to consider data security, except for the Sync methods, which are still secure.File Backup or Cloud Backup (with 1TB free cloud storage in 15 days) feature to move user profile.
#2: Move user profile to another drive with Windows built-in feature
Windows built-in Move feature in the Properties window of the Users folder can assist users in relocating their Users folder to another drive. To accomplish this, follow these steps:
Step 1. Create all the users folders you want to move, such as Documents, Desktop, Downloads, Pictures, Videos, and Music, on the target drive.
Step 2. To find the original Documents folder, go to C:\Users\[User] and look for it, or simply type %HOMEPATH% in the search box if you're unsure of the user name.
Step 3. Right-click the user profile folder, here is Documents, and then choose Properties.
Step 4. Click on the Location tab. Then click Move to select the Documents folder in the target drive.
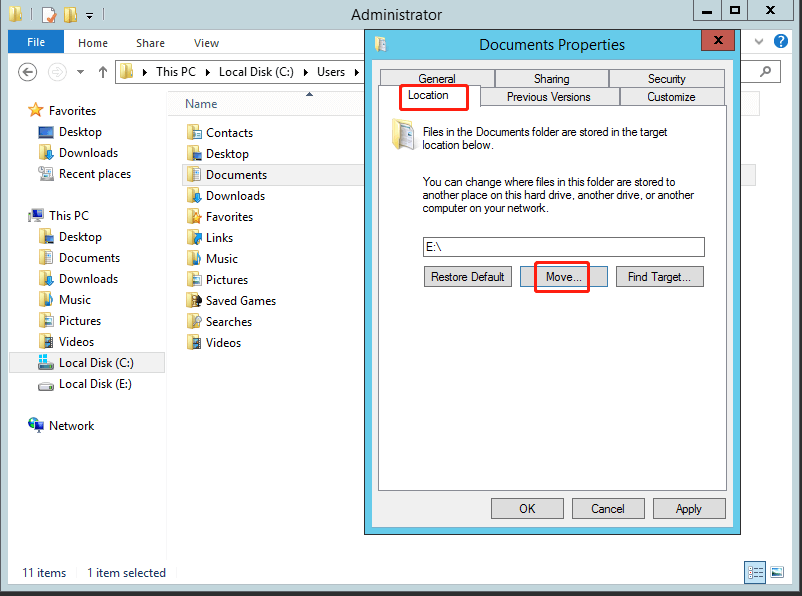
Step 5. If everything is correct, you can click Apply > OK to proceed.
To efficiently move a large number of folders to another drive, you can use the command line or a batch script to automate the process. This approach saves time and effort compared to manually moving each folder.
Summary
You can move the Users folder to another drive in Windows Server 2012 using two efficient methods. It's recommended to use Qiling Disk Master Server, which not only helps you move the folder but also performs continuous data protection.
You can sync your desktop to OneDrive and clone a hard drive in Windows Server using Qiling Disk Master, all while running operations in the background, allowing you to work without interruption.
Related Articles
- Windows 10 File Sharing Not Working - How to Resolve
What to do when Windows 10 file sharing not working? Try 6 solutions or its alternative to fix it easily. - How to Sync My Documents with Network Folder Easily
This article will tell you how to sync my documents with network folder via step by step guide. Continue to see below and get details. - How to Move My Documents to Another Drive in Windows 10
Are you looking for efficient ways to move My Documents to another drive in Windows 10? Read this article patiently to get the top two ways. - How to Sync Two Folders on Same Computer Easily
This article provides you with 2 reliable sync software and inllustrate how to sync two folders on same computer step by step. Learn more about them below! - How to Backup Files on NAS Drive to Cloud Drives in Windows 10/8/7?
How to backup NAS drive to cloud services? This article will provides you with the easiest way to backup files on NAS drive to OneDrive, Google Drive, Dropbox, etc. Please read on. - Best Way to Backup QNAP/Synology NAS to PC - Qiling Disk Master
This tutorial will show you how to backup from Network-attached storage (NAS) like QNAP NAS and Synology NAS to PC step by step with the help of free backup software.