Best Way to Convert FAT 32 to NTFS without Losing Data in Windows 7/10/11
Introduction of FAT 32 and NTFS
FAT32 and NTFS are two common file systems. FAT32 is widely supported by hard drives, DVD players, game consoles, and operating systems such as Windows XP, Linux, Mac, Android, and Windows Phone. However, FAT32 has important limits: a single file cannot exceed 4GB, and a partition cannot exceed 2TB.
If you need to convert NTFS back to FAT32 for device compatibility, this NTFS to FAT32 conversion guide covers the related task.
NTFS supports much larger files and partitions, making it a better choice for large storage needs. It is recommended by Microsoft and is used by Windows 7 and later systems. However, NTFS may not be supported by some devices, such as older game consoles or systems that do not recognize NTFS natively.
If you need to save a 10GB movie or another large file on a FAT32 drive, the file size limit will block the operation. Converting the file system to NTFS solves this problem and allows the drive to store larger files.
Convert FAT32 to NTFS using CMD
Step 1: Go to Start > All Programs > Accessories > Command Prompt.
Step 2: In Command Prompt, type "convert drive_letter: /fs:ntfs". Replace "drive_letter" with the actual drive letter, such as "E:" for the E drive. For example, type "convert E: /fs:ntfs" and press Enter.
Step 3: If prompted, enter the current volume label for the drive and press Enter. The conversion will start and change the file system to NTFS.
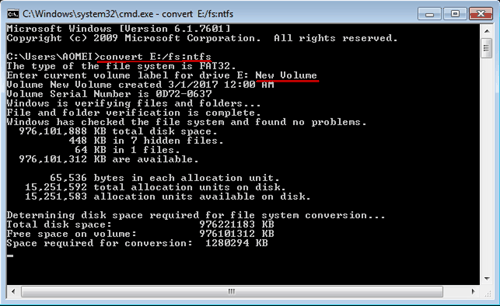
This method is relatively simple for experienced users, but Command Prompt is not always friendly for beginners. Before changing a file system, back up important data to avoid unexpected loss.
To convert FAT32 to NTFS without formatting, you can use Qiling Disk Master Professional. It can change the file system between FAT32 and NTFS on Windows XP, Vista, 7, 8, 10, and 11.
How to convert FAT32 to NTFS and keep data?
Step 1: Download this Qiling NTFS to FAT32 Convertor, install and run it. Click "Convert" in the top toolbar, and choose "Convert to NTFS/FAT32".
Step 2: Select the partition you want to convert from the list and click "Next". After the conversion finishes, open Disk Management to verify the file system.
After the steps are complete, the partition is converted to NTFS without requiring a reboot. This method also works for USB drives and external hard drives as long as Windows can recognize them.
Qiling Disk Master also provides other disk management features, such as converting disks between MBR and GPT, making it useful for broader partition and disk maintenance tasks.
Related Articles
- What is NTBackup and How to Use It in Windows 10/8/7?
NTBackup is a built-in tool in early Windows OS and has been replaced since Vista. But you can still use it in Windows 10 if you have BKF files to restore. - How to Transfer Data from One Hard Drive to Another | Best Way
Learn how to Transfer Data from One Hard Drive to Another | Best Way with clear steps, key checks, and practical tips. - How to Fix VSS Writer Waiting for Completion in Windows Server
If you're experiencing the 'VSS waiting for completion' error on Windows Server 2008, 2012, or 2016, you can find solutions in this article to resolve the issue. - How to Create Scheduled Backups to Shared Network with Wbadmin?
With the increasing number of data on your PC or server, data safety becomes very critical. It is time to use Wbadmin to create scheduled backups to a network share or pick powerful backup software to do so. - How to Defragment Partition and Hard Drive?
Before using Partition Assistant, defragment the partition you want to resize to help improve operation stability. - How to Delete Everything on a USB Flash Drive [Completely]?
This post shows how to delete everything on a USB flash drive (completely), even when you can't delete files from USB due to write protection or something else.
Products
Articles & Tutorials
- Data Recovery
- Data Backup
- File Recovery
- File Backup
- File synchronize
- System Backup and Restore
- Disk and Partition Clone
- Technical articles
- Disk Master Help
- Windows Deleted File and Disk Recovery Tutorials
- Windows File and Data Recovery Tutorials
- More Windows Tutorials for Install, Security, Files, and PC Tips
- Windows Boot, Repair, and Recovery Environment Tutorials
- Windows Backup Tutorials
- Windows Restore Tutorials
- Windows Clone and Migration Tutorials
- Windows Server Backup, Recovery, and Management Tutorials
- Windows Disk, Partition, and Storage Management Tutorials