Fixed: 100% Disk Usage on Windows 10 Task Manager (Update)
Disk Usage at 100% on Windows 10/11 Task Manager
You may experience lag and slow startup times, particularly with Windows PowerShell and launching commands within it. This is often accompanied by a sudden spike in disk usage, from 0-1% to 50-100%+, despite minimal usage from various programs, which can be frustrating and impact productivity.
It sounds like you're experiencing a delay or lag when launching Windows PowerShell, starting up Windows, or loading other programs and applications. This can be caused by various factors such as a slow hard drive, insufficient RAM, or a malfunctioning system component.
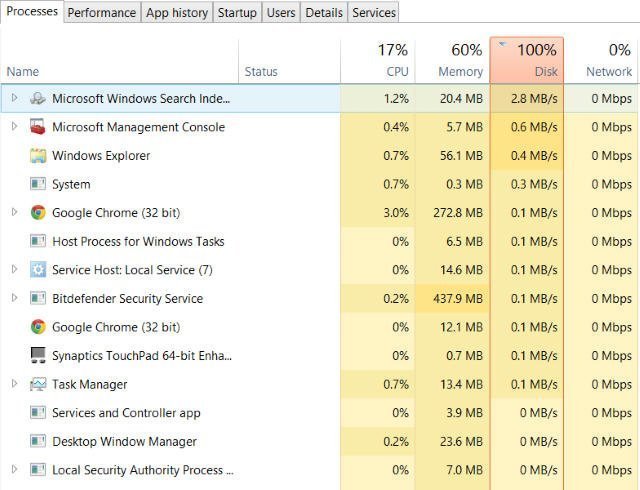
Upon booting up my Windows 10/11 computer, the mouse cursor is responsive, but all other interactions are unresponsive. Attempting to access the Start menu takes an unusually long time, about a minute. Notably, the Task Manager shows 100% disk usage, while the CPU usage is relatively low at 17% and memory usage is at 60%."
The disk usage at 100% in Windows 10/11 can be caused by various factors, such as system file corruption, malware, or resource-intensive programs running in the background. Restarting the system may temporarily resolve the issue, but it can recur due to underlying problems. To troubleshoot, check for system updates, run a full disk cleanup, and scan for malware. Additionally, consider disabling startup programs or services that may be consuming excessive resources. If the issue persists, consider running a System File Checker (SFC) scan or a System Restore to a previous point when the issue was not present.
About Disk Usage on Your Computer
The "Disk Usage is at 100%" in the Task Manager can occur due to various reasons, such as running low on disk space, having high disk usage by a specific program or process, or experiencing issues with disk fragmentation.
Why Get 100 Disk Usage on Windows 10 Task Manager?
Windows 10/11 100% disk usage issue can be caused by various factors, including antivirus software, Windows bugs, SuperFetch Service problems, unreasonable virtual memory, Flash issues, and combinations of Skype and Google Chrome usage, as well as hard drive errors.
Sometimes, there is just nothing that goes wrong on your computer, except for some settings.
How to Fix 100% Disk Usage on Windows 10/11 Accordingly?
If your Disk Usage is at 100% in the Task Manager, try the following methods until one of them works. You can try to identify and close resource-intensive programs, disable unnecessary startup programs, check for malware, update your operating system and drivers, and run a disk cleanup and disk defragmentation to free up space and improve disk performance.
- Method 1. Disable Antivirus Software temporarily
- Method 2. Change the settings in Google Chrome & Skype
- Method 3. Using Control Panel to uninstall all Browsers
- Method 4. Disable SuperFetch Service
- Method 5. Fix StorAHCI.sys driver
- Method 6. Disable Windows Search
- Method 7. Upgrade Device Driver
- Method 8. Reset Virtual Memory
- Method 9. Perform a Disk Check
Method 1. Disable Antivirus Software temporarily
If your disk usage is at 100% on Windows Task Manager, check if you've installed antivirus or anti-malware programs like Norton, Kaspersky, AVG, Avast, or Malwarebytes. If so, temporarily disable them as per their user manuals to see if it resolves the issue.
Method 2. Change the settings in Google Chrome & Skype
100 percent CPU usage on Windows 10/11 may be caused by a combination of Skype and Google Chrome, so you can try adjusting their settings.
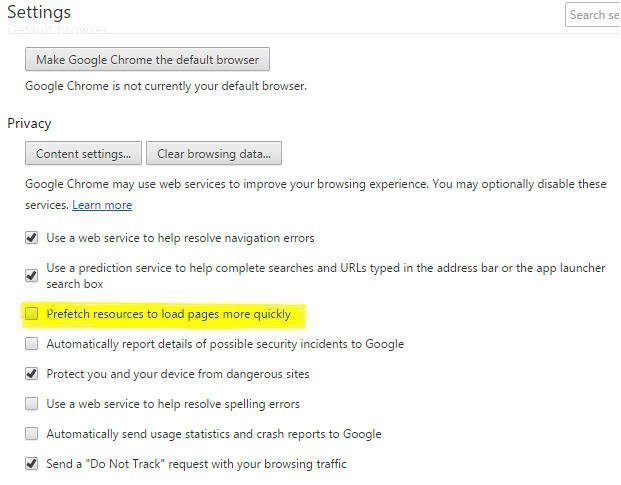
- Google Chrome
In Google Chrome, go to Settings > Show Advanced Settings... > Privacy > Prefetch resources to load pages more quickly, untick it.
- Skype
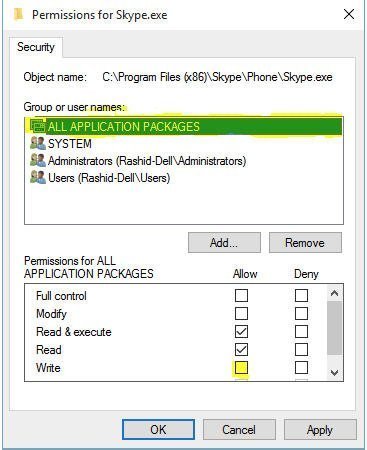
To resolve the issue, exit Skype and ensure it's not running in the Taskbar. Then, open Windows Explorer and navigate to the folder C:\Program Files (x86)\Skype\Phone\. Right-click on the Skype.exe file, select Properties, and click Edit on the Security tab.
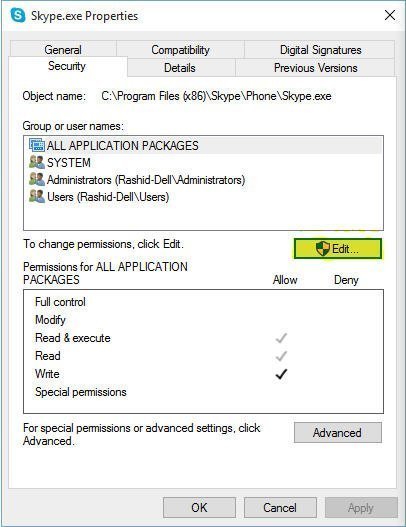
To enable writing to all application packages, select "ALL APPLICATION PAKAGES" and check the box next to "Write". Then, click "Apply" and "OK".
After running the process, start Skype and check the Disk Usage in Task Manager, which should no longer show 100% disk usage on Windows 10.
Method 3. Using Control Panel to uninstall all Browsers
To resolve high disk usage on Windows 10/11, consider uninstalling all browsers except Edge and IE, to isolate the issue with plugins. Alternatively, remove plugins one by one from each browser and test to identify the problematic plugin. Adobe Flash and Shockwave Player are common culprits of high disk usage.
To resolve the issue of browsers crashing or freezing, you can uninstall and reinstall them. This process is quick and easy, taking only seconds. After uninstalling, delete the temporary files, including those in the 'Temp', '%Temp%', and 'Prefetch' folders. Once done, restart your system and check if the problem is resolved. If it is, wait for 10-15 minutes to ensure the issue doesn't recur before reinstalling the browsers.
Method 4. Disable SuperFetch Service
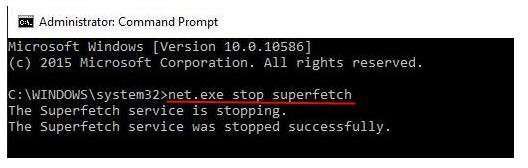
Although SuperFentch can help to decrease the boot time and make must-load programs more efficiently, it is another potential cause of disk performance issues. Thus, when you meet the problem that Windows 10/11 disk usage at 100%, you can stop the service:
Press Windows + X, choose Command Prompt (Admin), type "netsh int ip add 192.168.1.
net.exe stop superfetch
If your computer is experiencing a slowdown, you can try restarting it to see if that resolves the issue. If the problem persists, you can try running a disk cleanup and disk defragmentation to free up space and improve performance.
Method 5. Fix StorAHCI.sys driver
The Windows 10/11 100% disk utilization problem may also be caused by some Advanced Host Controller Interface PCI-Express(AHCI PCIe) models running with the inbox StorAHCI.sys driver due to a firmware bug. This needs to be checked as a potential cause.
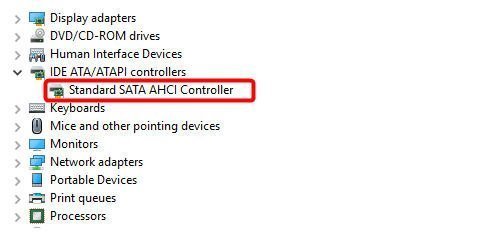
Press Windows + X simultaneously, choose Device Manager.
Expand the IDE ATA/ATAPI Controllers category, double-click the AHCI Controller.
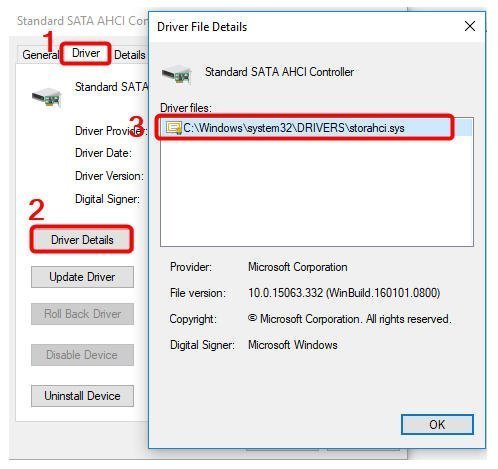
To resolve the issue, click on the Driver tab and then select Driver Details. If you see storahci.sys stored in the system32 folder, it means you are running the inbox AHCI driver, which needs to be fixed.
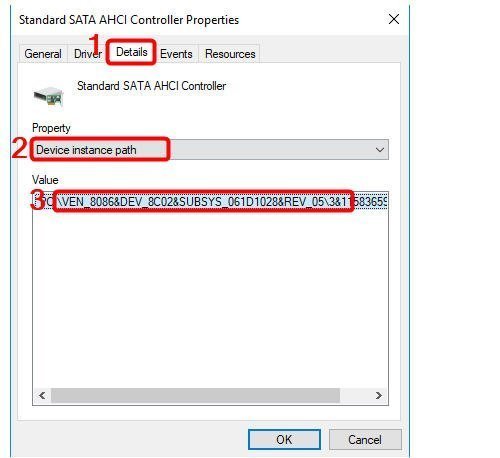
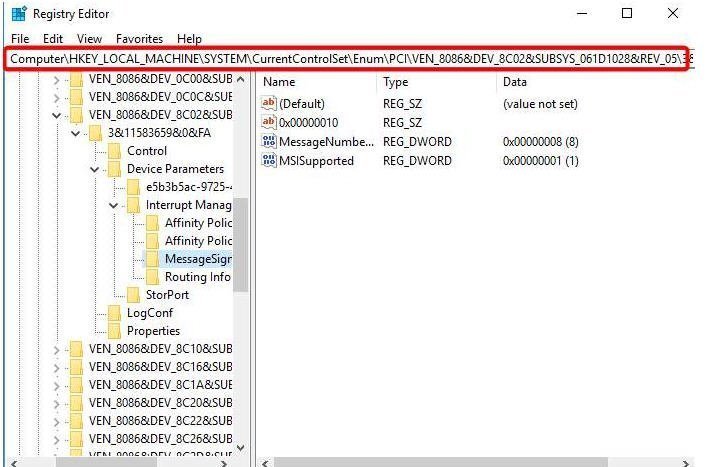
The AHCI Controller Properties window is opened, and the "Details" tab is clicked. The "Device instance path" is selected under "Property", and the path starting from "VEN_" is noted. The "OK" button is clicked.
To enable the Windows 10 Game Bar, you can follow these steps: Click Start, type regedit in the search box and hit the Enter key. Then, go to HKEY_CURRENT_USER\Software\Microsoft\Windows\CurrentVersion\GameBar and change the value of AllowGameBar to 1. This will enable the Game Bar.
HKEY_LOCAL_MACHINE\System\CurrentControlSet\Enum\PCI\\\Device Parameters\Interrupt Management\MessageSignaledInterruptProperties
- refers to the name of AHCI Controller.
- differs on different machines.
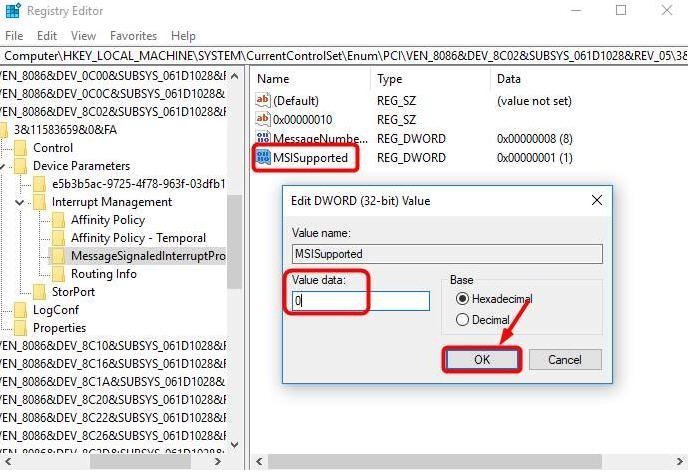
Double-Click on the "MSISupported" field, select the "Value" field from the dropdown, and set the value to "0". Then click "OK".
After that, restart your computer.
Method 6. Disable Windows Search
To determine if Windows Search is causing 100% disk usage on Windows 10/11, temporarily disable Windows Search, which will restart automatically after a computer restart.
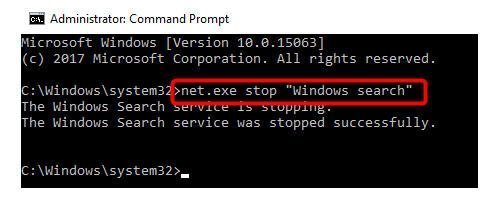
1. Press Windows key and Xsimultaneously, selectCommand Prompt (Admin).
2. To stop Windows Search, type "net.exe stop "Windows search"" and hit Enter in the command prompt.
To check if disabling Windows Search improves your computer's performance, go to Task Manager to see if your disk usage has decreased. If it has, you can permanently disable Windows Search by following the steps.
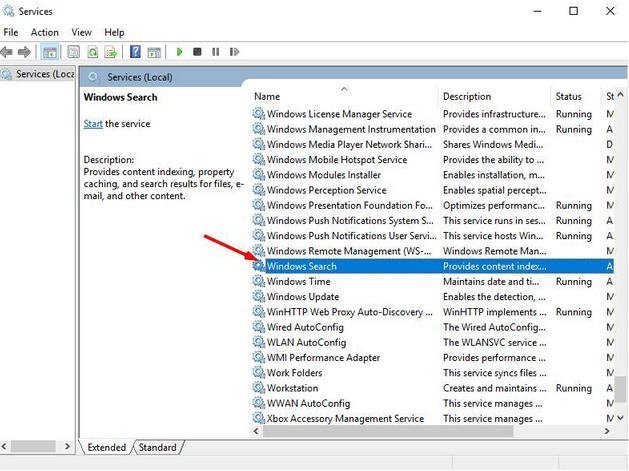
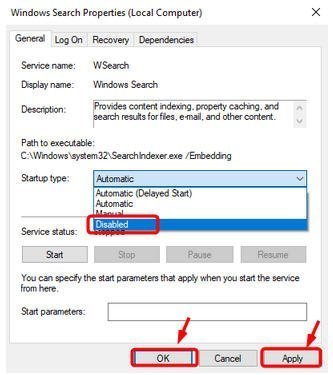
1. Press Windows key +R, type in services.msc.
2. Locate the Windows Search option, double click it to open its Properties window.
3. To disable a startup item, open the Properties window, select Disabled under Startup type, click Apply and OK.
Method 7. Upgrade Device Driver
Upgrading device drivers can help resolve the 100% disk usage issue. This can be done through Windows Update, by downloading from the manufacturer's website, or using a free driver update software.
Method 8. Reset Virtual Memory
Virtual memory is a portion of your hard drive that acts as an extension of your computer's physical memory. It can also be a cause of the 100% disk utilization problem. To resolve this issue, you can try resetting your system.
1. Open the Control Panel, click on System and Security, then select System. From the System window, click on Advanced system settings.

2. In the pop out window, select Advanced -> Settings. Then, go to the Advanced tab in the second pop up window, and select Change... in the Virtual memory section.
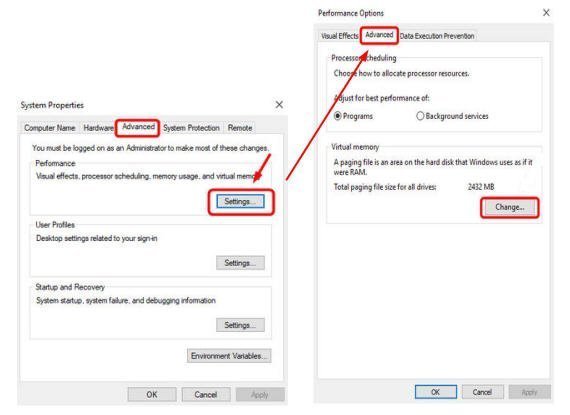
3. To adjust the virtual memory settings, ensure that "Automatically manage paging file size for all drives" is unchecked. Select the drive where Windows 10 is installed, and set both the "Initial size" and "Maximum size" for virtual memory. After that, click "Set" and then "OK" to confirm the changes.

Notes:
- The initial size varies depending on your computer, so if you're unsure, just enter the number from the Recommended category.
- The maximum size of virtual memory should be set to about 1.5 times the size of the physical RAM, so for a PC with 4 GB (4096 MB) of RAM, it should be no more than about 6,144 MB.
4. To clear your computer's 'temp' files, press Windows+ R, type 'temp', and hit Enter. This will open the Temp folder in Windows Explorer, where you can select all files and delete them.
Method 9. Perform a Disk Check
100% disk usage on Windows 10 may also be caused by hard disk errors, which can be resolved by performing a disk check using Windows CHKDSK or third-party software like Qiling Disk Master Standard, allowing for a check of a single partition or the entire disk with ease.
The software offers customizable checks based on partition and disk type, is free of bundled software, and can be downloaded without any cost.
- Check Partition
Step 1. Install and launch Qiling Disk Master, right click the partition you want to check, and select Advanced -> Check Partition.
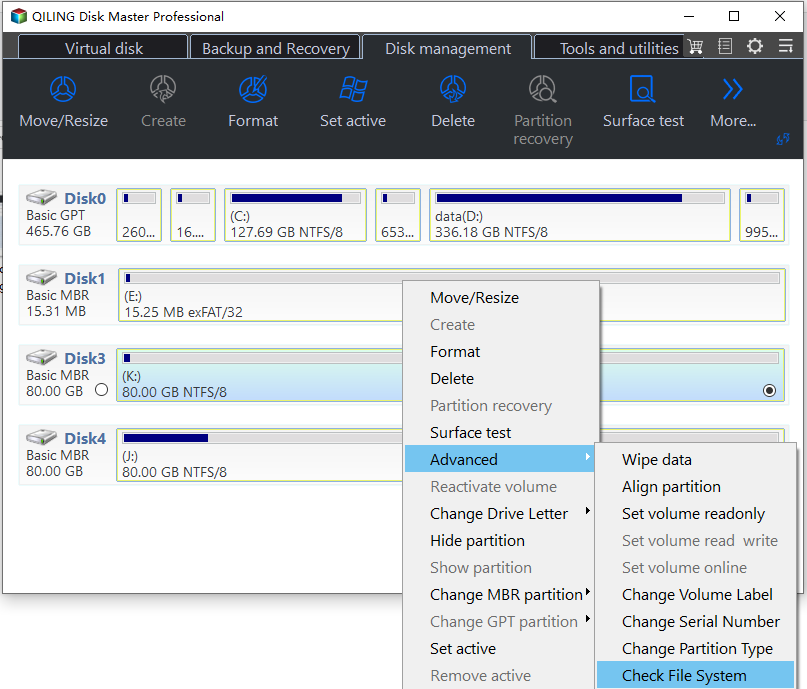
Step 2. Choose a way to check partition and fix errors, click OK to return to the main interface and click Apply in the toolbar.
- Check Disk
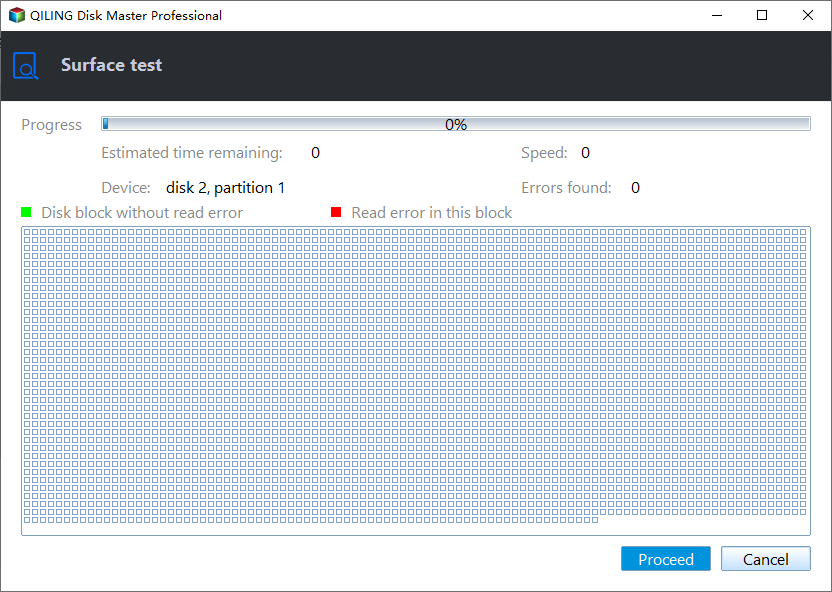
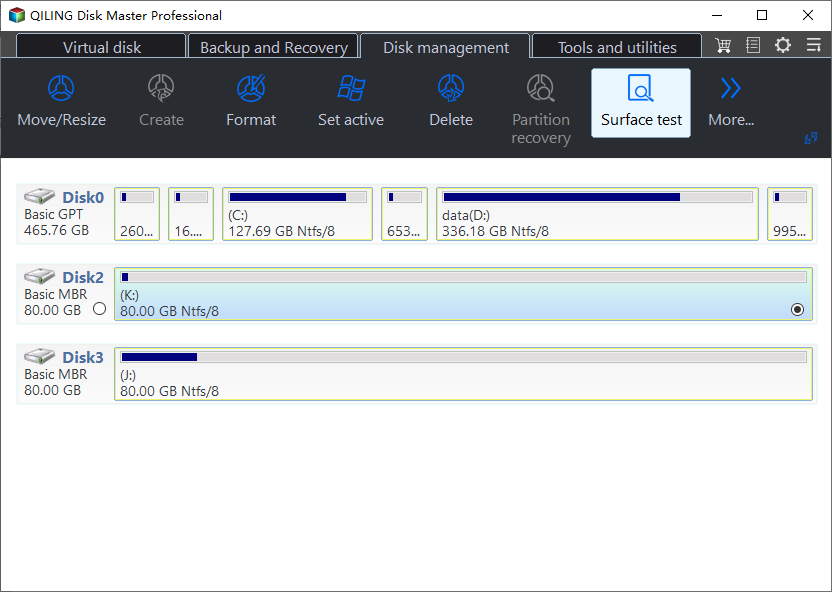
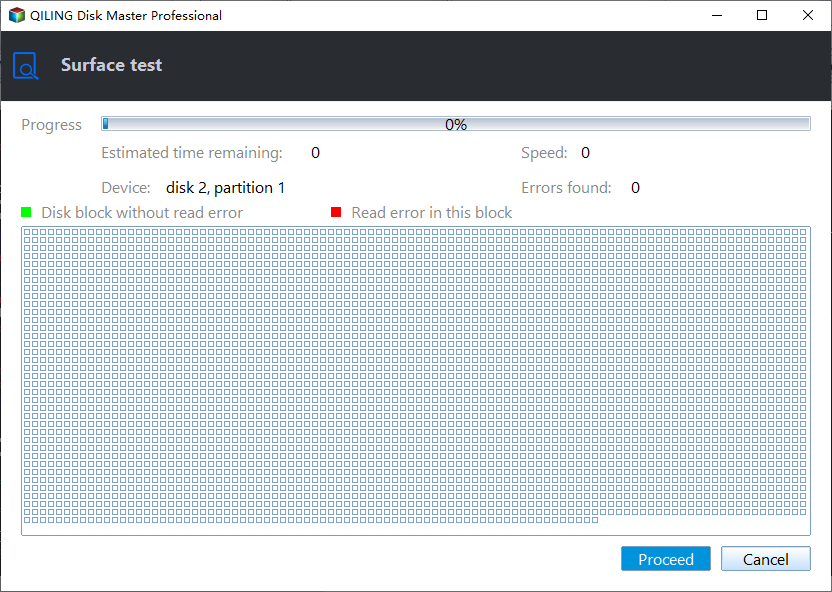
Step 1. Click the hard disk, select Test > Disk Surface Test.
Step 2. The Disk Surface Test will show you the Disk Surface Test window, where you can click the "Start" button to initiate the test and progress.
Qiling Disk Master Standard is a versatile tool that allows users to manage hard drive partitions effectively, even for those without technical expertise. It also offers an upgrade option to Qiling Disk Master Professional, which provides additional advanced features, including lost partition recovery and the ability to convert an MBR system disk to GPT without data loss.
Summary
Upgrading firmware for SSDs can help resolve the 100% disk usage issue on Windows 10/11, as it may be related to firmware problems with the SSD.
To address the issue of Windows 10 freezing or becoming unresponsive, you can try disabling Windows Notification, switching to a high performance power plan, upgrading your memory (RAM), or performing a clean boot. If you have found another effective solution, you can share it in the comments section, and the page will be updated accordingly.
Related Articles
- Solved: Lenovo Laptop Running Slow Windows 10
If your Lenovo laptop running slow, you need to read this article for why Lenovo laptop running slow on Windows 11/10/8/7 and how to speed up Lenovo laptop. - C: Drive Is Full, How to Empty It? (5 Methods)
The C drive is full and how to empty it? Here, 6 different ways are provided so you can resolve this issue easily and effectively by freeing up or extending storage space. - How to Format SD Card in Windows 10, 8, 7?
Format SD card in Windows 10, 8, 7 for your camera, phone, and other digital devices. - Tricks to Free Space on System Partition on Your PC
If you're running low on space on your system partition in Windows 10, 8, or 7, don't worry! There are some tricks to help you effectively free up space on your system partition. - How to Fix USB Flash Drive Not Detected in Windows 10/8/7?
This article provides a solution to the issue of a USB flash drive not being detected in Windows 10/8/7. It explains why this problem occurs and offers a simple and easy-to-follow guide to resolve it. - No Free Memory-How to Increase Memory of C Drive?
Find your computer works slower and slower? It's time for you to increase memory of C drive. Get effortless methods from this page.