Enable or Disable Offline Files in Windows 10 | Use it Correctly
What is offline files in Windows 10?
The offline files feature in Windows 10's Sync Center allows you to keep copies of network files always available offline on your computer, enabling you to work with them even when the server is slow, not connected, or unavailable.
Offline data is saved to the Offline Files folder at C:\windows\CSC. This folder contains data that was made offline, but is limited to the local system. Network folders, on the other hand, are empty online-only if the computer is not connected to the network drive.

In addition to enabling offline files in Sync Center and Always Available Offline mode, your network files may also be offline in various situations, such as when enabled in Sync Center and Always Available Offline mode, or when the network connection is lost or the file is not available on the network.
- The connected server is unavailable.
- The network connection is slower than a configurable threshold.
- Work offline mode is enabled in File Explorer
Why should you enable offline files in Windows 10?
Enabling offline files in Windows 10 offers two primary advantages. It allows you to make an exact copy of network files you want to protect and work with, providing a safeguard against potential network disruptions. Additionally, you can access and view these files at any time, even when your computer is not connected to the network and server, making it a convenient feature for remote work or areas with unreliable internet connections.
To sync files with the offline files folder or Sync Center, start by enabling offline files and activating the Offline Files folder. This will allow you to manage offline file disk usage, schedule syncs, and more.
How to enable or disable offline files in Windows 10
To enable offline files, ensure that the Windows Features are up-to-date and that the Group Policy Editor is set to allow offline files. Additionally, ensure that the user account has the necessary permissions to access the shared folder.
1. To sync network files and folders, create a shared folder and save all desired files and folders within it. Note the path, typically represented by two backslashes followed by the IP address or hostname, and the shared folder name. This path will be used for syncing.
2. To map a network drive to your local computer, you can use it as a local drive like any other drive (e.g. C:) on your computer.
If you're having trouble syncing a network drive to a local drive, you can follow these steps to resolve the issue.
To map a network drive, open "This PC" and select "Map network drive" under the "Computer" tab. In the pop-up window, enter the path of your shared folder and click "Finish" to complete the process.
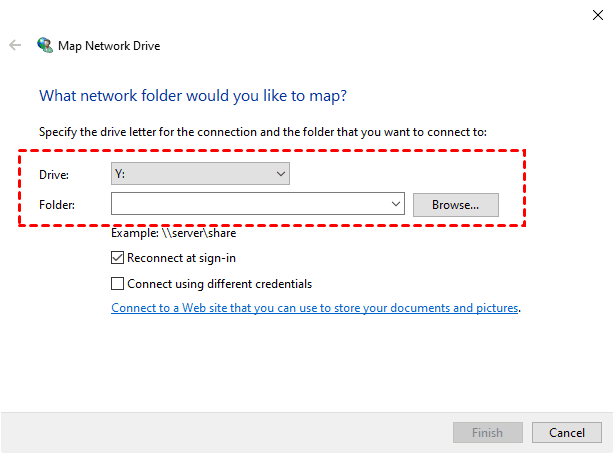
To access files on a mapped network drive, go to the mapped network drive, also called the offline files folder or its subfolder, right-click the files or folder you want to access at the local computer and select "Copy" or "Paste" to copy them to your local computer. Alternatively, you can also click on the files or folder and drag them to your local computer. Always available offline option from the context menu.
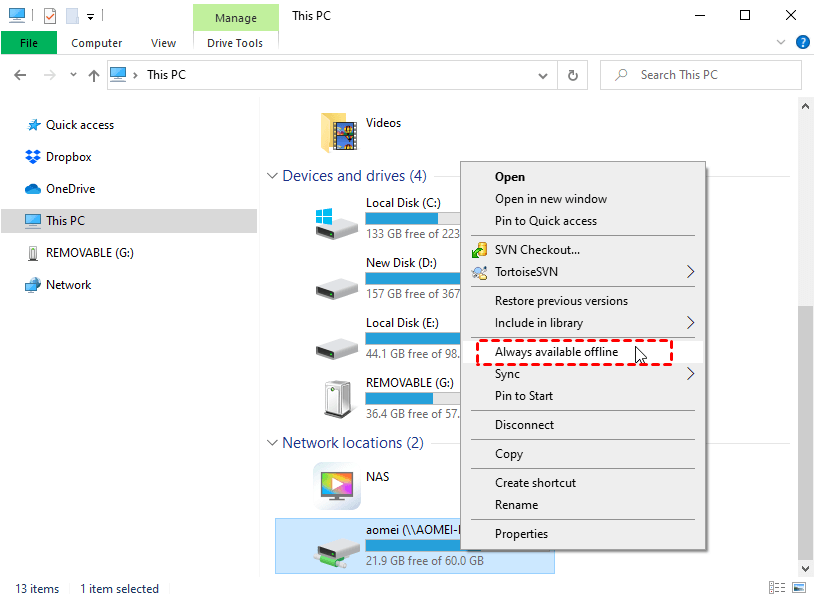
After that, it will start to prepare and make these files available offline, displaying the message "your files will be available offline", and then you can wait and disconnect your network drive after the task is complete.

You can turn on or off offline files in Windows 10 (also applicable in Windows 7 and 8) using one of three commonly used methods.
Method 1: Configure offline files in Windows 10 by Sync Center
Step 1. To access the Sync Center, go to the Control Panel, switch the view to "Large icon" or "Small icons", and click on Sync Center to open it.
Step 2. To access the Offline Files window, click on "Manage offline files" and you will be able to enable or disable offline files.
Step 3. To enable offline files, click "Enable offline files" under the General tab, then restart your computer. This will allow you to access network files even when your computer is offline.
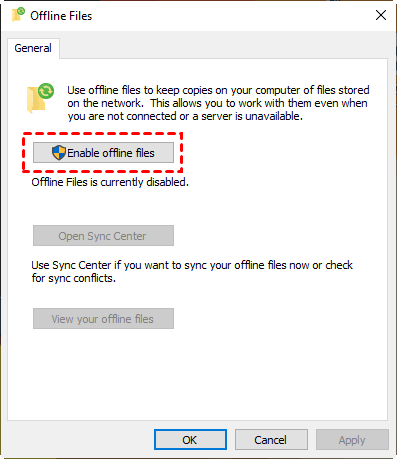
After enabling offline files in Windows 10, you can manage other settings such as disk usage, encryption, and network options.
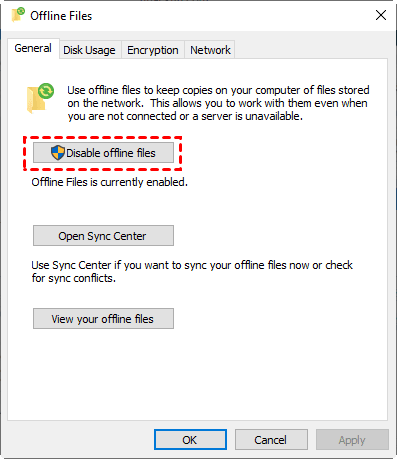
Step 4. To disable offline files, click "Disable offline files" in the Offline Files window, which will change to this option after enabling offline files.
Method 2: Enable/Disable offline files in Windows 10 using GPO
Step 1. Type group policy in the search box and then select group policy editor from the start menu list.
Step 2. Go to Computer Configuration > Administrator templates > Network > Offline Files key
Step 3. To enable or disable offline files, scroll down the Offline Files Setting and double-click "Allow or Disallow the use of Offline Files", then select your desired option.
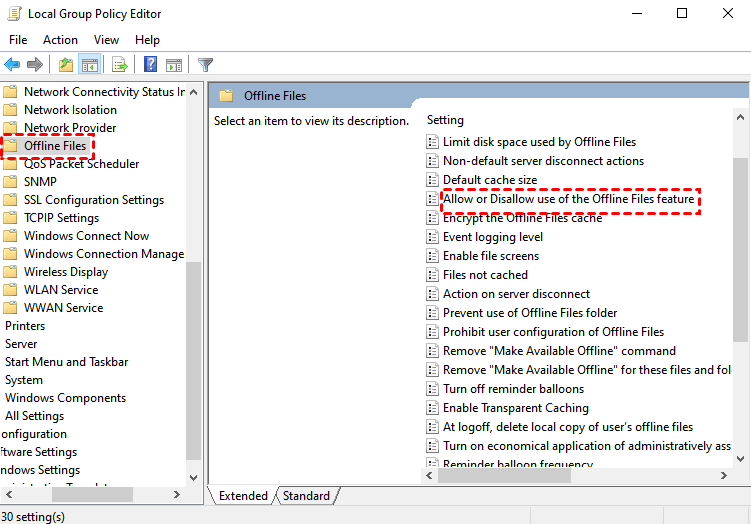
Step 4. To enable offline files, select Enabled in the next window.
Step 5. To disable offline files, select Disabled in the next window.
Method 3: Enable/Disable Offline Files in Windows 10 using Registry
Step 1. Open registry editor by typing registry in the search box and selecting it.
Step 2. To add the "Start" DWORD value to the CSC and CscService keys, go to the path in order, right-click on the blank area, select "new" and choose "DWORD (32-bit) Value" for 32-bit systems or "DWORD (64-bit) Value" for 64-bit systems, and set its name to "Start".
HKEY_LOCAL_MACHINE\SYSTEM\CurrentControlSet\Services\CSC
HKEY_LOCAL_MACHINE\SYSTEM\CurrentControlSet\Services\CscService
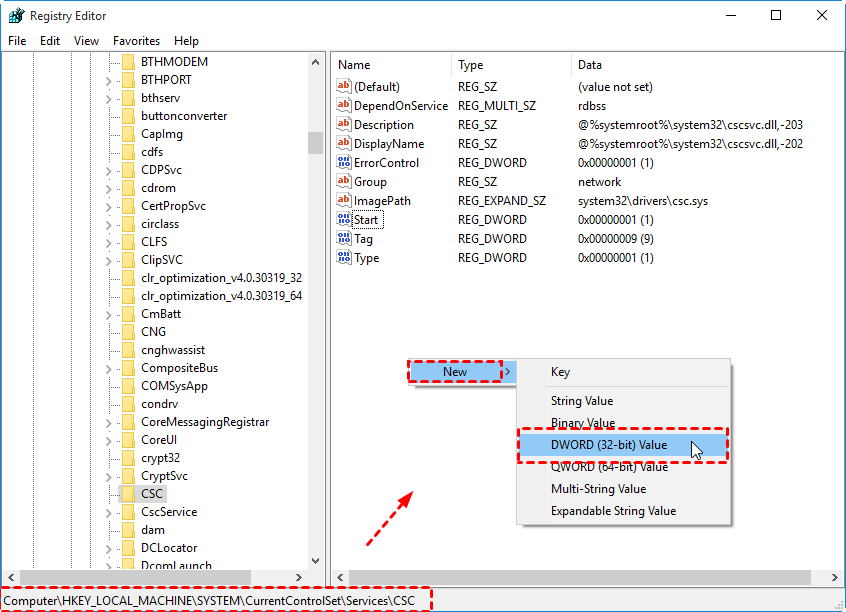
Step 3. To enable offline files, set the start value of CSC and CscService to 1 and 2 in order.
Step 4. restart your computer and make changes available.
Step 5. To disable offline files, set the start value of CSC and CscService to 4, then restart your computer to save changes.
If you're having trouble enabling offline files in Windows 10, you can try the solutions outlined in my previous article, "Windows 10 Sync Center Not Working - Fix or Replace It," which may help resolve the issue.
How to sync offline files in Windows 10
In Windows 10, you have two options for offline files sync: manually syncing offline files, or setting up automatic syncing. To sync offline files manually, you can follow detailed steps, while to sync offline files automatically, you can also follow detailed steps.
Method 1: Sync offline files manually
Step 1. Go to File Explore > This PC > network locations, then select the mapped network drive created in advance.
Step 2. Right-click folders which contain offline files, then select Sync > Sync selected offline files.
Method 2: Sync files automatically
Step 1. Open Sync Center again.
Step 2. To sync network files to a local computer, click on the Offline Files folder, which will display all shared folders for offline files sync. From there, you can either click "Sync" to immediately sync the network file to the local computer or click "Schedule" to set up automatic syncing.
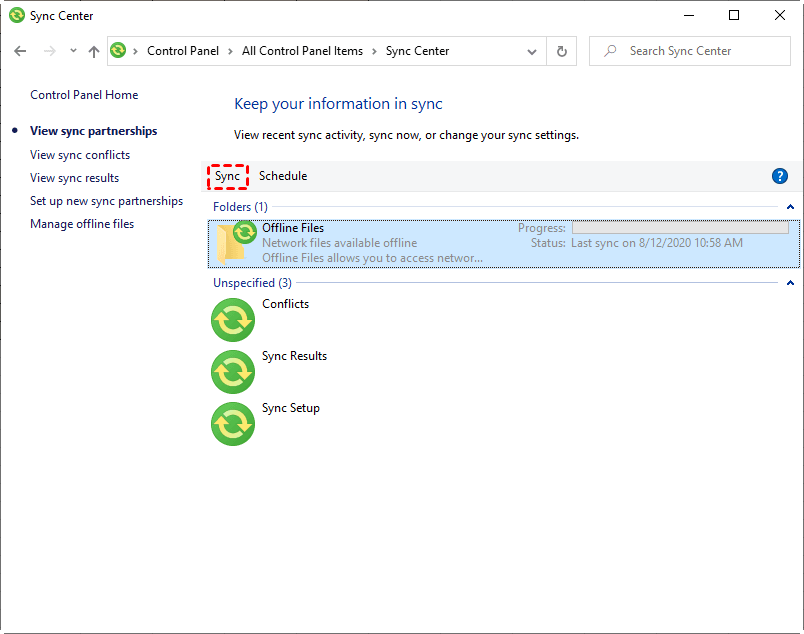
To view your files, simply double-click the shared folder you see (for example, Documents) under the Offline File folder.
Conflicts in syncing files - how to fix
If certain files don't sync, you might see conflict files in Offline Files. This happens when you edit a file offline and someone else edits the same file on the network, causing a conflict. Don't worry, it's an easy fix.
Step 1. To resolve sync conflicts, go to Sync Center, click on "View sync conflicts" on the left panel, and you will see a list of conflict files.
Step 2. After a conflict occurs, right-click the affected files and select "View" to review the options. You can then choose to keep the version you created while away, keep the version edited by someone else on the server, or keep both versions and rename the one you created.
Step 3. Sync files with Sync Center again.
In Windows 10, you can use offline files to sync network files locally, allowing you to access and work with them at any time, even without an internet connection, after making them offline on your computer. This feature is particularly useful for users who need to work with network files.
The process of syncing files can be complex and may cause dizziness, especially for first-time users. Additionally, syncs may not always go smoothly, resulting in errors like offline file conflicts, access denied, and sync pending.
Then, is there any easier way to sync network files and make it offline in Windows 10? Absolutely yes, you can use a powerful file sync software to complete this task in simple steps. And I will introduce you to one of the best software I have found in the next part.
Easier way to sync network files and make it offline in Windows 10
Offline files can refer to two things: a folder that stores synced files from the network to your local computer, or a file that's saved on your device rather than being shared on a network. In essence, after syncing, you'll have two copies of a file - one on the network and the other on your computer.
You can easily complete this task with the help of a reliable file sync software, such as Qiling Disk Master Standard, which offers several advantages.
|
📂 Basic Sync |
It enables direct syncing of files from a source to a destination, such as syncing network files to a local computer. |
|
⏰ Schedule Sync |
"Schedule Sync" helps users sync changed or newly added files on a daily, weekly, or monthly basis, and also allows them to set backup data, time, and intervals. |
|
🗑 Sync Deletions |
Its Options feature allows you to synchronize deletions from the source directory to the destination. |
|
💻 Compatibility |
It's compatible with Windows 7/8/8.1/10/11/XP/Vista. |
|
🍀 Clean Interface |
The software has a clean and user-friendly interface, making it easy for even beginners to navigate and complete tasks efficiently. |
This software allows you to backup files to an external hard drive or local disk, compressing them into an image file that can only be restored, thus protecting your data from loss.
To sync network files to your local computer automatically, you can use Qiling Disk Master Standard. First, download and install it on your computer, or try its Server edition for syncing files between Windows Servers. Once installed, you can start syncing network files to your local computer with ease.
Step 1. Launch Qiling Disk Master Standard, click Backup and recovery and File Sync in toolbar.
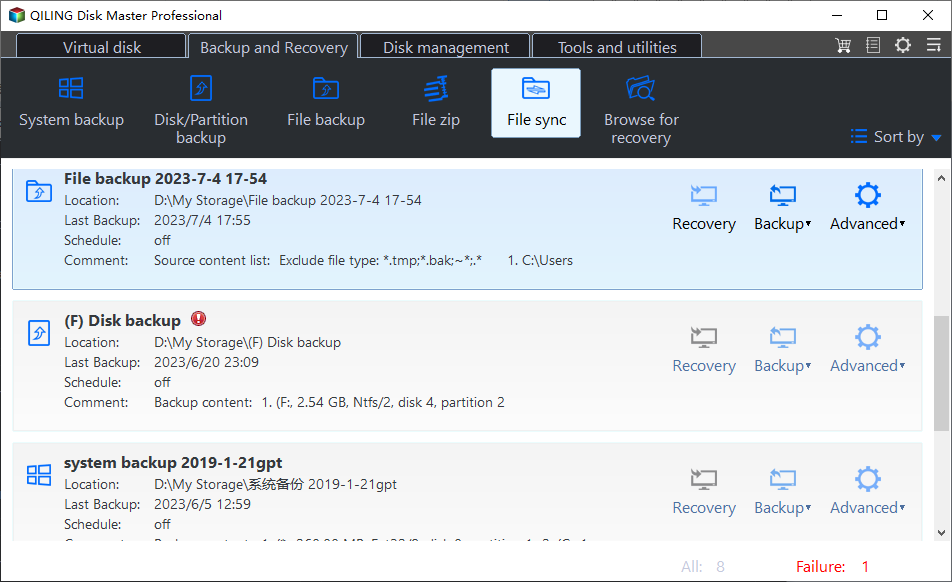
Except for Basic Sync, you can also use the following 3 sync solutions in the advanced version:
❤ Real-Time Sync is a feature that synchronizes files and changes instantly once detected, ideal for users who frequently update files or need real-time sharing.
❤ Mirror Sync ensures that files or folders in the destination remain identical to those in the source, preventing unauthorized modifications or malicious changes, such as viruses.
❤ Two-Way Sync ensures that all changes in the source directory are synchronized to the destination, and vice versa.
Step 2. Select your folder on network drive.
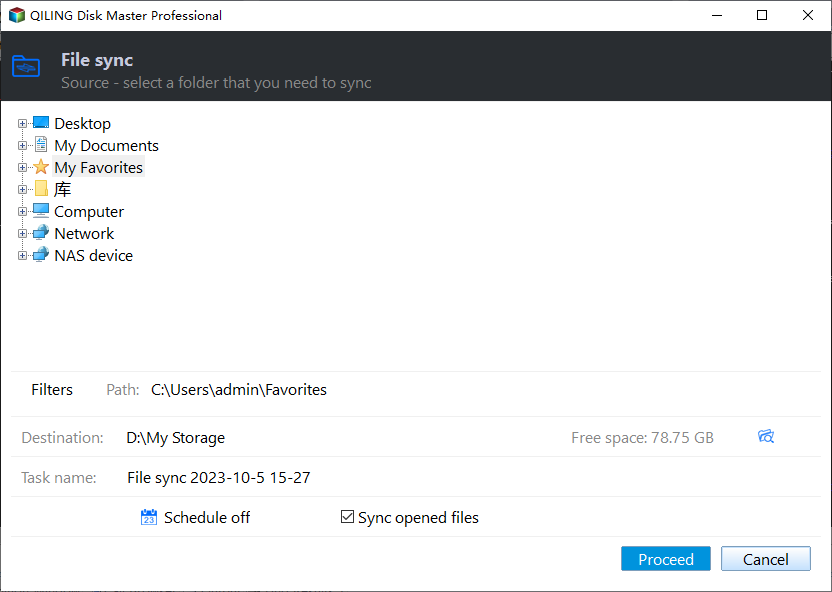
If this is the first time to sync network files, To add a network location, click "Add Share or NAS Device" in the window that appears, then enter the IP address, username, and password for the network location, and save the information.
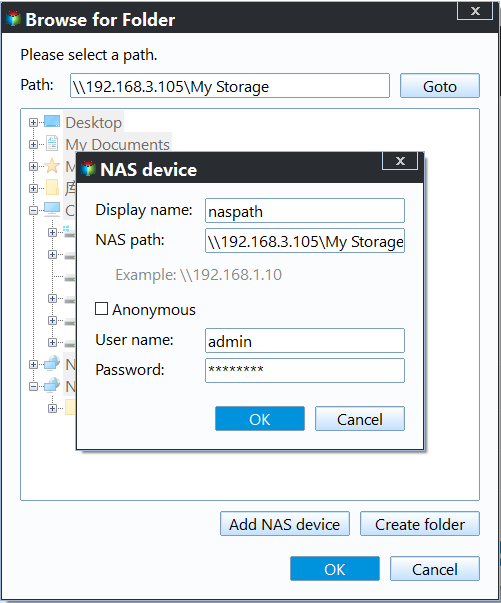
Step 3. Then, click the folder-shaped button to select a local drive to receive your network files.
Step 4. To adjust the task's flexibility, click on "Schedule Sync" and choose the sync frequency that suits you best. You can also specify the backup date, time, and intervals as needed.
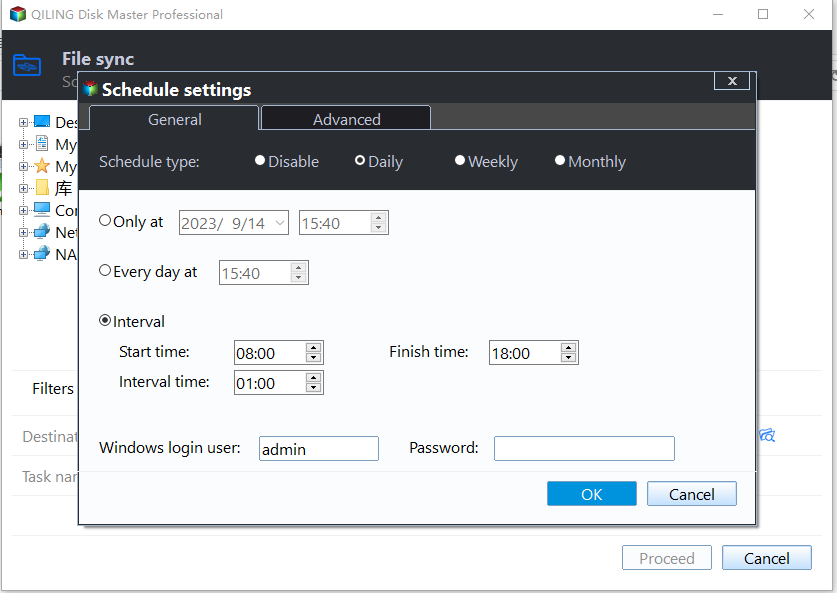
Tips:
❤ Wake the computer to run scheduled task: It is to wake your computer from sleep or hibernate mode and then automatically perform this task 2 minutes later.
❤ After the scheduled task is completed, the computer will shut down, restart, sleep or hibernate:This pre-set option allows you to step away during the sync task without any concerns, ensuring a seamless and uninterrupted process.
Step 5. Finally, confirm the file sync process and click Proceed to sync network files locally in Windows 10.
Notes:
❤ Don't modify the source folder name, otherwise the sync task will fail.
❤ Large files over 4GB cannot be synced to FAT/FAT32 partitions because FAT/FAT32 only supports file sizes up to 4GB.
❤ If you have any other questions, feel free to visit the FAQ page about Qiling File Sync.
❤ Besides syncing network drives to local drives, you can also sync local folders to cloud drives or other storage devices. For free users with limited cloud storage, it's recommended to create a cloud backup using Qiling Cloud, which offers 1TB of free space for 15 days.
Conclusion
The Offline Files feature in Windows 10 allows users to work with network shared files even when they're offline, and can be enabled or disabled depending on individual needs.
You can also try syncing files using a file sync software, which supports syncing any files on the network drive to your local computer in just 5 simple steps. You can customize the sync frequency, such as syncing daily, and in advanced versions, you can enjoy features like Real-Time Sync, Mirror Sync, and Two-Way Sync.
You can add an extra layer of protection to your files by using the File Backup feature. This feature saves your files as an image file, making them inaccessible unless you restore them from the backup. Additionally, you can download the backed-up files for your convenience.
Related Articles
- Top Two Ways to Set up One-way File Sync in Windows 7/8/10
- Freeware to Sync Files Between 2 Computers on the Same Network
- How to Sync Data between 2 Servers Automatically
- Samsung PC Auto Backup -Wireless Photo Transfer
One-way file sync is a method of synchronizing files from one location to another, typically from a source to a destination, without making any changes to the. - 5 Easy Ways to Fix SFC SCANNOW Stuck
Learn how to 5 Easy Ways to Fix SFC SCANNOW Stuck. This guide explains the causes, steps, and practical tips for sfc scannow stuck, sfc scannow fails, sfc scannow stuck at 73 on Windows with Qiling Disk Master. - How to Restore SQL Database from Bak File? (3 Methods)
After completing the backup successfully, you can restore SQL database from bak file any time you need. In this post, you will find 3 methods to do this, including SSMS, T-SQL query and command line.
Products
Articles & Tutorials
- Data Recovery
- Data Backup
- File Recovery
- File Backup
- File synchronize
- System Backup and Restore
- Disk and Partition Clone
- Technical articles
- Disk Master Help
- Windows Deleted File and Disk Recovery Tutorials
- Windows File and Data Recovery Tutorials
- More Windows Tutorials for Install, Security, Files, and PC Tips
- Windows Boot, Repair, and Recovery Environment Tutorials
- Windows Backup Tutorials
- Windows Restore Tutorials
- Windows Clone and Migration Tutorials
- Windows Server Backup, Recovery, and Management Tutorials
- Windows Disk, Partition, and Storage Management Tutorials