How to Fix M.2 SSD Not Detected in Windows 10 - 11 Ways
M.2 SSD not detected in Windows 10?
Solid-state drives (SSDs) SSDs mainly use flash memory to provide excellent performance and durability, outperforming traditional hard disk drives (HDDs) in read and write speed, power consumption, and noise. They are gradually replacing HDDs, with the M.2 interface being the most common.
Many users have been experiencing issues with M.2 SSDs not being detected in Windows 10/8/7, with two common cases being the M.2 SSD not showing up in the BIOS and not being detected in Disk Management. The reasons for these issues and their corresponding solutions are detailed below, providing a comprehensive understanding of the problems and their resolutions.
Reasons for M.2 SSD not showing up in BIOS
BIOS, The Basic Input/Output System (BIOS) initializes and tests hardware components, loads boot programs from mass storage devices, and then loads the operating system. However, if an M.2 SSD is not showing up in BIOS after a fresh install on the motherboard, the problem may be caused by a faulty M.2 slot, incompatible M.2 SSD, or incorrect BIOS settings, and can be solved by checking the M.2 slot, updating the BIOS, or re-seating the M.2 SSD.
The problem is often caused by a variety of reasons, including common ones.
- M.2 SSD not enabled in BIOS
- M.2 SSD is not properly connected to the computer
- Incorrect BIOS settings
7 solutions for M.2 SSD not showing up in BIOS
If your M.2 SSD is not appearing in the BIOS, try the following methods in order: checking the M.2 slot and cable connection, ensuring the SSD is properly seated, updating the BIOS, resetting the BIOS settings, checking for any conflicts with other devices, verifying the SSD is set to AHCI mode, and lastly, checking the SSD for any physical damage.
Method 1. Enable M.2 SSD in BIOS
If Windows 10 does not recognize your M.2 SSD, first check and confirm whether M.2 SSD is enabled in BIOS, it's a method worth trying.
- Restart the computer and enter the BIOS by pressing the F2 or Del key during the boot process.
✍ Note: The keys for entering the BIOS vary by motherboard brand, so it's best to check the manual or contact the manufacturer for specific guidance.
- In the BIOS main menu, tap and expand the SATA Configuration option.
- To configure SATA to IDE mode, go to the BIOS settings, select the SATA configuration option, and change it to IDE mode. Save the changes and exit the BIOS settings.
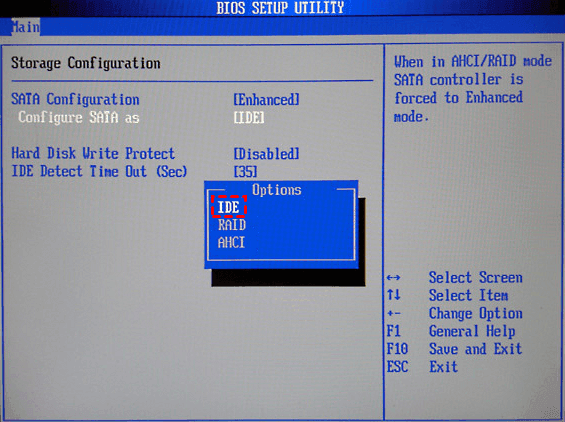
- To troubleshoot the issue with the M.2 SSD not appearing in the BIOS, restart the computer and verify if the M.2 SSD is visible in the BIOS settings.
Method 2. Reinstall M.2 SSD
If the M.2 SSD doesn't appear in the BIOS, check if it was installed correctly and reinstall it if necessary. This may resolve the issue.
The procedure for reinstalling an M.2 SSD varies depending on the type of computer. If you have a desktop computer, you'll need to follow a different set of steps than if you have a laptop. In some cases, you may be able to reinstall the M.2 SSD to a different slot on the motherboard, especially if it has multiple M.
◉ Desktop computer reinstallation of M.2 SSD
- After completely shutting down the computer, remove the previously installed M.2 SSD.
- To confirm the location of the M.2 slot on the motherboard, open the computer case and locate the motherboard. The M.
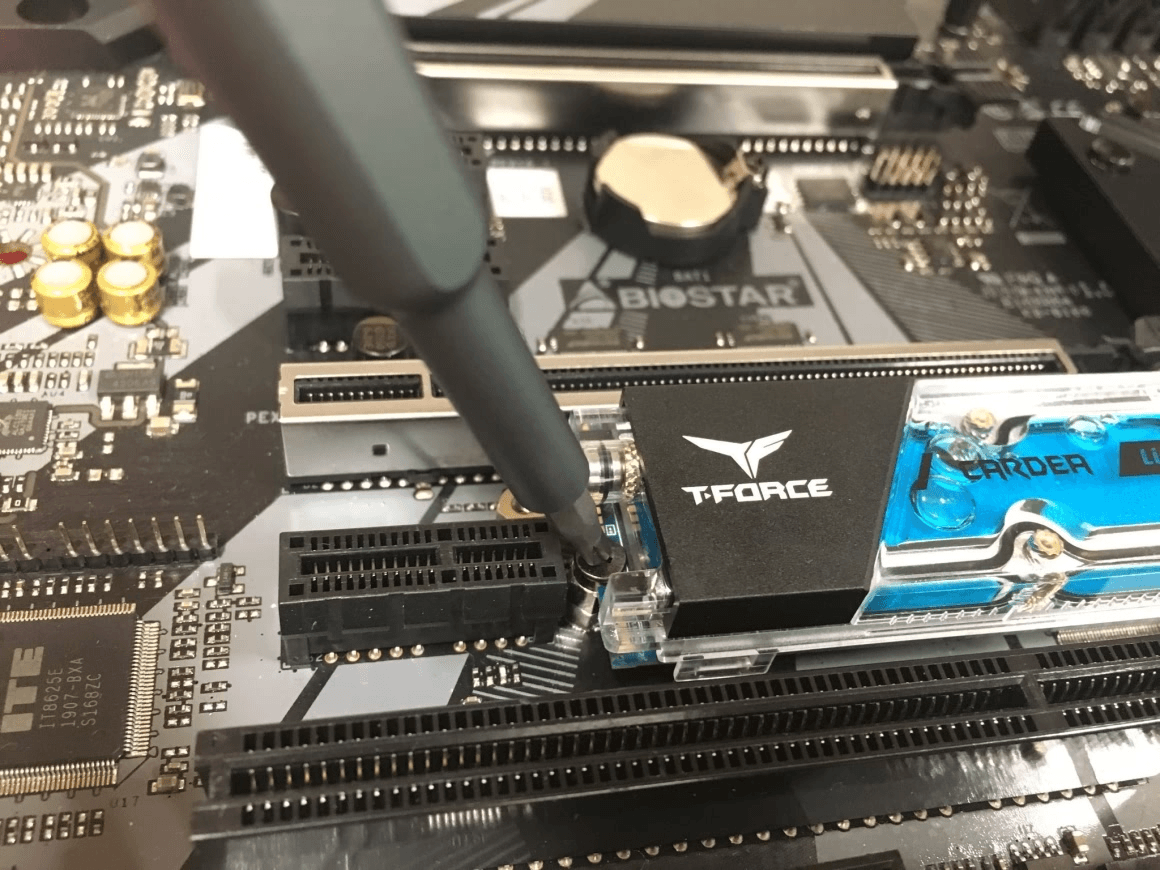
- Align the SSD interface To install the M.2 drive into the motherboard, position the drive with the motherboard slot and insert it into the M.2 slot at an angle of 20 degrees.
- Tighten the screws Screw the M.2 SSD into the mounting holes on the motherboard and secure it using a Phillips screwdriver.
- To assemble the computer, start by attaching the power supply to the motherboard. Then, connect the power cables to the motherboard, CPU, and any other components that require power.
◉ Laptop reinstallation of M.2 SSD
- Turn off the computer completely, then remove the back cover of the hard disk area.
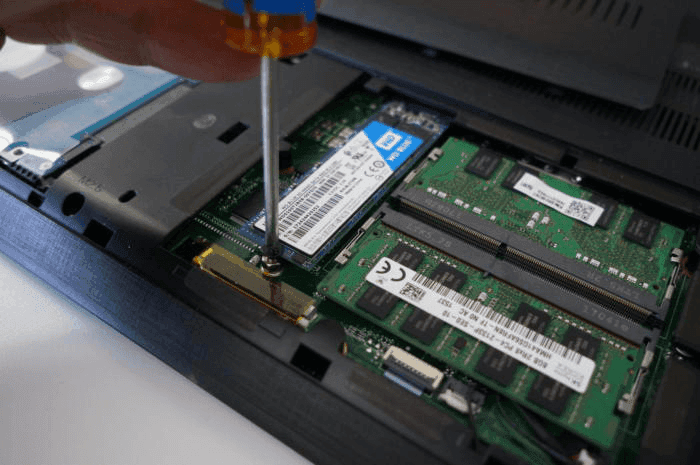
- Insert the M.2 SSD Insert the M.2 SSD into the M.2 slot at an angle, then press down gently until it clicks into place.
- After upgrading the M.2 SSD, securely fasten the back cover by fixing the screws at the end of the M.2 SSD and reinstalling it.
- Reconnect power to the computer, start it, and verify that the M.2 SSD appears in the BIOS settings.
Method 3. Check the M.2 setting in BIOS
The BIOS of some motherboards has an M.2 slot mode, which defaults to automatic mode, but in some cases, this setting can cause the M.2 SSD not to be detected, so it's necessary to check the M.2 setting in the BIOS.
- Restart the computer and enter the BIOS by pressing the F2 or Del key during the boot process.
- To access the Advanced settings tab and Onboard Devices Configuration, tap the Advanced settings tab and then tap Onboard Devices Configuration.
- To change the PCI Express X4_3 Slot to M.2 mode, tap on the menu next to "PCI Express X4_3 Slot (Black) Bandwidth" and select "M.2 Mode".
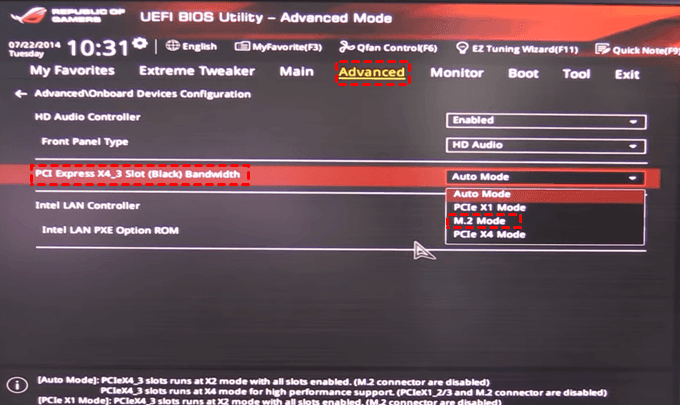
- After saving the changes, exit the BIOS. Reboot the computer and confirm if the M.2 SSD appears in the BIOS.
Method 4. Disable Secure Boot in BIOS
Disabling Secure Boot in BIOS has been reported to resolve the issue of an M.2 SSD not being recognized in the BIOS.
- Restart the computer and enter the BIOS by pressing the F2 or Del key during the boot process.
- To secure your system, go to the Security interface and select the Secure Boot option.
- To enable secure boot, select the "Secure Boot Control" option and set it to "Enabled".

NoteSome motherboards may only have Secure Boot enabled, but not Secure Boot Control. In this case, simply disable Secure Boot in the settings.
- Save the changes and exit the BIOS. Reboot the computer and verify if the M.2 SSD is visible in the BIOS.
Method 5. Disable Compatibility Support Module (for NVMe)
The Compatibility Support Module (CSM) detects compatibility mode at boot time, but disabling CSM and enabling UEFI is required to boot from an NVMe M.2 SSD. This resolves the issue of M.2 SSDs not appearing in the BIOS.
- To access the BIOS, reboot your computer and press the F2 or Del key during the boot process.
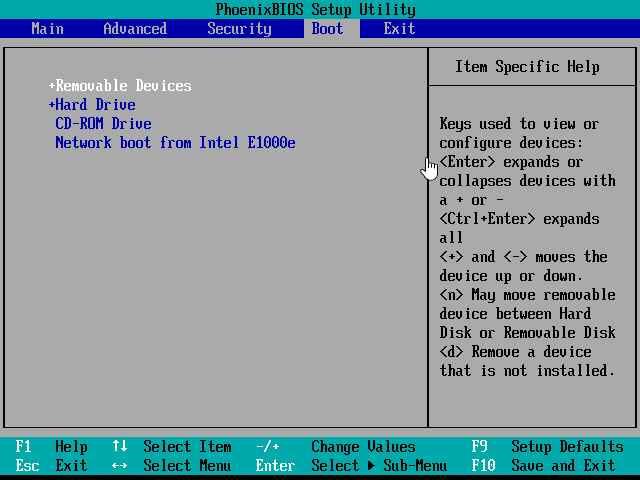
- In the Boot tab, find the Launch CSM option and set it to Disabled.
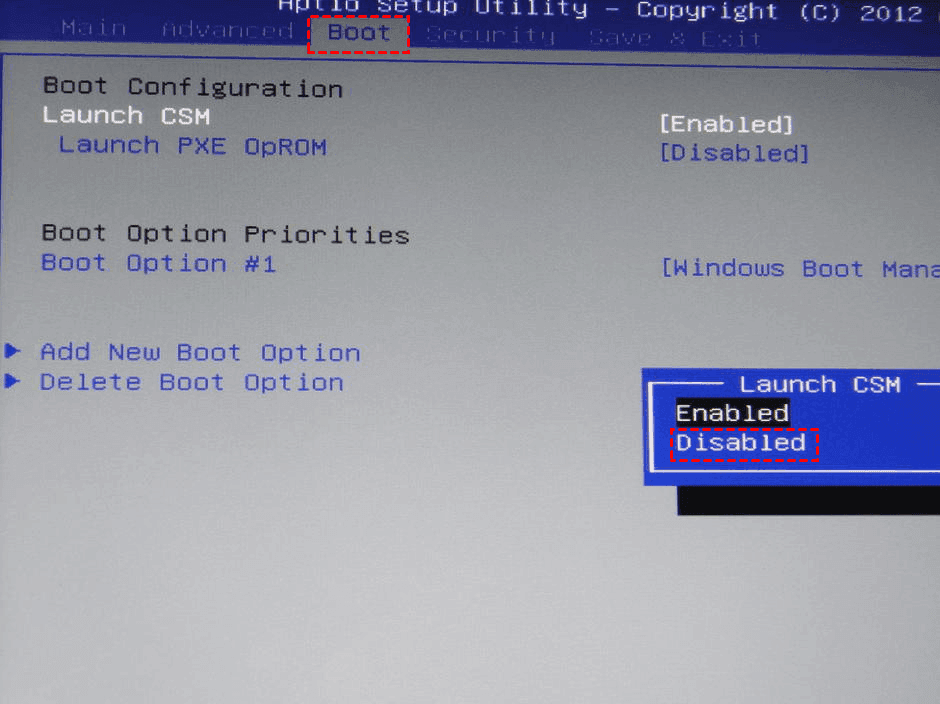
- Save the changes and exit BIOS. Reboot the computer and confirm if the M.2 SSD appears in the BIOS.
Method 6. Reset the BIOS
Resetting the BIOS If your M.2 SSD is not showing up in the BIOS, you can try resetting the BIOS to resolve the issue. This can often fix problems with the M.2 SSD not being recognized.
- To access the BIOS, reboot your computer and press the F2 or Del key when prompted during the boot process.
- The method of resetting the BIOS varies on different computers, allowing users to choose from options such as "Load defaults" or press keys like F9 or Alt+F to reset the BIOS settings. Once the reset is complete, users can save the changes and exit the BIOS.
- To reset the BIOS, you can either remove the CMOS battery on the motherboard and wait for a minute before reinstalling it, which will also reset the BIOS, or you can simply press the reset button on the motherboard, if available, or unplug the power cord and press the power button for 30 seconds to discharge the system and then plug it back in to reset the BIOS.

Method 7. Update the BIOS
If you're experiencing issues with an M.2 SSD not showing up in the BIOS, updating the BIOS to the latest version may resolve the problem, as an outdated BIOS can also be a contributing factor.
- To update your computer's BIOS, start by opening your browser and visiting the official website of your computer's motherboard manufacturer. From there, you can search for and download the latest BIOS update file.
- Copy the previously downloaded BIOS update file to a USB flash drive and reboot your computer.
- To update the BIOS, press the corresponding button to enter the BIOS interface, select the "Update BIOS From Drive" option, choose the BIOS update file from the USB drive, confirm the operation, and wait for the update to complete.

NoteDuring the BIOS update process, never power down or interrupt the update to avoid update failure and damage to the motherboard.
Reasons why M.2 SSDs are not detected in Disk Management
Disk Management If you're experiencing issues with your M.2 SSD not being detected in Disk Management, you can use the built-in system utility in Windows to perform advanced memory tasks and potentially resolve the problem. Before attempting to fix the issue, it's essential to understand the underlying cause of the problem. By doing so, you'll be better equipped to address the problem and get your M.2 SSD up and running in Disk Management.
This problem is often caused by a variety of reasons, including [list the common causes].
- M.2 SSD drivers are obsolete
- Missing or conflicting drive numbers
- M.2 SSD not initialized
- Windows systems are not compatible with the file system
4 solutions for M.2 SSD not detected in Disk Management
If you are at a loss for the problem of M.2 SSD not detected in Disk Management, please try the following 4 methods in order, I believe these methods can help you solve the problem.
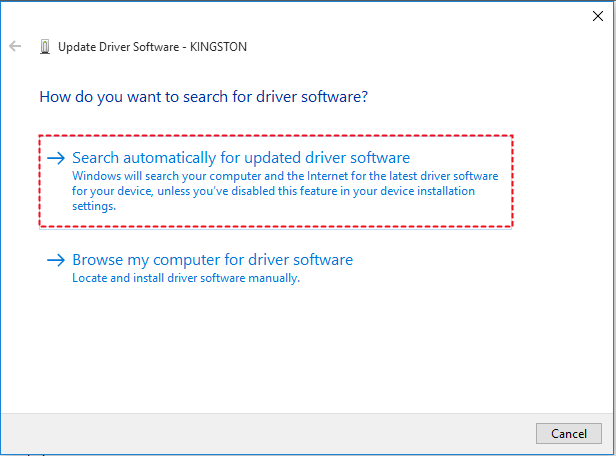
Method 1. Update M.2 SSD driver
Outdated M.2 SSD drivers Updating the drivers may resolve issues with M.2 SSDs not being detected in Disk Management, potentially fixing the problem.
- Right-click on the Start button and select Device Manager.
- To update the driver for the M.2 SSD, expand the Disk drives, right click on the M.2 SSD and select Update driver.
- To update the driver for your computer's sound system, go to the Start menu and select the "Settings" option. In the Settings window, click on the "Update & Security" option. In the Update & Security window, click on the "Windows Update" option.
- If the M.2 SSD is not detected in Disk Management, try using the M.2 SSD in a different slot or on a different system to rule out any issues with the drive itself. If the M.2 SSD is still not detected, try updating the motherboard's BIOS or UEFI firmware to the latest version, as this may resolve any compatibility issues.
Method 2. Perform hardware and device troubleshooting
To resolve the issue of an M.2 SSD not being detected in Disk Management, performing hardware and device troubleshooting may help, as suggested by some users.
- To open the Windows Settings, press the Windows key + I, and then select Update & Security.
- To troubleshoot hardware and device issues, select the Troubleshoot tab in the left panel, then choose Hardware and Devices in the right panel, and finally tap Run the Troubleshooter.
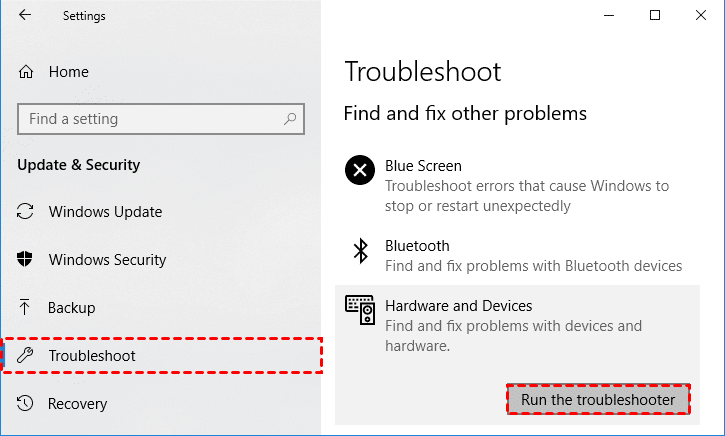
- Wait for the problem to be detected and fixed automatically. Reboot your computer and make sure the M.2 SSD is detected in Disk Management.
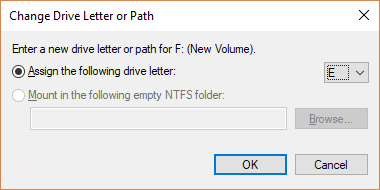
Method 3. Assigning drive letter
In some cases, your M.2 SSD is properly connected to the computer, but the M.2 SSD is not detected in Disk Management due to the missing drive letter. To fix this, assign a drive letter to your M.2 SSD.
- Right-click the Start button and select Disk Management.
- Right-click the partition where the drive number is missing, select the "Change drive letter and paths" option.
- In the new window, tap the Add button.
- Select Assign the following drive letter and a drive number in the list, then tap OK to save the changes.
- If the M.2 SSD is still not detected, try booting the computer in Safe Mode and then verify if the M.2 SSD is detected in Disk Management. If the M.2 SSD is detected in Safe Mode, it could indicate a driver or software issue, and you can try updating or reinstalling the relevant drivers or software.
Method 4. Initialize M.2 SSD
A brand new M.2 SSD may not be initialized before being connected to a computer, causing it to not be detected in Disk Management, and therefore needs to be initialized, selecting an appropriate file system during the process.
- To open the Disk Management window, press Windows + R to open the Run window, type diskmgmt.msc, and press Enter.
- In the Disk Management window, right-click on the M.2 SSD and select Initialize Disk.
- In the initialize disk window, select the appropriate partition style (MBR or GPT) based on the M.2 SSD's capacity size, then tap the OK button.
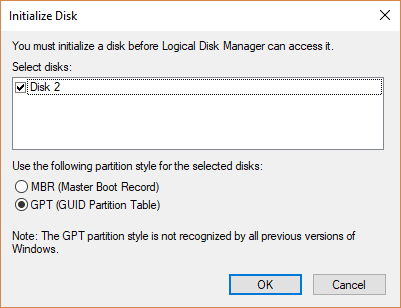
NoteThe MBR (Master Boot Record) specification has limitations, only supporting up to 4 primary partitions and a maximum hard drive capacity of 2TB. In contrast, the newer GPT (GUID Partition Table) specification can support much larger hard drives, up to 18EB (1EB=1024TB=1048576GB), and a much higher number of partitions, up to 128, but requires a motherboard that supports UEFI.
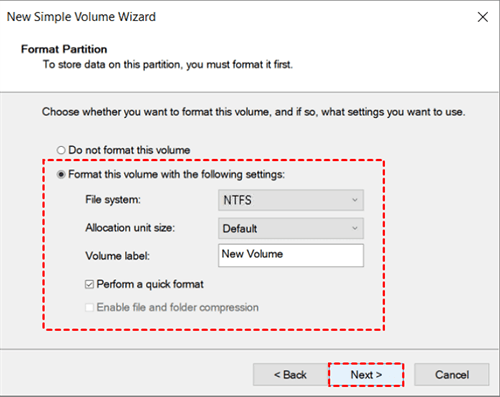
- After initialization is complete, right-click the unallocated space on the M.2 SSD and select "New Simple Volume" to create a new drive.
- The New Simple Volume Wizard prompts to set the partition size, drive number and format, and choose the appropriate file system.
An easy way to migrate your system to a new hard drive
In Windows 10, M.2 SSD not being detected can be resolved by checking the BIOS settings, updating the UEFI firmware, or using a different port. If the issue persists, it may be due to a hardware problem. To migrate the system to a new M.2 SSD without reinstalling, using a system cloning software like Qiling Disk Master Professional is recommended, which can save time compared to a clean install.
Qiling Disk Master Professional can provide you professional system cloning service and support Windows 11/10/8.1/8/7/Vista/XP and other system versions. That is, with just a few clicks, you can clone all data from the source system partition containing the OS, software, and applications to the new M.2 SSD. This saves the time of reinstalling the Windows system and also preserves the original data of the system partition. Here are the detailed steps of system cloning, but before that, you need to do the following preparations.
◐ The software uses Intelligent Clone by default, which requires checking the storage spaces involved in system cloning. Ensure the destination disk is larger than or equal to the used space of the source disk to avoid cloning failures.
◐ If you're cloning a system onto a target disk with multiple partitions, the System Clone function will overwrite those partitions. To avoid data loss, use the Partition Backup function to back up important data before cloning the system. This ensures your important files and data are safe even if the cloning process overwrites some partitions.
◐ Download and install Qiling Disk Master Professional 30-day trial version.
Note✍: System Clone can only be demonstrated in the trial version and cannot be performed. If satisfied, upgrade to the pro version before cloning the system.
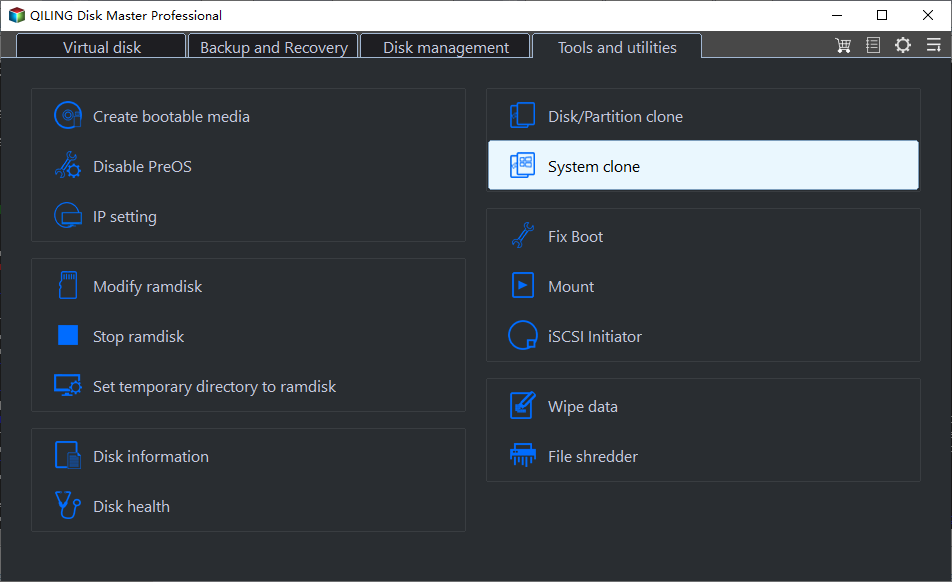
- To clone your system, switch to the "Clone" tab in the left window of Qiling Disk Master Professional and tap the "System Clone" button in the right window. This will allow your Windows system to check for the new M.2 SSD and run the cloning process.
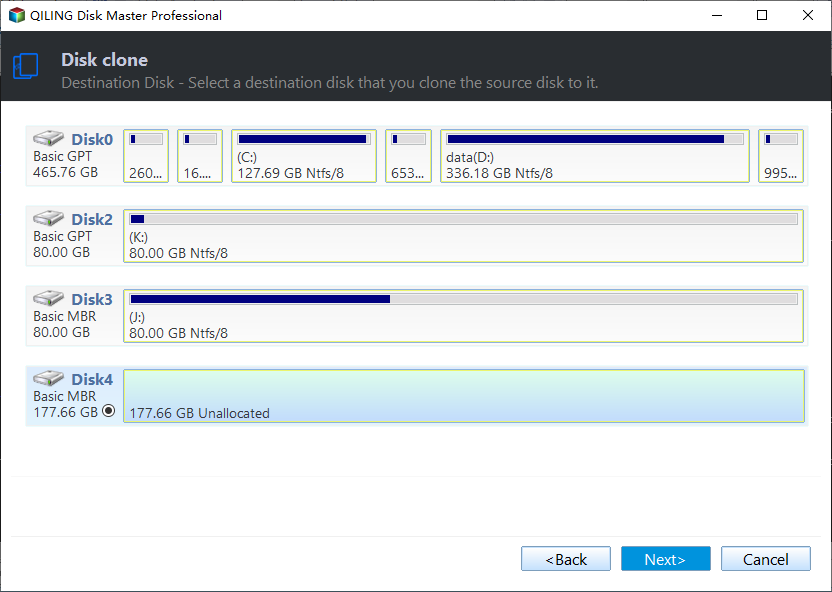
- In the destination partition interface, select the target disk for system migration, which is the newly installed M.2 SSD, and click "Next".
- It is recommended to check the SSD Alignment checkbox and tap the Proceed button after previewing the operation on the target M.2 SSD disk.
NoteTo make a complete copy of the entire sector, you can check the "Sector By Sector Clone" checkbox, but it requires ensuring the target disk has storage space greater than or equal to the source disk.
- After the system clone is complete, change the boot order in the BIOS to ensure the computer will boot successfully from the new M.2 SSD.
NoteThe format of a computer disk partition style can significantly impact the System Clone process. For MBR disks, only the system partition and system reserved partition are transferred, whereas GPT disks also include the EFI system partition and MSR partition in the transfer. Notably, Qiling Disk Master Professional enables the transfer of systems between MBR and GPT disks without converting partition styles.
Qiling Disk Master Professional offers additional features beyond its data recovery capabilities.
- If you want to transfer your system without loading Windows, you can create a bootable media and boot from it.
- Qiling Disk Master Professional only supports personal user version of Windows system, if you want to transfer the system to Windows Server, please use Qiling Disk Master Server instead.
- If you're concerned about data security on your computer, you can use the Disk Clone function to completely copy and transfer all data from the source hard drive to the new hard drive, enhancing data security.
- Upgrading to the Technician version allows professionals to create a portable version of Qiling Disk Master, which can be copied to a removable device, enabling use on any computer without installation, saving time and effort.
Summary
The issue of an M.2 SSD not being detected in Windows 10 can be frustrating. To resolve this problem, you can try the solutions outlined above, which include checking the M.2 port and SSD for physical connection issues, updating the BIOS and UEFI firmware, and disabling and re-enabling the M.
Users are accustomed to using M.2 SSDs for enhanced Windows system performance. To migrate the system to a new M.2 SSD or upgrade without reinstalling, Qiling Disk Master Professional can be used for system cloning, saving time and effort.
Related Articles
- Quick Fix: Cloned SSD Won't Boot in Windows 11, 10, 8, 7
- Free Samsung M.2 SSD Migration Software for Windows 10/8/7
- Solved: Kingston SSD Toolbox Not Detecting SSD in Windows 10
- Best Carbon Copy Cloner Alternative for Windows 11, 10, 8, 7
This article is written for users who need Carbon Copy Cloner Windows alternative to backup or clone your computer. Keep reading to learn more. - Splitting Image File to Smaller Ones to Fit on Disk Space
Splitting an image file into multiple smaller files helps to fit in different storage devices like USB, CD, FAT32 partition, etc. Qiling Disk Master can make it. - Hard Disk Partition Management with Windows PE Bootable Rescue CD/USB
Creating a bootable CD/USB based on Windows PE might be the best way to manage your disk and partition when your OS failed to boot.