Upgrade Windows 10 32 Bit to 64 Bit without Losing Data
Content of this article:
- Why upgrade Windows 10 32 bit to 64 bit?
- Requirements for Windows 10 32 bit to 64 bit upgrade
- Backup Windows 10 to keep a copy your data
- Upgrade Windows 10 32 bit to 64 bit without data loss
- Always keep Windows 10 update to enhance Windows security
- Wrapping things up
Why upgrade Windows 10 32 bit to 64 bit?
Microsoft only allows users to upgrade from a qualifying version to its equivalent edition on the same architecture, but many users want to upgrade Windows 10 32 bit to 64 bit without losing data. This is because the Windows 10 64-bit system has several advantages, including being able to use more RAM, run 64-bit applications, and have better performance and security. Additionally, 64-bit systems can support more devices and hardware, making them a more versatile option. Overall, upgrading to Windows 10 64-bit can provide a more robust and efficient computing experience.

- This system takes advantage of large amounts of memory, up to 2TB, to process and analyze data.
- With more memory, you can run more apps simultaneously without affecting the experience.
- You can improve productivity on memory-intensive tasks such as opening many tabs on your web browser or running virtual machines by using more RAM.
- 64-bit CPUs allow for the use of both 64-bit and 32-bit programs, and many apps now require a 64-bit operating system.
- ...
Requirements for Windows 10 32 bit to 64 bit upgrade
Upgrading Windows 10 32-bit to 64-bit is recommended for PCs with 8GB or more RAM, as 4GB RAM may affect the experience. Before upgrading, ensure the processor supports 64-bit, the computer has 2GB memory or more, and drivers are compatible with 64-bit.
Step 1. To check if your computer has 2GB of RAM or more, go to Settings > System > About and look for the Installed RAM details, or right-click on This PC and select Properties, and confirm if it shows 2GB or higher.

Step 2. To determine if your computer is 64-bit, check the System type under Device specifications, looking for "32-bit operating system, x64-based processor", or search System Information to see if it shows "x64-based PC".

Step 3. Determine the CPU's compatibility and confirm the presence of key features such as Physical Address Extension (PAE), No-eXecute (NX), Streaming SIMD Extensions 2 (SSE2), and CMPXCHG16b (CX16) on the processor.
- Go to the Microsoft Sysinternals website and click on the "Download Coreinfo" link.
- Right-To download and extract the Coreinfo.zip folder, click on it, select "Extract all" from the dropdown menu, and then click on the "Extract" button.
- To view the command-line interface (CLI) in Windows 10, type "cmd" in the Coreinfo address bar and press Enter.

- Type coreinfo and press Enter.
- To upgrade to Windows 10 64 bit, search for PAE, NX, SSE2, and CX16 in the system properties, and if all of them are available, you can proceed with the upgrade.

Step 4. Go to the manufacturer's website and confirm the other components (eg: graphics and sound cards) have 64-bit version drivers.
Backup Windows 10 to keep a copy your data
To avoid losing data or programs, it's recommended to backup your system using free backup software like Qiling Disk Master Standard before upgrading to Windows 10 64-bit. Since Microsoft only offers a clean installation of the 64-bit system, which will format your disk and install a fresh version, you won't be able to do an in-place upgrade from 32-bit to 64-bit.
With this tool, you can revert Windows 10 64 bit to 32 bit, restore files or folders, schedule system backups, and explore image and restore files. It also allows for disaster recovery and bootable system restoration.
To create a backup, please download the free backup software - Qiling Disk Master Standard, install and launch it.
Step 1. On the main page, click System Backup under the Backup tab.

Step 2. Qiling Disk Master has already chosen the system partition and other boot partitions required to start your computer. You just need to select a destination path for your backup and click Proceed.

Tips:
★ Unexpected human errors may result in system boot failure during a clean install, so it's suggested to create a bootable disc with Qiling Disk Master just in case.
★ You can still set options, schedule backup, and backup scheme to continuously backup Windows 10, with some features available on the Professional version or higher.
Upgrade Windows 10 32 bit to 64 bit without data loss
After backing up your system, your data will be safe, allowing you to upgrade Windows 10 32-bit to 64-bit without worrying about data loss. The only way to do this is by performing a clean install of Windows 64-bit on your current 32-bit system, which involves creating an installation media to start your computer.
Part 1: Create Windows 10 installation media
Step 1. Connect a USB drive with at least 8GB of space, then go to Microsoft's Windows 10 download page and click the "Download tool now" button to save the download tool to your PC.

Step 2. Double-click the MediaCrationTool.exe file to run it and accept the license terms.
Step 3. Tick Create installation media for another PC and click on Next.

Step 4. Tick Use the recommended options for this PC or select language, architecture, and edition manually. Then click Next.

Step 5. Select the USB flash drive option and click Next.

Step 6. Select the removable drive from the list and click Next. Wait until the Windows 10 installation process is complete, then click Finish.

Part 2: Clean install Windows 10 64 bit
Step 1. To install Windows 10 32-bit on a USB flash drive, plug the drive into a computer with a Windows 10 32-bit system, restart the computer, and set the boot priority to the USB flash drive via the BIOS settings. Save the changes and reboot. If prompted, press a key to continue.
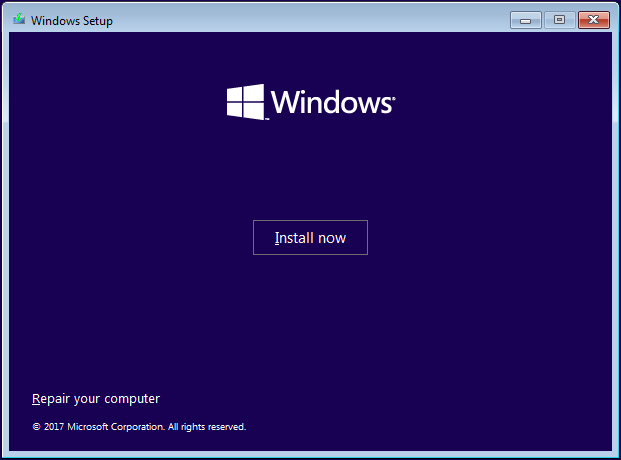
Step 2. Wait for Windows 10 installation disc to load, once done, set up language and other preferences and click Install now.
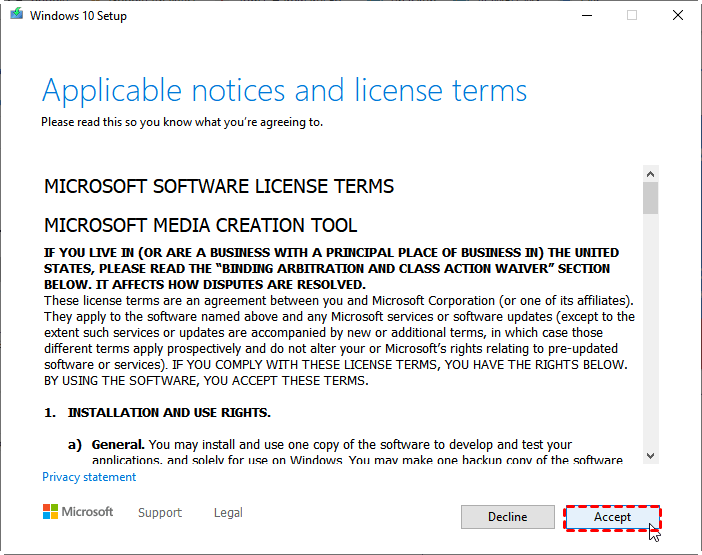
Step 3. Accept the license terms and click Next.
Step 4. Select the "Custom" installation type for Windows 10, which will delete files and uninstall programs, so it's essential to back up important data to an external hard drive beforehand.

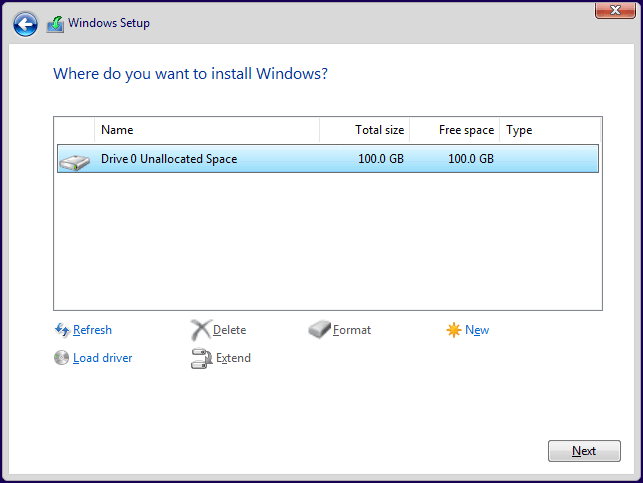
Step 5. To install Windows 10, click Drive Options and delete all partitions until it shows unallocated space. Select the unallocated space and click Next to clean install Windows 10, or use an existing partition with enough space.
Note: This operation can also be applied to upgrade Windows 7 32 bit to 64 bit, upgrade Windows 8 32 bit to 64 bit, upgrade Windows 11 32 bit to 64 bit.
Part 3: Restore files from backup image after upgrading
To upgrade windows 10 32-bit to 64-bit without losing data, you still need to restore files from backup. Here are two methods below:
1. Restore from file backup. If you've created a separate file backup, you can directly go to the Restore tab and select file backup to restore files from backup in Windows 10.

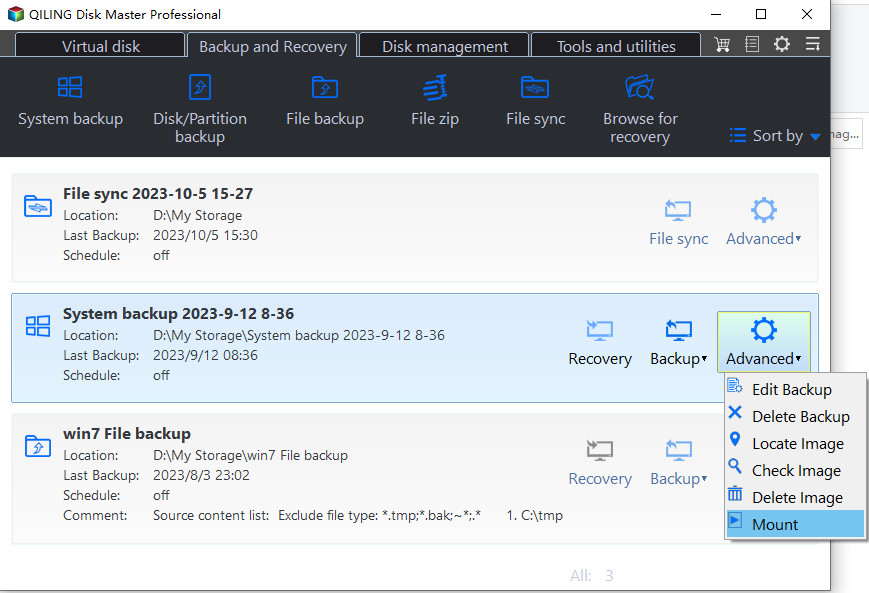
2. Restore file from system image backup. Restoring from a system will overwrite the 64-bit system, so use the Explore Image tool on the Professional version to restore selectively.
Always keep Windows 10 update to enhance Windows security
Windows Update is a feature that helps users receive security updates and critical fixes for their computers, enhancing security and productivity. It includes updates like Windows 10 21H2 and 22H2, which focus on productivity, management, and security.
You can enjoy the following features in Windows 10 21H2:
- Adding WPA3 H2E standards support for enhanced Wi-Fi security.
- Windows Hello for Business introduces a new deployment method called cloud trust, enabling simplified passwordless deployments and achieving a deploy-to-run state within a few minutes.
- GPU compute support is now available in Windows Subsystem for Linux (WSL) and Azure IoT Edge for Linux on Windows (EFLOW) deployments, enabling machine learning and other compute-intensive workflows to run more efficiently.
The main thing Windows 10 22H2 release brings is an extension to the life cycle for Windows 10, providing 18 months of servicing for Home and Pro editions, and 30 months for Enterprise and Education editions.
Go to Settings>Update & Security>Windows Update, click the Check for updates button to download and install the latest updates and missing drivers.

Wrapping things up
Upgrading Windows 10 32-bit to 64-bit is possible without losing data, as long as your computer meets the upgrade requirements and you've backed up your system and important files and folders. Additionally, creating a bootable disc can provide peace of mind in case of any boot issues.
It's recommended to keep Qiling Disk Master installed on a Windows 10 64-bit system, which can automatically back up only changed files daily and manage disk space professionally, ensuring a safe and up-to-date copy of data.
Related Articles
- How to Clone Hard Drive in Windows 10 64/32 Bit
- How to Ghost Windows 10 64-bit/32-bit Computer Easily
- Full Guide to Upgrade to Windows 10 without Losing Files
- How to Backup Windows 10 64 Bit Easily and Quickly
- Windows 10 Recovery Tools Guide and Free Download | 2021
- Windows OS Migration Software: Migrate OS to New Hard Drive
This page introduces the best OS migration software and guides you through the process of transferring your system to a new hard drive or SSD without data loss, compatible with Windows 11/10/8/7/XP/Vista.