4 Ways to Create Dell Windows 7 Recovery Media (Disk/USB)
- Overview for Dell recovery media in Windows 7
- How to create a Dell Windows 7 recovery disk or USB?
- Method 1. Create Windows 7 recovery disk in via Dell OS Recovery Tool
- Method 2. Create Dell recovery media in Windows 7 with freeware
- Method 3. Create Dell repair disk with Windows 7 built-in tool
- Method 4. Create Dell recovery media with Windows 7 USB/DVD Download Tool
- Conclusion
Overview for Dell recovery media in Windows 7
Dell recovery media The Dell recovery disk or USB drive is a backup of the computer's original factory condition, allowing you to restore your system to its original settings or a favored configuration. This is particularly useful in case of system failures in Windows 7/8/10, and even if the computer won't start, you can use the recovery disk or USB drive to access recovery tools and resolve issues.

How to create a Dell Windows 7 recovery disk or USB?
In Windows 7, you can create a Dell recovery media using various methods, such as the Dell OS Recovery Tool or a System Repair Disc. To determine the best approach for you, follow this guide to explore your options.
- Method 1. Create Windows 7 recovery disk in via Dell OS Recovery Tool
- Method 2. Create Dell recovery media in Windows 7 with freeware
- Method 3. Create Dell repair disk with Windows 7 built-in tool
- Method 4. Create Dell recovery media with Windows 7 USB/DVD Download Tool
Method 1. Create Windows 7 recovery disk in via Dell OS Recovery Tool
Dell no longer offers direct downloads of Windows 7 recovery disk images, but instead provides an OS Recovery Tool to create a recovery USB key with the licensed OS version that shipped with your system, based on the Service Tag.
The Dell OS Recovery Tool can help you download a customized Dell recovery image of Microsoft Windows that was preinstalled on your Dell PC. To use it, you simply need to download and install the tool, then follow the steps to create a Dell recovery drive in Windows 7.
Step 1. Plug in your USB drive (with at least 16GB of storage space).
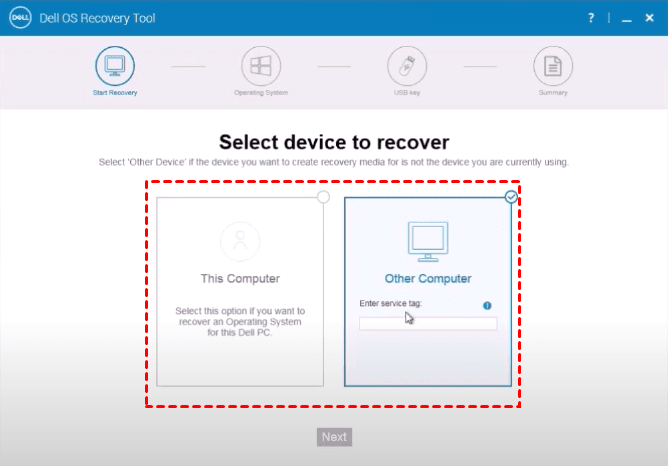
Step 2. Launch Dell OS Recovery Tool, select the computer and click Next.
Using the same Dell PC, please click This Computer.
Enter the Service Tag of the Dell PC under Another computer on another working PC, click Search.
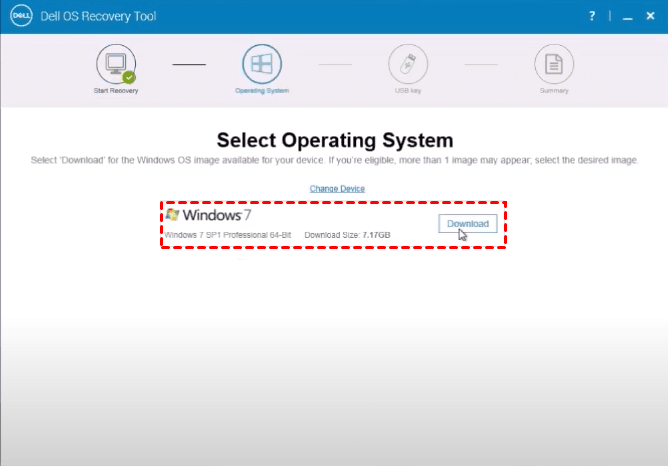
Step 3. Select the operating system and click Download, wait for the download to complete.
If you only want a disk image file, just stop at this step. The dell windows 7 recovery ISO could be found in following path: C: \ProgramData\Dell\OS Recovery Tool\Downloads.
Of course, you can continue the wizard to create a recovery USB.
Step 4. Click Next, select the available USB key from the drop-down menu, then click Burn OS and wait for the process to end.
Step 5. When the process is done, you will see a summary screen.
Before transferring data from one USB drive to another, it's a good idea to backup any important data on the source USB drive to prevent loss. This ensures that all data on the destination USB drive remains intact.
Method 2. Create Dell recovery media in Windows 7 with freeware
Qiling Disk Master Standard is a free backup and restore tool for Windows, allowing you to create bootable media on a DVD/CD, USB drive, or ISO image file.
This bootable media allows you to restore your Dell computer to a previous Windows 7 system image created with Qiling Disk Master, and also enables daily data protection when your computer is back to normal.
To restore a crashed computer using a Dell recovery disk or USB drive in Windows 7, you'll need a backup of the system in a normal state. This process consists of two parts: creating a backup of the system in its normal state, and then using the recovery disk or USB drive to restore the computer.
Backup Dell Windows 7 OS with Qiling Disk Master:
Step 1. Download, install and launch this freeware. Click Backup and select System Backup to backup Windows OS, or choose Disk Backup to back up the hard drive to an image file, such as System Backup.
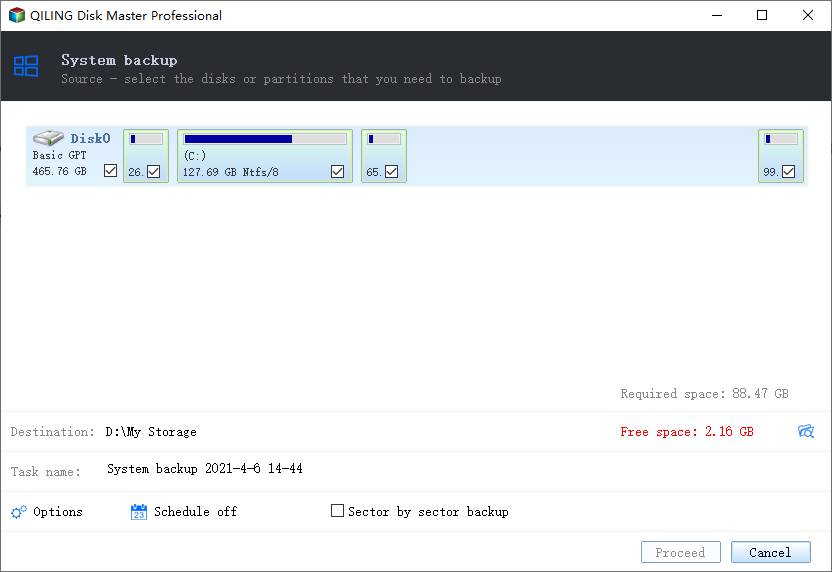
Step 2. It will automatically choose the system partitions as the source. You only need to choose another location as destination path.
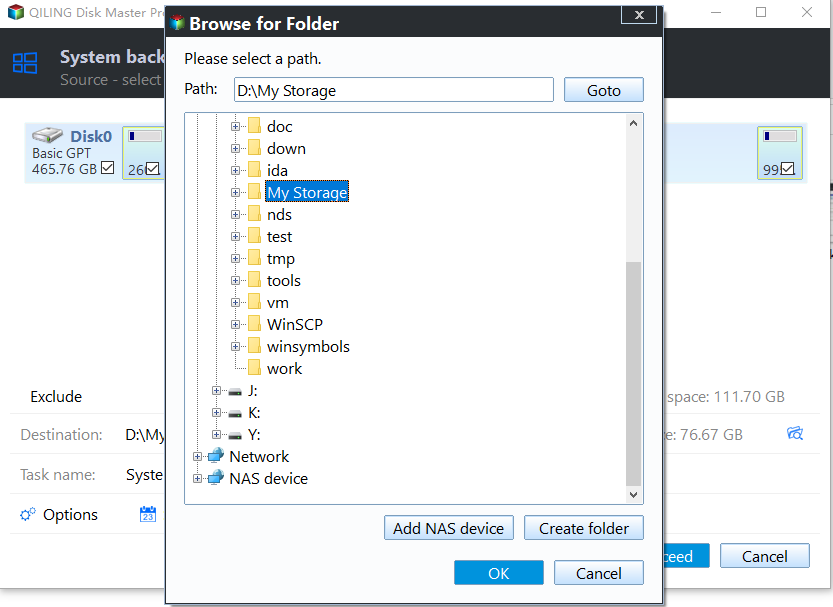
Step 3. At last, click Proceed and wait for the progress to reach 100%.
Create a Windows 7 bootable media in case Dell computer won't boot:
Step 1. To create a bootable media, insert your USB or CD/DVD into the computer, making sure the USB drive is formatted with NTFS. Then, navigate to the Tools tab and select the option to Create Bootable Media.
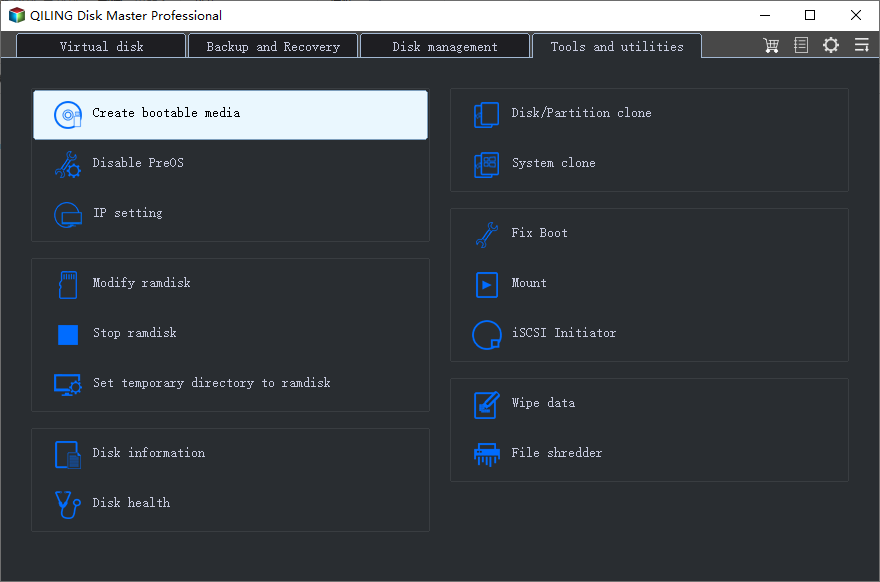
Step 2. Export the ISO file to a specified location by selecting the storage device or specifying the location path, then click "Proceed" to start the process, wait for it to complete, and finally click "Finish".
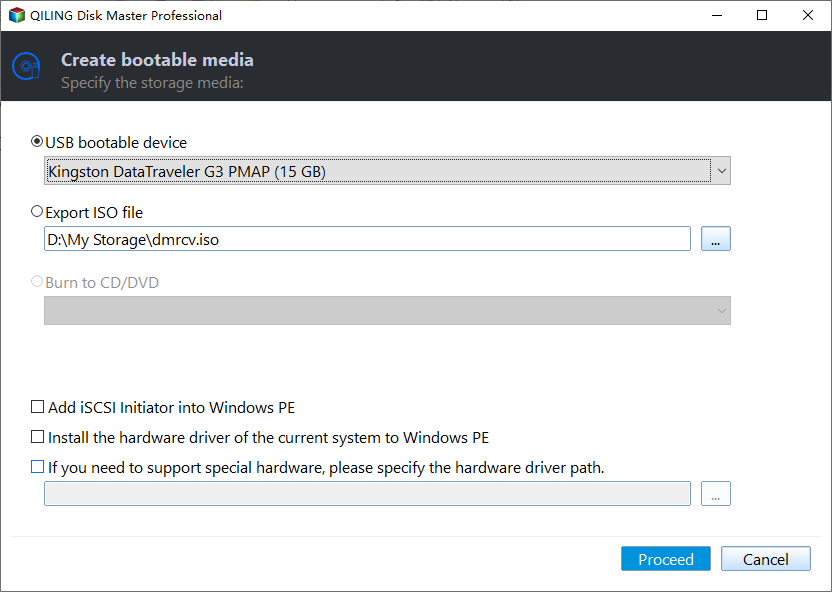
To recover a Windows 7 system, you can create a system image, insert the Windows 7 recovery media into a faulty computer, boot it into Windows PE, and then restore the system to a normal state using the previously created system image.
If your Dell computer won't boot, you can try upgrading to the Professional edition, which allows you to use the Universal Restore feature to restore your system image on a different hardware setup, essentially creating a bootable media and system image on a working PC.
Method 3. Create Dell repair disk with Windows 7 built-in tool
Windows 7 system repair disc allows you to access all Windows recovery options, and can be created using a CD or DVD, enabling you to create a Dell recovery disk for Windows 7.
Step 1. Insert the CD/DVD to the computer.
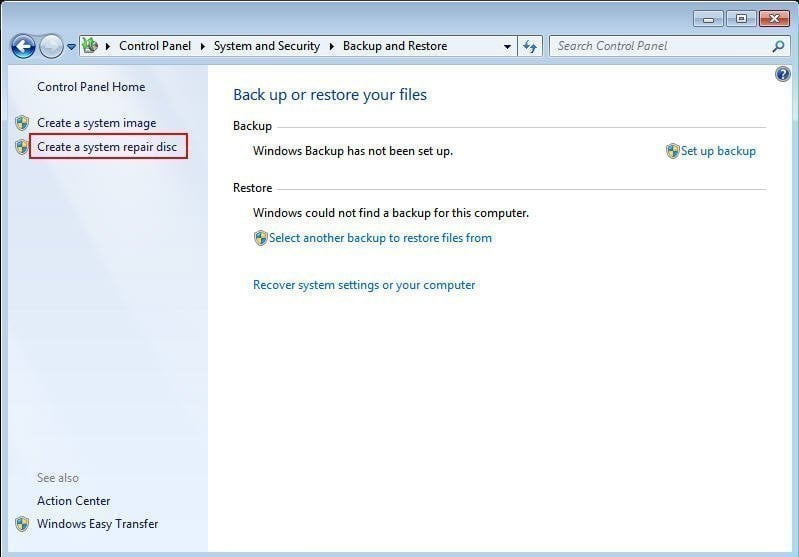
Step 2. To create a system repair disc, go to Start > Control Panel > System and Security > Backup and Restore. At the left column of the Backup and Restore interface, click on "Create a system repair disc".
Step 3. In the pop-up window, select CD or DVD and click Create disc. Wait for the process to be finished.
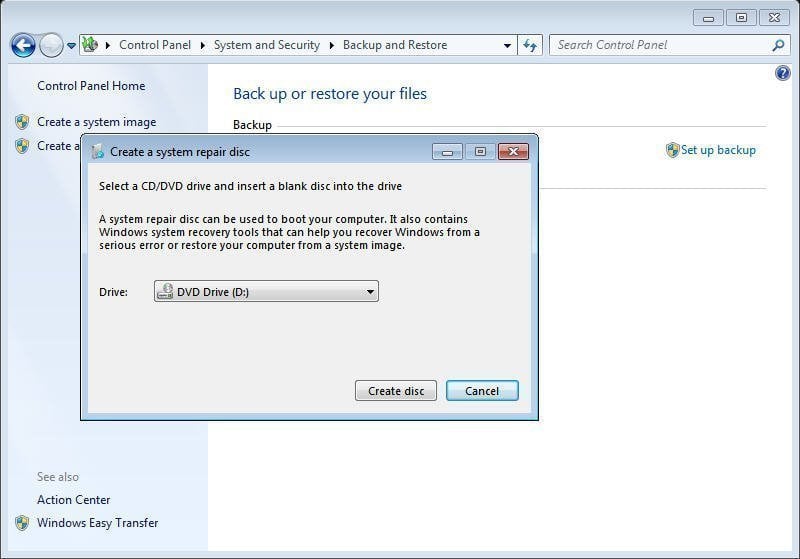
When your computer needs repair, you can insert a system repair disc to access Recovery Options, allowing you to either repair or restore Windows from boot.
You can easily create a Windows 7 system repair disc using the built-in tool, but it's only available on CD/DVD, not USB.
Method 4. Create Dell recovery media with Windows 7 USB/DVD Download Tool
To create Dell recovery media with Windows 7 USB/DVD Download Tool, prepare an ISO image file, a USB drive, and the tool. Then, follow the steps to create a recovery disk or drive for Dell in Windows 7, using the ISO image file and USB drive.
Step 1. Run the Windows 7 USB DVD Download Tool, browse to select the Windows 7 ISO file, and then click Next.
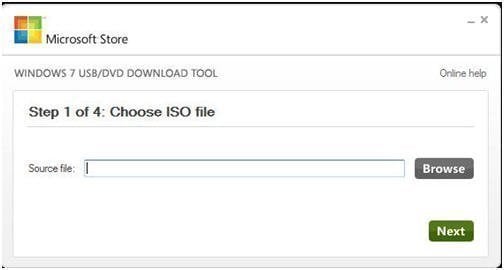
Step 2. To choose a media type, select either a USB device or a DVD as the media type, and use the USB device as an example.
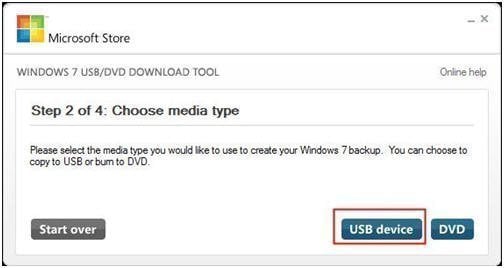
Step 3. Insert your USB drive to the working computer and select it. Then, click Begin copying.
This process will delete all data on your USB drive. Please save any important files to a safe location before proceeding.
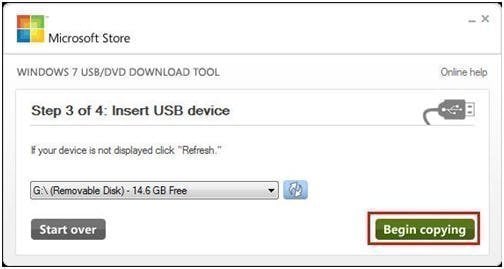
Step 4. When the process completes, you'll get a recovery USB drive.
A System Repair USB is similar to a system repair disc, allowing you to boot from it and access Windows Recovery Options to repair or restore your computer if it encounters issues.
Conclusion
You can easily create Windows 7 recovery media for your Dell computer using these methods. This allows you to access recovery options and troubleshoot problems, even if the computer won't boot properly due to a system error. The Dell recovery disk or USB drive can be used to resolve issues and get your computer up and running again.
Qiling Disk Master Standard is a tool that can create a Dell Windows recovery CD/DVD, USB drive, or a bootable ISO file, making it easier to create recovery media in Windows 7, and it also supports all Windows PC OS, including Windows Server.
Related Articles
- How to Create Windows 7 Recovery USB Drive Effortlessly?
It's wise to learn to create Windows 7 recovery USB drive, which can help you to repair or restore your system if your computer fails to boot. - Create Windows 7 Recovery Disk or Disc Step by Step Guide
Windows 7 recovery disk or disc gives you a way to repair or reinstall your computer when something severe happens, such as system failure, hard drive failure. - 5 Methods to Reimage Dell Computer in Windows 10/8/7
If you fail to repair Windows operating system, it may be the time to factory reset it. Read the 5 methods to reimage Dell computer and find the most suitable one for your situation. - Safely Perform Dell Factory Reset in Windows 10/8/7 | 2 Ways
Perform Dell factory reset in Windows 10 before selling to protect your privacy, 2 ways provided in this article to reset Dell laptop to factory settings easily. - Where is the Save File Location for Hogwarts Legacy Cracked by Empress?
This guide explains Where is the Save File Location for Hogwarts Legacy Cracked by Empress with clear steps, key checks, and practical tips. - Why Clone Hard Drive to SSD | How to Clone Hard Drive to SSD in Windows 10
This guide explains Why Clone Hard Drive to SSD | How to Clone Hard Drive to SSD in Windows 10 and provides practical steps, tips, or recovery options to help you complete the task safely.
Products
Articles & Tutorials
- Data Recovery
- Data Backup
- File Recovery
- File Backup
- File synchronize
- System Backup and Restore
- Disk and Partition Clone
- Technical articles
- Disk Master Help
- Windows Deleted File and Disk Recovery Tutorials
- Windows File and Data Recovery Tutorials
- More Windows Tutorials for Install, Security, Files, and PC Tips
- Windows Boot, Repair, and Recovery Environment Tutorials
- Windows Backup Tutorials
- Windows Restore Tutorials
- Windows Clone and Migration Tutorials
- Windows Server Backup, Recovery, and Management Tutorials
- Windows Disk, Partition, and Storage Management Tutorials