How to Stop Backup in Progress in Windows 7 Effortlessly?
- Scenario: "backup in progress" always running
- Need to stop backup in progress in Windows 7
- How to stop backup process in Windows 7?
- Solution 1. Stop backup in progress by turning off Windows Backup
- Solution 2. Disable backup in progress via clean boot
- Manage backups with more advanced utility
- Verdict
Scenario: "backup in progress" always running
To resolve the issue, try pressing the Windows key + R, type "services.msc" and open the Services window. Look for the "Windows Backup" service, right-click on it and select "Stop". This should terminate the backup process and remove the "Backup in progress" message. You can also try restarting your laptop in Safe Mode and then stopping the service from there. If the issue persists, you may need to reinstall the Windows Backup service. Additionally, you can try running the System File Checker (SFC) and DISM tools to scan and replace any corrupted system files that might be causing the issue.
Need to stop backup in progress in Windows 7
As a computer user, it's essential to back up your data, especially the operating system, to ensure you can restore your system to its last-saved state in case of a problem. Fortunately, Windows has its own built-in backup tool that can help you achieve this.
Windows Backup is causing issues, specifically displaying a "backup in progress" message in the Action Center icon, despite no actual backup being performed.
The computer is slow and unresponsive, making it difficult to perform tasks, likely due to software conflicts, scheduled backups, or issues with specific components that cannot be copied.
To stop a backup in progress in Windows 7, you can either pause the backup process or cancel it. To pause the backup, open the Backup and Restore window, click on the "Pause" button, and then click "Stop" to stop the backup process. Alternatively, you can cancel the backup by clicking on the "Cancel" button in the Backup and Restore window. If the backup is stuck, you can also try to cancel it through the Task Manager.
How to stop backup process in Windows 7?
To stop a backup in progress in Windows 7, consider taking the following measures. You can either cancel the backup process through the Backup and Restore Center, or shut down your computer to interrupt the backup. Choose the solution that best suits your situation.
Solution 1. Stop backup in progress by turning off Windows Backup
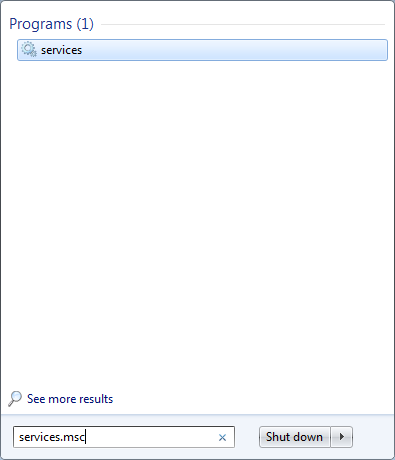
To disable Windows Backup, go to the Start menu, type "services.msc" and press Enter. In the Services window, find and click on the "Windows Backup" service, then click on the "Stop" button.
Step 1. Click Start in the lower left corner of the computer. Then type services.msc and press Enter.
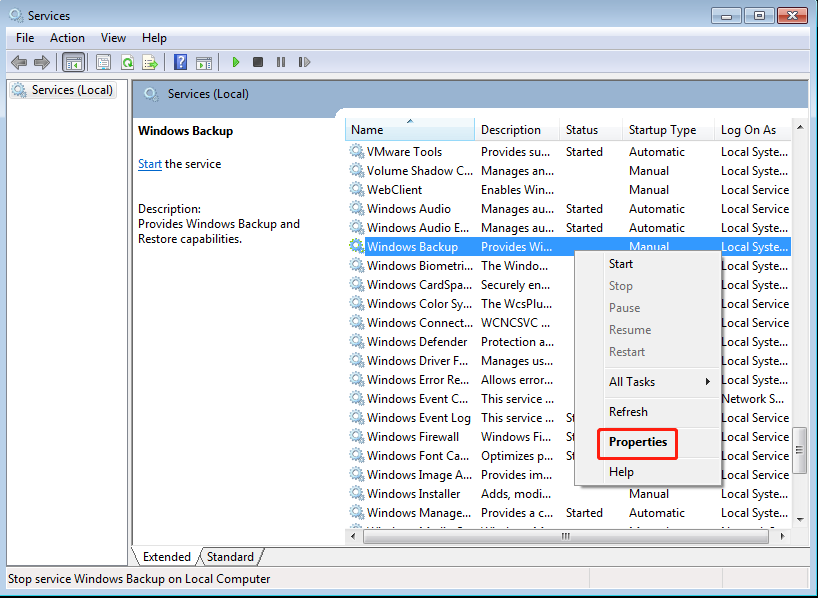
Step 2. Scroll down to find Windows Backup and right click it. Then click Properties.
Step 3. Click the inverted triangle under General tab. Choose Disabled. Then click OK.

If some people tried to disable Windows Backup but the backup in progress is still running, they can try the next method to resolve the issue.
Solution 2. Disable backup in progress via clean boot
To stop Windows backup in progress, you can start Windows 7 by using a minimal set of drivers and startup programs. Simply put, you can perform a clean boot. Here are detailed steps.
Step 1. Sign in to the computer as an administrator.
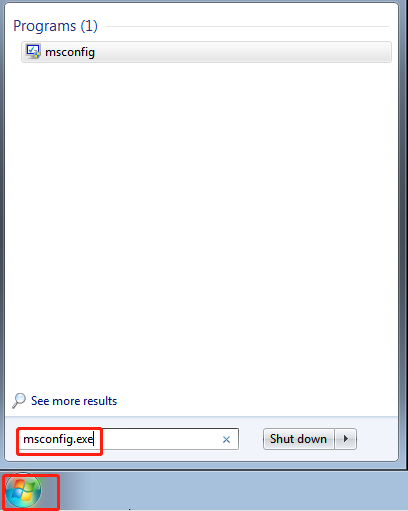
Step 2. Click Start in the lower left corner of your computer. Type msconfig.exe in the search box. Then press Enter.
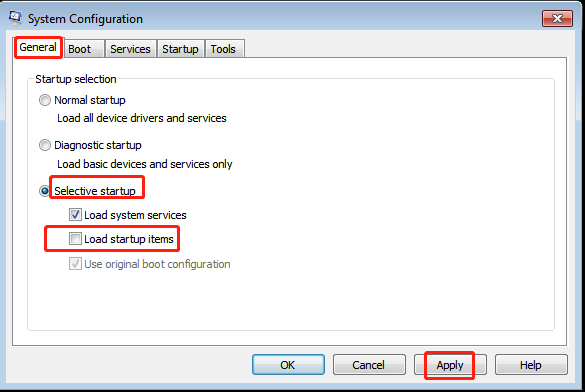
Step 3. Choose Selective startup under the General tab. Click to clear the Load startup items check box. Then press Apply.
Step 4. Click Hide all Microsoft services under the Services tab. Choose Disable all. Then click Apply.
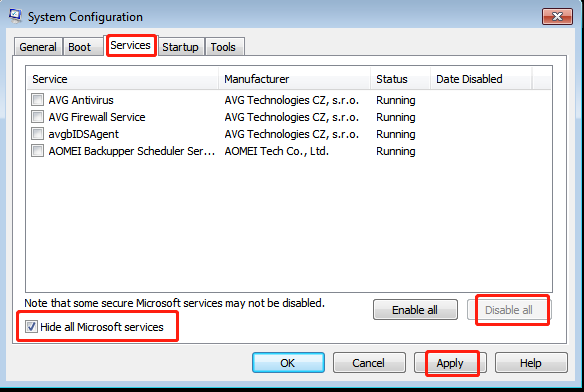
Step 5. Click OK and Restart subsequently.
In Windows 7, you can disable backup in progress by going to the Control Panel, clicking on System and Security, then clicking on Backup and Restore, selecting the "Stop the backup" option, and confirming the action. Alternatively, you can stop the backup by opening the Task Manager, finding the backup process, right-clicking on it, and selecting "End task". Be cautious when using these methods, as incorrect selection of options can lead to serious problems. These methods are also time-consuming and require careful attention to detail.
To avoid the "backup in progress" issue in Windows 7, it's recommended to use an alternative to create a system image, such as using a different backup software or method. This can help prevent the problem from occurring.
Manage backups with more advanced utility
Qiling Disk Master Standard is a top-rated free backup utility that offers system backup capabilities in Windows 10/8.1/8/7, Windows Vista/XP. Its VSS technology enables users to work uninterrupted while the backup is in progress.
Like Windows built-This freeware offers automatic backup scheduling, allowing you to set up regular backups. If needed, the schedule can be canceled. It also provides incremental and differential backup options for frequently modified data.
To create system image, you can follow these steps:
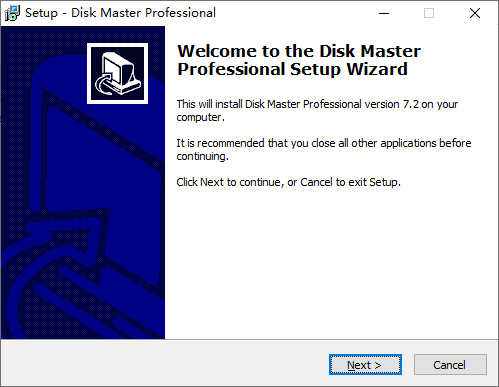
Step 1. Download, install and launch this freeware.
Step 2. Click Backup and System Backup subsequently.

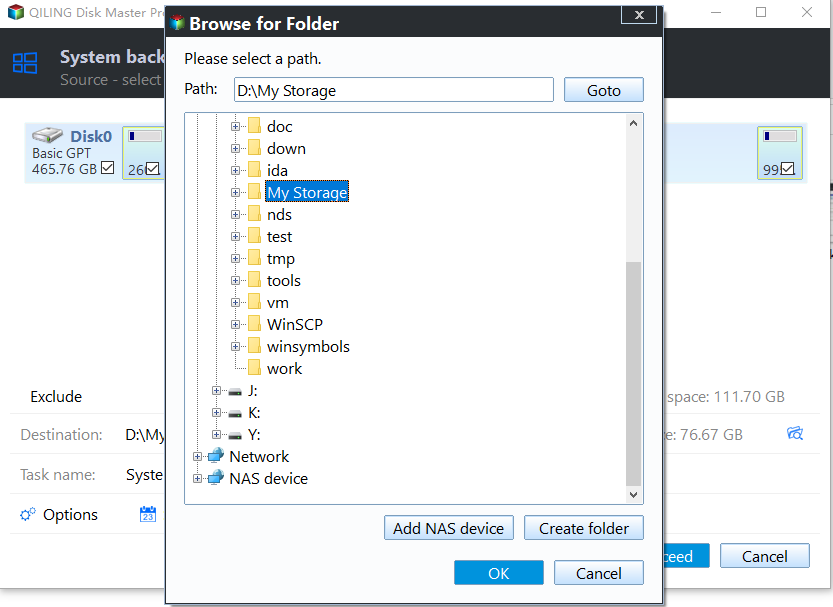
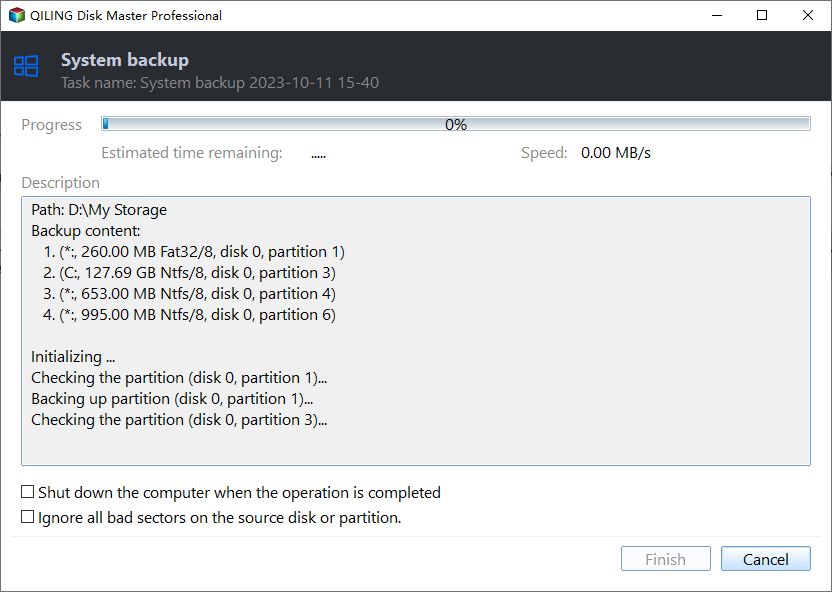
Step 3. The task name can be changed as desired. The system partitions are selected by default for the related system partitions. The destination path, F:\, is selected at the lower location.
Step 4. You can create an automatic backup based on Daily, Weekly or Monthly by clicking Schedule. Then click Proceed.
Notes:
- There are six options under Backup Options in Step 4, including General, Compression, Splitting, Intelligent Sector, VSS, and Other. These features can be customized according to your needs, and you can also set up backup encryption by enabling it under the General tab to prevent unauthorized access.
- To choose Event triggers, USB plug in or File Sync under the Schedule tab in Step 4, you need to upgrade to the advanced version.
- In paid version, Scheme in Step 4 can help you automatically delete older backups.
- To restore the system later, go to Home, then System Backup, and select Restore.
- To cancel schedule tasks, go to Home > System Backup > Advanced > Schedule Task > Do not schedule.
Verdict
To stop a backup in progress on Windows 7, try the solutions mentioned in the article, and consider using Qiling Disk Master Standard for future backups. If you're a Windows Server user, Qiling Disk Master Server is also available.
Related Articles
- Best Free Cloning Software for Windows 11 (No Boot Issues)
This tutorial provides you with free Windows 11 clone software and tells you how to clone a hard drive on Windows 11 and boot from it safely. - How to Free Up Space on Windows 11 Easily and Safely (3 Ways)
This article describes why free up space on Windows 11 and 3 easy and safe approaches to achieve the goal, including the easiest one. Please read on. - How to Move Hard Drive to New Computer in Windows 11
If you want to find a way to move hard drive to new computer in Windows 11, this article can help you a lot. You can find a professional migration tool that can help you transfer data and OS on hard drive to new computer without losing secure boot. - How to Refresh Windows 11 without Losing Programs (3 Ways)
To refresh Windows 11 without losing programs, you can learn 3 easy ways from this article and the best way to prevent data loss. Please read on. - Alienware Backup and Recovery in Windows 10, 8, 7 | 2 Ways
If you are looking for a way to do Alienware backup and recovery, learn more about Alienware Respawn and Qiling Disk Master below and select the way suitable for your situation. - Dell Alienware Hard Drive Replacement - No Data Loss
How to perform Alienware hard drive replacement in Windows 11, 10, 8, 7 if running out of space? The best Dell SSD cloning software - Qiling Disk Master will replace Alienware HDD with SSD in only a few steps.