Encrypt an External SSD on Windows 11
An external SSD is easy to lose and easy to plug into someone else's machine, which makes it the device most worth encrypting. Windows 11 can encrypt the whole drive with BitLocker To Go, but that feature is limited by edition, and the choice of encryption scope has a direct effect on how long the first pass takes. This guide walks through the preparation, the encryption itself, and the recovery-key handling that decides whether the drive is still usable after a problem.
BitLocker To Go and its alternatives
BitLocker To Go is the built-in option for removable drives. It encrypts the entire volume, prompts for a password when the drive is plugged in, and lets you store a recovery key. It requires Windows 11 Pro, Enterprise, or Education. On Windows 11 Home the option does not appear in the context menu, and the automatic device encryption that Home does support covers internal drives only.
If you are on Home, or if the drive must be readable on a Mac or Linux machine, use a third-party container tool instead. See Encrypt a USB drive without BitLocker for the comparison.
Some external SSDs also offer hardware encryption, either always-on or configurable through the vendor utility. That protects the data if the enclosure is removed, but it depends on firmware you cannot audit. Treat it as an extra layer rather than a replacement for software encryption.
Before you encrypt
Step 1. Back up the drive. Encryption rewrites the volume; a power loss during the first pass can leave it unreadable. A copy somewhere else turns a disaster into an inconvenience.
Step 2. Decide the file system. NTFS is the right choice for Windows-only use and supports files larger than 4 GB. exFAT is readable on more platforms but has weaker journaling. BitLocker To Go can encrypt either.
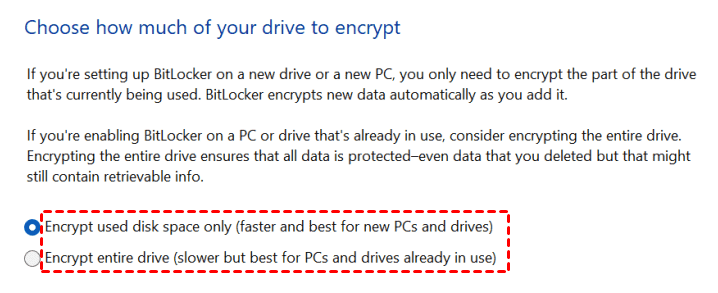
Step 3. Choose the encryption scope. Encrypting used disk space only finishes quickly on a new or mostly empty drive. Encrypting the entire drive also protects deleted remnants, which matters if the drive previously held sensitive files.
Step 4. Plug the drive into a stable power source. A laptop on battery that sleeps mid-encryption is a common cause of a half-encrypted volume.
Encrypt the external SSD
Step 1. Open File Explorer and find the external SSD under This PC.
Step 2. Right-click the drive and choose Turn on BitLocker. If the entry is missing, confirm your Windows edition and that the drive is not already encrypted.
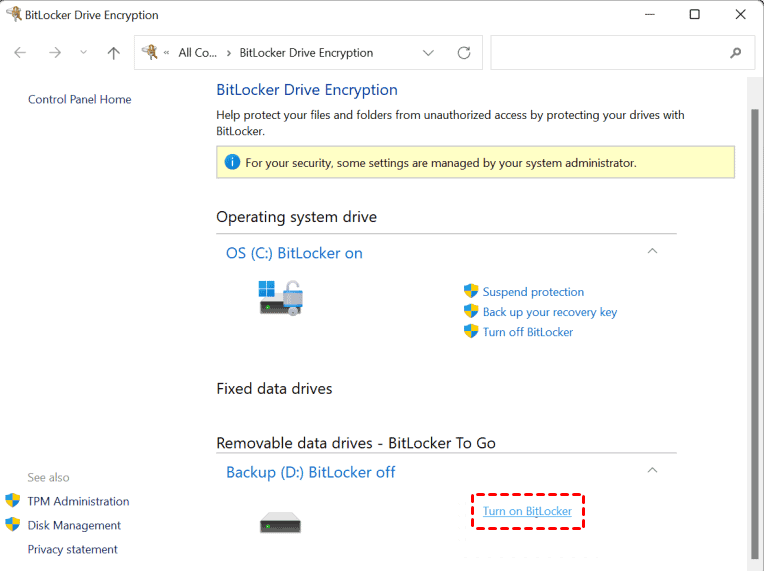
Step 3. Set a password for unlocking. Choose something long rather than something complex but short; length is what resists guessing.
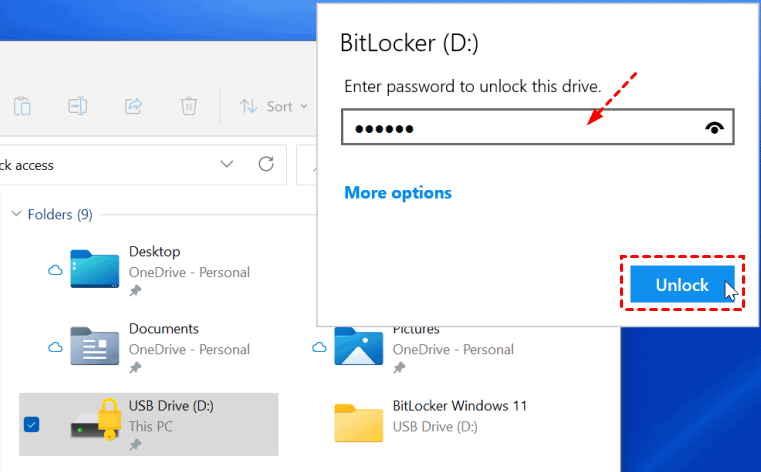
Step 4. Select how to store the recovery key. Saving it to your Microsoft account is convenient but ties access to that account. Saving to a file is more portable, provided the file is not stored on the drive being encrypted.

Step 5. Choose used disk space only or encrypt entire drive, then start. Leave the drive connected until the progress bar completes.
If you prefer a container instead
A container tool such as Qiling Safe Disk writes an encrypted file onto the drive and mounts it as a drive letter. It works on every edition of Windows 11 and does not touch the rest of the SSD.
Handle the recovery key
The recovery key is the only way into the drive if the password is lost or the drive is moved to a machine that cannot validate it. Handle it as carefully as the data itself.
- Store it off the encrypted drive. A key saved inside the volume it protects is unusable by definition.
- Keep two copies in two places. One printed, one in a password manager or an unrelated encrypted note.
- Verify it before you need it. Print or copy the 48-digit key and confirm the characters match. A single mistyped group is the same as no key at all.
- Do not email it to yourself unencrypted. Email is exactly the channel an attacker is most likely to reach.
Daily use and unlocking
- Automatic unlock. BitLocker can remember the drive on a specific PC. Convenient on a desktop, unwise on a laptop that leaves the building.
- Safely eject. Removing an encrypted drive during a write can corrupt the volume and require the recovery key.
- Read-only on other PCs. Windows can open BitLocker To Go volumes read-only on machines without the password, if the drive was prepared for it. Do not assume this works; test it before relying on it for file exchange.
- Re-encrypt after formatting. Formatting an encrypted drive removes encryption together with the data. Turn protection back on before storing anything new.
Related Articles
- Encrypt a USB Drive Without BitLocker
Options for Windows 11 Home and for drives that must work on Mac or Linux. - Password Protect an External Hard Drive in Windows 11
What password protection means for large external drives and which method to use. - Mount an Encrypted Virtual Disk on Windows 11
How container-based encryption behaves when it is opened as a drive letter.
Products
Articles & Tutorials
- Data Recovery
- Data Backup
- File Recovery
- File Backup
- File synchronize
- System Backup and Restore
- Disk and Partition Clone
- Technical articles
- Disk Master Help
- Windows Deleted File and Disk Recovery Tutorials
- Windows File and Data Recovery Tutorials
- More Windows Tutorials for Install, Security, Files, and PC Tips
- Windows Boot, Repair, and Recovery Environment Tutorials
- Windows Backup Tutorials
- Windows Restore Tutorials
- Windows Clone and Migration Tutorials
- Windows Server Backup, Recovery, and Management Tutorials
- Windows Disk, Partition, and Storage Management Tutorials