Mount an Encrypted Virtual Disk on Windows 11
An encrypted virtual disk is a single file that becomes a drive letter when you open it. Once mounted, applications read and write it like any other volume; once dismounted, the file is again unreadable without the password. Most mounting problems come from mixing up two formats that look identical in File Explorer, or from mounting read-write a volume that should be opened read-only. This guide covers both paths.
What mounting actually does
A virtual disk is a container file that holds a file system inside it. When you mount it, a driver presents that inner file system to Windows as a physical disk, so it receives a drive letter and can be read by any program. Unmounting detaches the drive letter and closes the file.
Two formats are common, and they are not equally secure.
- VHD and VHDX. Native Microsoft formats. Windows 11 can mount them without extra software. They are not encrypted by themselves; encryption comes from placing BitLocker inside them or from the tool that created them.
- Encrypted container. A vendor or open-source format protected by a password, such as a VeraCrypt volume or a Qiling Safe Disk image. The data is ciphertext at rest and can only be mounted through the matching program.
Mount a VHD or VHDX file
Step 1. Right-click the .vhd or .vhdx file and choose Mount. Windows assigns a drive letter automatically.

Step 2. If the file is BitLocker-protected, a password prompt appears for that volume. Enter the password or the 48-digit recovery key.

Step 3. When finished, open Disk Management, right-click the virtual disk, and choose Detach VHD. Closing File Explorer does not unmount it.

Step 4. To mount at every startup, use Disk Management then Action then Attach VHD with the read-only option, or create a scheduled task. Do not enable automatic mounting for a container on removable media that is not always connected.

Mount an encrypted container
Step 1. Install the program that created the container, or the one you intend to use consistently. Qiling Safe Disk can create and mount its own images; VeraCrypt can open its own volumes.
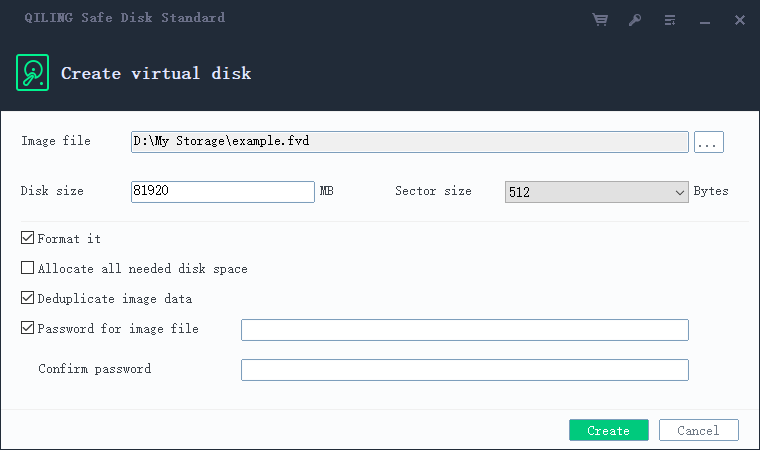
Step 2. Select the container file in the program, choose a free drive letter, and mount it.
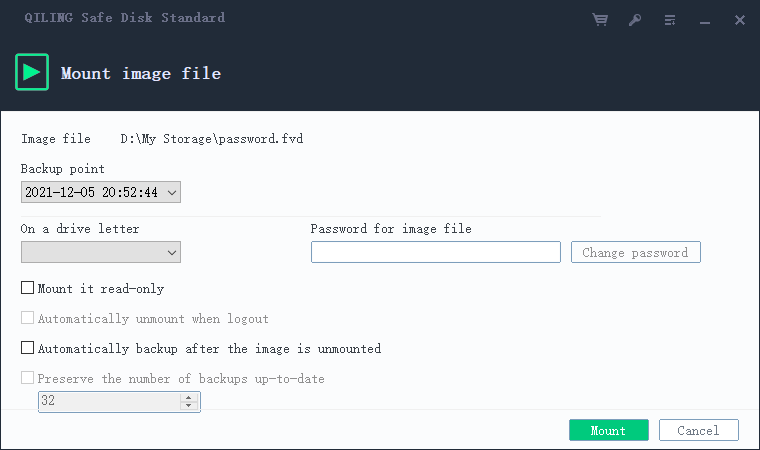
Step 3. Enter the password. If a keyfile is required, select it as well; a correct password without the keyfile will not open the volume.
Step 4. Work with the files through the new drive letter, then dismount from the program's interface. Dismounting is what closes the encrypted file and releases the lock.
Read-only versus read-write
Mount read-only when you only need to read or copy data out. This prevents accidental changes and lets you open a container that is stored on a medium you do not want to modify, such as a write-protected USB stick or a backup kept on read-only media.
Mount read-write when you need to add or edit files. Read-write mounting takes an exclusive lock on the container file, which is why a container cannot be open on two computers at once over a network share.
Common mount failures
- Drive letter already in use. Assign a different letter in the mount dialog rather than disconnecting an existing drive.
- "The file is in use." Another program still has a handle on a file inside the mounted volume. Close Explorer windows, editors, and backup agents, then dismount again.
- Container opens but shows as RAW. The inner file system is damaged. Mount read-only and run a recovery scan instead of formatting it.
- Password rejected. Check the keyboard layout and Caps Lock, and confirm whether a keyfile is required. Repeated failures do not destroy the container, but they do not help either.
- Container disappears after sleep. Some tools unmount on suspend. Remount and, if the option exists, disable automatic dismount on idle.
- VHD mounted but no drive letter. Open Disk Management; the volume may be offline or lack a letter because it was detached improperly.
Related Articles
- Move an Encrypted Virtual Disk to Another Computer
Transport a container safely and open it on a machine that has never seen it. - Create a Secure Encrypted Backup Container
Size, create, and manage a container built specifically for backup data. - Create an Encrypted Folder in Windows 11
Folder-level encryption compared with container-based virtual disks.
Products
Articles & Tutorials
- Data Recovery
- Data Backup
- File Recovery
- File Backup
- File synchronize
- System Backup and Restore
- Disk and Partition Clone
- Technical articles
- Disk Master Help
- Windows Deleted File and Disk Recovery Tutorials
- Windows File and Data Recovery Tutorials
- More Windows Tutorials for Install, Security, Files, and PC Tips
- Windows Boot, Repair, and Recovery Environment Tutorials
- Windows Backup Tutorials
- Windows Restore Tutorials
- Windows Clone and Migration Tutorials
- Windows Server Backup, Recovery, and Management Tutorials
- Windows Disk, Partition, and Storage Management Tutorials