How to Delete Files on Windows 11 Safely and Recover Mistakes
Deleting a file, freeing storage, and securely erasing a drive are different tasks. Normal deletion usually moves files to the Recycle Bin. Permanent deletion can remove that easy recovery path, while a file in use may need its application closed first. Decide what you intend to remove and keep a backup before bulk cleanup.
Select and back up important files
Step 1. In File Explorer, identify the files and folders you may delete. Check Documents, Desktop, and Downloads for anything you need to keep. Do not select Windows, Program Files, or an unfamiliar application-data folder for deletion just because it is large. Connect a separate drive with enough free space for the backup.
Step 2. Open Qiling Disk Master. On the Backup and Recovery tab, click File backup to create a new backup task.

Step 3. In the source tree, expand your user folder or Computer, then check the boxes beside the folders you want to protect. Expand a folder if you need to select only certain items. Review the checked items so the files you plan to delete are included; you do not need to back up the entire system drive for this cleanup.

Step 4. Click the folder icon beside Destination. In the folder browser, select a folder on the separate backup drive and click OK. Back in the File backup window, confirm that the destination path points to that drive and has enough free space.
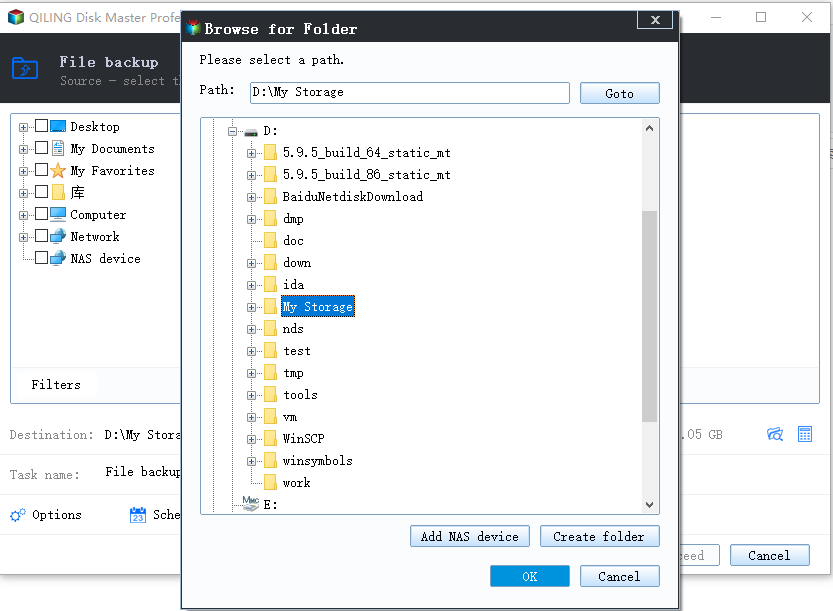
Step 5. Review the source selections and destination once more. You can give the task a recognizable name, then click Proceed at the bottom of the File backup window. Wait for the task to finish without disconnecting the backup drive.
Step 6. Before deleting the originals, use the backup task's recovery option to restore a sample file to a different folder. Open the restored file to confirm the backup is usable. Keep the backup until you have checked that the cleanup did not remove anything you still need.
Delete through File Explorer or Storage
Method 1. In File Explorer, start with a small sample of known disposable files. Select them and press Delete, then inspect the Recycle Bin. To undo a mistake, select the item there and choose Restore. If Windows says a file is open, close its application and retry instead of changing system-folder permissions.
Method 2. For selected files that should bypass the Recycle Bin, press Shift + Delete and read the confirmation. This is harder to undo but is not guaranteed secure erasure.
Method 3. Open Settings > System > Storage > Temporary files. Inspect each category, especially Downloads and Recycle Bin, and leave anything uncertain unchecked. Click Remove files, then return to Storage to confirm how much space was freed.
Delete a precise file from Command Prompt
Open Command Prompt and use a quoted full path for one confirmed file, for example del "C:\Users\YourName\Downloads\old-copy.zip". Verify the path with dir first. Avoid wildcard, recursive, or forced deletion commands unless you fully understand the scope. If Windows says the file is in use, close its application or restart; do not change system permissions blindly.
If something was deleted by mistake
Stop saving new data to that disk. Restore from Recycle Bin or your backup first. If neither contains the file, use a recovery tool to scan the original drive and save any recovered result to a different disk. SSD TRIM, overwrites, and cloud sync can limit recovery. For selling a drive, follow a drive-specific secure-erasure process instead of merely deleting visible files.
Related Articles
- Recover Documents from Recycle Bin
Check the easiest recovery path after an accidental deletion. - Make Windows 11 Faster
Find storage and performance gains without deleting needed files.
Products
Articles & Tutorials
- Data Recovery
- Data Backup
- File Recovery
- File Backup
- File synchronize
- System Backup and Restore
- Disk and Partition Clone
- Technical articles
- Disk Master Help
- Windows Deleted File and Disk Recovery Tutorials
- Windows File and Data Recovery Tutorials
- More Windows Tutorials for Install, Security, Files, and PC Tips
- Windows Boot, Repair, and Recovery Environment Tutorials
- Windows Backup Tutorials
- Windows Restore Tutorials
- Windows Clone and Migration Tutorials
- Windows Server Backup, Recovery, and Management Tutorials
- Windows Disk, Partition, and Storage Management Tutorials