How to Make Windows 11 Faster by Fixing the Actual Bottleneck
Windows 11 can feel slow for different reasons: too many startup apps, a nearly full disk, insufficient memory, or storage that cannot keep up with the workload. A useful change addresses the bottleneck you can observe.
Measure one repeatable task before and after each change, such as opening your normal work applications. Wiping a disk is not a routine performance tune-up.
Find the resource that stays busy
- Restart the PC and allow updates or indexing to settle before measuring performance.
- Open Task Manager with Ctrl + Shift + Esc. Watch Processes and Performance while reproducing the slowdown.
- Check whether CPU, memory, or disk usage remains high. Record the responsible application rather than terminating unfamiliar system processes.
- Check C: free space and the drive's health. Repeated storage errors require backup and diagnosis, not optimization.
High memory pressure may call for fewer simultaneous applications or supported RAM expansion. Thermal throttling or a power-limited laptop is not fixed by deleting documents.
Reduce startup work and review storage cleanup
In Task Manager's Startup apps page, disable optional launchers you recognize. Leave required security, accessibility, and hardware functions enabled. Restart and compare the same workload. Disabling startup does not uninstall the application.
- Open Settings > System > Storage > Temporary files.
- Wait for the size calculation and review categories individually.
- Keep Downloads, Recycle Bin, and previous-installation files unless you have deliberately approved their removal.
- Remove only selected disposable files, then check available space again.
Review Storage Sense retention settings before enabling automation. Moving personal files to another physical disk can help capacity, but do not drag Windows or Program Files to another volume.
Adjust effects and use storage optimization appropriately
For a low-powered PC, reduce animation and transparency under the appropriate Accessibility or Personalization settings. Test readability and responsiveness before disabling more effects. Keep text smoothing if it improves readability.
Open Defragment and Optimize Drives, inspect the Media type, and let Windows use the supported operation for that device. HDD defragmentation and SSD optimization are different. Do not apply repeated manual HDD-style defragmentation to an SSD as a generic speed fix.
Install relevant Windows and manufacturer driver updates. If performance worsened after a specific driver change, investigate that change instead of updating every driver from an unofficial bundle.
Move a healthy HDD installation to an SSD
If the system disk is a healthy HDD and disk activity is the measured bottleneck, an SSD migration may help. Confirm the PC's compatible storage interface and the destination's capacity before purchasing or cloning.
Step 1. Back up important files, connect the destination SSD, and save any existing SSD data elsewhere.
Step 2. Open Qiling Disk Master's disk clone function and choose the complete Windows disk as source.
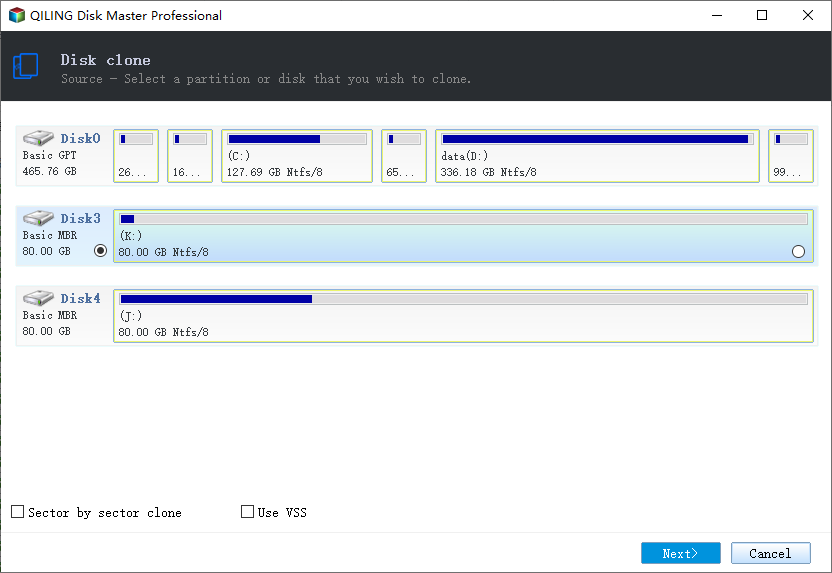
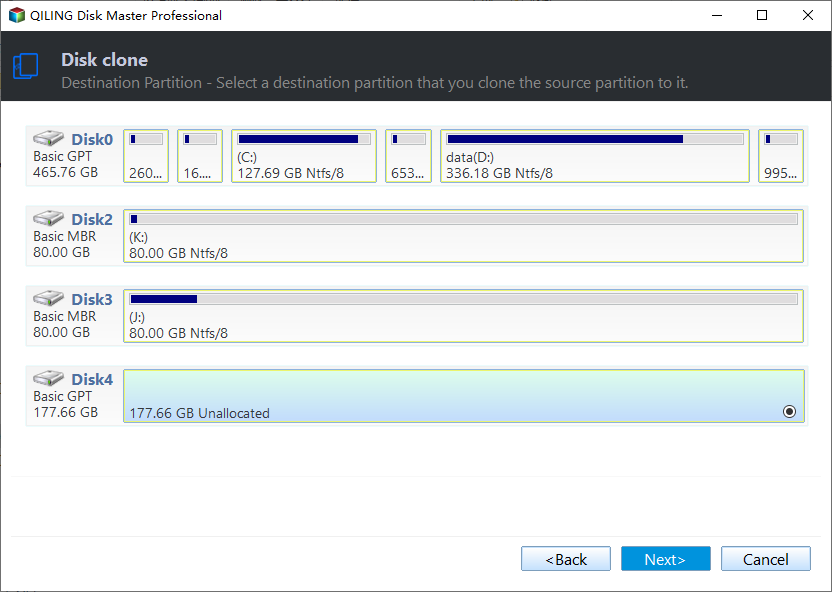
Step 3. Select the SSD as destination and review the overwrite warning. Include the required boot partitions in the resulting layout.
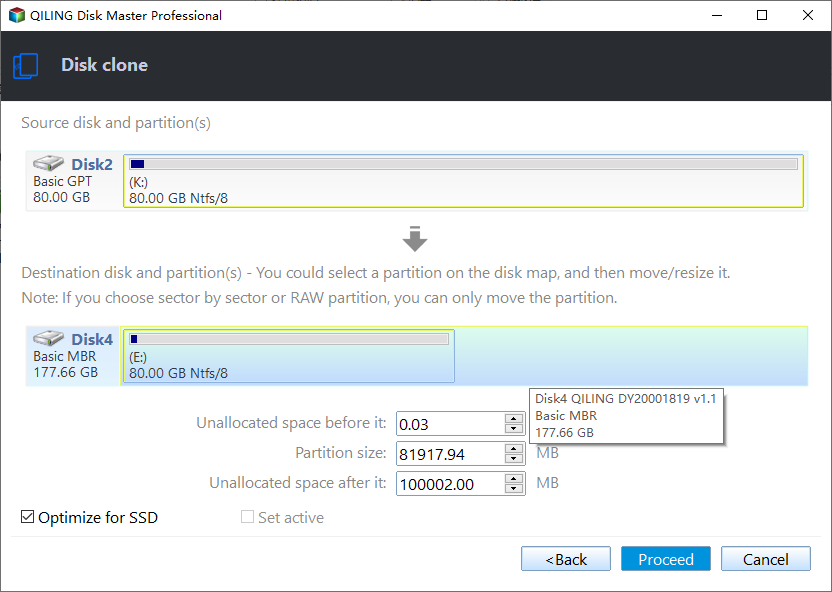
Step 4. Review capacity and SSD alignment, then click Proceed. Use an edition supporting the intended system clone.
Step 5. After completion, shut down and install the SSD in its intended position. Test independent startup before repurposing the original disk.
Compare results and keep useful changes
Repeat the same startup and application tests under similar conditions. Keep a change log so that a regression can be reversed. If CPU or memory remains the bottleneck, an SSD alone will not eliminate that limitation.
Do not use registry cleaners, indiscriminate service disabling, or disk erasure to chase a score. Keep the original disk and backup until the migrated system and applications have been verified.
Related Articles
- Laptop Slow After a Windows 11 Update
Investigate update-related slowdowns before changing the disk layout. - Performance Problems After Cloning
Check the destination and migration result when a clone feels slower. - Windows 11 vs. Windows 10 for Gaming
Compare gaming features and measured performance before upgrading for an expected FPS improvement.
Products
Articles & Tutorials
- Data Recovery
- Data Backup
- File Recovery
- File Backup
- File synchronize
- System Backup and Restore
- Disk and Partition Clone
- Technical articles
- Disk Master Help
- Windows Deleted File and Disk Recovery Tutorials
- Windows File and Data Recovery Tutorials
- More Windows Tutorials for Install, Security, Files, and PC Tips
- Windows Boot, Repair, and Recovery Environment Tutorials
- Windows Backup Tutorials
- Windows Restore Tutorials
- Windows Clone and Migration Tutorials
- Windows Server Backup, Recovery, and Management Tutorials
- Windows Disk, Partition, and Storage Management Tutorials