Clone Disk Partition with Freeware or Easier Way
Quick Navigation:
- How Can I Clone My Hard Drive for Free?
- Best Partition Copy Software for Free - Qiling Disk Master Standard
- How to Clone Partitions to SSD for FREE
- Part 1: Prepare for FREE Disk Partition Clone
- Part 2: Create a Disk Image in Windows 10 or 11
- Part 3: Restore Disk Image to New SSD for FREE
- How to Clone Partitions in Windows 10 or 11 Easily
- In sum
How Can I Clone My Hard Drive for Free?
You're trying to clone your old Kingston 64GB SSD to a new OCZ 120GB SSD using Macrium Reflect, but after changing the drive letter, your computer won't boot properly. You want to keep the old drive and just rename it with a different drive letter. You should try using the "clone" option in Macrium Reflect instead of the "transfer" option, which might be causing the issue. This way, you can keep the old drive intact and simply rename it. If you're still having issues, you might want to try a different cloning software or seek further assistance.

For this issue, you need to be sure the following things:
- The new SSD is a primary partition and marked as active.
- The new SSD is the first boot option.
After replacing the old SSD with a new one, you can remove the old drive and let your computer boot from the new one. If your computer boots normally, you can then plug the old drive back in. This way, you can verify that the new SSD is working properly and the old drive is still functional.
If the system reserved partition is not on the correct drive, it may be necessary to move the system reserved partition to the SSD. This can be done to resolve the issue. For more information, you can refer to the article on cloned hard drive won't boot.
You can also try the best free disk partition cloning software - Qiling Disk Master Standard to clone hard drive to another one and boot from it successfully. Please keep reading below to learn more.
Best Partition Copy Software for Free - Qiling Disk Master Standard
Qiling Disk Master Standard is the best free disk partition clone software, allowing you to clone disk partitions with its Disk Backup and Disk Restore feature, giving your computer a new lease on life. The target drive can be an HDD with a bigger capacity or an SSD with higher performance.
- The Disk Backup feature will backup everything on the disk, including the operating system, boot-related partitions, and other data, such as installed programs and personal files, if it is a system disk.
- The Disk Restore feature enables you to restore a backup image to a new disk, which can be larger or smaller. This feature also allows you to enhance SSD disk performance and adjust the partition size of the target disk if it is larger.
In advanced editions, such as Qiling Disk Master Professional, you can directly clone a disk, switch the system disk and cloned disk, and boot from it without restoring an image first. This allows for a secure boot, and cloning a larger drive to a smaller drive is possible.
Honestly, the second one is much easier. If you want an easier way, try Disk Clone feature instead.
How to Clone Partitions to SSD for FREE
Here, you can use the free method - Disk Backup and Disk Restore to clone partitions for free. This method is applicable to all Windows systems, including Windows 11/10/8/7/XP/Vista, both 32-bit and 64-bit. You can follow the steps below to learn how to clone disk partition to SSD for free.
Part 1: Prepare for FREE Disk Partition Clone
Before cloning a disk partition using the backup and restore method, it's essential to make some preparations to ensure a smooth cloning process.
- Prepare a new hard drive to store backup image temperarily and a new SSD to receive image on backup disk.
- The backup and restore method requires the new SSD to be equal to or larger than the backup drive, with available space to match the used space, to avoid the process from failing.
- If your computer is a laptop, you'll need a USB-to-SATA cable or adapter to connect your external hard drive. This will allow you to transfer files from the hard drive to your laptop.
- All data on the SSD will be completely erased, so please back up files in Windows 11/10/8/7 before proceeding.
Part 2: Create a Disk Image in Windows 10 or 11
Step 1. Download and open Qiling Disk Master Standard after installing. Select Backup -> Disk Backup.

Note: If you want to clone a specific partition, select Partition Backup instead.
Step 2. To add a disk, click the + Add Disk button and select the system disk, then choose the destination disk to store the disk image file.

Step 3. Click Proceed to perform disk backup for Windows 10.
With a disk image, you can easily restore a backup image to a new SSD and boot from it successfully. This can be especially useful in case of computer failure, as you can create bootable media for your computer to ensure a smooth recovery process. There are two ways to achieve this: one is to create a bootable media for your computer, and the other is to restore the backup image to the new SSD.
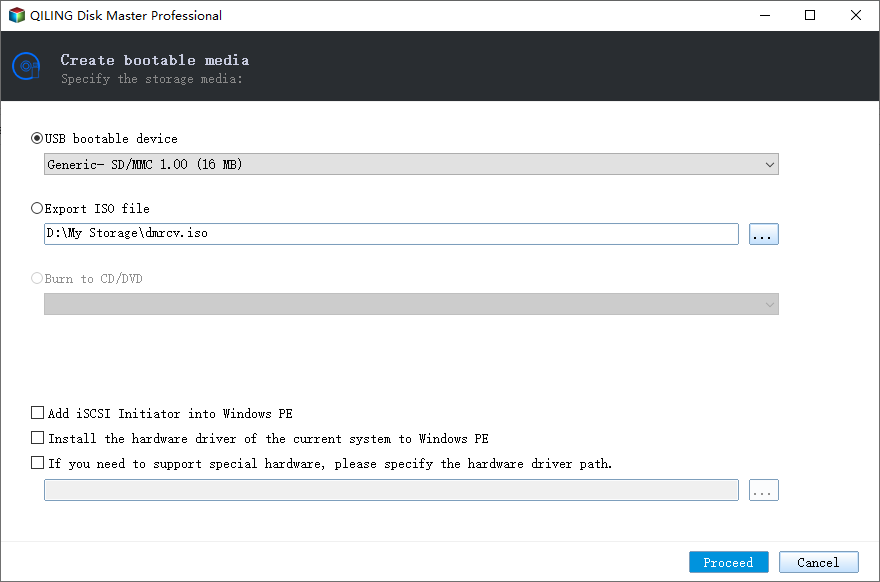
#1: Use Create Bootable Media feature. The tool requires a USB or CD/DVD to store boot files needed to start Windows, and it supports booting any Windows system, including 32-bit and 64-bit versions, whether based on BIOS or UEFI.

#2: Use Recovery Environment feature in advanced edition. If you don't have extra storage, it's suggested to create a recovery environment for your current computer, allowing you to access the software without booting into Windows.
Part 3: Restore Disk Image to New SSD for FREE
To restore a disk image, you can simply open the software and follow the on-screen instructions. If your computer is unbootable, connect the bootable media you created and boot from it, then proceed with the restore process, which may vary slightly.
#1: You create a bootable USB or CD/DVD
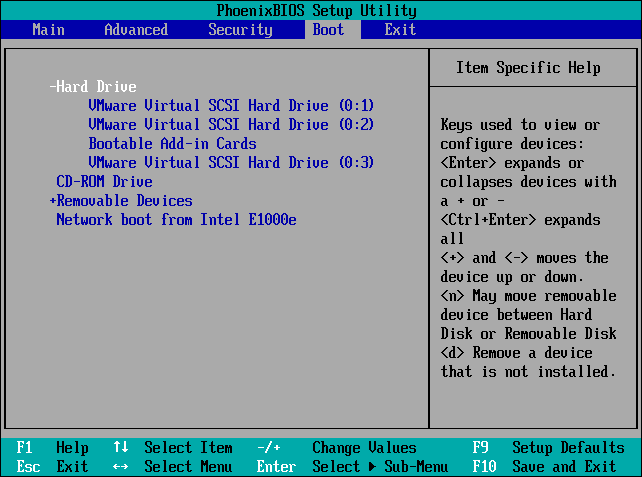
To access the BIOS settings, restart your computer and press a key (usually F2, ESC, or F11) to enter the BIOS setup. Then, navigate to the Boot tab, select the device you want to boot from (such as a USB drive or CD/DVD), and set it as the first boot option.
#2: You create a recovery environment
To resolve the issue, restart your computer and you will see two boot options: Windows 10/11 and Enter into Qiling Disk Master. Select the second option, which is an alternative boot mode, if your computer is not functioning properly.
You can restore a disk image to a new SSD for free. After cloning the original drive, you can then continue to restore the disk image to the new SSD, which will allow you to boot from the new drive without any additional costs.
Step 1. To restore your system, connect an external drive containing your system image and a new SSD to your computer. On the main page of Qiling Disk Master Standard, click "Restore" > "Select Image File" and locate your backup image on the external drive.

Step 2. To restore the entire disk, select the "Restore the entire disk" option and click Next. This will utilize the latest backup image by default, but you can choose a different image by clicking the inverted triangle next to the current time point.

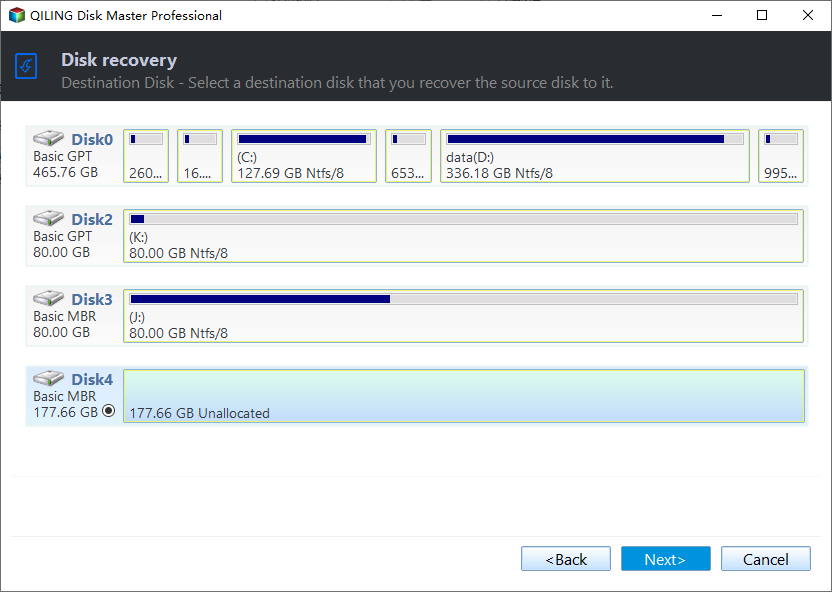
Step 3. Select your new SSD as destination to receive the backup image and click Next.
Step 4. To enhance SSD performance, enable SSD Alignment and proceed with restoring the disk image to the new SSD. This will improve reading and writing speeds.
Notes:
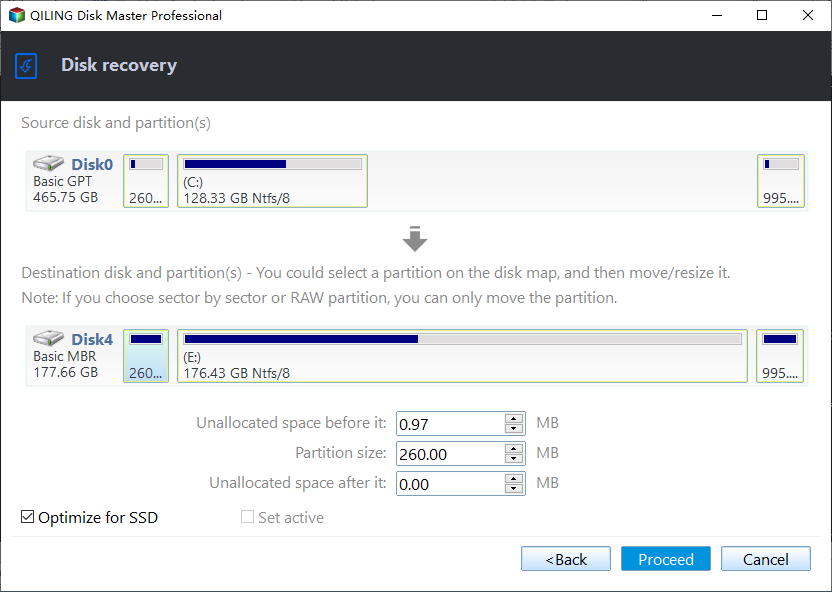
✔ Edit Partitions is used to adjust partition size on the larger destination disk, allowing you to make full use of its disk space.
✔ Universal Restore helps install all necessary drivers to boot Windows, and it's automatically checked if restoring an image to different hardware, prompting a request to upgrade to the professional version after clicking Proceed.
Step 5. Wait until the process ends, then click "Finish" to close the window. Replace the old drive with the new SSD and let your computer boot from it.
How to Clone Partitions in Windows 10 or 11 Easily
You can also use the Disk Clone feature in the advanced edition, which simplifies the process and reduces the required time, in addition to the backup and restore method. Upgrading to the professional version will allow you to take advantage of this feature.
To clone a disk partition in Windows 10 or 11, you'll need to prepare a new SSD that uses the same disk type (MBR or GPT) as the old disk. If the types don't match, you can use the Edit Partitions feature to convert the destination disk from MBR to GPT or vice versa. Additionally, if the new SSD is larger, you can use this feature to adjust the partition size to fit the new disk's capacity.
Before starting to clone disk partition, you need to check disk type for both.
- In Disk Management, right-click the old hard disk or SSD and choose Properties > Volume > Partition Style, where you'll see MBR or GPT at the right side.

- If the new SSD's specifications match the source disk's, you can skip the conversion process, but be aware of the potential unallocated space on the cloned hard drive.
To clone a disk partition in Windows 10 or 11, follow these steps:
Step 1. Open Qiling Disk Master Professional, click Clone and Disk Clone in order.

Note: To clone the specific partition, click Partition Clone to replace it.
Step 2. Select the old disk you want to clone (here is Disk0) and click Next.

Step 3. Select the new SSD to save everything on the old disk (Here is Disk1) and click Next.

Step 4. If you're cloning a disk partition to an SSD, select the "SSD Alignment" option to achieve peak performance. Alternatively, click "Edit Partitions" to convert the disk type or adjust the partition size using the available options.
- Convert the destination disk from MBR to GPT: If the destination disk has a different partition style than the source disk, it's a good idea to convert the partition style of the destination disk to match the source disk. This ensures compatibility and helps the system to recognize the disk correctly.
- Copy without resizing partitions: It will not resize the partition size.
- Add unused space to all partitions: The command will redistribute the unallocated space to each partition of the target disk, taking into account the target disk's size.
- Manually adjust partition size: You can extend the unallocated space to any partition on the destination disk you want.
Notes:
✘ If you use the Edit Partitions feature, the "Sector by sector clone" option will be unavailable, as it's used for cloning all sectors of a hard drive.
✔ This software helps with various tasks such as cloning the Master Boot Record (MBR) to a GPT disk without data loss, migrating an operating system to a Solid-State Drive (SSD), copying data from one USB drive to another, and more.
Step 5. Confirm the disk info and cloning settings, click Proceed to start the cloning process. Then, boot the computer from the cloned hard drive and verify that all content is correct. If it's a laptop, swap the hard drive first.

In sum
Qiling Disk Master Standard is a free software that allows you to clone disks and partitions with ease. It offers two cloning methods: a free backup and restore method, and an advanced method that's easier and saves time. This tool is perfect for creating a duplicate of your disk or partition, providing a reliable backup solution.
With Qiling Disk Master, you can directly clone a hard drive with a different size, whether larger or smaller, to make your SSD achieve its best performance and prevent unallocated space after cloning. Additionally, you can use it to migrate your OS to a smaller SSD if the target disk is not big enough to hold everything on the old disk.
Related Articles
- Best Free SSD Cloning Software for Windows 10/8/7
- Best Bootable Disk Clone Software for Windows 10/8/7
- Freeware to Clone Hard Drives with Bad Sectors (Bootable)
- Easily Clone Hard Drive to SSD on Windows 10 (Free)
- Best Windows Operating System Clone Software for Windows
- Best Free Windows 11 Migration Tool
You will know the best Windows 11 migration tool and learn how to migrate the operating system, files or data to a new drive easily using this tool.