Samsung Data Migration Interrupted in Windows 11: Diagnose and Retry
An unknown-reason error during Samsung Data Migration does not identify a single fault. A disconnected USB bridge, unsupported destination, source read error, or unsuitable target layout can all interrupt the copy. A pause near the end is not by itself proof that cloning has failed.
Keep the original Windows disk unchanged. Until the replacement starts independently, it should be treated as an incomplete migration rather than your only working copy.
Record the failure and check compatibility
- Record the error text, progress percentage, software version, and source and destination disk models.
- Confirm the destination is supported by the installed Samsung software. Check the current manual for the exact model and connection type; OEM drives can have different support.
- Obtain updates from Samsung's official support site. Do not install a repackaged migration utility from a download mirror.
- Inspect the target's capacity and the source partitions selected for migration. There is no universal rule that every migration fails above 75% usage.
- Review encryption, OEM recovery, and multi-volume restrictions in the manual before retrying.
Samsung's migration download guidance directs users to its supported tools. Different releases can expose migration through a different interface.
Eliminate unstable connections and source errors
After safely shutting down, reconnect the destination using a reliable cable or supported internal connection. Avoid an unpowered hub. Keep the computer on mains power and prevent sleep during the operation.
If the source remains stable and readable, protect important files first, then inspect its health with the drive manufacturer's diagnostics. A drive that clicks, disappears, or reports increasing read errors needs recovery planning; repeated cloning attempts can make matters worse.
- Close applications that continuously modify large files, including virtual machines and database programs.
- Confirm the destination contains no files you still need. A new clone attempt can overwrite its previous contents.
- Restart Windows and run one controlled retry after addressing an identified cause.
- If the same error returns, preserve the log and compare the failure point. Changing programs does not repair a defective cable or unreadable source.
Use Qiling Disk Master for a complete-disk clone
A complete disk clone is useful when you need the original layout and startup partitions. Check that your Qiling edition supports the intended system-disk operation, and back up the destination before proceeding.
Step 1. Start Windows from the original drive and connect the destination SSD. Identify both disks by model and capacity.
Step 2. Open the disk clone function and select the entire original Windows disk as source. Include its boot partitions rather than choosing C: alone.
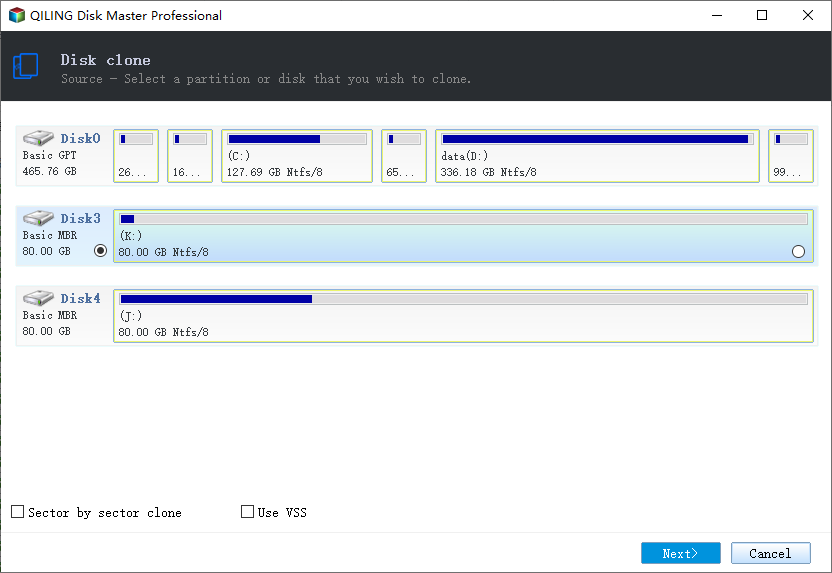
Step 3. Select the Samsung SSD as destination. Confirm that the overwrite warning applies to the intended device.
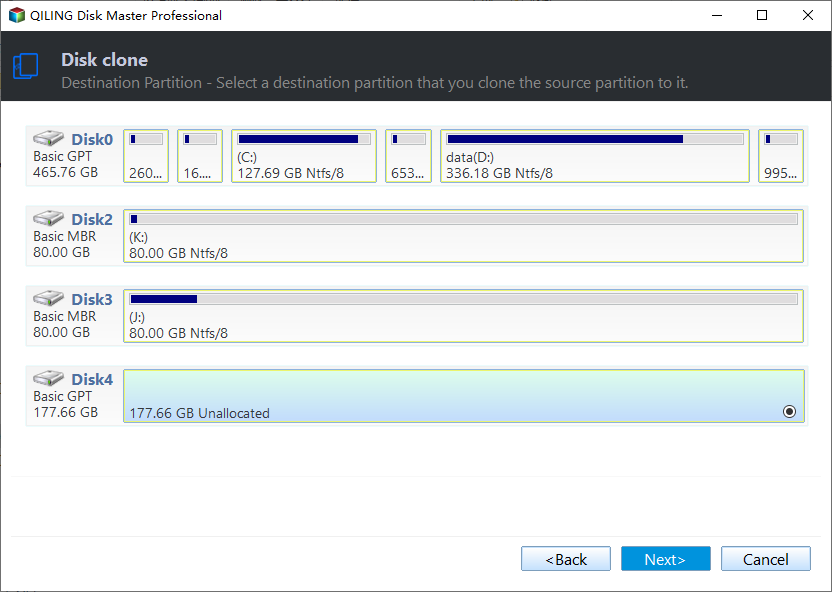
Step 4. Review the partition layout and enable SSD alignment when offered. A sector-by-sector copy can require a target at least as large as the source; do not select it automatically for a smaller SSD.
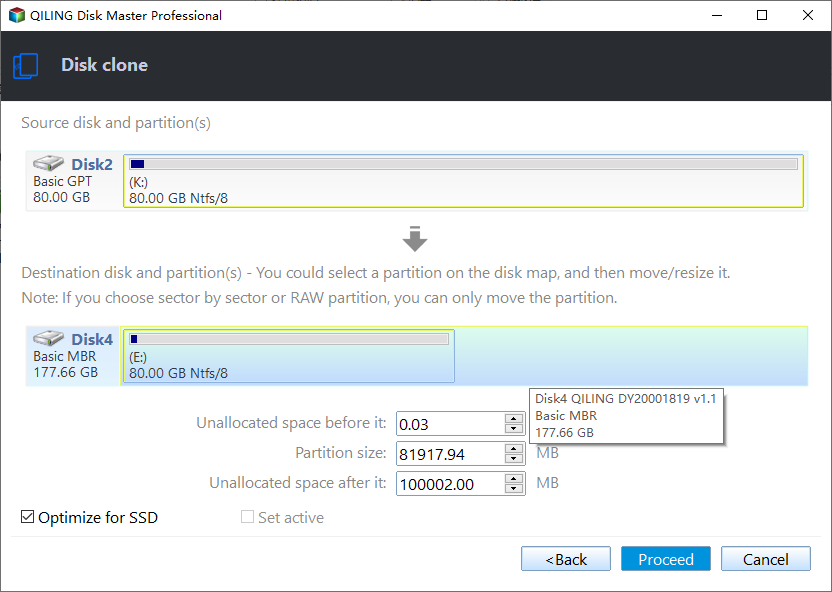
Step 5. Click Proceed. Leave both drives connected until completion, then shut down before changing internal connections.
Prove the SSD works before retiring the original
Install the SSD in its intended internal position and test it with the original disk disconnected where practical. Select the correct Windows Boot Manager or legacy disk entry without arbitrarily changing firmware mode.
Check applications, important files, and usable capacity, then restart again. If the SSD starts only with the original attached, startup files may still be on the original disk. Keep the old drive until the SSD starts independently and a separate backup exists.
Related Articles
- BOOTMGR Missing After Cloning
Check omitted startup partitions when the copied Windows disk will not start. - Samsung Disk Clone
Prepare source and destination disks before copying Windows.
Products
Articles & Tutorials
- Data Recovery
- Data Backup
- File Recovery
- File Backup
- File synchronize
- System Backup and Restore
- Disk and Partition Clone
- Technical articles
- Disk Master Help
- Windows Deleted File and Disk Recovery Tutorials
- Windows File and Data Recovery Tutorials
- More Windows Tutorials for Install, Security, Files, and PC Tips
- Windows Boot, Repair, and Recovery Environment Tutorials
- Windows Backup Tutorials
- Windows Restore Tutorials
- Windows Clone and Migration Tutorials
- Windows Server Backup, Recovery, and Management Tutorials
- Windows Disk, Partition, and Storage Management Tutorials