Use SSD for OS and HDD for Storage | Your Best Choice
Content of this article:
- The need to use SSD for OS and HDD for storage
- Best practice of using SSD for boot and HDD for storage
- Best software to make SSD for operating system and HDD for storage
- How to use SSD as boot drive and HDD as storage easily
- Summary
The need to use SSD for OS and HDD for storage
"When setting up your PC, you'll want to partition your HDD to separate it into two or more sections, one for the OS (operating system) and another for storage. This way, you can keep your OS and programs on the SSD for faster performance, and use the HDD for storing files, videos, and other data. You can partition the HDD using the built-in Disk Management tool in Windows or a third-party software like Qiling Disk Master. Just make sure to create a primary partition for the OS and leave the rest for storage. If you're still unsure, you can also consider a 2-drive setup with a separate storage drive for added flexibility."
Many users prefer to set their SSD as the operating system drive and their HDD as the storage drive, taking advantage of their respective strengths - the SSD's superior performance and the HDD's greater storage capacity at a similar price.
SSDs have several advantages over traditional hard drives, including being lighter, quieter, more durable, and producing less heat. They also consume less power and have no moving parts, making them less prone to damage. As a result, it's often recommended to store the operating system on an SSD and other data on a traditional hard drive, combining the benefits of both.
Best practice of using SSD for boot and HDD for storage
To set an SSD as the boot drive and an HDD as storage, the best approach is to migrate the operating system to the SSD and then format the HDD for reuse. However, the method may vary depending on your specific situation.
Situation 1: Your computer is brand new
You can either create an installation media using an ISO from Microsoft's Download center, perform a clean install of the OS on the SSD, and then format the hard drive using Disk Management, or backup the image of your old computer and do a dissimilar hardware restore, taking into account any hardware incompatibility issues.
Situation 2: Your computer is well-configured
If your computer has been used for a long time and has a lot of software and data, it's best to clone the OS to a new SSD disk in Windows 7/8/10, which will preserve all your programs, settings, and data without the need to reinstall Windows, reconfigure settings, or risk losing data. This is the most efficient and safe way to upgrade your computer.
If you're setting up a new computer or want to start from scratch, you can use Microsoft's ISO image to fresh install the system. However, if you have an existing computer with a well-configured system, cloning or backing up and restoring with a single software is a more convenient option.
Best software to make SSD for operating system and HDD for storage
To easily use an SSD as the boot drive and an HDD for storage, you can use software like Qiling Disk Master Professional, which offers two methods to make an SSD the boot drive, suitable for various SSD brands, and a way to wipe a hard drive for storage.
This software supports "Intelligent Clone" and "Intelligent Sector Backups" by default, allowing it to only clone or backup used sectors, including the operating system, system settings, personal data, and programs stored on the system partition. This enables successful OS migration from HDD to SSD, even from a large HDD to a smaller SSD, and allows booting from the cloned SSD without any issues. During the process, users can enjoy various useful features.
- SSD Alignment: It is used to further accelerate the reading and writing speed of SSD disk and prolong its lifespan.
- Sector By Sector Clone: You're referring to the process of cloning a system partition on a hard disk drive (HDD). This process involves creating an exact copy of the system partition, including all sectors, to another storage device, such as another HDD or solid-state drive (SSD).
- Universal Restore: It's a tool that helps resolve hardware incompatibility issues when restoring a system image to a computer with different hardware, allowing the computer to boot successfully from a restored SSD disk.
After making the SSD the boot drive, you still need to use the HDD for storage. To do this, you need to delete all the data on the system partition or entire disk using the Disk Wipe feature, which supports four different disk wiping methods, including Fill sectors with Zeros and three more thorough methods.
Download this software to have a try right now! (The clone and universal restore feature in the free trial version can only be demonstrated, please upgrade to enjoy.)
How to use SSD as boot drive and HDD as storage easily
Here I will show two available methods mentioned before in order. The first method to set SSD as boot drive and HDD as storage is to clone SSD for OS only and format HDD for storage. But in between, you still need to check if the cloned SSD is bootable, otherwise your computer will fail to boot.
For the two methods of transferring Windows 10 from one computer to another, the first involves cloning the process, while the second involves backing up and restoring the system. The second method is recommended if the target computer has different hardware, as it can resolve driver compatibility issues.
To set an SSD as the boot drive and an HDD as storage, follow these steps: First, prepare your computer by shutting it down. Next, connect the SSD and HDD to your computer, ensuring the SSD is connected to a SATA port and the HDD is connected to a SATA port or another type of storage interface.
- To ensure your computer's case can accommodate both types of drives, it should be able to hold 3.5-inch and 2.5-inch drives. Typically, solid-state drives (SSDs) come in 3.5-inch sizes, while hard disk drives (HDDs) are usually 2.5 inches in size.
- Prepare a 120GB SSD at least.
Method 1: Use SSD for operating system and HDD for storage with clone feature
Step 1: Clone SSD for OS only with System Clone
1. To clone your system to a new SSD, connect the prepared SSD to your computer and ensure it's detected. Then, launch the disk clone software Qiling Disk Master Professional and click on System Clone under the Clone tab.

Tip:
If you want to clone all the data on the original disk, you can choose to clone the hard drive to an SSD using the Disk Clone feature.
The professional edition allows cloning of both data and system disks from MBR to MBR/MBR to GPT, or GPT to GPT/GPT to MBR. If only data disk cloning is desired, the standard edition is a free option.
2. This software will automatically select the system partition and boot related partition(s) as the destination path, and then proceed with the cloning process using the selected prepared SSD.

3. To enhance the performance of an SSD (Solid-State Drive), you can optimize it by selecting the "Optimize for SSD" option. This will improve the drive's writing and reading speed. Once you've made this selection, click "Proceed" to confirm the change, ensuring that there are no issues with your SSD.

If the SSD disk is large enough to hold all sectors of data on the system partition in the HDD disk, you can choose to clone all sectors with the Sector by Sector Clone feature.
Step 2. Boot computer from the cloned SSD
After completing the cloning process, it's essential to verify that the cloned SSD is bootable before formatting the HDD as storage. To do this, boot your computer from the cloned hard drive and check if it boots successfully. This ensures that the cloned SSD is working properly and can be used as a replacement for the original drive. Once you've confirmed the cloned SSD is bootable, you can then format the original HDD as storage.
1. To access the BIOS settings, restart your computer and press the specific key (such as ESC, F2, etc.) on the initial screen.
2. Go to the Boot tab and change SSD as the first boot option via the Shift and + keys.

3. Save the changes and exit the BIOS screen. Your computer will restart and boot from the cloned SSD. If it doesn't, refer to the "cloned SSD won't boot" section for troubleshooting.
Step 3: Wipe a hard drive for reuse
1. Launch Qiling Disk Master, go to Tools and select Disk Wipe.

2. You will be asked to select a partition, unallocated space or disk according to the option you choose in the previous step. Then, click Next.
>If you only want to wipe the operating system, select the partition method and choose the system partition on the HDD disk.
>To completely erase a disk and all its data, select the disk's header and then choose the option to erase the entire HDD disk.

3. Select a disk wiping method and click Start to wipe the HDD disk.
>If you want to quickly delete all data on a partition or disk, you can use the "Fill sectors with Zero" or "Fill sectors with random data" option, with the latter being a safer choice.
>If you want a more thorough method, consider using the "DoD52220.22-M" or "Gutman" option, which can wipe a disk up to 32 times, compared to the previous method which only wiped it 7 times.
You can choose to format a disk with either the built-in disk partition manager - Disk Management or a third-party tool. Alternatively, you can also use the built-in disk partition manager - Disk Management to format the disk. The steps to format a disk with Disk Management are as follows:
1. To open the Disk Management window, press the Windows key + R to open the Run window, then type diskmgmt.msc in the box and hit Enter.
2. After entering the Disk Management window, right-click the HDD and select Format.

3. Select FAT32 or NTFS as the file system, then proceed with the formatting process by clicking Next until the final step, and finally click Finish to initiate the formatting.
Method 2: Use SSD for boot and HDD for storage with backup and restore feature
To set an SSD for OS only using the backup and restore feature, you'll need an additional disk to temporarily store the backup image, except for the SSD itself. If you want to use the system image on a different computer with different hardware, you'll need to install the SSD on that computer and create bootable media to boot it for recovery. However, if you're working on the same computer, you can skip the bootable media creation step.
Step 1: Create a system image backup with System Backup
1. Launch Qiling Disk Master, go to Backup, then System Backup, and it will automatically select the system partition, boot-related partition(s), and all personal data and programs.
2. Select the lower box, choose a disk for the backup image, and then click Proceed.
Step 2: Create a Bootable USB to boot computer
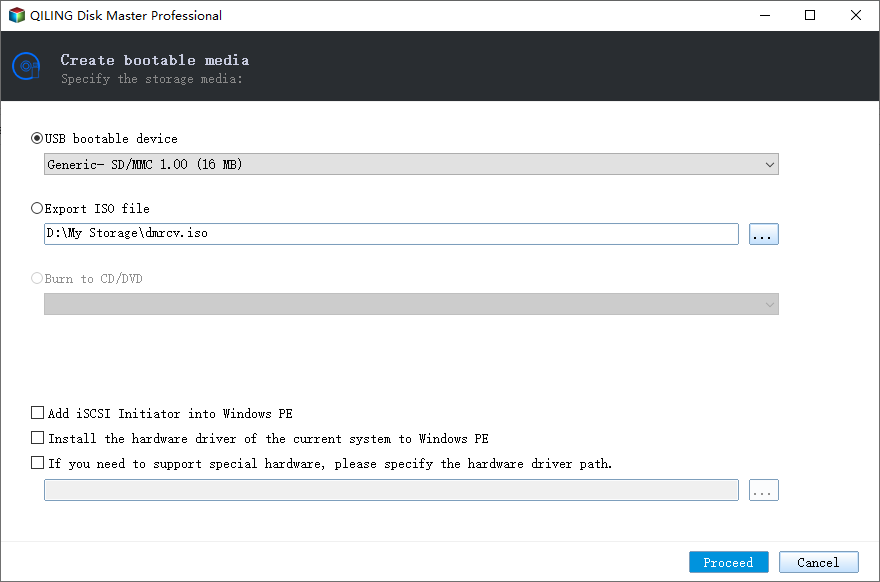
1. Go to Tools and Create Bootable Media.
2. In the Select Bootable Media window, select a storage device to store the boot files to start this software under PE mode, choosing from CD/DVD, USB, or ISO image file options. Click Next to proceed.
Step 3: Restore system image to new SSD easily
1. Install an SSD on the new computer, connect the created bootable USB and disk containing the system image to it. Restart the computer and set the boot priority to the bootable USB in the BIOS settings. Save the changes and restart into Windows PE mode.
2. Here you will see the main page of Qiling Disk Master, click "Restore" and "Select Image File" to choose the backup image on the external disk.

3. To restore a system image, select the option to Restore this system image and then click Next. You can also choose to restore the system to a different location by selecting Restore system to other location and then clicking Next.
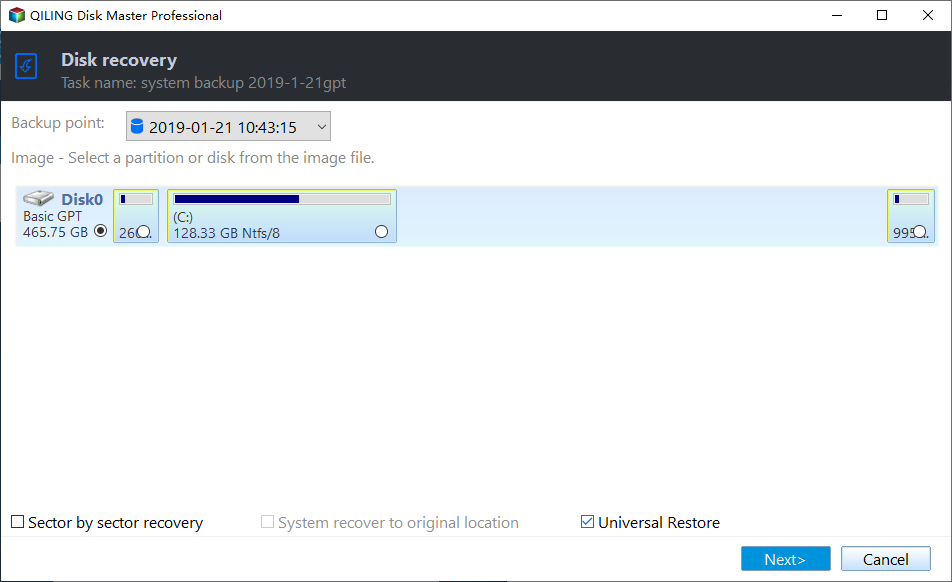
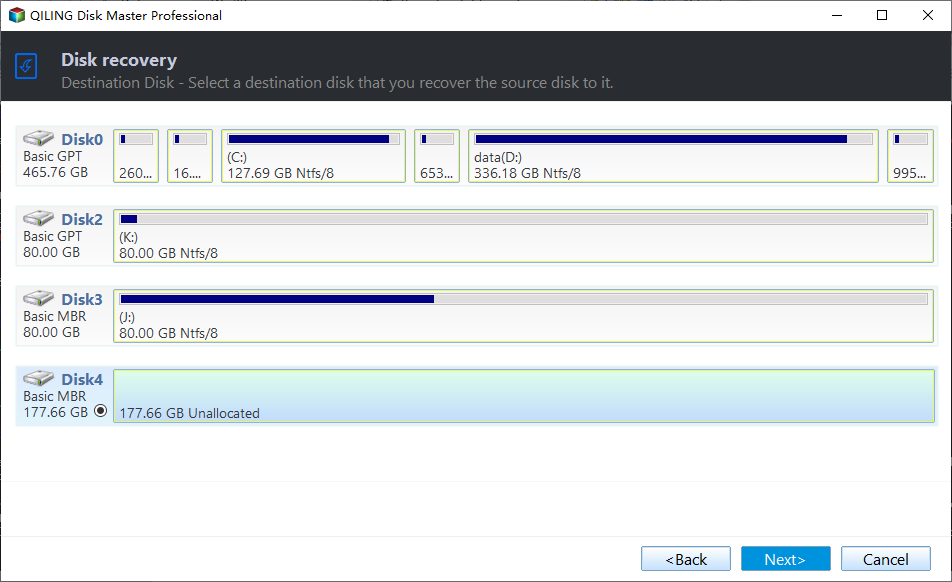
4. To select the new SSD as the restore destination, click on it in the list and click Next. This will transfer the backup image to the new SSD.
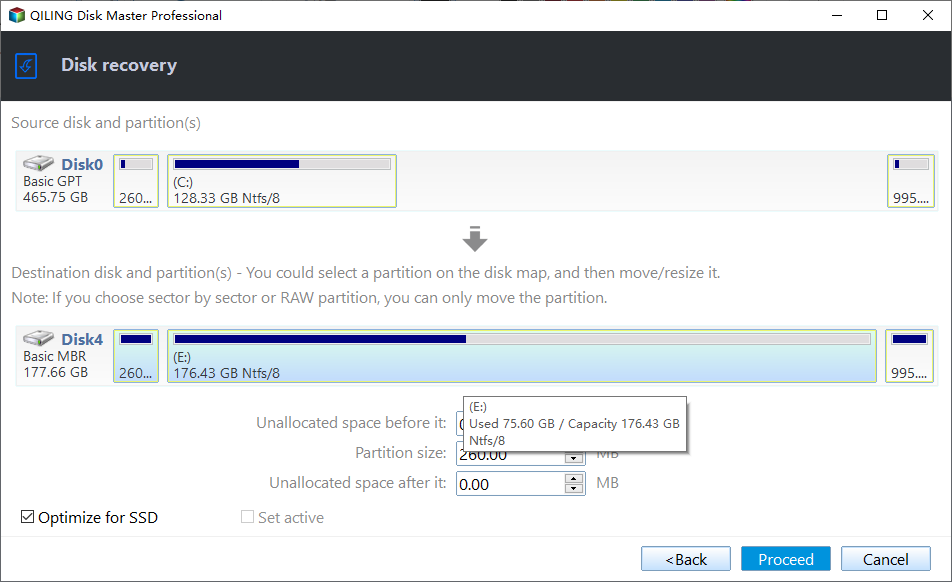
5. Confirm the disk info, tick SSD Alignment and Universal Restore, then click Proceed.
After the system restore completes, you still need to check if the restored SSD is bootable media and wipe HDD for reuse. The steps for this are the same as shown in Method 1, where you follow Step 2 and Step 3 to complete the rest of the process.
Summary
Using a solid-state drive (SSD) and a hard disk drive (HDD) together in a laptop or desktop can be a great combination. The best approach is to use the SSD for the operating system (OS) and the HDD for storage. This setup allows you to take full advantage of the strengths of both drives, resulting in a faster computer and more storage capacity.
To make the process easier, you can either install Windows from scratch on your brand new computer, or use a reliable software to clone or backup and restore your system to a new SSD, preserving all your data, programs, and configured settings from the old computer.
Qiling Disk Master Professional is a reliable software that supports cloning, backup, and restore features, as well as a Disk Wipe feature to delete data on partitions, unallocated space, or entire disks. It's suitable for both IT professionals and technicians, who can use Qiling Disk Master Technician or TechPlus for more advanced tasks.
Related Articles
- Fixed: Samsung SSD Clone Failed in Windows 11, 10, 8, 7
If your Samsung SSD clone failed, what can you do to safely fix the error? Here is the answer to save your SSD. - Seagate Cloning Software: Migrate Data to Seagate Drive Easily
This post will introduce you great and overall Seagate cloning software for Windows 10,8, 7, and show you how to complete disk copy under the help of it. - How to Perform SSD to SSD Migration in Windows 7/8/10?
Look for a way for SSD to SSD migration, like old to new SSD, or smaller to larger SSD migration? Try the reliable disk manager Qiling Disk Master. - Fixed: Transcend SSD Scope Not Working for System Clone
What if Transcend SSD Scope is not working for system clone in Windows 11, 10, 8, 7? here is the solution and better Transcend SSD clone tool. - Stepwise Guide | How to Clone 500GB HDD to 250GB SSD🔥
Learn how to clone a 500GB HDD to a 250GB SSD with our step-by-step guide. Discover the perfect tool to easily migrate your data and operating system to the new SSD, maximizing its performance despite the smaller size. - Super Easy | How to Clone Hard Drive Before Replacing
Cloning your hard drive before replacing it can help keep your new drive with the same data as your old one, and this post will guide you through the process using Qiling Disk Copy.