BCDBoot Failure When Attempting to Copy Boot Files: Check Source and Target
BCDBoot needs a readable Windows installation and a suitable destination for startup files. A copy failure may mean the source path is wrong, the encrypted volume is locked, or the selected system partition is unsuitable or inaccessible.
Rebuilding MBR code does not automatically fix this file-copy failure. Start by identifying both ends of the command.
Find the installed Windows directory
- Boot compatible Windows installation media and open Command Prompt through the recovery options.
- Run
diskpart, thenlist diskandlist volume. Record the disk layout and leave DiskPart withexit. - Check candidate Windows volumes with commands such as
dir D:\Windows. Do not assume the normal C: letter is still C: in recovery. - Confirm that the folder contains the actual installed system, not the recovery environment. Check that the relevant Windows files are readable.
- If BitLocker is locking the volume, use the correct recovery key to unlock it before retrying. Do not format an encrypted volume because its files are inaccessible.
Identify the system partition and firmware mode
For UEFI/GPT, the destination is the existing EFI System Partition on the intended disk. For BIOS/MBR, it is the correct legacy system partition. A small size or FAT32 label alone does not prove a volume is the EFI partition.
Use DiskPart's disk and partition detail commands to confirm the relationship. If the correct existing system volume needs a temporary letter, select that verified volume and assign an unused letter, such as S:. Keep a record of any letter you added. Do not create or format a replacement partition until the layout has been assessed.
If the system partition is absent, the disk is RAW, or its capacity is wrong, stop this copy-only workflow. Those problems need a separate partition or hardware recovery plan.
Retry BCDBoot with explicit, verified paths
For a modern compatible recovery environment, if D:\Windows is the verified installation and S: is its verified EFI System Partition, the UEFI example is:
bcdboot D:\Windows /s S: /f UEFI /vFor a confirmed BIOS/MBR installation with the appropriate system partition assigned S:, the corresponding example is:
bcdboot D:\Windows /s S: /f BIOS /vThese are conditional examples, not commands to paste with guessed letters. The firmware argument is UEFI, not EFI. Older tool versions have different options; check bcdboot /?.
Record the verbose error. Investigate destination free space, read-only status, and source-file integrity instead of immediately formatting S:. Using /f ALL does not resolve a wrong source or a damaged partition.
Microsoft's BCDBoot reference also explains that specifying /s changes firmware-entry behavior. Successful file copying and a correct firmware boot entry are separate checks.
Test startup and preserve the working layout
Remove the installation USB, select the intended disk or Windows Boot Manager, and test normal startup. If the computer still fails, keep the exact new error rather than repeating the same copy command indefinitely.
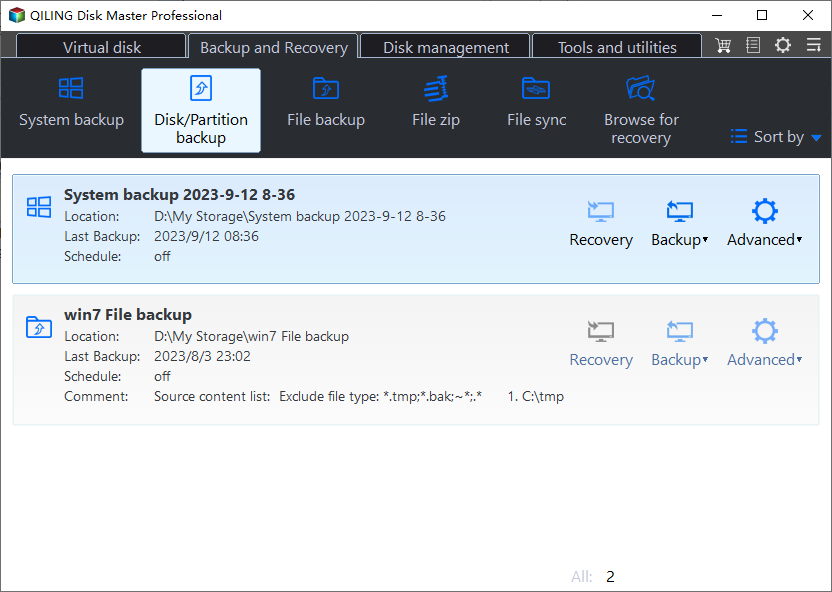
When Windows runs normally, use Qiling Disk Master to save the repaired layout before further changes.
Step 1. Attach a separate disk and open Disk/Partition backup.
Step 2. Select the Windows disk and its startup partitions, then choose a destination on the separate disk.
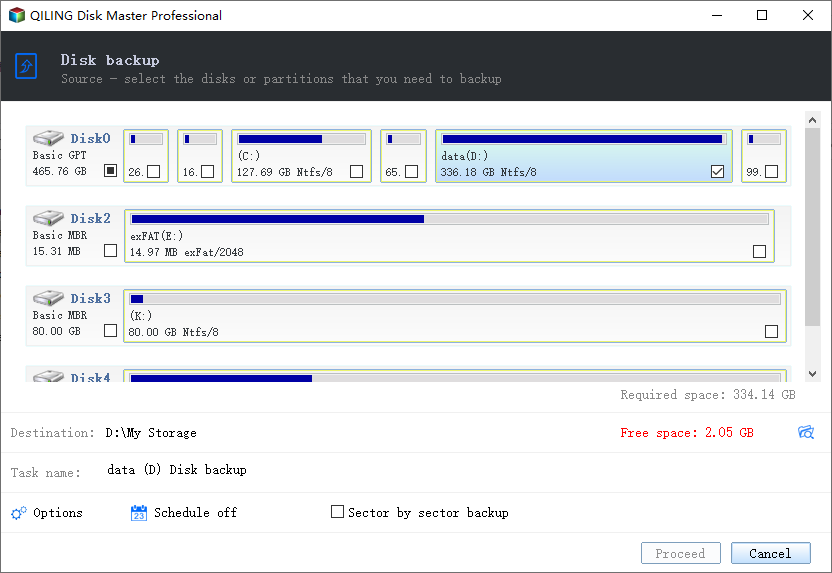
Step 3. Review the selection and click Proceed. Keep compatible recovery media and verify access to the image. Remove only temporary drive letters you added once their purpose is finished.
Related Articles
- Windows Boot Sector Repair
Match legacy and UEFI recovery methods to the actual disk layout. - Invalid Bootable Partition
Check boot-device selection and partition detection before writing files.
Products
Articles & Tutorials
- Data Recovery
- Data Backup
- File Recovery
- File Backup
- File synchronize
- System Backup and Restore
- Disk and Partition Clone
- Technical articles
- Disk Master Help
- Windows Deleted File and Disk Recovery Tutorials
- Windows File and Data Recovery Tutorials
- More Windows Tutorials for Install, Security, Files, and PC Tips
- Windows Boot, Repair, and Recovery Environment Tutorials
- Windows Backup Tutorials
- Windows Restore Tutorials
- Windows Clone and Migration Tutorials
- Windows Server Backup, Recovery, and Management Tutorials
- Windows Disk, Partition, and Storage Management Tutorials