[Explained]: Is It Safe to Delete Temp Files on Windows 10?
What are temp files?
Temporary files are created by Windows or programs to help complete tasks, store session data, or speed up repeated operations. They often use extensions such as .tmp or are stored in Temp folders.
Temporary files and virtual memory are similar, but temporary files are more targeted and serve a specific program. The path for temp files varies, but for Windows, it's usually in the AppData folder on the C drive, which can be moved to another drive to save space.
Deleting temporary files can help improve Windows performance by freeing up disk space. If left uncleaned for a long time, temp files, caches, and similar data may take up a lot of space and slow down Windows.
Is it safe to delete temp files in Windows 10 and 11?
Upgrading from Windows 10 to Windows 11 may result in a large number of update temp files on your disk. Fortunately, it is safe to delete these temp files in Windows 11, allowing you to free up space on your device.
Temporary files in the temporary folder can be safely deleted, as their purpose is to store temporary information to shorten loading times. However, it's best not to delete temporary files that are currently running, as this may cause program errors.
How to delete temp files in Windows 10, 8, 7, and 11
You can delete temp files in Windows 10, but it is better to do it safely. Use the Temp folder, Disk Cleanup, Storage settings, or a trusted cleaner so you can remove unnecessary files without affecting active programs.
▶ Method 1. Delete temp files manually
To manually delete temporary files, follow these steps: simply navigate to the folder where temporary files are stored (usually the "Temp" folder), select the files you want to delete, right-click on them, and choose "Delete" from the context menu. You can also use the "Ctrl+Shift+Delete" keyboard shortcut to quickly delete the selected files.
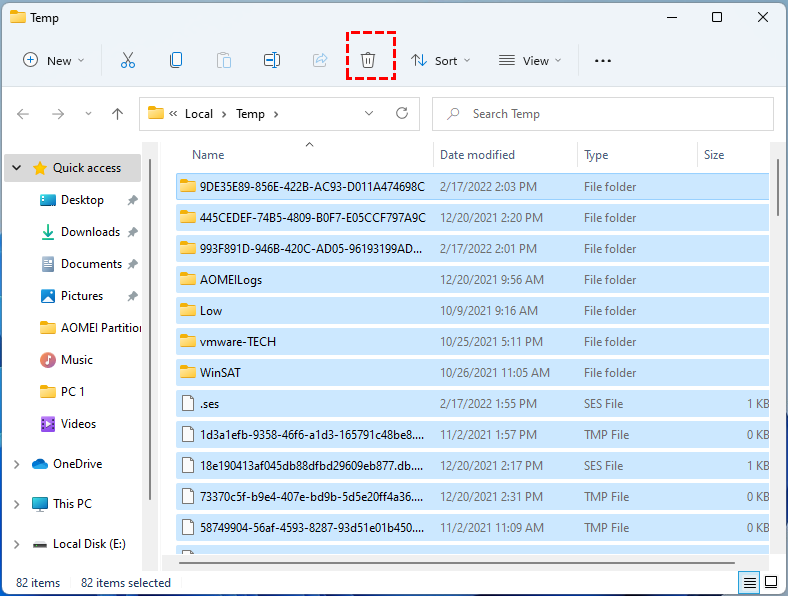
Step 1. Press "Windows + R", type in "%temp%" and hit Enter.
Step 2. Here, you can select the temp files and delete them.
▶ Method 2. Run Disk Cleanup
Disk Cleanup is a Windows built-in cleaner that can delete Temporary files on the target drive.
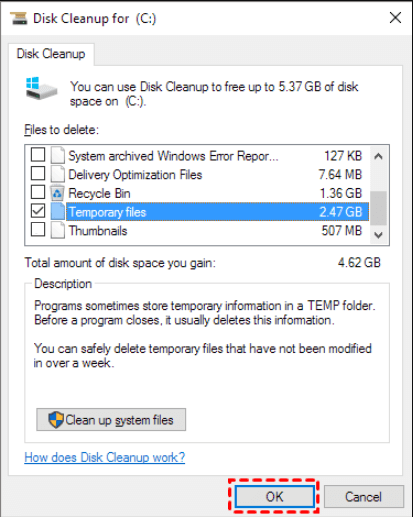
Step 1. Type "Disk Cleanup" in the search bar and press "Enter".
Step 2. Select the target drive and click"OK".
Step 3. Check "Temporary files" and click "OK" to confirm the deletion.
▶ Method 3. Clean temp files via Storage
Windows 10 and 11 users can manage Temp files with the Storage feature, which allows them to view and delete temporary files and system files that are no longer needed. This feature can be accessed by clicking on the "Storage" option in the Settings app, and then selecting "Temporary files" or "System files" from the list of available options.
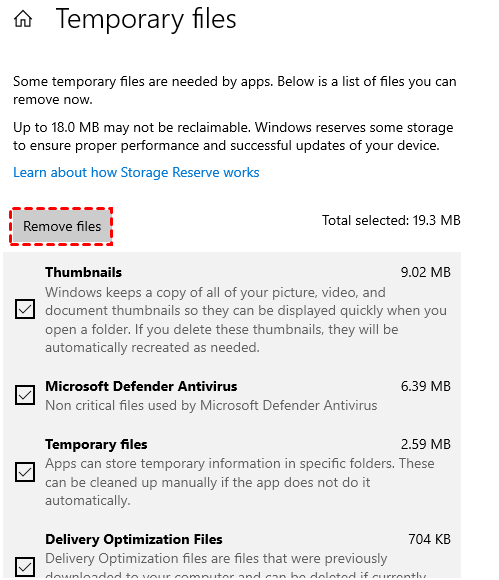
Step 1. To free up storage space on your computer, open the Start menu and navigate to "Settings". From there, select the "System" option, followed by "Storage".
Step 2. Click "Temporary files".

Step 3. All temporary files will be organized, and you can click "Remove files" to delete them.
Powerful junk cleaner: Delete PC temp files safely
To delete temporary files, the best option is Qiling Disk Master Standard, a free and powerful junk cleaner compatible with Windows 11, 10, 8, and 7.
The software's "PC Cleaner" feature scans and removes system junk files, including Recycle Bin, Temporary Files, and Log files, and displays the paths of all temporary files, allowing users to quickly clean all junk files by clicking "Clean All".
Tip: After upgrading to the Pro Version, you can free up more space by deleting large files or moving installed apps to another drive.
Bottom line
After reading this article, you should have a basic understanding of temporary files, including how to safely delete them in Windows 10, and specific steps on how to do so.
Qiling Disk Master is the most suitable tool for deleting temporary files, and it also offers many advanced features, including allocating free space, migrating OS to SSD, converting MBR to GPT, and more.
Related Articles
- A Powerful PC Junk Cleaner for Windows 10 And 11
How to make the computer run faster? An excellent PC junk cleaner for Windows 10 can help you, which can remove all kinds of junk files to free up more space and improve computer performance. - Deep PC Cleaning: Make the Computer Run Faster!
No one wants to use a slow computer. If you're looking for a deep PC cleaning service, you've come to the right place, this article will teach you how to clean your PC from the outside and inside. - How to Perform Xbox 360 Hard Drive Format [Easy Guide]
Discover the easiest ways to perform Xbox 360 hard drive format with our convenient and straightforward tutorial. Follow the step-by-step instructions carefully to ensure a smooth process, taking all crucial steps to become an expert in formatting your Xbox 360 hard drive. - 4 Ways to Fix PNY 128 GB Flash Drive Write Protected
PNY 128 GB flash drive write protection is a common issue that can be frustrating for many computer users. Fortunately, there are four effective ways to resolve this problem, which will be discussed in this article to help you regain access to your write-protected flash drive. - Your Best Guide to Clone Windows to M.2 SSD [2024 Tutorial]
Do you want to know the process to clone Windows to M.2? You can find the right ways and complete the steps with the following tutorial. - Which Command Is Used to Format a Disk Partition as EXT4? Check and Find Answer Here
The command used to format a disk partition as EXT4 is `mkfs.ext4`. This command is used to create a file system on a disk partition, and the `ext4` option specifies the file system type as EXT4.