Solved: Lenovo NOVO Button Not Working in Windows 10, 8, 7
- Lenovo NOVO button not working problem
- NOVO button not working issues and solutions
- Problem 1. NOVO button not working
- Problem 2. NOVO button system recovery black screen
- Problem 3. NOVO button menu stuck
- Problem 4. NOVO button menu keeps popping up
- How to use NOVO button system recovery for factory reset?
- Better Way to Perform Lenovo System Recovery
- Can you disable NOVO button?
- Summary
Lenovo NOVO button not working problem
The NOVO button is a small button with a backwards arrow icon, located near the Power button on Lenovo Ideapad laptops, and is used with the OneKey Recovery software.

To access Lenovo OneKey Recovery, press the NOVO button when the system is in a shut down state, allowing you to start the recovery process, normal startup, enter the BIOS settings, or configure the boot menu.
If your Power button isn't working, you can use the NOVO button menu to start your computer normally, which won't damage your data or make any changes to the computer.
NOVO button not working issues and solutions
If the NOVO button is not working, it could be due to a faulty or damaged button, or a software issue.
Problem 1. NOVO button not working
Solution 1: To ensure your Lenovo computer powers off completely instead of hibernation, turn it off by pressing the power button, then press and hold the power button for 5 seconds to discharge any remaining power, and finally wait 10-15 seconds for the computer to fully power off before retrying the NOVO button.
Solution 2: If the Lenovo computer still doesn't work after trying the above methods, you can try turning off Fast Boot and using the Fn + F2 (or F2) or Fn + F12 (or F12) keys to access the boot menu, from which you can restore or reset your computer, or take other actions.
If the F11 key doesn't work to reset your Lenovo computer, you can try using the NOVO button, which is usually located on the side or top of your laptop. If that doesn't work either, you can try the solutions to the F11 system recovery problem. If you're still having trouble, you may want to contact Lenovo support for further assistance.
Problem 2. NOVO button system recovery black screen
Meeting the NOVO button menu system recovery not working and showing a black screen can be caused by various issues, including faulty hardware, corrupted system files, or problems with the recovery mode itself.
Proven Solution: To fix the NOVO button system recovery black screen issue, click the NOVO button, choose System Recovery, click Return once the recovery starts, and then click Reboot, which will initiate a repair process for your Windows and resolve the black screen issue.
Problem 3. NOVO button menu stuck
The NOVO button menu loop causes a boot menu loop where selecting any option redirects back to the boot menu, preventing the computer from booting up.
Solution: To recover your data, you should check your hard drive for errors, fix the recovery partition if it's corrupted or missing, and if the hardware is no longer functioning, clone the failing hard drive.
Problem 4. NOVO button menu keeps popping up
To resolve the issue of the NOVO button menu constantly popping up while starting, you may need to update your BIOS or UEFI firmware to the latest version. This is often the case when the system is unable to properly load the default settings or configuration.
Solution: To fix a frozen laptop, try shutting down the machine, removing the battery and charger for about 5 minutes, then reconnecting them, which can help reset the system and resolve the issue.
But the next time you start up Lenovo computer, it will still keeps popping up.
How to use NOVO button system recovery for factory reset?
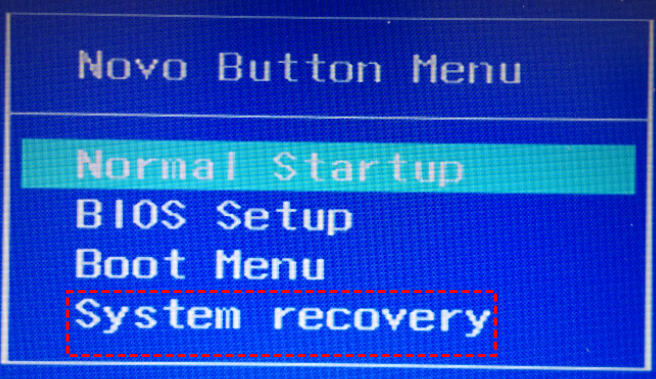
1. To access the NOVO Button Menu, press the NOVO button while the device is in a shutdown state, and select System Recovery from the menu that appears.
2. To reset Lenovo Ideapad to its factory settings, go to Troubleshoot, select Reset this PC, and choose between keeping files or removing everything, then follow the on-screen instructions to complete the reset.
Better Way to Perform Lenovo System Recovery
Qiling Disk Master is a powerful one-key recovery software for Windows that enables you to create a new recovery environment, allowing you to trigger recovery with the F11 or A key, which is particularly useful for Lenovo computers where the NOVO button is non-functional.
Please download Qiling Disk Master demo to have a try:
To create a Lenovo factory recovery partition on a Windows PC or Server, start by ensuring you have the latest Lenovo System Interface Foundation (LSIF) drivers installed. Next, download the Lenovo System Update (LSU) tool from the Lenovo website.
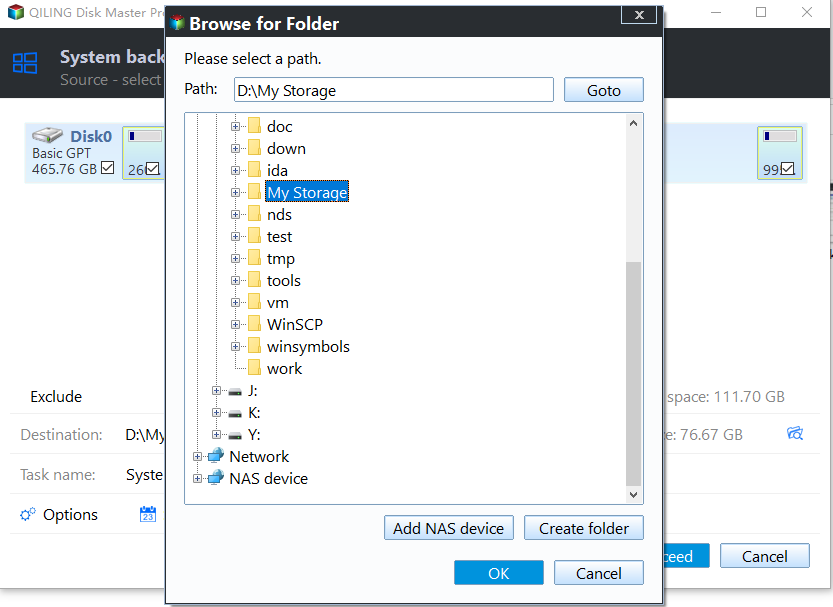
Step 1. Launch Qiling Disk Master, click OneKey System Backup.

Tip: You can compress or password protect the system image file in Backup Options.
Step 2. Select a partition to create the Lenovo factory recovery partition behind it, and press the Proceed button.
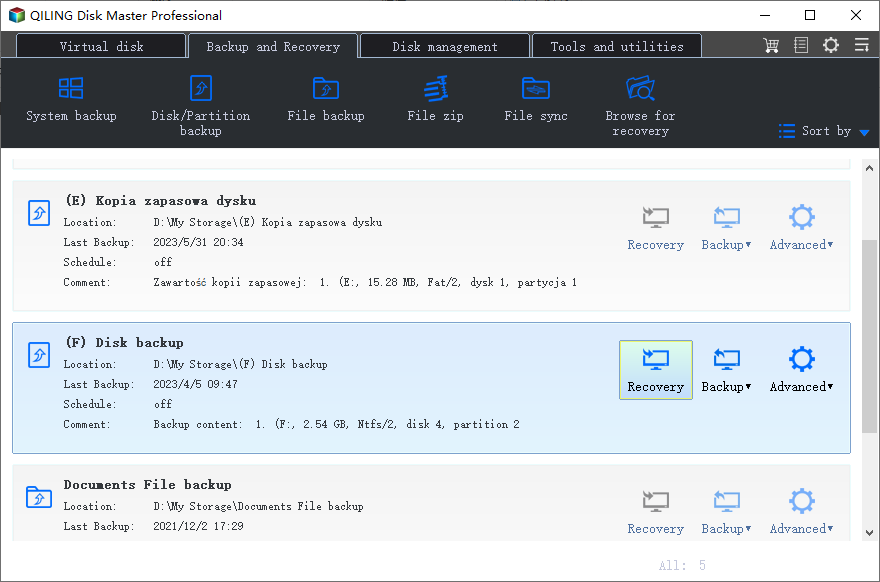
To restore Lenovo to its previous state or factory settings, select the "Disk Master Environment" menu to enter Qiling Disk Master, then choose "Onekey System Restore" and follow the on-screen guide. This process will guide you through restoring your Lenovo to its previous state or factory settings, depending on the state you created the recovery partition.
Can you disable NOVO button?
To disable the NOVO button, go to your BIOS settings and turn off OneKey Recovery, or uninstall Lenovo OneKey Recovery and then disable the NOVO button in the BIOS settings.
The NOVO button, which is used to boot a computer from a USB drive, cannot be disabled through any software or settings. The only way to disable it is to physically damage the button, but this is not recommended as it may cause damage to the computer.
Summary
If the NOVO button on your Lenovo computer isn't working, try the suggested solutions to resolve the issue, and if those don't work, consider using an alternative method to create a recovery partition and enable the F11 or A key as a hotkey for system recovery.
Related Articles
- How to Use Lenovo One Key Recovery in Windows 7/8/10?
In this article not only will you learn how to download Lenovo recovery, but also the best way on how to use Lenovo Onekey Recovery to protect system and data on it and recreate partition or image when Lenovo OneKey Recovery not working. - (SOLVED)Lenovo Service Partition Has Been Destroyed
You may receive Lenovo service partition has been destroyed issue after a system operation failure. Want to get the way to fix Lenovo service partition has been destroyed? See this article. - How to Create Acer eRecovery Management USB or Similar Disk
This article will show you how to create Acer eRecovery Management USB or similar disk in simple steps. - Restore System to Factory Default Settings with Acer Recovery Management
You can easily restore your Acer system to its factory default setting using Acer Recovery Management, which also includes a lossless data recovery method. - Computer Imaging: Image A Computer with Step-by-Step Guide
Have you heard of computer imaging or image computer? Do you know how to image a computer? This post offers a complete overview of Computer Imaging, and a step-by-step guide to image a computer easily. - (FULL FIX 2021) We Couldn't Create a New Partition or Locate an Existing One
Get the full solutions to fix 'we could not create a new partition or locate an existing one' Windows 11/10 USB, error 0x8004240f, 0x80042468, SSD, RAID, unallocated space, and many other related Windows 11/10 install errors.