(SOLVED)Lenovo Service Partition Has Been Destroyed
- About Lenovo service partition has been destroyed
- How to fix Lenovo service partition has been destroyed in Windows 7/8/10
- Guide for safe mode
- Guide for using Windows installation disc
- Method 1: Lenovoservice partition has been destroyed – fixed via Registry
- Method 2: Resolve error Lenovo service partition has been destroyed by CMD
- Method 4: Restore your computer to a good state via System Restore
- Method 5: Troubleshoot Lenovo Service Partition has been destroyed via Lenovo OneKey Recovery
- Qiling Disk Master Pro– protect your computer in a better way
About Lenovo service partition has been destroyed
Lenovo service partition has been destroyed, causing system or application components to fail to run normally. This issue may be due to various reasons, including system crashes, malware infections, or hardware failures.
1. The Windows Registry contains invalid entries due to failed software installation or uninstallation. This issue can cause problems with the system's functionality and stability.
2. Consequences of virus or malware attack.
3. Improper system shutdown due to a power failure.
4. Accidentally deletion of a necessary files or registry entry.
To prevent data loss and ensure your computer runs smoothly, create a system backup. This will safeguard your files and settings, allowing you to restore your computer to a previous state if it encounters issues or crashes.
How to fix Lenovo service partition has been destroyed in Windows 7/8/10
Some users are experiencing issues where they can't access their operating system or command prompt, and instead are stuck in the BIOS screen or seeing an error message, with no helpful solutions found.
If the Lenovo service partition has been destroyed, you can try the following solutions: Check if the partition is still available in the BIOS settings, reset the BIOS to its default settings, run a disk check using the Lenovo System Update tool, or reinstall Windows. If none of these solutions work, you may need to contact Lenovo support for further assistance.
Guide for safe mode
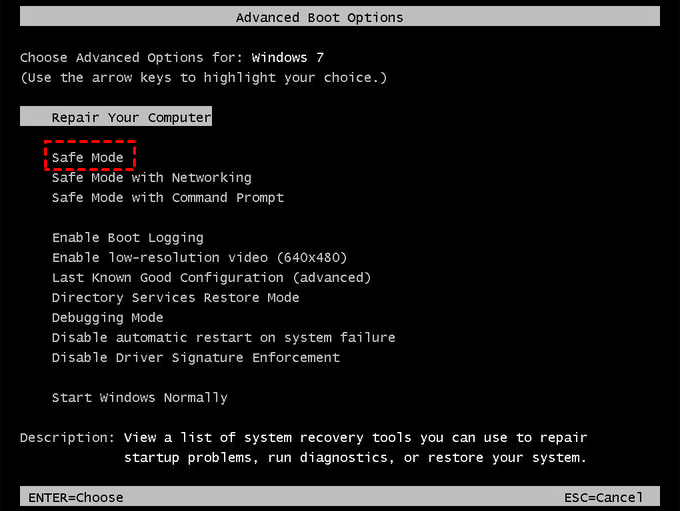
Step 1. In Windows 7, you can restart your computer and press F8 repeatedly before the Windows logo appears on the screen.
Step 2. If you can access advanced boot options, select Safe Mode.
To safely restart your Windows 8 or 10 computer, press and hold the Shift key while clicking the Restart button. This will initiate a safe mode restart, bypassing any problematic startup processes that may be causing issues.
Guide for using Windows installation disc
If you can't go to safe mode, you can still boot your computer using a Windows installation disc.
Step 1. Download ISO from Microsoft and burn it to disc.
Step 2. To boot from a CD or DVD, start your computer, enter the BIOS settings by pressing the corresponding key (usually F2, F12, or Del), set the boot priority to your disc drive, and then press F10 to save the changes and exit the BIOS settings.
Step 3. When you see the prompt "Press any key to boot from CD/DVD", press any key on your keyboard to proceed with the booting process from your disc. This prompt usually appears on the screen when your computer is starting up and is looking for instructions on how to proceed.
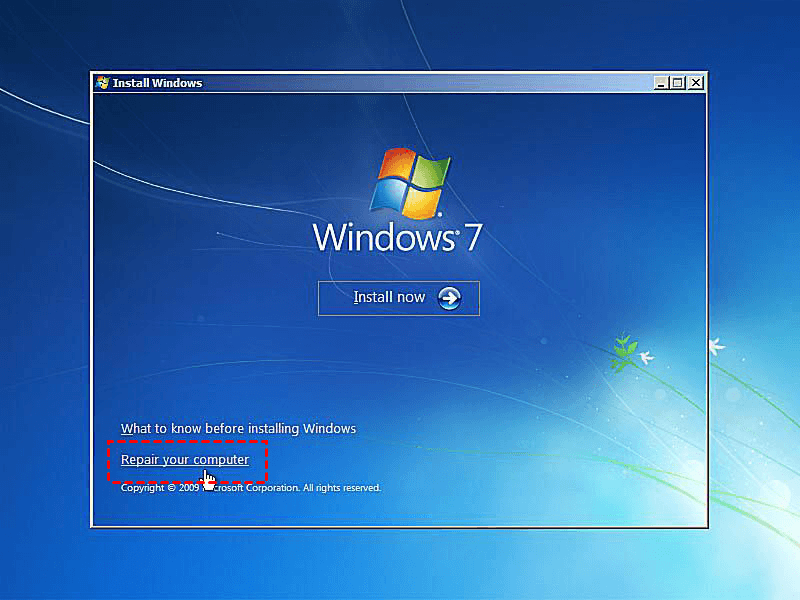
Step 4. Click Next in the Install Windows page.
Step 5. To enter the system recovery options, click on "Repair your computer" and select any necessary option.
If your computer is Windows 8/10, you can click "Repair your computer > Troubleshoot > Advanced Options" and then select the option you want to use.
Method 1: Lenovoservice partition has been destroyed – fixed via Registry
Backup the Windows Registry
Before starting any operation, it's recommended to backup the Windows Registry to prevent potential issues, in case something unexpected happens.
Step 1. Go to safe mode or installation disc.
Step 2. To open the registry editor, press the Windows key + R to open the Run window, then type "regedit" and press Enter. Alternatively, you can go to the Command Prompt and type "regedit" to open the registry editor.
Step 2. Click File and Export in this window.
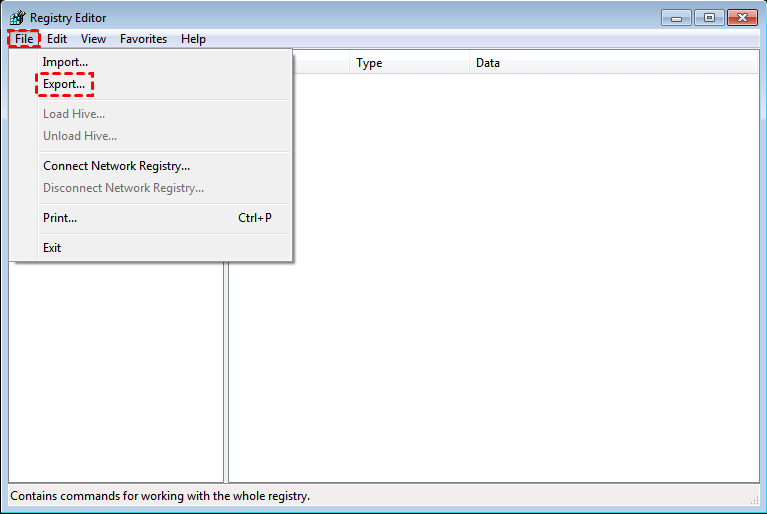
Step 3. Set a name for your backup and select a location to save it, then click Save.
Remove invalid entry from the Windows Registry
Step 1. Go to the registry editor.
Step 2. Expand the following keys one by one and check the string values presented in the right-side panel. Then, you need to look for a string value containing path of an EXE file of a software which has been uninstalled and delete it from your computer.
HKEY_LOCAL_MACHINE\SOFTWARE\Microsoft\Windows\CurrentVersion\Run
HKEY_LOCAL_MACHINE\SOFTWARE\Microsoft\Windows\CurrentVersion\RunOnce
HKEY_LOCAL_MACHINE\SOFTWARE\WOW6432Node\Microsoft\Windows\CurrentVersion\Run
HKEY_LOCAL_MACHINE\SOFTWARE\WOW6432Node\Microsoft\Windows\CurrentVersion\RunOnce
HKEY_USERS\.DEFAULT\Software\Microsoft\Windows\CurrentVersion\Run
To remove invalid startup programs in Windows, delete the string values containing the startup programs in the Windows Registry. This will immediately remove the invalid entry.
Method 2: Resolve error Lenovo service partition has been destroyed by CMD
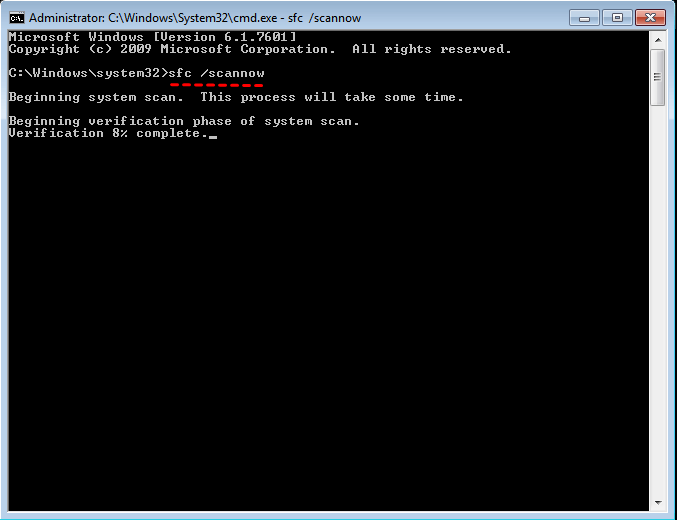
Step 1. Go to CMD and run as administrator.
Step 2. Run the command SFC /scannow in the command prompt, restart your computer, and check if the error appears again. If it doesn't, no further steps are needed. If it still appears, try the next solution.
If your computer is running Windows 8/10, you can still try the DISM command-line with the following command.
DISM /Online /Cleanup-Image /ScanHealth
Method 4: Restore your computer to a good state via System Restore
If you created one or more system restore points, you can restore your computer to an earlier date when the computer worked normally.
Step 1. To access System Restore, you can boot your computer in Safe Mode or use a Windows installation disc. In Safe Mode, you can navigate to System Restore just like in a normal boot. Alternatively, using a Windows installation disc, click "Next" on the Install Windows page and then select "Repair your computer" and proceed to System Restore.
If your computer is Windows 8/10, you can click "Repair your computer" > "Troubleshoot" > "Advanced Options" > "System Restore" to revert to a previous point when the issue wasn't present.
Step 2. Select the recommended restore and click Next.

Step 3. Confirm the restore point and click Finish to start the restoring process.
Method 5: Troubleshoot Lenovo Service Partition has been destroyed via Lenovo OneKey Recovery
You can search Lenovo OneKey Recovery in the search box and select it from the result list.
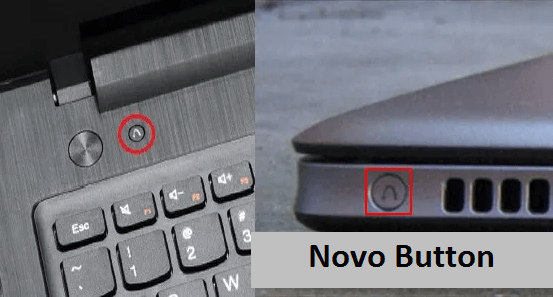
Step 1. Press the Novo button to enter the Novo Button Menu, typically located on the upper left corner of the Power button.
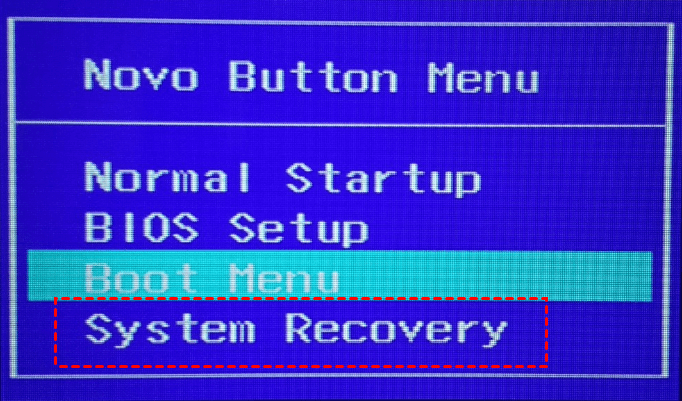
Step 2. Choose System Recovery to get to Lenovo OneKey Recovery.
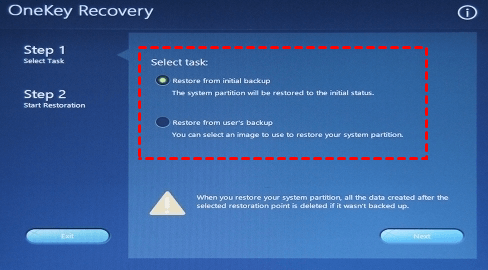
Step 3. To recover your computer, select how to recover your computer and click Next. There are two options: Restore from initial backup and Restore from user's backup.
Step 4. Click Start and wait until the recovery is completed. Afterwards, follow the on-screen instructions to set up Windows settings.
Qiling Disk Master Pro– protect your computer in a better way
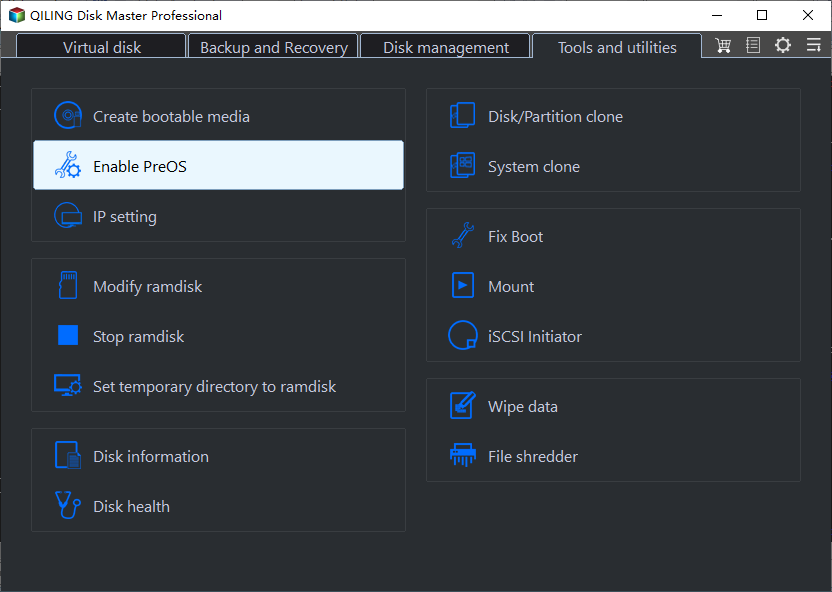
Lenovo OneKey Recovery can fix the issue, but some users have issues with it after resizing partition. An alternative to Lenovo OneKey Recovery is Qiling Disk Master Pro.
This software is similar to Lenovo OneKey Recovery, allowing you to create a recovery partition and restore a preinstalled operating system when system problems arise. Additionally, Qiling Disk Master Pro can still recover your system in situations where Lenovo OneKey Recovery fails to initialize or cannot find the service partition.
If you need technical services or UI customization, you can use Qiling Disk Master Technician or Customization.
Detailed steps:
Step 1. Download Qiling Disk Master, install and open it.
Step 2. Click OneKey System Backup.

Step 3. To back up your system, select the backup option and click Next. There are two choices: backing up to the Qiling Disk Master Partition (recommended) or choosing a different location.
- ★Tips:
- You can enable the feature to compress the backup image with a normal or high compression level or add a password to it, making it more secure and harder to access without permission.
- You can schedule the update to keep all items on your computer up to date instead of a factory image. You have 3 options: Daily, Weekly, Monthly.
Step 4. Preview the final result and click ProceedTo ensure there's enough unallocated space, check if any free space exists on your storage device. If there is unallocated space, you can proceed with the task. However, if no unallocated space is available, you'll need to create a new unallocated space before proceeding. This ensures that the storage device has sufficient room for the task at hand.
Related Articles
- Troubleshoot | Lenovo One Key Recovery Partition Has Damaged
I cannot access Lenovo OneKey Recovery after resizing my partition, saying "onekey recovery partition has damaged so do not launch the main application". Be relax and see this article. - Workaround to Lenovo Product Recovery Stuck in Recovery Mode
Are you troubled by "Lenovo Product Recovery Stuck" issue? If so, you can click on this article and learn the workaround for it. - Solved: Lenovo NOVO Button Not Working in Windows 10, 8, 7
NOVO button not working for system recovery in Windows 10, 8, 7? Find solutions here and get better way to perform Lenovo system recovery. - (100% Transfer) How to Transfer H&R Block to New Computer
Here we will show you how to transfer h&r block from one computer to another. No reinstall you need. Follow Qiling Disk Master to get the smooth program transfer. - Change File Extension One-by-One and in Bulk
If you're curious about file extensions like .doc or .png, you might wonder how to change them. For instance, you might want to know how to convert a JPG to PNG. In this article, we'll explain how to change a file extension in Windows 10, including how to do it individually and in bulk. - Can I Clone BitLocker Encrypted Drive Without Disabling It? Yes! [3 Minutes Guide]
This guide provides a 3-minute tutorial on how to efficiently clone a BitLocker encrypted drive on Windows without disabling it, and without needing a recovery key for decryption. By following the simple steps, you can clone the BitLocker drive to a new disk in just a few clicks.