How to Remove Write Protection from USB in Windows 11/10/8/7
Quick Navigation:
- #1. Remove Write Protection from USB by Turning Switch to OFF
- #2. How to Remove Write protection from USB with Command Prompt (Diskpart)
- #3. How to remove USB write protection with Registry
- Using Registry to remove USB write protection in Window 10 and 11
- Using Registry to remove USB write protection in windows 7
- #4. Remove USB Write Protection by Turning off BitLocker Partition
- Tips: How to Recover Data From write-Protected USB Flash Drive
- Your Effective USB Flash Drive Recovery Software
To remove write protection from a USB flash drive, follow the steps in this article. The process applies to Windows 10/8/7. However, be aware that removing write protection may result in data loss, so it's essential to back up your data first. If you do lose data, consider using a USB drive recovery software to recover it as soon as possible to prevent permanent data loss.
USB write protection is a feature that prevents data from being erased or modified on a USB pen drive, rendering it unusable until the protection is removed. When this occurs, the error "The disk write is protected" is displayed, and the user is unable to use the USB without resolving the issue. Fortunately, there are various methods available to remove write protection from a USB pen drive.
#1. Remove Write Protection from USB by Turning Switch to OFF
To remove write protection on USB pen drives with a physical switch, you need to turn the switch OFF. This switch is designed to protect the user's data by turning it ON in times of need, but it may accidentally be touched, activating the write protection mechanism. To disable write protection, simply flip the switch to the OFF position, which will allow you to write data to the pen drive again. This is a simple and effective way to regain access to your data.
1. Physically locate the switch on the pen drive.
2. Turn the switch to OFF if this is switched ON. It will immediately deactivate write protection.

3. Once you plug the external hard drive into a computer, all your files will be accessible and modifiable again.
#2. How to Remove Write protection from USB with Command Prompt (Diskpart)
The Command Prompt, also known as cmd, is an interpreter for command lines available on various operating systems, including Windows 11/10/8/7. To remove the read-only status of a USB pen drive using Diskpart, follow this process:
1. To open the Command Prompt, press the Windows key + R on your keyboard, then type "cmd" in the search bar to find it.
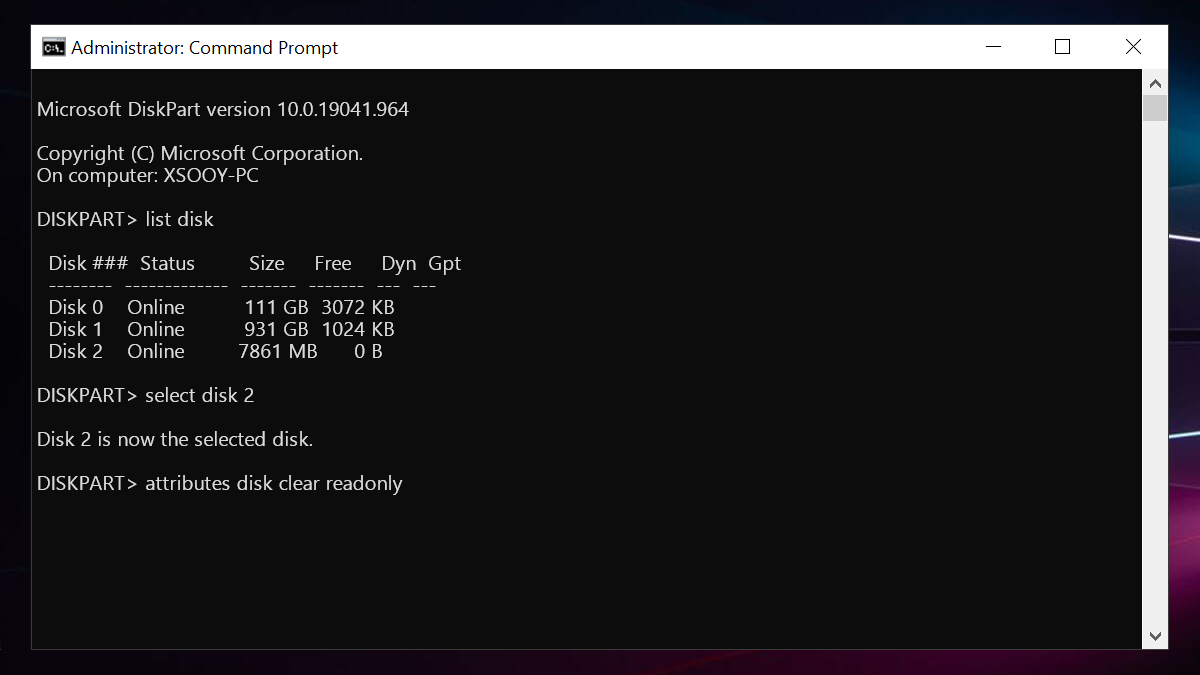
2. Once it opens, type Diskpart and press enter.
3. Then proceed by typing list disk and press enter.
4. To choose your USB pen drive, type "select disk X" in the command line, where X is the number assigned to the write-protected USB drive.
5. To remove write protection from a USB drive using the Command Prompt, type `attributes disk clear readonly` and press Enter. This command will clear the read-only attribute from the USB drive, allowing you to write to it again.
Close the Command Prompt by typing "exit" as soon as the process is finished. Immediately reboot your PC, then check if write protection has been disabled or is still present.
#3. How to remove USB write protection with Registry
The Windows Registry is a database of settings that stores hardware configurations, installed applications, and the operating system. To remove write protection from a flash drive using the registry, it's essential to be cautious, as direct system modifications can be hazardous, especially for beginners. However, following the exact steps carefully can help you use the registry editor without damaging your system. Note that the process differs slightly between Windows 8/10 and Windows 7.
Using Registry to remove USB write protection in Window 10 and 11
1. Plug the write-protected USB flash drive.
2. To open the Registry, click on Start, then open the Run dialog by pressing the Windows key + R, type "regedit" and press Enter, or click on the Start button and search for "Registry Editor".
3. Click on HKEY_LOCAL_MACHINE then expand SYSTEM.
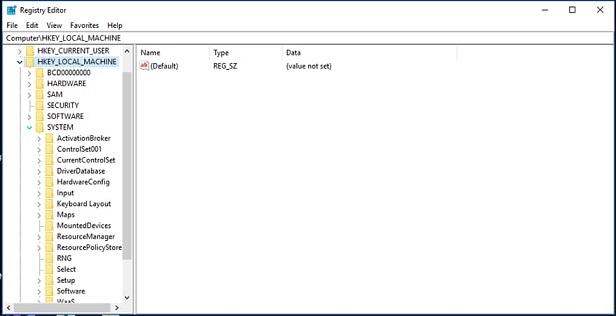
4. From SYSTEM navigate to CurrentControlSet > Control > StorageDevicePolicies.
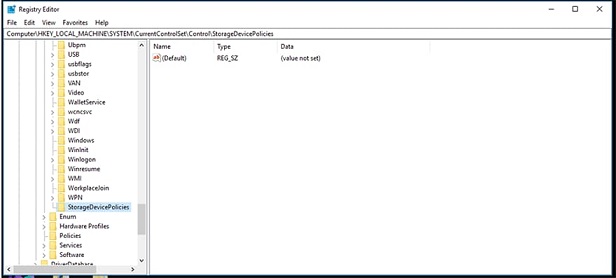
5. Open Edit DWORD by double-clicking WriteProtect
6. To change the value in the value data text box to 0, click on the value data text box, delete the current number, and type 0. Then, click OK to save the changes.
7. Close regedit and restart your computer.
To add StorageDevicePolicies to the registry, you can use the following PowerShell command: `New-Item -Path "HKLM:\SOFTWARE\Microsoft\Windows\CurrentVersion\Explorer\MyComputer\NameSpace\" -Name "StorageDevicePolicies" -ItemType "key"`. This will create the StorageDevicePolicies key in the registry, which may resolve the issue. Note that this command should be run in an elevated PowerShell prompt.
8. Go to HKEY_LOCAL_MACHINE then expand SYSTEM.
9. From SYSTEM navigate to CurrentControlSet > Control.
10. In the File pane, right-click in an empty space, select New, and then choose KEY.

11. To access the StorageDevicePolicies, navigate to the folder pane on the left and name the key "StorageDevicePolicies" and press Enter.
12. After creation select StorageDevicePolicies from the folders pane.
13. To add a new DWORD (32-bit) Value to the registry, right-click an empty space in the file pane, place the mouse pointer on "New" and select "DWORD (32-bit) Value".
14. Name the value WriteProtect and press Enter.
To open the Edit DWORD dialog box, double-click on WriteProtect, then proceed with the steps as described above.
Using Registry to remove USB write protection in windows 7
1. Open regedit as done above
2. Go to HKEY_LOCAL_MACHINE then go to SYSTEM.
3. From SYSTEM proceed to CurrentControlSet, then Services.
4. Choose USBTOR.
5. Double-click on Start this will open a dialog box.
6. In the dialog box, enter 3.
7. Finally close Registry Editor.
#4. Remove USB Write Protection by Turning off BitLocker Partition
BitLocker is a full volume encryption feature in Microsoft Windows, starting from Windows Vista, that protects data by encrypting the entire drive. When enabled, it prevents any modifications to the encrypted partition unless the protection is removed. To enable BitLocker, the user must prepare the drive, put the computer to sleep or shut it down, and then enter the recovery key to decrypt the drive. Once decrypted, the user can access the data, and the drive can be modified. However, if the user forgets the recovery key, they may lose access to the encrypted data.
1. To manage BitLocker on a volume, open File Explorer, right-click on the BitLocker volume, and select the "Manage BitLocker" option from the context menu.
2. Choose the partition that is write-protected (displaying BitLocker) and click on Turn off BitLocker option.
3. It will decrypt on its own and display, Bitlocker off.
To remove write protection from a USB drive on Windows 11/10/8/7, you can try one of four easy methods. Firstly, you can try using the built-in Disk Management tool to remove the write protection.
Tips: How to Recover Data From write-Protected USB Flash Drive
If all methods to remove write protection from a USB drive fail, it's still possible to recover data from the write-protected drive using Deep Data Recovery. The lost data remains on the drive until it's overwritten, allowing for recovery.
Your Effective USB Flash Drive Recovery Software
- The best USB recovery software is a safe and easy process that involves only 3 steps, making it a big effort saver.
- This undelete or unformat USB tool supports almost all USB devices.
- This system allows you to selectively recover only the data you need, saving you time and effort by not having to recover the entire system.
In other to recover data using Deep Data Recovery
1. Plug the USB pen drive into your computer, then download and install the Deep Data Recovery software on your PC or Mac. Once installed, launch the software.
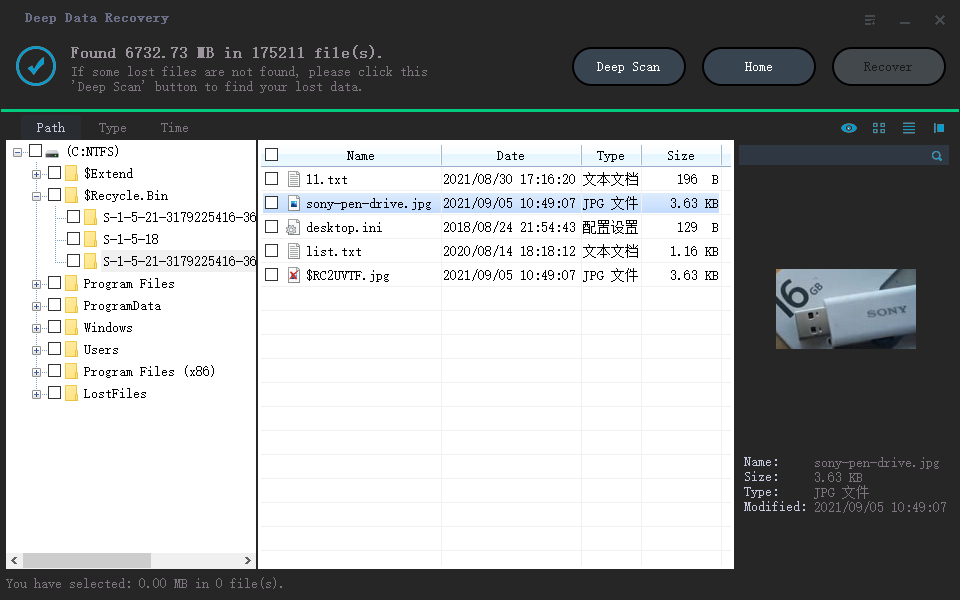
2. The next screen displays a list of your USB Flash drives. Choose the write-protected USB Flash drive and click on the "Scan" button to proceed, which will initiate a quick scan of the USB Flash Drive.
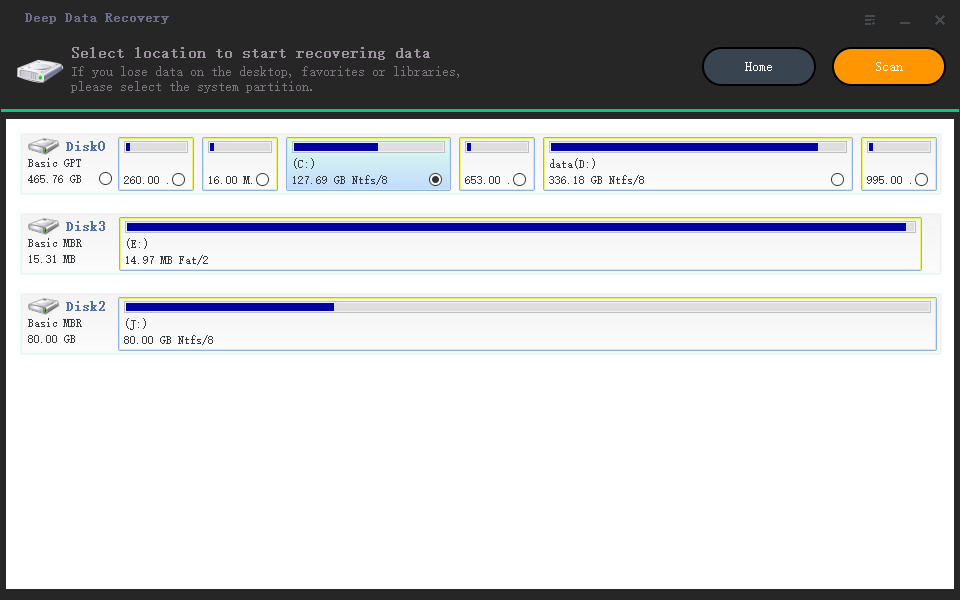
3. After the scan is complete, preview the seen files and select the one you want to recover from the options. If the desired file is not found, you can proceed with a deep scan, which is a more intense search procedure that requires more time but is more effective in file recovery. This allows you to recover your data from a write-protected USB pen drive.
Related Articles
- How to Recover Pictures from Panasonic Lumix
- How to Fix Slow USB Transfer Speed in Windows 11/10/7
- How to Fix USB Drives not showing up in Windows 10
- How to Recover Data from Raw USB Flash Drive
- How to Recover Data from USB in CMD
- How to Recover Deleted Files from USB Drive
- How to Recover Data from Formatted USB Drive
- How to Recover Data from USB Flash Drive That Needs to Be Formatted