How to Shrink Extended Partition in Windows Server 2008
Windows Server 2008 may store one or more logical drives inside an extended partition. To shrink this kind of layout safely, first identify the logical drive you want to reduce, then create unallocated space without damaging other logical drives in the same extended container.
Understand extended partitions in Server 2008
An extended partition is a container, not the normal volume you open in File Explorer. The drive letters inside it, such as D: or E:, are logical drives. In most cases, you shrink the logical drive first. The extended partition boundary changes only when the free space is at the correct side of the container.
Before resizing a server partition, do these checks:
- Confirm the disk number, drive letter, capacity, file system, and used space.
- Back up important data or create a system backup if the disk stores server roles, databases, or shared folders.
- Close applications and services that are writing to the target logical drive.
- Run chkdsk first if the volume reports file system errors.
Shrink a logical drive with Disk Management
Disk Management can shrink a logical drive when there is enough movable free space at the end of that drive. It cannot always move partitions or adjust non-adjacent space, so check the layout carefully before relying on it.
Step 1. Right-click Computer, choose Manage, open Storage, and click Disk Management.
Step 2. Find the logical drive inside the extended partition. Check the drive letter and size again so you do not shrink the wrong server volume.
Step 3. Right-click the logical drive and choose Shrink Volume. Windows will query the available shrink space.
Step 4. Enter the amount of space to shrink in MB, then click Shrink. If Disk Management offers less space than expected, immovable files or volume errors may be blocking the shrink.
Step 5. After shrinking, confirm where the new unallocated space appears. If it is still inside the extended partition, you can use it to create another logical drive. If you need to give that space to a primary partition, you may need a partition tool that can move boundaries.
Shrink it with Qiling Disk Master Server
 Qiling Disk Master
Resize a Server 2008 logical drive with a clear preview before applying changes.
Step 1. Open Qiling Disk Master Server and locate the logical drive inside the extended partition. Check the drive letter and capacity before choosing any operation.
Step 2. Select the partition that you need to adjust, then click the Resize/Move button.
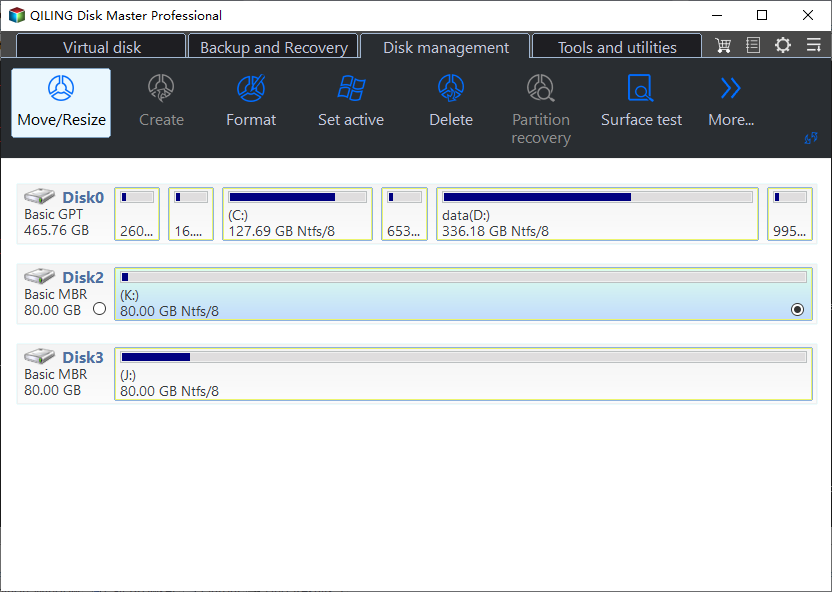
Step 3. In the resize window, drag the right border of the logical drive to the left, or type the new partition size manually. This creates unallocated space after the selected logical drive.
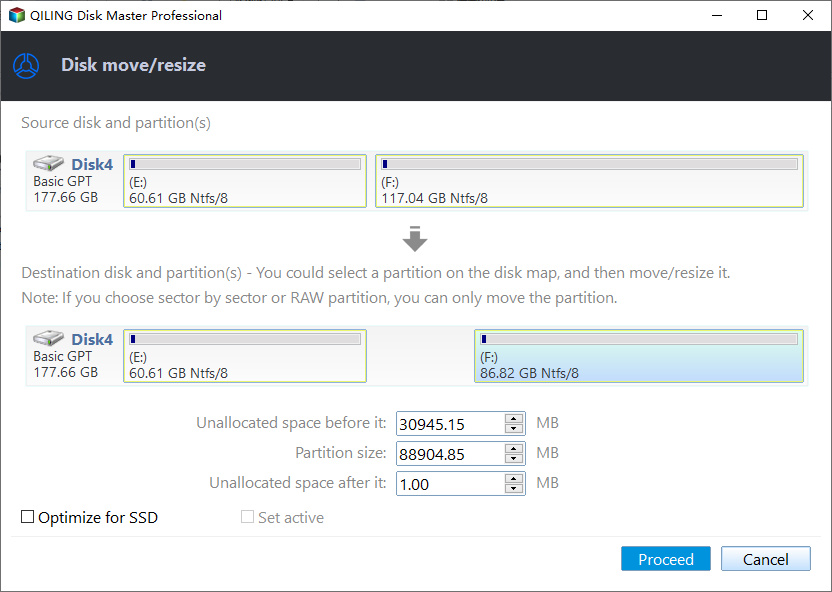
Step 4. Review the pending operation list. If the target drive letter, new size, and unallocated space are correct, click Proceed to execute the resize.
Check the result
After the resize finishes, reopen Disk Management and confirm the logical drive size and unallocated space location. Restart affected services, check shared folders, and verify that applications using the resized volume can still read and write files normally.
Related Articles
-
How to Partition a Dell Hard Drive
Create, resize, and protect disk partitions without touching recovery partitions. -
We Could not Create a New Partition
Fix Windows Setup partition errors with boot-mode and disk-layout checks.
Products
Articles & Tutorials
- Data Recovery
- Data Backup
- File Recovery
- File Backup
- File synchronize
- System Backup and Restore
- Disk and Partition Clone
- Technical articles
- Disk Master Help
- Windows Deleted File and Disk Recovery Tutorials
- Windows File and Data Recovery Tutorials
- More Windows Tutorials for Install, Security, Files, and PC Tips
- Windows Boot, Repair, and Recovery Environment Tutorials
- Windows Backup Tutorials
- Windows Restore Tutorials
- Windows Clone and Migration Tutorials
- Windows Server Backup, Recovery, and Management Tutorials
- Windows Disk, Partition, and Storage Management Tutorials