How to Move Files to Google Drive Easily (8 Methods)
- How to Move files in Google Drive
- How to Move Files from One Google Drive to Another
- Method 1: Transfer Google Drive files with the "Share" feature
- Method 2: Upload Google Drive files with "Take out"
- Method 3: Download Google Drive files and upload to another account
- How to Move Files from Computer to Google Drive
- Method 1: Upload file on Google Drive via desktop app
- Method 2: Move files to Google Drive Automatically with Qiling Disk Master
- How to Move Files from Android Phone to Google Drive
- Method 1: Move files from Android via Google Drive mobile app
- Method 2: Upload files to Google Drive with Gallery "Share" feature
- Conclusion
Google Drive is a file storage and synchronization service developed by Google, launched on April 24, 2012. It supports applications for various platforms, including a website, Windows and MacOS computers, and Android and IOS smartphones.

Google Drive is a widely used service with over 1 billion users worldwide. It allows users to share files with others by moving them in Google Drive or transferring them between accounts. Many also use it to protect their data by uploading files from their PC or Android devices.
You can learn whatever you want by following the methods outlined below. Click on the quick navigation anchor text to jump to the method that suits your situation.
- How to Move files in Google Drive
- How to Move files from one Google Drive to Another
- How to Move files from PC to Google Drive
- How to Move files to Google Drive from Android
How to Move files in Google Drive
To move files in a Google Drive shared folder, you can use the "Move to" option or simply drag and drop the files manually.
Step 1. Open Google Drive and log in to your Google Drive account if necessary.
Step 2. Navigate to the folder containing files or separate files you'd like to move, right-click it and select the "Move to..." feature.

Step 3. To move files from a selected folder in Google Drive, select the folder you want to move files to, then click "Move HERE".

Note:The "Move to" feature deletes the original file in the shared folder and replaces it with a copy in the destination folder, which has inherited permissions from the shared folder.
How to Move Files from One Google Drive to Another
Some users may need to move files from one Google Drive to another for file sharing purposes or to alleviate space issues.
If you don't know how to move files between two Google Drive accounts, you can continue to see below and I'll introduces you to 3 helpful ways.
Method 1: Transfer Google Drive files with the "Share" feature
To move files from one Google Drive account to another, use the "Share" option. Select the file you want to move, click "Share," and enter the email address of the target Google Drive account. You can also add permissions to the shared file by selecting the permission level. Once shared, the file will be moved to the target Google Drive account.
Step 1. Sign in to your Google Drive account.
Step 2. Locate the files or folders you want to move, right-click them and select "Share" icon.

Step 3. In the pop-up window, type your another account and click "Send". You can set share settings for your another account with "Share with people settings".
Step 4. After that, log in your another account in the webpage.
Step 5. To access shared files, click "Shared with me" and right-click on them to make a copy.

Step 6. Right-click the duplicated files and select "Move to" to migrate your files to a different folder.
Method 2: Upload Google Drive files with "Take out"
Google Takeout is a service that allows users to export content from their Google Account, providing a backup or making it accessible outside of Google Drive. The process is straightforward and can be completed by following these steps.
Step 1. Go to Google Takeout, click "Deselect all" and keep only the "Drive" option checked. Then, click Next.

Step 2. Select deliver method, frequency, file type and click "Create export".

Step 3. Wait until the process completes 100%, then click the download button to save and unzip the archive file.
Step 4. Log in your another Google Drive account in the webpage.
Step 5. Select "File upload" or "Folder upload" to find the unzipped file and upload it to Google Drive.
Method 3: Download Google Drive files and upload to another account
Step 1. Create a new folder under "My Drive" and put all your files into it.
Step 2. Right-click the folder and select "Download" from the context menu. This will compress all files into a zip file, which should be uncompressed beforehand.
Step 3. Log in your another Google account and upload the unzipped folder by "File upload" or "Folder upload".

How to Move Files from Computer to Google Drive
To ensure your data is safe, you may want to protect it on your local computer and automatically sync your local folder to Google Drive, keeping two copies of your files at all times. This article provides two methods to achieve this.
Method 1: Upload file on Google Drive via desktop app
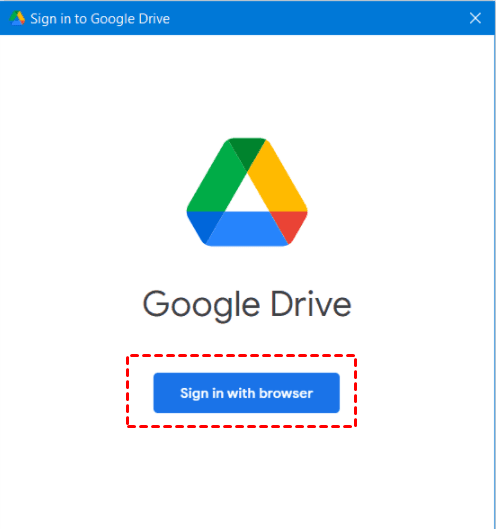
Step 1. Download Google Drive for desktop, install it, sign in with your Google Drive account, and start the first sync.
Step 2. Open Drive for desktop, click Sign in with browser to connect your Google Account that you use for Google Drive.
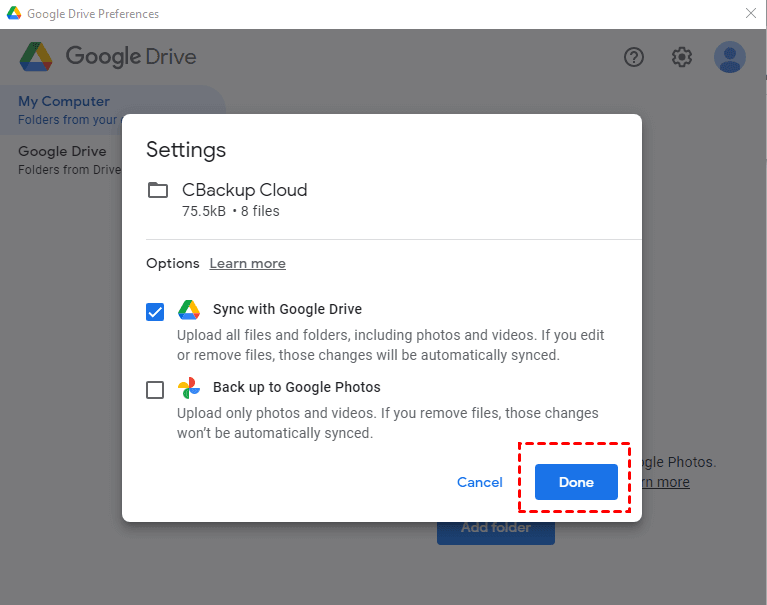
Step 3. When you click the My Computer tab, it will automatically switch to it. Then, click on the "Folder" option to select any folders on your local computer that you want to back up.

Step 4. Select the sync settings based on the types of items you're uploading, then click "Done". For photos and videos, choose "Back up to Google Photos", while for multiple file types, select "Sync with Google Drive".
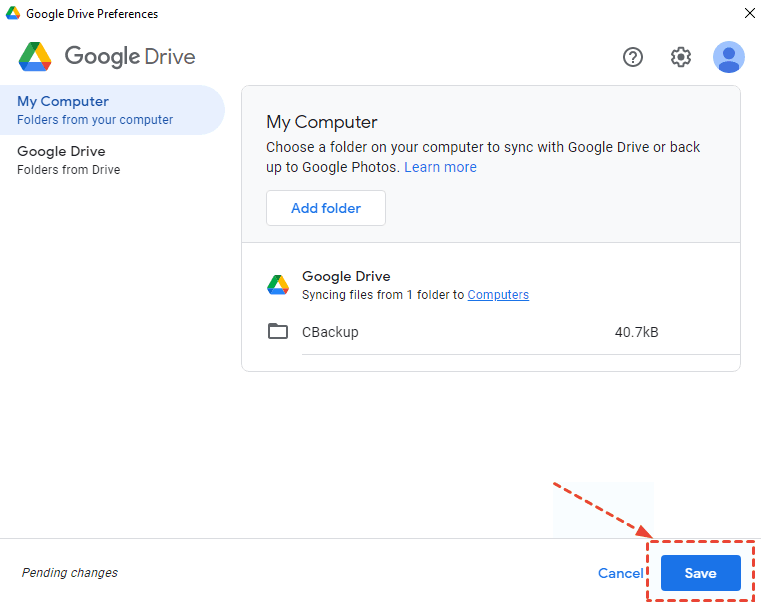
Step 5. Select local folders and sync settings, then click Save to sync files from computer to Google Drive. Alternatively, go to the Google Drive tab and sync cloud files locally.
After setting up Drive for desktop on your computer, it creates a virtual Google Drive disk that syncs automatically with files and folders added to it, which is typically found in the "Computer" tab.

Method 2: Move files to Google Drive Automatically with Qiling Disk Master
Like Google Drive, Qiling Disk Master Standard is a free file sync software that automatically moves files to Google Drive, but it's more practical and flexible, especially in situations where you need to sync files across multiple devices or services.
- Google Drive's sync feature allows changes made outside the Google Drive folder to be synced, ensuring that all files and folders are up-to-date and consistent across all devices.
- It is capable of syncing files outside the desktop folder.
- This feature allows you to schedule automatic sync settings, giving you control over when your data is synced when your computer connects to a network, rather than syncing immediately.
It's recommended to use Qiling Disk Master Standard to move files to Google Drive, especially in situations where files are too large or need to be synced with multiple platforms like Dropbox and OneDrive. Download it to try it out.
Step 1. To start a file synchronization task, go to the "Backup and recovery" tab in Qiling Disk Master Standard, then click on "File Sync".

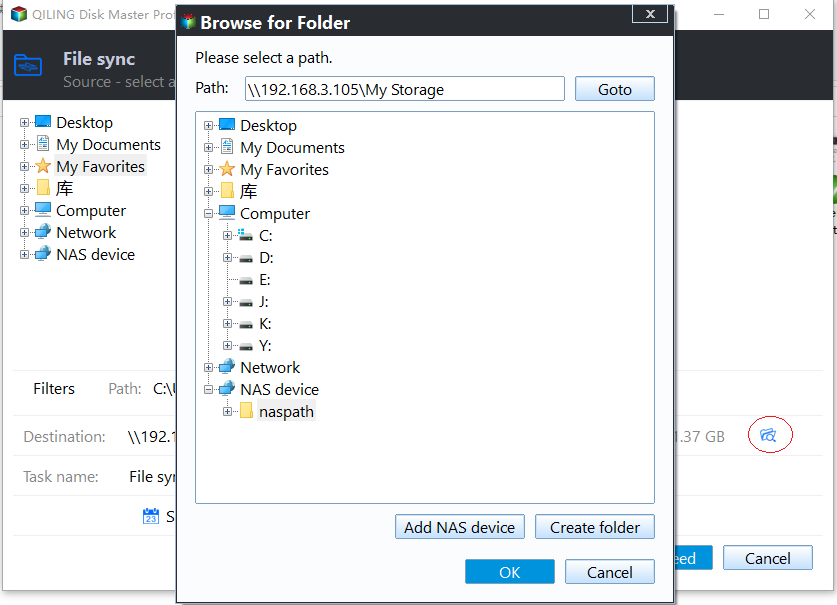
Step 2. Click "Folder" and then "This PC" to select files or folders from local computer.

Step 3. Click the inverted triangle and "Select a cloud drive".
Step 4. Click "Schedule Sync" and select a syncing frequency (Daily, Weekly, Monthly) to automatically move files to Google Drive. Then, click "Proceed" to confirm.

👍 More advanced features on the professional version or higher:
✔ Event triggerIt enables file synchronization at specific events, like system shutdown or startup, among others.
✔ USB plug in: It is to automatically copy files to USB drive when connectedSo, you can start the task without needing to physically connect the USB drive beforehand, and it will automatically detect and use it.
✔ Filter settingThis tool allows you to sync files with specific extensions, which can save both time and storage space.
✔ Different sync methods: Except for File Sync, you still can use File Sync, File Sync, Two-Way SyncDepending on the sync direction, frequency, or synced files in the destination, the syncing process may vary. The sync direction determines whether files are synced from the source to the destination, vice versa, or both ways. The frequency of syncing can also affect the process, such as syncing every hour, daily, or weekly.
How to Move Files from Android Phone to Google Drive
To move files from Android to Google Drive, you can use the Google Drive app on your Android device. Simply open the app, select the files you want to move, and choose the "Save to Drive" option. This will upload the files to your Google Drive account, creating a copy of the files on the cloud. Alternatively, you can also use a third-party file manager app, such as Solid Explorer or ES File Explorer, to move files from your Android device to Google Drive.
Method 1: Move files from Android via Google Drive mobile app
Uploading files or folders to Google Drive on an Android phone is a straightforward process. To do this, follow these steps: [insert steps here].
Step 1. Open Google Drive mobile app on your Android phone.
Step 2. Tap on "+" at the lower right corner and then "Upload" to find your files and upload them.

Note: You cannot upload files not in Google format, such as Google files or Word docs.
Method 2: Upload files to Google Drive with Gallery "Share" feature
You can still share files to Google Drive from the photo gallery, in addition to uploading files. To do this, follow these simple steps.
Step 1. Open your photo gallery on your Android phone.
Step 2. Select a photo and tap on the "Share" button.
Step 3. Then, you will see many available options. Click "Save to Drive" and hit "Allow" to authorize the drive.

Step 4. Rename the title for clear distiguish and pitch on "Save" to upload files.
Conclusion
This article provides 8 practical methods to move files to Google Drive in various situations, ensuring you have at least two copies of your files and can easily recover them if they're damaged or deleted.
In addition to online backup, the 3-2-1 backup strategy also recommends creating multiple copies of your data and storing them in different locations. Qiling Disk Master allows you to sync files to external disks (HDD or SSD), USB drives, network drives, NAS, and other storage devices, providing an effective way to safeguard your data.
Related Articles
- How to Backup Data on SD Card to Google Drive (5 Ways included)
This article is written for users who want to backup SD card to Google Drive for security or multiple access. Here are 5 ways to help you. - How to Backup PC Files to Google Drive Automatically
Backing up files to Google Drive is very convenient for users to access the data from different computers, and this article will tell you how to backup files to Google Drive. - How to Sync Local Folder to Google Drive in Windows 7/8/10
To sync local folder to Google Drive automatically, you have three methods, namely using Google Drive for desktop, Google Drive folder and Qiling Disk Master Standard. Pick one of them and sync files now! - Backup External Hard Drive to Google Drive Efficiently (3 Ways)
Want to back up local files and folders on external hard drive to Google Drive cloud? This page details how to back up or sync external hard drive to Google Drive cloud with three ways step by step. - Backup WD My Cloud to Google Drive with the Best Freeware
Do you plan to backup WD My Cloud to Google Drive? Read this article thoroughly to get the best freeware to assist you. - Backup Files and Folders for Windows 7/8/10 with Simple Steps
Looking for an easy way to backup files and folders on a computer? Get the free tutorial here with quite simple steps for file backup in Windows 11/10/8/7.