How to Create Scheduled Task to Copy Files to Another Folder?
How to auto copy files from one folder to another
If you want to keep a latest copy of frequently modified files, you can use a tool like rsync or Robocopy to transfer the files from one folder to another, while only copying the files that have changed since the last transfer. This way, you can keep a synced copy of the files without having to manually copy them every time.
You can create a batch file with command lines to automate tasks, and use Windows Task Scheduler to schedule the batch file to run at regular intervals, such as copying files to another folder or mapped network drive.
If you find this method can hardly meet your needs, or you want an easier solution with intuitive GUI, you can also try a powerful alternative. I will then describe the two approaches separately.
Download Free File Copy Software
The easiest way to schedule a file copy between local folders, network drives, and cloud services is to use a task scheduler like Task Scheduler (Windows) or cron (Linux/macOS). You can also use cloud storage services like Google Drive, Dropbox, or OneDrive, which often have built-in scheduling features. Additionally, you can use third-party tools like Robocopy (Windows) or rsync (cross-platform) to automate file copies.
- Create scheduled task to copy files to another folder
- Easier alternative: auto copy files to other location via freeware
Create scheduled task to copy files to another folder
The most commonly used command lines to copy files and folders are xcopy and robocopy. I will use robocopy here, as it's a more robust replacement of xcopy.
Step 1. To create a .bat file, open a text editor like Notepad, right-click on the desktop, select "New" > "Text Document", and then rename the file with a .bat extension. For example, you can save it as "mybatchfile.
Step 2. The basic syntax for robocopy is: robocopy [source] [destination] [/move] [/copy] [/move] [/copy] [/move] [/copy] [/move] [/copy] [/move] [/copy] [/move] [/copy] [/move] [/copy] [/move] [/copy] [/move] [/copy] [/move] [/copy] [/move] [/copy] [/move] [/copy] [/move] [/copy] [/move] [/copy] [/move] [/copy] [/move] [/copy] [/move] [/copy] [/move] [/copy] [/move] [/copy] [/move] [/copy] [/move] [/copy] [/move] [/copy] [/move] [/copy] [/move] [/copy] [/move] [/copy] [/move] [/copy] [/move] [/copy] [/move] [/copy] [/move] [/copy] [/move] [/copy] [/move] [/copy] [/move] [/copy] [/move] [/copy] [/move] [/copy] [/move] [/copy] [/move] [/copy] [/move] [/copy] [/move] [/copy] [/move] [/copy] [/move] [/copy] [/move] [/copy] [/move] [/copy] [/move] [/copy] [/move] [/copy] [/move] [/copy] [/move] [/copy] [/move] [/copy] [/move] [/copy] [/move] [/copy] [/move] [/copy] [/move] [/copy] [/move] [/copy] [/move] [/copy] [/move] [/copy] [/move] [/copy] [/move] [/copy] [/move] [/copy] [/move] [/copy] [/move] [/copy] [/move] [/copy] [/move] [/copy] [/move] [/copy] [/move] [/copy] [/move] [/copy] [/move] [/copy] [/move] [/copy] [/move] [/copy] [/move] [/copy] [/move] [/copy] [/move] [/copy] [/move] [/copy] [/move] [/copy] [/move] [/copy] [/move] [/copy] [/move] [/copy] [/move] [/copy] [/move] [/copy] [/move] [/copy] [/move] [/copy] [/move] [/copy] [/move
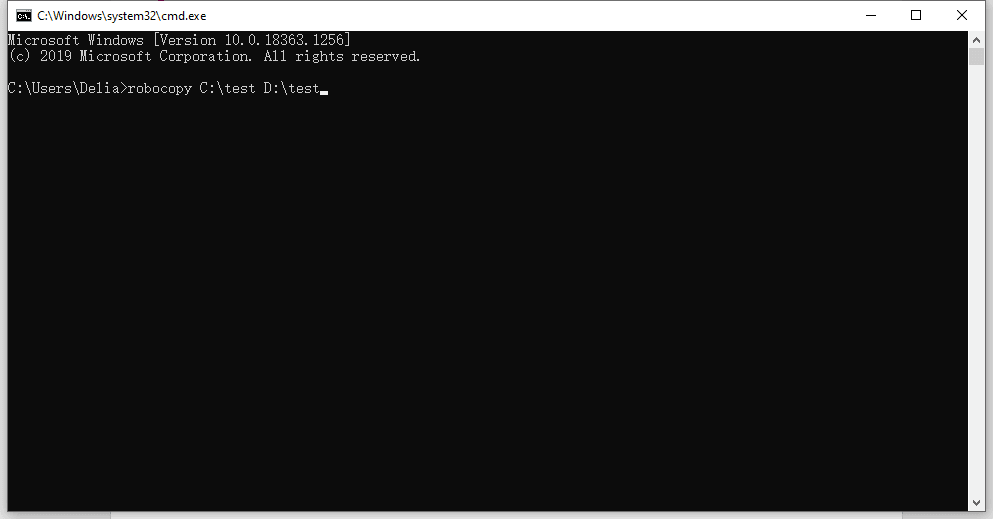
robocopy [source] [destination]
To copy files from the desktop to the D drive, you can use the following command in the command prompt: `xcopy C:\Users\YourUsername\Desktop\* D:\* /s /y` where `C:\Users\YourUsername\Desktop\` is the source directory and `D:\*` is the target directory. The `/s` option tells xcopy to copy all subdirectories and the `/y` option tells it to overwrite files without prompting. Replace `YourUsername` with your actual Windows username.
robocopy C:\Users\Delia\Desktop\copy D:\copy
If you want to transfer other files between different source and target directories simultaneously, simply add another command line in the notepad according to your needs.
Here are the additional switches to customize the file copy in one paragraph:
- /s to copy subdirectories and excludes empty directories;
- /xo to excludes older files;
- /mov To move files to another folder while deleting them from the source folder, use the `move` command with the `--delete` option, e.g.
Here's a full list of robocopy parameters you can refer to. Pick and combine them appropriately, you can accomplish a lot of wonderful things.
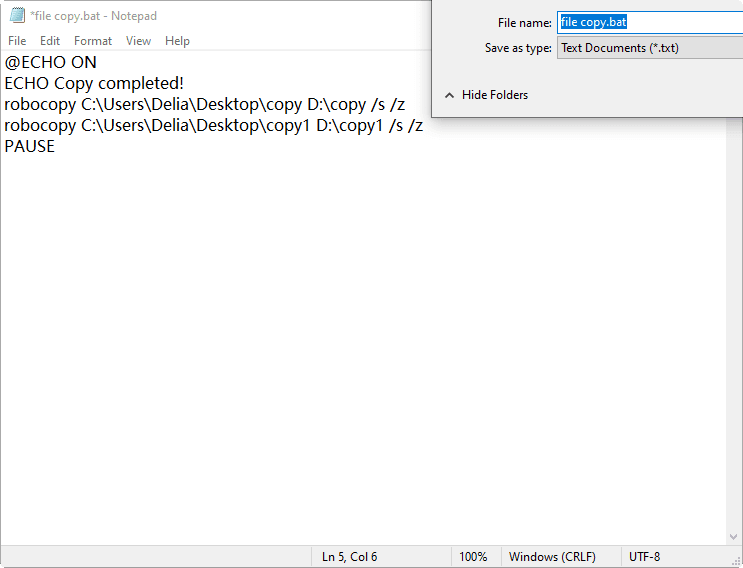
You can use the `echo` and `pause` commands to receive a message after completing file copy and press any key to exit. For example: `echo File copy completed.`; pause` would display the message "File copy completed.
@ECHO OFF
ECHO Copy completed!
robocopy C:\Users\Delia\Desktop\copy D:\copy /s /z
robocopy C:\Users\Delia\Desktop\copy1 D:\copy1 /s /z
PAUSE
The script displays a "copy completed" message after copying files to target directories, then pauses the cmd window until a key is pressed to continue.
Step 3. To create a batch file, click on File > Save As... and give the file a name.
You can create a batch file that runs a series of commands, including copying or moving files, and can be run by double-clicking it. Additionally, you can use Windows Task Scheduler to automate the process by creating a scheduled task that copies or moves files to another folder at a specified time or interval.
✍To create a robocopy scheduled task using parameters, you can use the /MOT:m option, which will execute another incremental backup if changes are detected in "m" minutes.
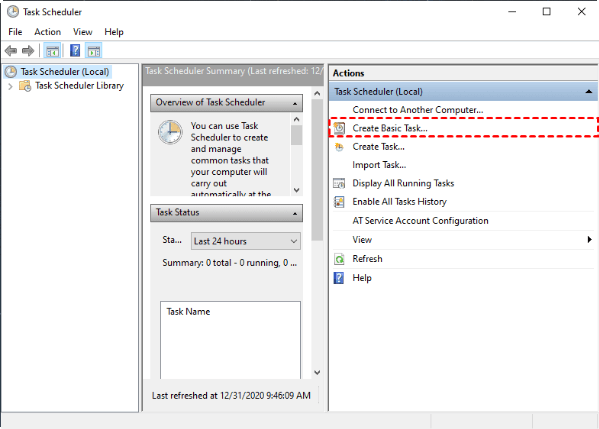
Step 4. Open the Control Panel and view it by large icons or small icons, then choose Administrative Tools > Task Scheduler. Alternatively, you can directly search for it.
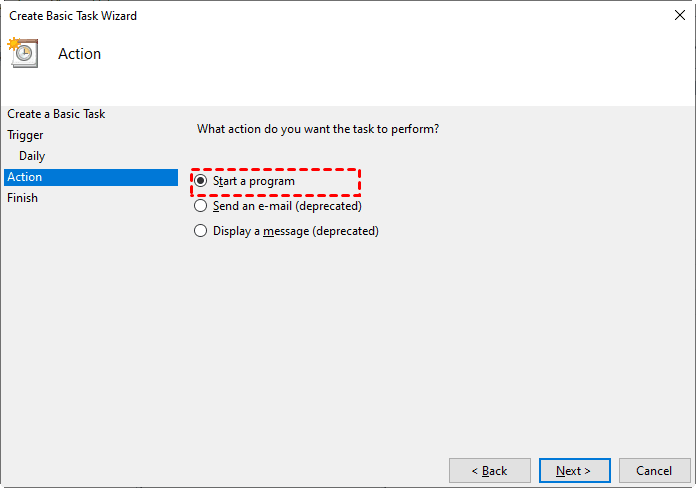
To create a basic task, go to the main interface and select "Create Basic Task..
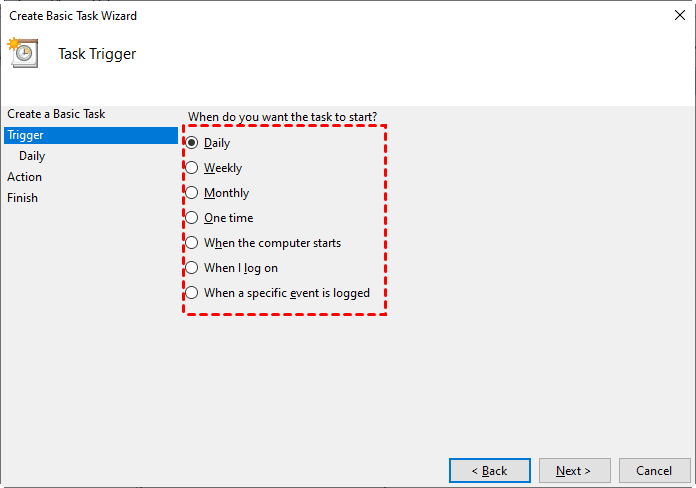
Enter the task name and description, choose how to trigger the task, and set up the specific time point if necessary. For example, to create a scheduled task to copy files to another folder every day, select the "Daily" option.
To start a program, select the "Start a program" option and browse for the .bat file you created, which will allow you to run the script and perform the desired action.
Confirm all the settings and click Finish to schedule the file copy task. You can find it in the Task Scheduler Library afterward, and feel free to edit or delete it.
How to schedule task to copy files to network drive
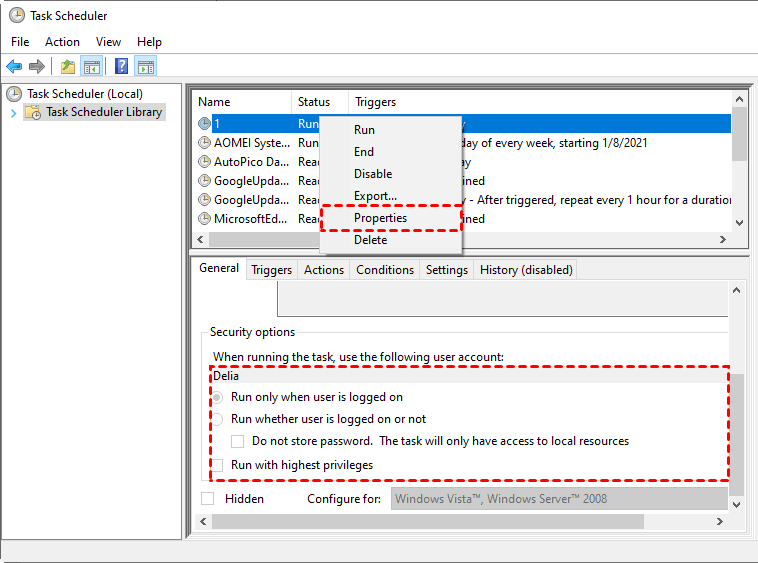
When using Task Scheduler to copy files to or from a mapped network drive, the task may not work due to security options in Task Scheduler Library.
Task Scheduler can only access mapped network drives when the "Run only when user is logged on" option is enabled. If not, modify the task's properties by right-clicking it.
Easier alternative: auto copy files to other location via freeware
The combination of robocopy and task scheduler offers flexibility, but requires computer knowledge. For a more intuitive solution with equally powerful data protection features, consider using Qiling Disk Master Standard.
This freeware works on Windows 11/10/8.1/8/7/Vista/XP and allows you to copy files between various locations, including internal and external disks, flash drives, network locations, and cloud drives, making it easy to achieve your file copy tasks.
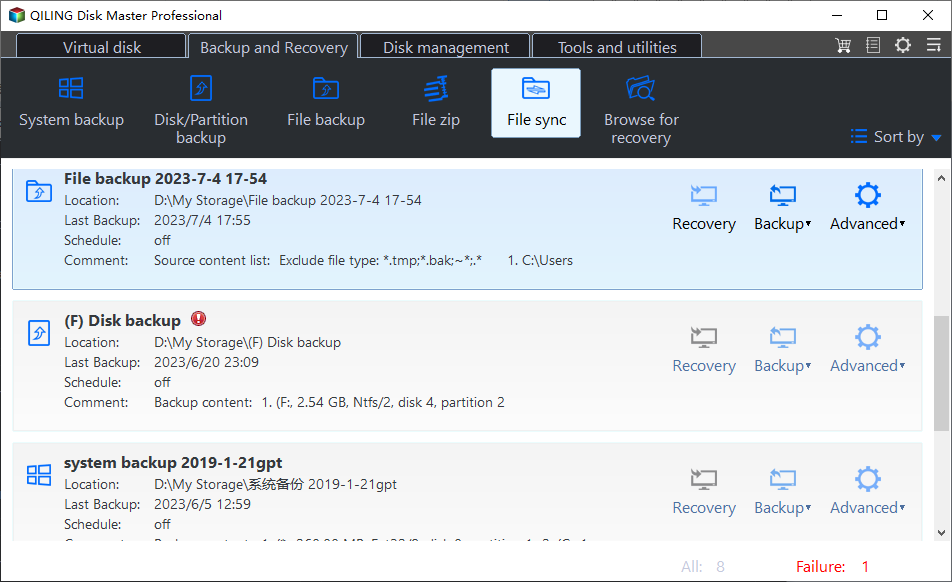
Best free sync software to create scheduled file copy task
♦ Schedule copy files to another folder/drive
♦ Schedule copy local folder to network
♦ Auto sync folders between computers
♦ Auto sync network folder to OneDrive, Google Drive...
This software allows you to create a scheduled task in just 3 steps to automatically copy files to another folder. If you prefer real-time syncing without a schedule, you can upgrade to the Professional edition to enjoy instant syncing of changed files.
To copy files, simply download the free sync software and follow the guide below.
How to schedule task to copy files to another folder:
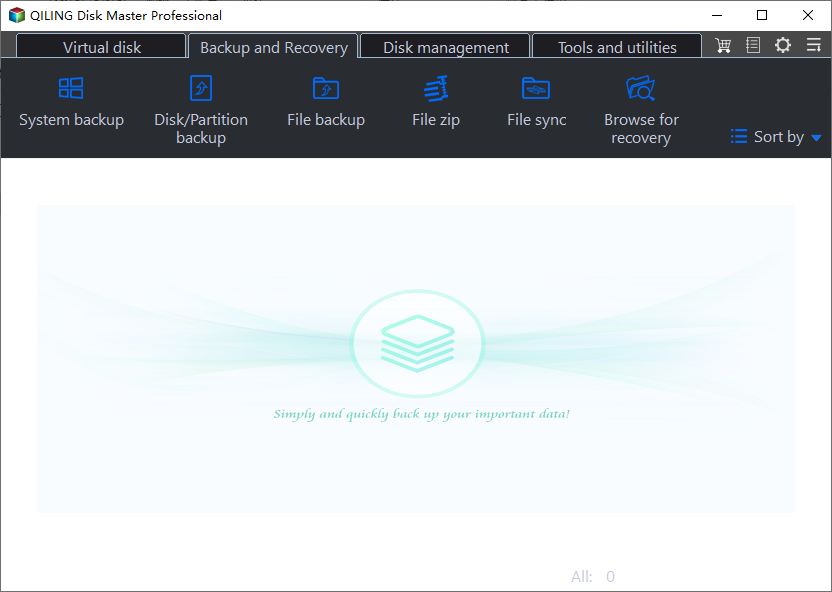
Step 1. To sync changed files from the source directory to the target directory, open the software, navigate to the "Backup and recovery" tab, and select the "File Sync" option.
✍Other sync modes (available in Pro edition):
Real-Sync changed files from the source folder to the target folder in real-time, ensuring that the target folder always has the most up-to-date files without manual intervention.
Mirror sync means keeping the files in the target folder exactly the same as in the source folder, with no changes or deletions.
Two-Sync changed files involves comparing the source folder and target folder to identify any changes made to files on either side. The process then updates the other folder to match the changes, ensuring that both sides are synchronized and up-to-date.
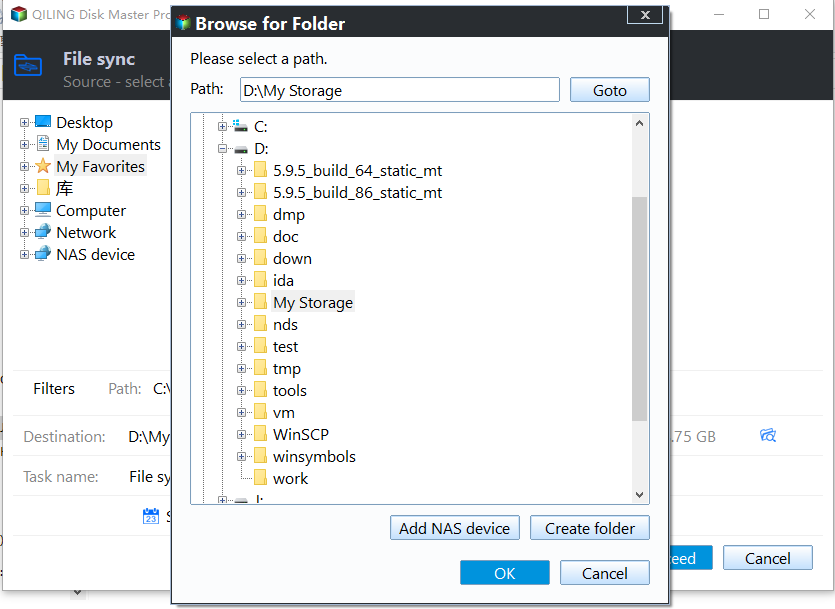
Step 2. Click "Add Folder" to select the source files you want to copy, then click on the destination bar to choose the target location where you want to copy the files.
✍To copy files from or to a network location, click Share/NAS, then select Add Share or NAS Devices to specify a path, or choose a mapped network drive directly.
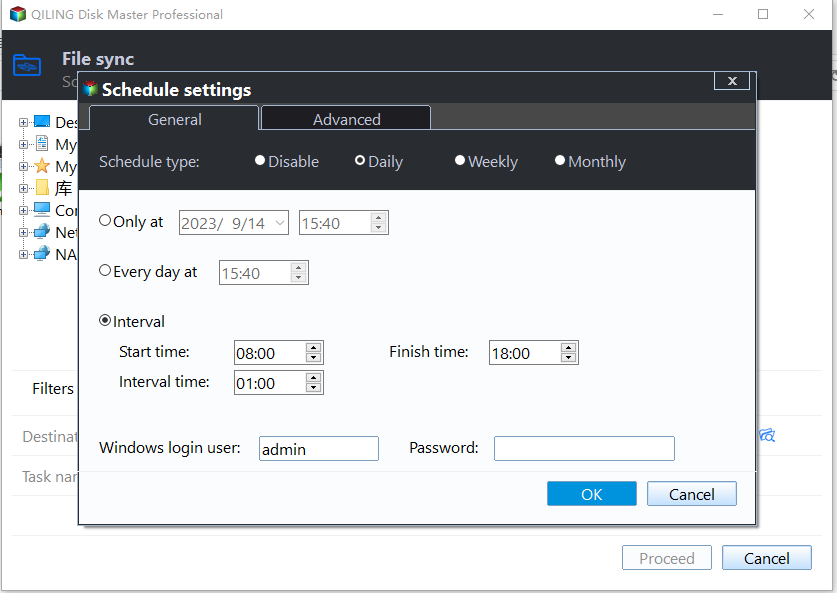
Step 3. Click Schedule Sync to set up automatic file copy and click Proceed to execute the scheduled task.
✍The schedule options for this feature include daily, weekly, and monthly triggers, as well as the ability to set events or plug in a USB device, with the latter two options requiring the Pro edition.
Supplement: backup files to another folder as images
By Basic Sync, you can create a copy of a folder with its original structure and file formats, but any changes made to the source folder after copying will not be reflected in the target directory, making it difficult to restore earlier versions of files.
In Qiling Disk Master, you can back up files, partitions, OS, or entire disks to compressed image files, and set up automatic scheduled backups. The backup images are read-only and can be used to restore to any earlier version, allowing for different data versions to be kept.
To backup your files, go to the Backup tab and select the desired option. You can also choose to do incremental or differential backup, which saves only changed files and conserves storage space.
The Sync method also supports backing up files to multiple locations, but cloud backup is a popular method that often requires paid storage due to limited free space, which can be a challenge for users who need to backup a large number of files or folders.
Qiling Disk Master offers a cloud backup feature with 1TB free cloud storage for 15 days after sign-up, which can be accessed through Qiling Cloud without human intervention.
Conclusion
Windows allows you to schedule a task to copy files to another folder on a regular basis, but this requires knowledge of xcopy/robocopy commands and Task Scheduler. Alternatively, you can use software like Qiling Disk Master for a more convenient solution.
Qiling Disk Master is a comprehensive backup and data management tool that offers file backup, file sync, and more advanced features like Disk Clone and System Clone for complex data handling. It also has different versions for various user groups, including a Server edition for Windows Server users.
Related Articles
- How to Run Robocopy Incremental Backup on Schedule? [Simple Guide]
- How to Perform Auto Backup with Batch File in Windows 10?
- Copy Folders and Subfolders using XCopy Command or Easier Way
- How to Use Rsync in Windows 10 | Tutorial and Alternative
- Real-Time File Replication for Windows
In this article, you will find the easiest way to perform real-time file replication in Windows 11, 10, 8, 7 with the real-time file synchronization software. let's find out. - Best Free Samsung Auto Backup Software in Windows 11, 10, 8, 7
To create Samsung auto backup in Windows 10, try Samsung auto backup software - Qiling Disk Master if the Samsung Auto Backup is not working in Windows 10.