Perform Auto Backup with Batch File in Windows 10 (2 Ways)
What is batch file? Can you use it for backup?
A batch file in Windows 10 is a script file with a .bat extension that contains a series of command lines to be executed by the Command Prompt. It's useful for automating repetitive tasks, such as backing up important data.
To create a backup batch file in Windows 10, you can write a script using xcopy or robocopy commands and schedule it with Task Scheduler. Alternatively, you can use a GUI-based file backup solution to automate the backup task, which is easier and provides more comprehensive functionality, including image backup and file sync.
I will cover both methods in the following article, just pick the one that suits you best.

- How to create backup batch file in Windows 10 (2 Ways)
- Better way for automatic file/system backup in Windows 10
How to create backup batch file in Windows 10
To automate Windows backup commands, start by creating a text editor file with a .bat extension. This script file will contain the backup commands, which can be run automatically every time you double-click it. Alternatively, you can use the Windows Task Scheduler to schedule the task to run on a regular basis.
Among the commands that apply in this case, copy is for files only while xcopy works on both files and folders, so the latter is more popular, and robocopy functionally replaces xcopy and provides more options.
Please note: You could use a batch file to copy or synchronize important files and folders as a backup, but it can't create an image backup or keep different versions of data for accurate recovery. If you need further backup capabilities, consider the next method.
Way 1: Create batch file to backup files in Windows 10 step by step
1. To create a new text file, you can either search for Notepad in the taskbar or right-click on the desktop, then select "New" and "Text Document" to open a new text file.
2. You can type the backup script. If you want any text to be displayed after the operation is completed, enter the following lines.
@ECHO OFF
ECHO [Any text you want]
PAUSE
The command "PAUSE" is used at the end of a script to keep the window open after execution, preventing it from closing immediately.
To create a backup batch file using xcopy, you can use the command "xcopy [source] [destination]" and insert the backup command before "PAUSE". This will allow you to create a batch file that can be used to back up files from a source location to a destination location.
You can add any switch you need as following:
/f Displays source and destination file names while copying.
/u Copies files from Source that exist on destination only.
/s Copies directories and subdirectories, unless they are empty.
/e Copies all subdirectories, even if they are empty.
Copies the subdirectory structure from one directory to another, but does not copy any files. This is useful for preserving the directory hierarchy when moving or transferring data.
/h Copies files with hidden and system file attributes.
/z Copies over a network in restartable mode.
Copies only source files that are newer than existing destination files, ensuring that only the most up-to-date versions of files are transferred.
… Click here to view more parameters.
*Robocopy command-Robocopy is a command-line utility that can be used to backup files and folders. It can also be used to perform an incremental backup, which means it will only copy new or modified files since the last backup. This can be a good option for large datasets or for systems where disk space is limited.
I'll give a simple example here. You could modify it and replace the path as you need.
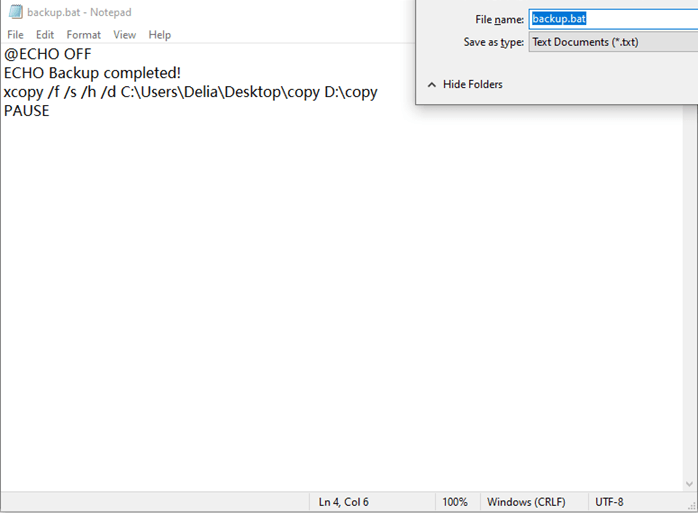
@ECHO OFF
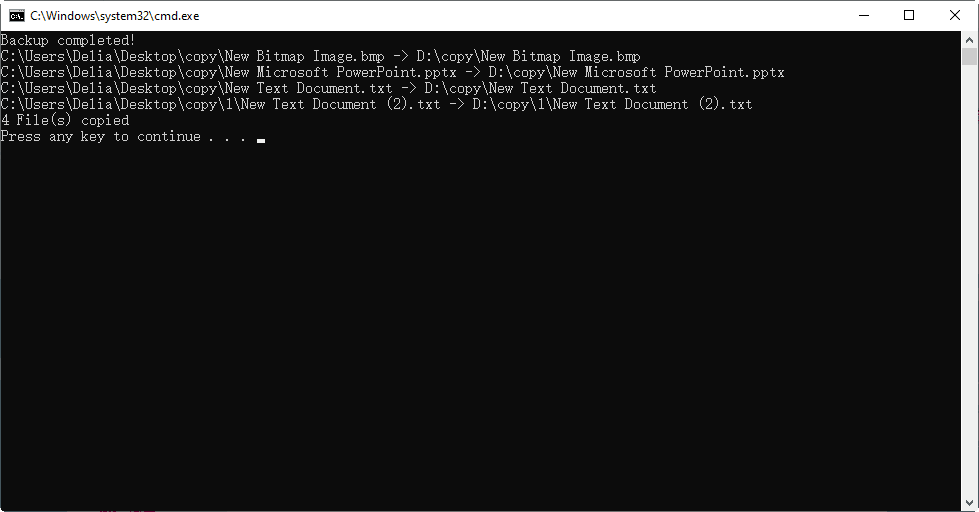
ECHO Backup completed!
xcopy /f /s /h /d C:\Users\Delia\Desktop\copy D:\copy
PAUSE
This command copies all newly changed or added files (including subdirectories and system files) from the source to the destination, displaying all file names and opening a window afterward.
3. To save the batch file, click on "File" in the top left corner, then select "Save As" from the dropdown menu. Give the file a name and change the file extension from ".txt" to ".bat".
4. Then you can double-click the script file to have a try.
Way 2: Create auto backup batch file with Task Scheduler
Now that you've created a backup batch file, how to automate it? Task Scheduler is the answer.
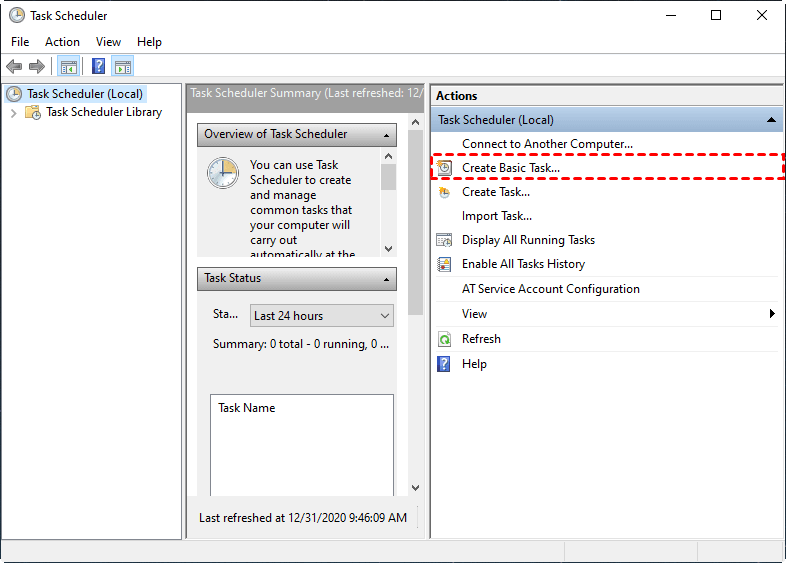
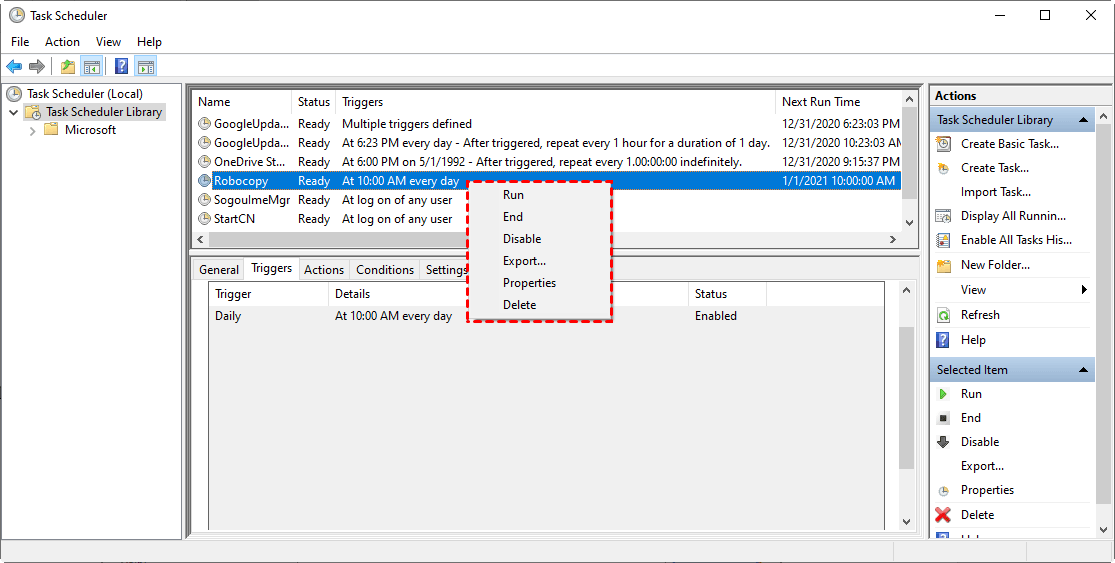
1. To access the Task Scheduler, open the Control Panel, choose a view (large icons or small icons), and then select "Administrative Tools" followed by "Task Scheduler". From there, you can create a basic task.
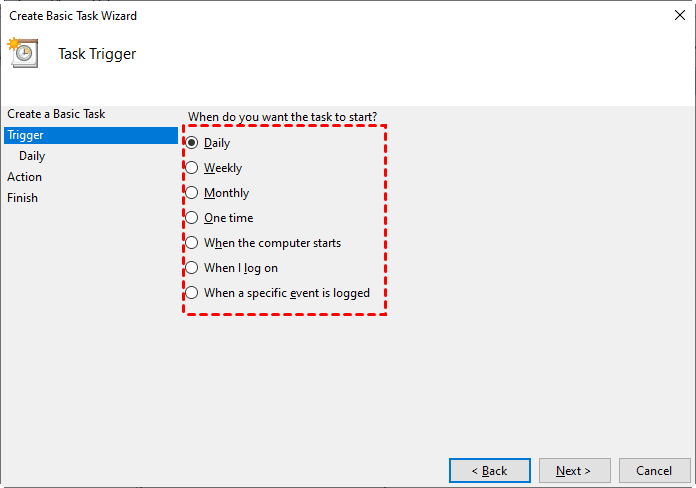
2. Type a task name and description, then choose how to trigger the task. Frequency and event are both available.
3. To start a program, select the Start a program option and browse your PC to select the .bat file you want to run.
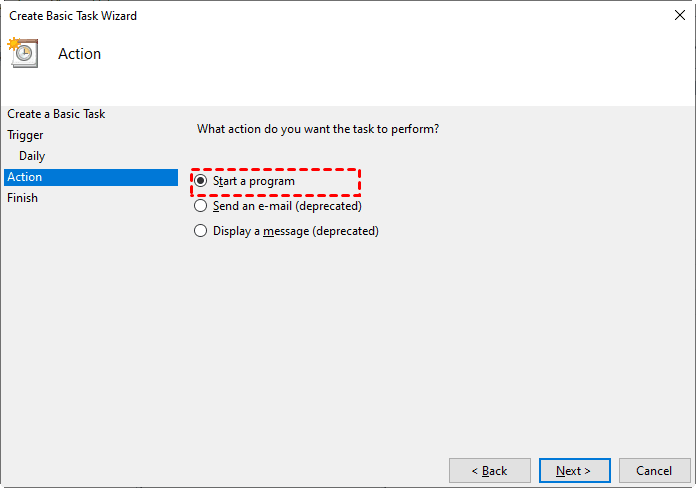
4. After confirming, click Finish to create the schedule task. It will be located in the Task Scheduler Library afterward.
Better way for automatic backup in Windows 10
When using a batch file to backup files in Windows 10, it synchronizes files from source to target with the original folder structure, allowing the copied files to be accessed and used directly. However, this method does not keep multiple copies of a frequently modified directory, making it difficult to retrieve previous versions if changes are made and auto-copied to the target directory.
To meet your various backup needs, consider using free backup software like Qiling Disk Master Standard. This tool allows you to sync files in their original format and also create image backups. Additionally, it's easy to set up automatic scheduling for either type of backup or sync.
- >> For backup: You can choose to back up files and folders, partitions, disks, or even your entire operating system. The default backup method is incremental, which only saves changes made since the last backup, saving you time and disk space.
- >> For sync: You can specify files or folders to sync and with the Professional edition, you'll get advanced sync modes like File Sync, which automatically syncs when a data change is detected, as well as File Sync and Two-Way Sync.
This software supports various storage options, including internal/external hard drives, USB flash drives, NAS, network shares, and cloud storage. It can be used on all Windows PCs and allows users to arrange the source and target as they like. A free version is available for download to try it out.
Way 1: Backup files & folders in Windows 10 automatically
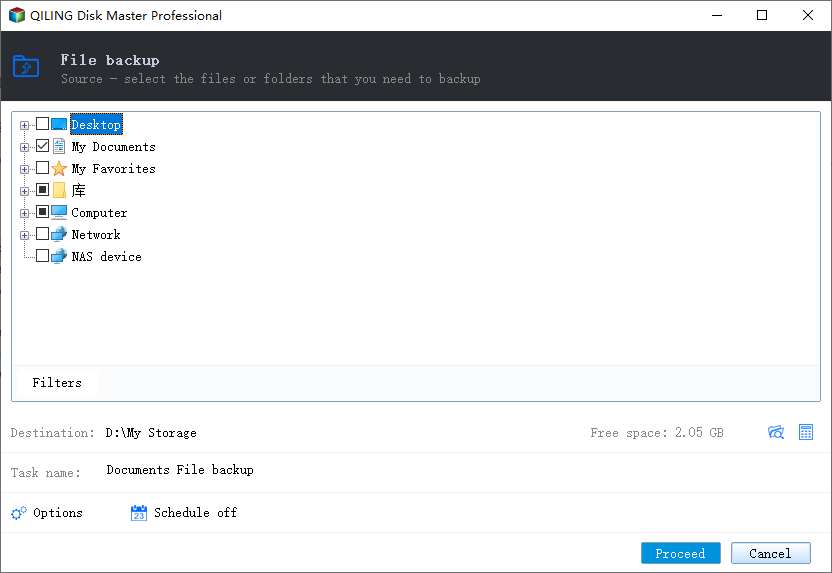
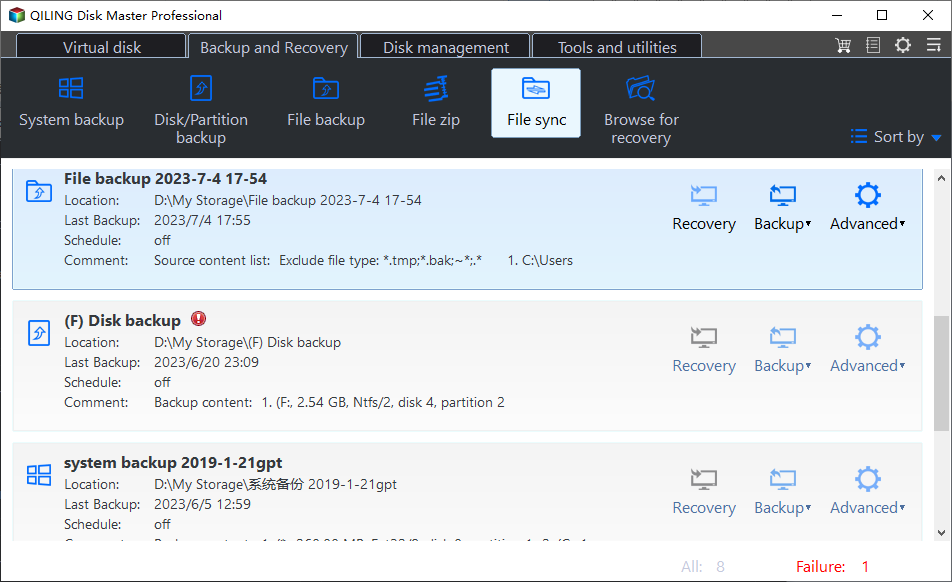
1. Launch the software, select Backup, and then File Backup to image files and folders, or choose other options as needed.

Qiling has several advantages over batch files, including its ability to auto-detect and back up the full system. It allows for system backup or disk backup when needed, and also enables cloud backup through Qiling Cloud, a cloud drive with 1TB of free storage, offering 15 days of free access after registration.
2. Click on either the Folders or Files tab to select the source data, then choose a destination to save the image file.
To backup files from or to a network location, click on the source or target bar, then select Share/NAS and add a share or NAS device to specify the path.
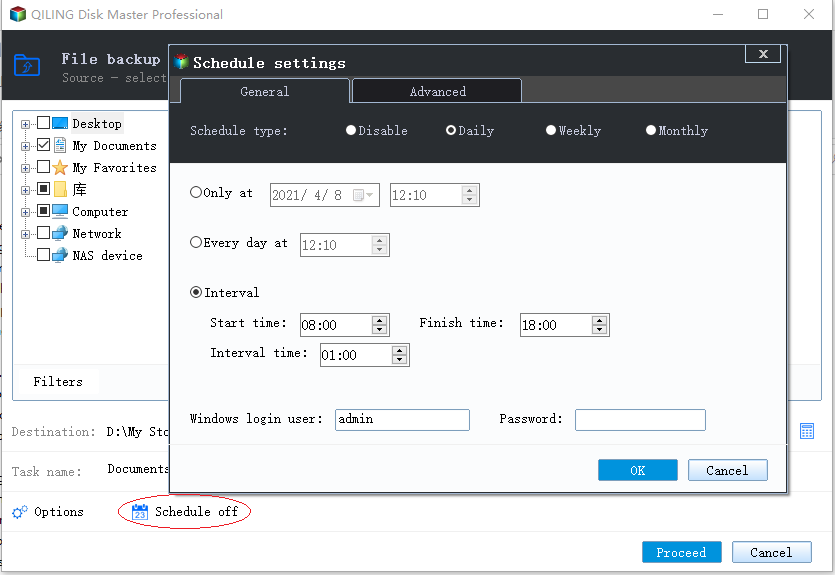
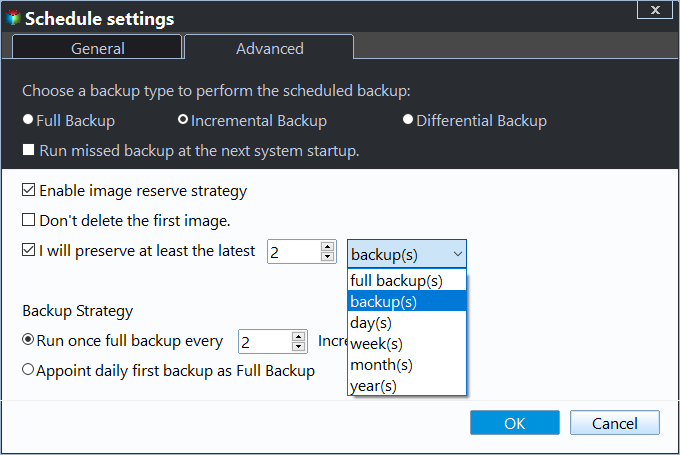
3. To set up automatic backup, click Schedule Backup. This includes options such as Daily, Weekly, and Monthly in the Standard version, and USB plug in and Event triggers in the Pro edition. After selecting the desired backup schedule, click Proceed to execute the task.
This software will run Incremental Backup alongside a scheduled backup task by default, which saves time and disk space, but may also lead to the backup disk being filled to capacity due to limited space.
You can now automatically delete backups older than a certain number of days using automatic backup cleanup methods. However, to use this feature, you'll need to upgrade your account, with a 5% discount available for a single computer.
Way 2: Auto sync folders between 2 directories in Windows 10
1. Go to the Backup and recovery tab, then select File Sync to sync changed files from the source directory to the target directory.
In Pro or higher editions, you'll have three additional sync modes: File Sync, which mirrors the target folder to the source folder; File Sync, which makes the target folder identical to the source folder; and Two-Way Sync, which syncs any changed files in the source or target folder to the other side.
2. Click the "Folder" button to select one or multiple folders to sync.
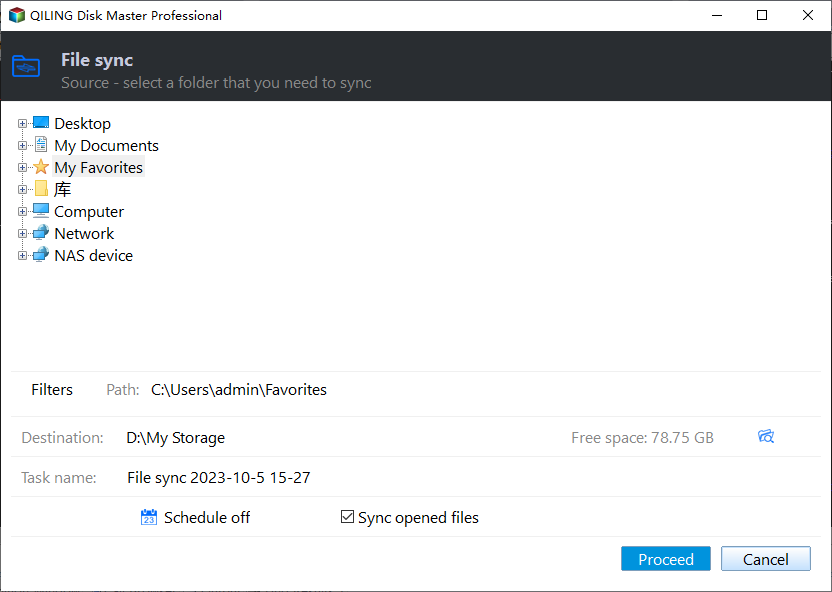
3. You can set up a Schedule Sync to perform file copy automatically, similar to backup.
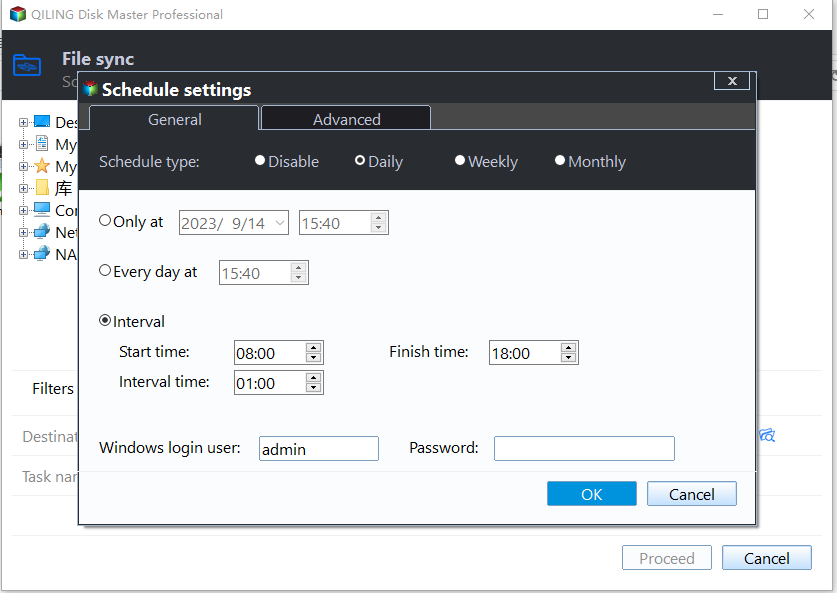
For File Sync, you don't need to create a schedule as it will run automatically once a change is detected.
4. Click Proceed to execute the task.
Conclusion
To create a backup batch file in Windows 10, you can simplify and automate the backup process, making it easier to perform regular backups. However, for a more comprehensive backup experience with a simple operation, Qiling Disk Master is a reliable alternative.
This software allows you to sync, backup, or clone files and hard drives with ease, including cloning a hard drive to an SSD, and has a server edition for Windows Server users.
Related Articles
- The Best Xcopy Alternative in Windows 10/7/XP
Looking for the best Xcopy alternative for Windows 11, 10, 7, XP? Check this out to learn powerful alternative to Xcopy when facing Xcopy not working error. - Two Ways to Create Data Backup Using CMD in Windows 10/8/7
Looking for a way to backup data like system and files in Windows using CMD? This page shows an easy way to complete. - XCopy Does Not Copy All Files in Windows 7/8/10(Solved)
This article will show you how to solve the problem that XCopy does not copy all files. Also, you can try to backup files with easier way. - Use Windows 10 WBadmin to Create System Image Backup
You will learn how to use Windows 10 Wbadmin backup or easier alternative to create system image backup. Learn both software and select one to protect your computer! - How to Sync Folders to NAS Automatically in Windows 11/10/8/7
Syncing folders to NAS (Network-Attached Storage) devices can be a convenient way to access and share files across multiple devices. In this guide, we'll show you how to automatically sync folders to NAS in Windows 11/10/8/7 using the Qiling Disk Master file sync software. - Top Two Ways to Automatically Upload Photos to Dropbox
Saving photos manually to Dropbox is too much trouble. Things will get much easier if you can automatically upload photos to Dropbox. Luckily, there are two feasible ways.