How to Create Windows 10 System Image Backup and Restore It
Quick navigation:
- Does Windows 10 has system image backup?
- How to create a Windows 10 system image backup and use it
- What you need to know about Backup and Restore(Windows 7)
- How to create and restore (Windows 10) system image to different computer
- Another backup software to create Windows 10 system image
- Summary
Does Windows 10 has system image backup?
Windows 10 is generally the most stable and usable OS from Microsoft, but it's still vulnerable to various risks that could result in data loss and system failure, including natural disasters, virus attacks, human errors, and sudden crashes. To mitigate these risks, creating a system image backup in Windows 10 is essential.
Windows 10 has two main image backup software: "File History" and "Backup and Restore (Windows 7)". The latter, previously used for Windows 7, remains in Windows 10/11 and allows for system image backup.
How to create a Windows 10 system image backup and use it
Before creating a Windows 10 system image, prepare a storage device to store the system image backup and connect it. This is a prerequisite for using the built-in Backup and Restore (Windows 7) feature in Windows 10.
To create a system image of Windows 10 on a USB drive and restore from it, you can use the built-in tool in Windows 10, which is called Windows Backup. This tool allows you to create a system image on a USB drive, external hard drive, or network location. The most common method is to use a USB drive as the backup storage, and then use the system image to restore Windows 10 to the same or a different computer. The process involves selecting the USB drive as the backup location, choosing the system image option, and then following the prompts to complete the backup process.
Part 1: Create Windows 10 image for deployment
Step 1. To get started with the Windows 10 system image software, open Backup and Restore (Windows 7) and choose from three methods: creating a system image, creating a system repair disc, or creating a system recovery drive.
- Through File History: To create a system image backup, go to the Control Panel, select File History, and click on System Image Backup at the lower left corner.
- Through Control Panel: To access the backup and restore feature in Windows 7, go to the "Control Panel" and select "Backup and Restore (Windows 7)".
- Through Settings: To access older backups on Windows 10, go to "Settings" > "Update & Security" > "Backup", scroll down to "Looking for an older backup" and select "Go to Backup and Restore (Windows 7)".

Step 2. Click "Create a system image" at the left panel. This will initiate a scan of your storage device, listing all available drives.

Step 3. Tick "On a hard disk" and select the USB drive from drop-down menu. Then, click "Next".

If you're unable to locate your USB drive, you can try disconnecting it from your computer and then reconnecting it again. This simple step may resolve the issue and allow you to access your drive.
Step 5. Confirm your backup settings and click "Proceed" to create system image on USB in Windows 10.
After completing the backup task, you'll be prompted to create a system repair disc. Please do so if you don't have a bootable media. If you don't have a CD/DVD, you can create a Windows 10 recovery USB using the built-in Recovery Drive feature.
Part 2: Restore Windows 10 from system image backup
If your computer can still boot, go to Update & recovery > Recovery > Advanced startup > restart now. This will restart your computer to the Windows recovery environment. From there, select Troubleshoot > Advanced Options > System image recovery, and follow the on-screen instructions to perform a system restore.

If your computer won't boot, you can try using a system repair disc or recovery drive to start Windows. First, set the boot priority to the bootable media, then boot from it and go to System image recovery.
What you need to know about Backup and Restore(Windows 7)
While it's true that you can easily make a complete system backup in Windows 10 using Backup and Restore (Windows 7), it's also worth noting that this method has its downsides.
- High disk space usage: The size of a Windows 10 system image is directly related to the amount of used space on the system. The more space the system has utilized, the larger the image will be, requiring more space on the USB drive or other devices and taking longer to create.
- Insufficient function: It does not support differential backup, encryption, etc.
- Error-prone: The system image backup failed error can occur due to various reasons, including a USB not being a valid backup location, BIOS/UEFI issues, insufficient space, shadow copy storage problems, or no available disk.
- Inflexible use: This backup software only allows for a full system restore, with no option to restore individual files from the created image. Furthermore, the restored image cannot be transferred to a smaller SSD or a different computer.
- Lack of maintenance: Microsoft's System Protection feature, which allows you to backup your system, is still available, but it's no longer maintained by Microsoft, starting from Windows 10 version 1709. This means that while you can still use it to backup your system, it may eventually stop working.
A more reliable Windows 10 backup software is needed, and searching "backup and restore software" online reveals many options. Among them, Qiling Disk Master Standard stands out as an exceptional program.
How to create and restore (Windows 10) system image to different computer
Qiling Disk Master Standard is a popular Windows 10 image backup software that supports all backup and restore solutions, including system backup, disk backup, partition backup, file backup, system restore, and selective file restore. It offers several advantages during use.
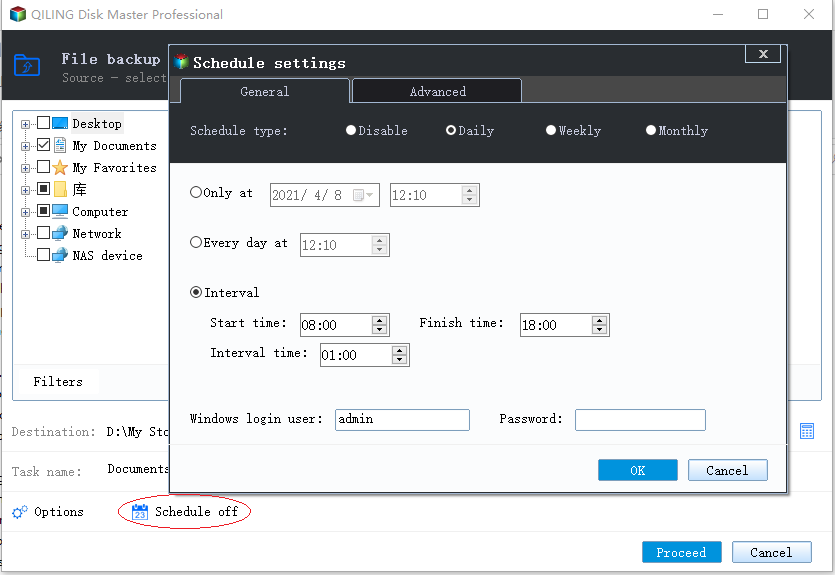
- Schedule backup: You can use it to backup system regularly based on daily, weekly, or monthly schedules.
- Incremental backup: You can choose to backup only changes in the system partition, saving disk space and backup time.
- This software allows you to backup Windows 10 to multiple destinations, including USB drives, internal hard drives, external hard drives, cloud storage, and network shares.
- This software has a user-friendly interface that is simple to understand and operate, making it accessible to users of all skill levels.
- Supports all the Windows system, including Windows 7/8/8.1/10/11/XP/Vista.
To try the system restore software, connect your USB drive and download the freeware. If you want to restore the system to a different computer, you'll need to upgrade to the professional version first. Then, follow the steps below.
Part 1: make a system backup windows 10
Step 1. To create a backup, open Qiling Disk Master Standard, click on the "Backup" and "System Backup" options. This will automatically select the Windows 10 OS and the necessary boot-related partitions required to boot Windows 10.

Step 2. To back up Windows 10, click on the arrow and select the USB drive connected to your computer as the backup location. You can also back up to an external hard drive, NAS, or network location.

Step 3 At the lower location of System Backup, you will see three helpful features. Clicking "Options" allows you to compress a large system image to a smaller one with three compression levels, enables email notification to receive the final result in a timely manner, and other features.
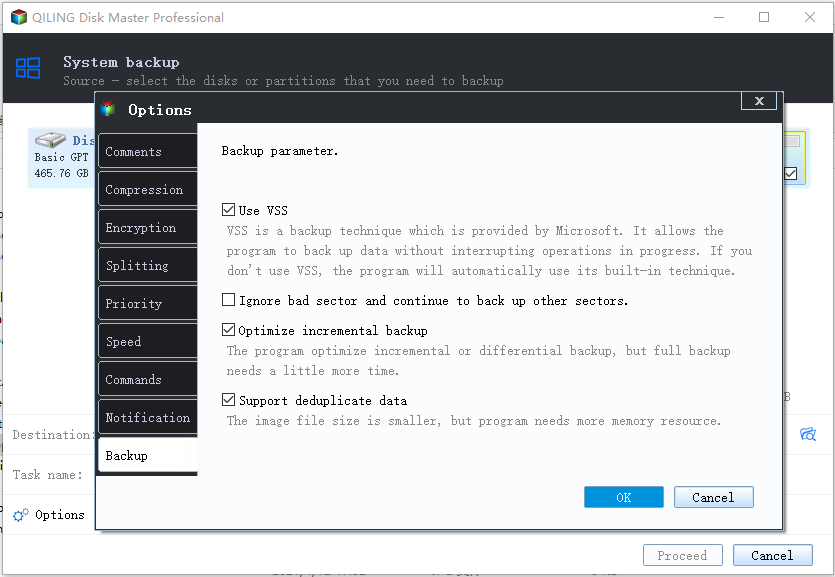
You can set Incremental Backup in the Backup Scheme, and also use Differential backup with cleanup methods like By quantity, By daily, By daily/weekly/monthly, available in the professional version.
Step 4. Then, click "Proceed" to backup Windows 10 OS.
Part 2: Restore Windows 10 system image from USB
If your computer is still bootable, you can open Qiling Disk Master Standard and select the image by clicking "Restore" and "Select Image File". Tick "Restore this system image" and click "Proceed" at last, ensuring the device with the system image is connected to your computer.

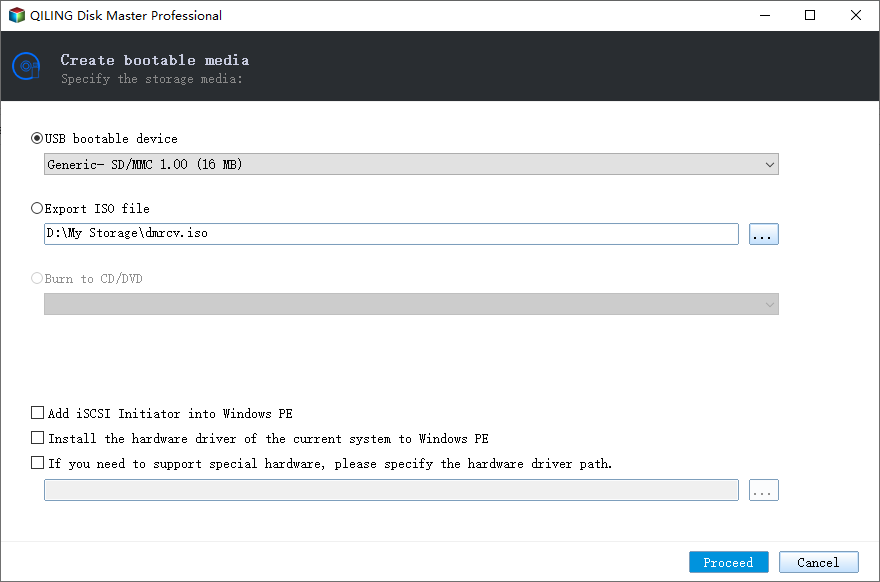
If your computer is unbootable, you need to create a bootable media or directly use the PXE boot tool to start your computer and restore the image under the recovery environment.

You can also create a Recovery Environment in Windows 10, which allows you to access software and perform operations directly in the recovery environment without needing the device at the next system boot.
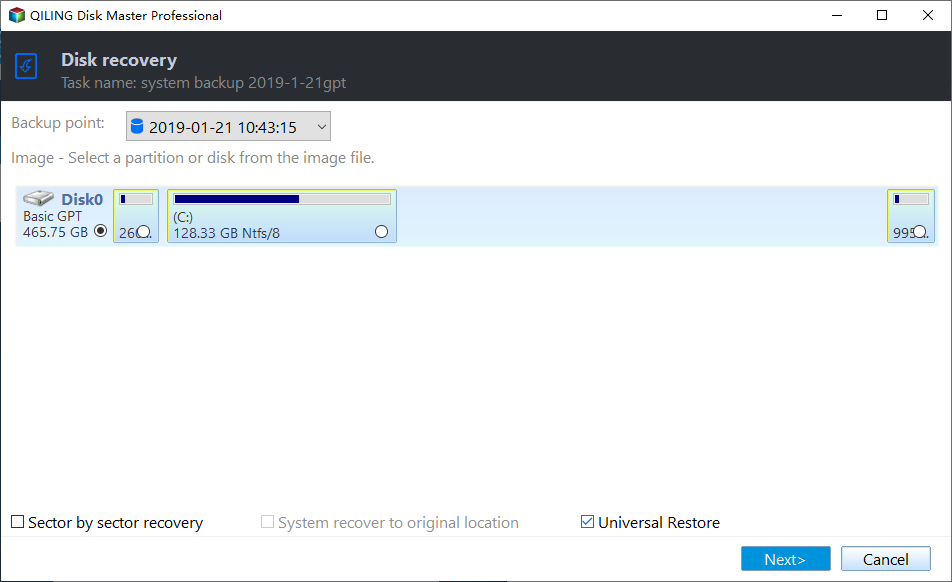
When creating a system image of Windows 10 for another computer or restoring the system to a different computer, the "Universal Restore" feature is checked by default. However, if you're using the free version, enabling this feature will prompt you to upgrade to the advanced version.
Summary
You can create a system image backup in Windows 10 or 11 using various tools, including Backup and Restore (Windows 7), Qiling Disk Master Standard, and Qiling Disk Master Professional. These tools can help you create a backup of your entire system, including operating system, installed applications, and settings.
To create a Windows 10 system image backup and restore it on the current computer, any of the mentioned tools can be used. However, if you want to restore the system to a new computer, only the professional version of Qiling Disk Master can be used, thanks to its Universal Restore feature, which installs all the necessary drivers to start Windows.
Related Articles
- Fix Windows Folder Size Too Large | 4 Methods
Here are 4 methods to fix Windows folder size too large, pick one or more of them and delete files you don't want. Hurry up and learn more below. - Best Free Microsoft Deployment Toolkit (MDT) Alternative
Want to find a Microsoft Deployment Toolkit alternative to create a Windows 10 image for deployment? How to deploy Windows 10 image to multiple computers simultaneously? Just see the step-by-step guide. - Qiling Image Deploy | SYSPREP Workaround in Windows 7, 8, 10, 11
This article describes a great Sysprep alternative in Windows 7, 8, 10, 11 - Qiling Image Deploy which can deploy system to multiple computers simultaneously. - Windows Deployment Services (WDS) Alternative - More Efficient
If you are not content with Windows Deployment Services and looking for a WDS alternative, here it is. - How to Backup Your Files in Windows 11 and Downgrade Back to Windows 10
If you're planning to downgrade from Windows 11 to Windows 10, you'll want to back up your files first. Fortunately, backing up your files in Windows 11 is a straightforward process. You can use the built-in File History feature to automatically back up your files to an external drive or network ... - 2022 Complete Guide: How to Boot from SSD After Cloning
If Windows won't boot from your SSD after cloning, don't worry - this guide will walk you through the process of resolving the issue and getting your computer to boot from the cloned SSD. You'll learn why your computer may not be booting from the cloned SSD and get a step-by-step guide on how to ...