How to Unpartition Hard Drive on Windows 10 And 11
Why need to unpartition hard drive?
An unpartitioned hard drive is a drive that has been cleared of all existing partitions or volumes, effectively merging them back into a single unallocated space. This process can be useful if you want to add unallocated space to another hard drive, allowing you to utilize the entire drive for storage or other purposes.
Unpartitioning a hard drive may be necessary or beneficial in certain situations. For instance, if a hard drive has been formatted or repartitioned, unpartitioning it can help recover lost data or restore the drive to its original state.
✦ Changing Disk Structure: To revert to a single partition setup, you would need to delete all existing partitions on the hard drive, effectively unpartitioning it, allowing you to create a single partition for your desired use.
✦ Simplification: If managing multiple partitions becomes too complex, you can simplify management by unpartitioning them, which can be a good option if you no longer need the organization provided by separate partitions.
✦ Reclaiming Space: When you have unused partitions, unpartitioning them can free up space that was allocated to those partitions, allowing you to use that space for other purposes or expand existing partitions.
✦ Data Privacy: If you're planning to sell or give away a hard drive, consider unpartitioning and securely erasing it to prevent any personal or sensitive data from remaining on the device.
To unpartition a hard drive on Windows 10, you can delete all partitions on the hard drive. This will essentially wipe the drive clean and allow you to start from scratch.
How to unpartition a hard drive on Windows 10
If you're unsure how to unpartition a hard drive in Windows 10, don't worry - there are two methods to help you achieve this.
▶ Method 1. Unpartition hard drive with Disk Management
Cause using Disk Management to unpartition hard drive will delete all the partition on it, so all the data will be deleted. If you have important data on the hard drive, you'd better back up data on the hard drive in advance. Then, follow the steps below:
1. To open Disk Management, press "Windows" + "R" to open the "Run" dialog box, type "diskmgmt.msc" and press "Enter".
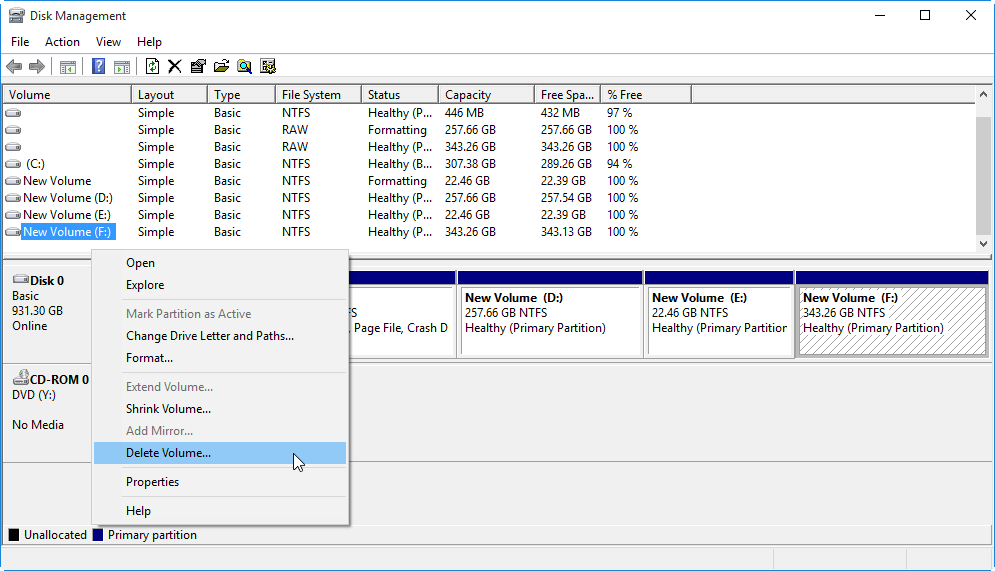
2. In the Disk Management window, right-click the partition you want to delete and click "Delete Volume". If you want to delete all partitions on the hard drive, you can select the entire hard drive and click "Delete Volume".
3. After that, you will see the partition as unallocated space. Now, you can allocate the free space to the adjacent partition to extend it. This will give you more space to use.
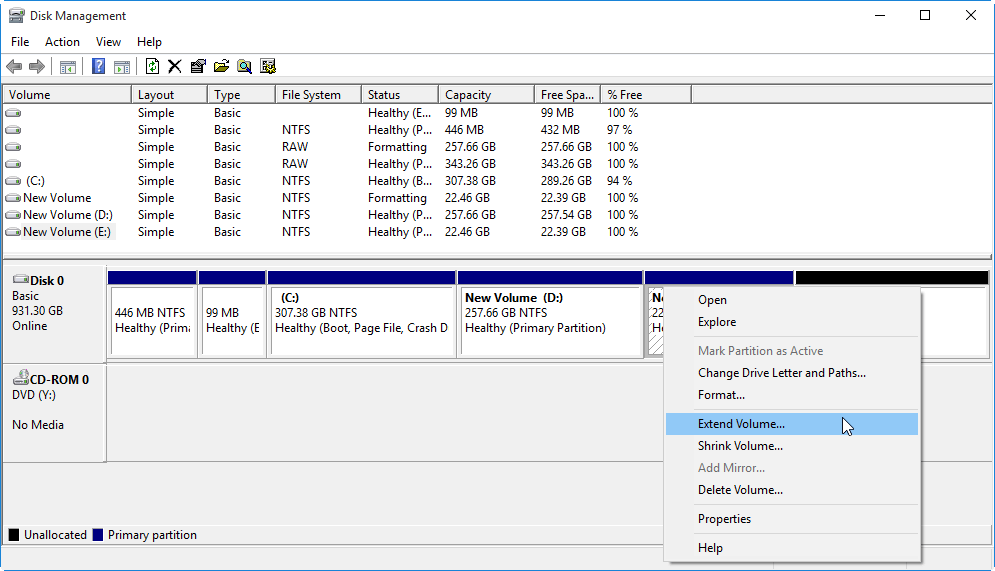
Tip: If you want to delete a system partition, you won't be able to use Disk Management to delete it, as the "Delete Volume" option will be greyed out.
▶ Method 2. Unpartition hard drive on Windows 10 more easily and no limit
While Disk Management can delete all partitions, it still has some restrictions. Fortunately, there are third-party freeware tools available that can easily delete partitions on a hard drive.
I highly recommend Qiling Disk Master Standard, a powerful disk partition manager that can delete all partitions on Windows 11/10/8/7 and wipe hard drive permanently, making data unrecoverable by any data recovery software.
If you have important data on your hard drive, please back up your hard drive first.
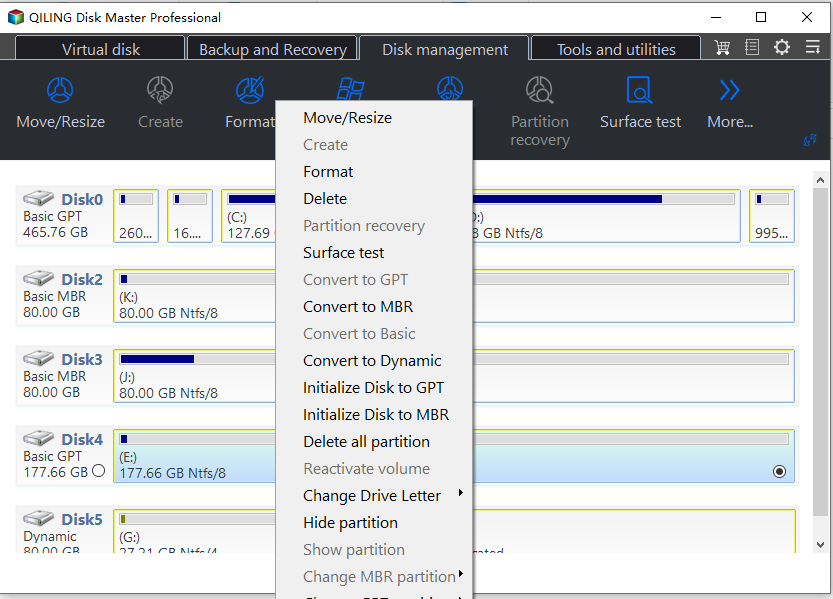
Step 1. Install and run the software. The partition information will be displayed on the main interface. To unpartition a drive, right-click on it and select "Delete All Partitions" to open the related dialog.
Step 2. Click "OK" to continue.
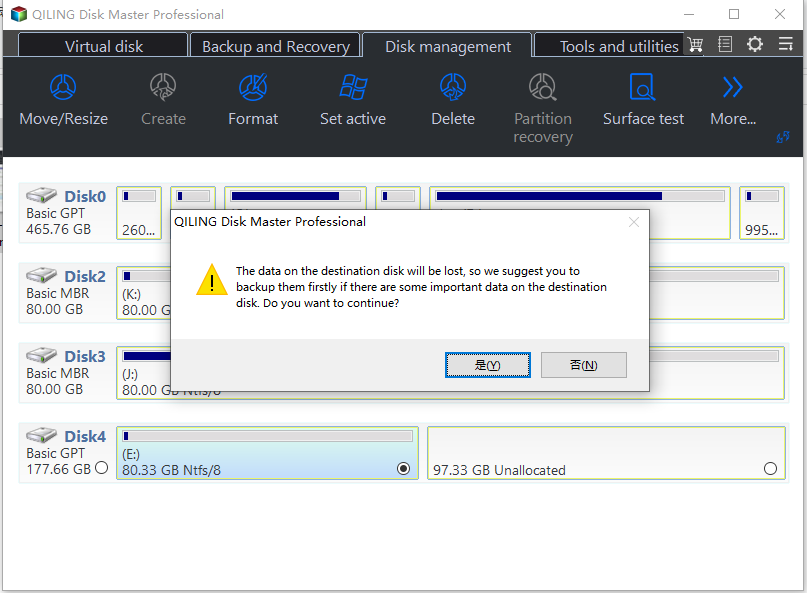
If you're about to delete a system partition, be aware that your computer won't start again after deletion. Create a bootable USB stick beforehand to ensure you can still boot your computer.
◥ Delete all partitions:Deleting all partitions on a hard disk is an option, but it's worth noting that the data which has been deleted is recoverable if you choose this path.
◥ Delete all partitions and wipe all data on the hard drive: Deleting all partitions and wiping all data on the hard drive is a drastic option that should be considered carefully. This action will erase all data, including files and partitions, and even data recovery software may not be able to recover them. If you're unsure, consider making a backup of your data first.
Step 3. After that, you can see the hard drive show as unallocated space.
- ★Tips:
- Deleting a primary partition results in unallocated space, whereas deleting a logical partition by Disk Management yields free space. To obtain unallocated space, you must delete the free space again. (Note: This response is a concise summary of the original text)
- If you're looking to unpartition a solid state drive (SSD), you can try using the SSD Secure Erase function to reset it to its factory settings and restore its performance. This can help you unpartition the drive.
Conclusion
To unpartition a hard drive on Windows 10 or other Windows systems, simply follow these steps. In addition to deleting all partitions, this process also offers many other useful functions such as creating, moving, resizing, or formatting partitions, converting MBR to GPT, cloning disks, rebuilding MBR, and more.
Upgrading to the Professional Edition allows for the allocation of free space from one partition to another to extend it, or moving installed applications to another drive to free up space.
Related Articles
- How to Partition C Drive without Formatting in Windows 10/8/7?
Learn how to partition C drive in Windows 11/10/8/7 using Windows snap-in Disk Management and Qiling Disk Master without formatting C drive and losing data. - Windows 10 Disk Management - The Built-in Disk Partition Manager
In this tutorial, you will learn what is Windows 10 Disk Management, how to open it as well as how to use it for disk partition management. Moreover, a better Disk Management tool will be introduced to help manage disk partitions more conveniently in Windows 11, 10, 8, 7. - Shrink Volume with Disk Management in Windows 11, 10, 8, 7
Many people may want to know how to use Disk Management to shrink volume. This article will teach you how to do it and provide other solutions. - Best System Clone Service for Windows and Windows Server Users [Your Best Practice]
This guide explains Best System Clone Service for Windows and Windows Server Users with clear steps, key checks, and practical tips. - How to Fix Boot Manager Failed to Find OS Loader [100% Working]
To remove a partition in Windows 10, you can use Disk Management or DiskPart. Qiling Disk Master provides a simpler way to delete partitions and manage disk space without risking data loss on other partitions. - How to Boot Raspberry Pi From USB [Step-by-Step]
To modify the Raspberry Pi bootloader to boot from a USB storage medium, follow these steps. First, ensure that the USB drive is formatted with a compatible file system such as FAT32. Next, create a bootable USB drive using a tool like Etcher or add.
Products
Articles & Tutorials
- Data Recovery
- Data Backup
- File Recovery
- File Backup
- File synchronize
- System Backup and Restore
- Disk and Partition Clone
- Technical articles
- Disk Master Help
- Windows Deleted File and Disk Recovery Tutorials
- Windows File and Data Recovery Tutorials
- More Windows Tutorials for Install, Security, Files, and PC Tips
- Windows Boot, Repair, and Recovery Environment Tutorials
- Windows Backup Tutorials
- Windows Restore Tutorials
- Windows Clone and Migration Tutorials
- Windows Server Backup, Recovery, and Management Tutorials
- Windows Disk, Partition, and Storage Management Tutorials