2 Free Ways to Burn or Copy ISO to USB in Windows 11/10/8/7
Why burn ISO files to USB drive?
ISO is a file format used on CD, DVD, or Blu-ray discs, often used to archive operating systems like Windows or Linux. Burning an ISO to a USB drive can create a portable version of Windows, allowing users to take their familiar work environment with them wherever they go. This can be particularly useful for those who need to use Windows 10 on multiple devices or in different locations.
2 Free methods to burn ISO to USB in Windows 10
Burning a Windows 10 ISO to a USB drive is a more complicated process than copying and pasting files, as the USB drive needs to be bootable once the ISO images are copied onto it. Fortunately, there are two methods available in Windows 10 to help you copy the ISO to the USB drive.
▌Method 1. Copy ISO to USB via Windows native "Windows To Go"
To burn an ISO file to a USB drive in Windows 10, you can use the built-in "Windows To Go" feature, which allows you to create a Windows To Go workspace that can boot a computer from a certified USB drive. To do this, go to Settings, then Update & Security, and select the "Create a Windows To Go workspace" option. Follow the on-screen instructions to select the ISO file, choose a drive, and confirm the creation of the workspace.
Step 1. To begin, download the ISO files from Microsoft's official website. Next, connect a certified USB drive with a minimum capacity of 32 GB to your computer.
Warning: Before burning an ISO image to a USB drive, please ensure that the drive is empty or that you have backed up any important files you want to keep, as the process will delete all data on the drive.
Step 2. To enable Windows To Go, open the Control Panel on your computer and search for "Windows To Go". Once the search results appear, click on the "Windows To Go" feature. This will allow you to create a portable version of Windows that can be booted on other compatible devices.
Step 3. The computer will automatically search for the inserted USB drive. Once found, click on the USB drive you plan to burn the ISO onto and then click "Next" to continue.
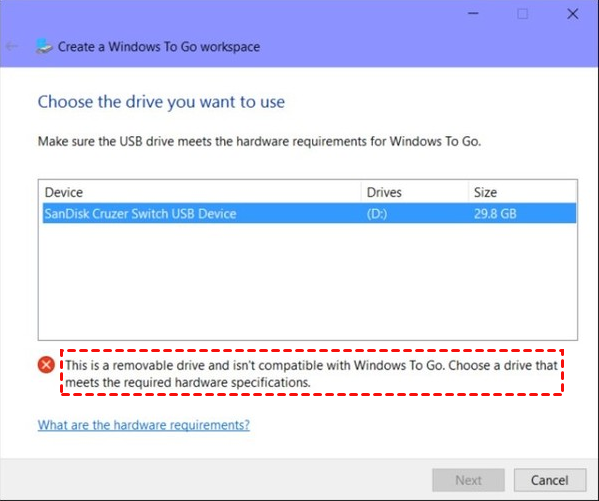
Note: The "Next" button will only be clickable and the installation process will proceed smoothly if the USB drive meets the required hardware specifications of Microsoft, otherwise, you will encounter the error message mentioned.
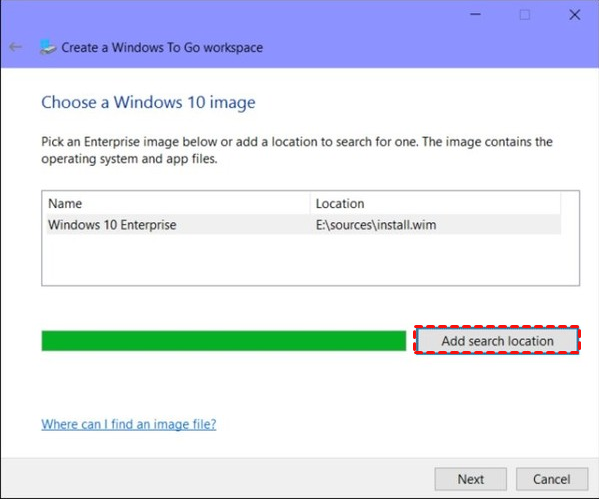
Step 4. Add a search location to search for the Windows 10 installation ISO file, then select the mounted ISO file.
Step 5. You can enable BitLocker Drive Encryption on your Windows To Go workspace in the next window, which can protect valuable data on the USB drive.

Step 6. Windows 10 will move the ISO image to the USB drive, allowing for a more straightforward installation process.
▌Method 2. Burn ISO to USB via freeware
Windows To Go is a feature only available on Windows 8/8.1 Enterprise and Windows 10 Education/Enterprise/Pro, and not on Windows 7, Windows 8/8.1 Home/Pro/Education, or Windows 10 Home. Additionally, it requires a qualified USB drive with a space size of at least 32 GB. To overcome these limitations, users can consider using a third-party free partition manager, such as Qiling Disk Master Standard.
This software allows you to burn ISO files to a USB drive, compatible with Windows 11/10/8/7 versions, and does not require a certified drive, just 13 GB of space is needed. You can download the freeware and follow the guide.
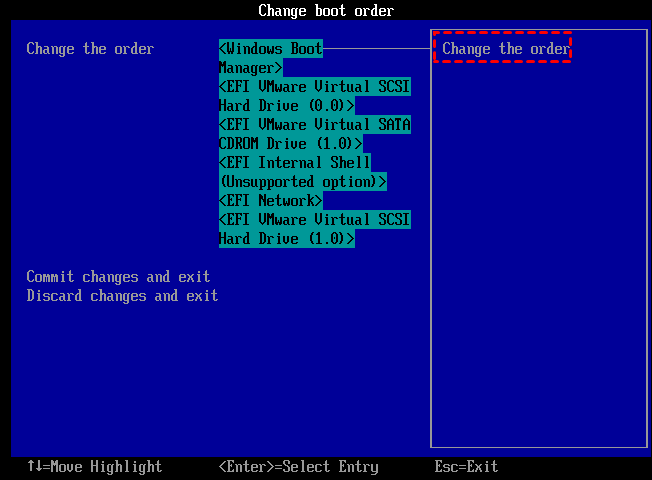
After completing the process, plug the USB drive into another computer, enter the BIOS settings, and change the boot order to boot from the destination disk. This will allow you to boot your computer using the newly created destination disk.
Final verdict
To burn an ISO to a USB drive on Windows 10, you can use Qiling Disk Master Standard, which is an easy-to-use tool for this task. If you need to create a bootable USB drive with your current system, you can upgrade to the Professional edition, which also offers additional features such as transferring the OS to an SSD, allocating free space between partitions, splitting a large partition into two smaller ones, and converting MBR to GPT for Windows 11.
Related Articles
- Best Free WinToUSB Alternative- Qiling Disk Master
Here, we will share a free yet powerful WinToUSB alternative, which breaks the limitations of WinToUSB software and permits you to create portable Windows 11/10/8/7 more easily and flexibly! - Free Download Windows 7 ISO/CD to USB Bootable Software
To get a portable Windows 7 workspace on a USB drive, you can use reliable software to put Windows 7 ISO to USB drive and make it bootable. - Restart to Repair Drive Error in Windows 10 | 5 Fixes
"Restart to repair drive errors" always showing up is an anoying problem for many computer users, this article can help you fix it easily with 5 solutions. - How to Restore Multiple Databases in SQL Server (3 Methods)
To restore multiple databases in SQL Server at once, you can use a T-SQL script that utilizes a loop to apply the restore process to each database, or opt for a software solution that can handle the task with fewer restrictions. - Enable Image File Compression to Save Disk Space
Image file compression can help save disk space and Qiling Disk Master, a free backup software, offers this feature. - How to Explore Image File in Windows 11, 10, 8, 7 [5 Steps]
Image file explorer can help mount a backed up image file to a virtual drive, allowing you to access files from My Computer or This PC.