Easily Securely Erase SSD Windows 10 without Affecting Performance
Do you need to secure erase SSD?
Windows 10 has been optimized for SSDs, resulting in a significant performance boost when installed on one. However, users may experience a decline in SSD performance after heavy data usage, seemingly without reason.
If you haven't changed other settings that may impact SSD performance, it's time to do a Secure Erase on your Windows 10 SSD. This process will wipe everything from your SSD, restoring its performance without affecting its lifespan. Additionally, wiping or erasing a solid-state drive is also necessary in situations such as reinstalling Windows, removing sensitive data, or when the drive is no longer needed.
- Dump or resell the SSD: Securely erasing your SSD drive can prevent others from accessing your personal files by deleting everything from the drive.
- Eliminate virus and malware on the device: If your SSD drive is infected by a stubborn virus or malware, you can completely remove it by erasing or wiping the drive.
Choose a reliable tool to securely erase SSD in Windows 10
Some SSD manufacturers provide a utility for ATA Secure Erase in Windows, such as Samsung Magician, SanDisk SSD Toolkit, Intel Solid-State Toolbox, or OCZ Toolbox, but a universal SSD eraser tool that works on all SSDs may be a better option if you have multiple brands.
To save time and energy, use Qiling Disk Master Professional, which securely erases SSDs without damaging performance or lifespan, and also wipes HDDs using various methods.
Qiling Disk Master Professional is a versatile hard disk manager that can extend the NTFS system drive without rebooting the computer, migrate the OS to an SSD with secure boot, convert the system disk between MBR and GPT without deleting partitions, clone the SSD drive, and allocate free space from one partition to another, among other features.
How to securely wipe or erase in Windows 10?
To securely erase an SSD using Qiling Disk Master Professional, follow these steps. First, download and install the software, then launch it and select the SSD you want to erase.
Before proceeding:
1. Back up important files on the SSD you don't want to lose to cloud or external hard drive, as they will be unrecoverable after secure erasing.
2. Connect the target SATA SSD drive to a working Windows 7 computer, ensuring it is properly seated and secured with screws. The computer should be turned off before making any connections.
3. Install and launch Qiling Disk Master Professional on a Windows 7 computer, and you can download the Professional Demo version to try it out first.
To erase an SSD drive and delete everything from it, you'll need to follow a series of steps. First, back up any important data, as it will be deleted permanently.
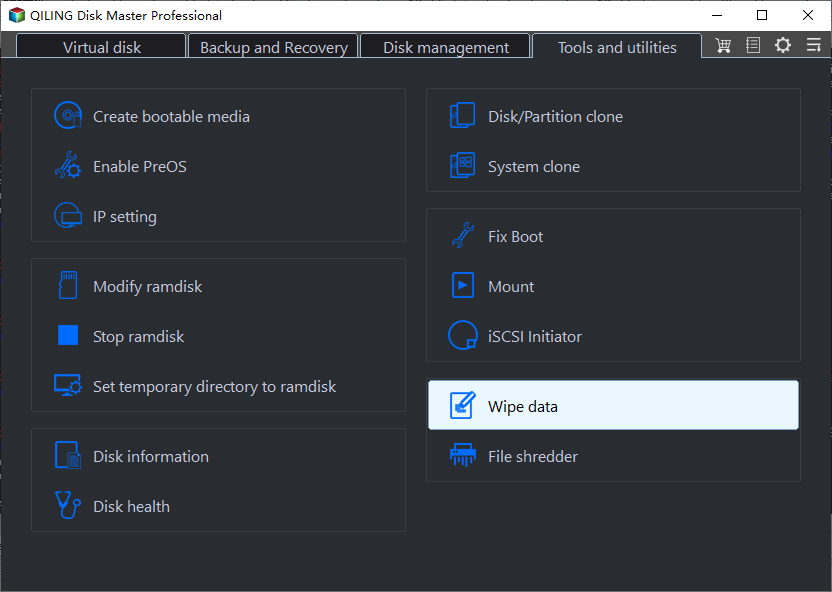
Step 1. Click on "Tools" on the main interface, then select "Wipe data" from the options.
Step 2. In this step, select the SSD drive that needs to be completely wiped.

✍ See how to relieve SSD frozen state:
1. To access the internal components of your computer, you need to physically open it up. If you have a desktop computer, you'll need to remove the side panel or screws that hold the case together. For a laptop, you'll need to remove the rear cover or drive shell, which can usually be found on the bottom or back of the device.
2. To securely erase an SSD, locate the drive that needs to be erased and disconnect its power cable.
3. Disconnect the SATA data cable from the SSD.
4. Reconnect the SATA cable to the SATA port on the SSD.
5. Once the SSD is removed, plug the power cable back into the SSD's power connector.
Step 3. After the hot-swap, click "Next" again to proceed with the process, and wait for it to finish.

Step 4. When the SSD has been erased successfully, click "Finish".
Wrap up
To securely erase an SSD in Windows without damaging its performance and lifespan, follow the steps outlined. After securely erasing the SSD, you can also use the software to create partitions before installing Windows. If you need to perform similar operations on Windows Server 2019/2016/2012/2008/2003, try Qiling Disk Master Server instead.
Related Articles
- How to Transfer Data from Old SSD to New SSD in Windows 10/8/7?
If you want to migrate data or files from the old SSD to the new SSD, you can transfer SSD to SSD by cloning it. To do it easily, Qiling Disk Master is a great choice for cloning SSD to transfer data to another SSD. - Turn On or Off Device Encryption on Windows 11
You will learn how to turn on or off device encryption. Besides, you can password protect your data without a Microsoft passport key. - Fixed: Unallocated Space on 4TB Hard Drive that Shows up Only 2TB
If you find your 4TB hard drive only shows 2TB space and the rest storage shows unallocated space in your Windows 11/10/8/7, don't worry since here we will explain why the unallocated space appears on 4TB drive and how to deal with it safely. - How to Unboot USB Drive to Normal in Windows 10/8/7 (3 methods)?
Need to unboot USB stick? This article will illustrate 3 methods to unboot USB flash drive to normal status. - How to Install Windows Server 2008 on USB Flash Drive?
No matter you want to install Windows Server 2008 on USB for a portable Server, install OS or repair the boot issues, you can find the stepwise guide in this article. - Partition Recovery Software for Windows Server: Restore Deleted/Lost Partition Effortlessly
If you have deleted partition by accident in Windows Server 2008, 2012 (R2), 2016, 2019, 2022, you can restore the lost partition and the data via recovery partition software.