How to Run Sysprep in Windows 10 and 11 | Step by Step
What Does Sysprep Do in Windows 10
Sysprep is a built-in Windows tool that prepares a system image for deployment to multiple computers, generalizing the image in the process.

When creating a system image for Windows installation on multiple computers, the SID (Security Identifier) is copied, potentially causing issues.
To avoid issues like WSUS incompatibility caused by SID duplications on the same network, you can use Sysprep to remove computer-specific information and generalize new SIDs for client computers, making it easier to prepare a Windows image for deployment.
To capture the Windows 10/11 OS image for deployment in WinPE, you can use the built-in tool called "Windows System Image Manager (WSIM)" or third-party tools like Qiling Disk Master. WSIM allows you to create a .wim file of the OS, which can then be used to deploy the image to multiple machines using WinPE.
How to Sysprep Windows 10 Step by Step
You can use Sysprep to remove computer-specific information (SID, GUID, etc.) and generalize the image. Here I will take Windows 10 as an example.
Step 1. Configure a reference computer.
To configure a reference computer, you need to prepare a computer with the desired operating system, software, and settings that you want to replicate in the image. This computer will serve as the template for the image, and all the configurations, software, and settings on this computer will be captured and included in the image. This process ensures that the image is consistent and identical to the reference computer, making it easier to deploy and manage.
- An up-to-date Windows build;
- A clean Windows installation;
- Necessary drivers, applications, and configurations.
Step 2. Run Sysprep in Windows 10.
To run Sysprep in Windows 10, press the Windows logo key + X at the same time, then select Command Prompt (Admin) from the menu.
`cd /d/Windows/Setup/Sysprep` Enter
cd \Windows\System32\Sysprep
Step 3. Generalize system image using Sysprep.
Then, enter this command to generalize system image:
sysprep /generalize /shutdown
To generalize Windows 10/11 in a VM, run the command "sysprep /generalize /mode:vm" to remove any unique identifiers and prepare the OS for imaging.
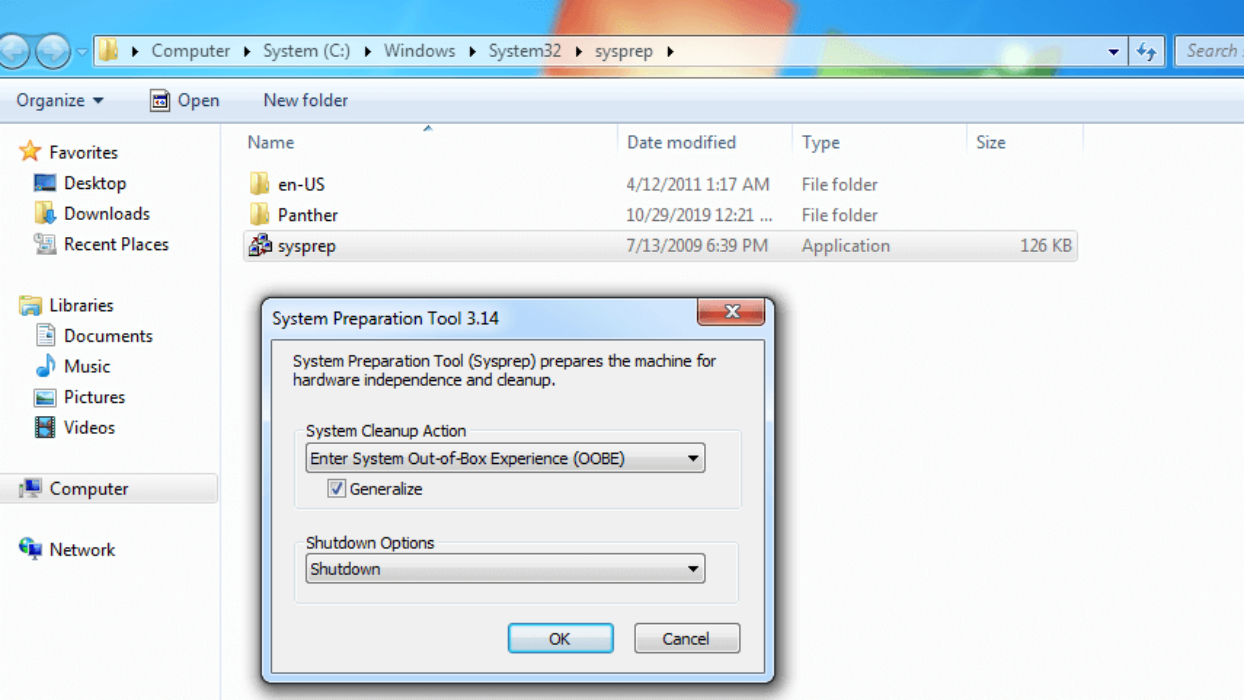
To open Sysprep GUI mode, type "sysprep" and press Enter. Choose "Enter System Out-of-Box Experience (OOBE)" and select the "Generalize" checkbox. Then, click "OK" and select "Shutdown" from the drop-down menu.

✍Tips:
- To explore the command line mode, type sysprep /h and press Enter at Step 3.
- Enter System Out-of-Box Experience (OOBE): The server is configured to boot up as if it were powered on for the first time, simulating a fresh start. This process includes initializing the operating system, loading default settings, and setting up the network connections.
- Generalize: removes SID information from the image.
- Shutdown: once Sysprep completes, shutdown the server.
- To run Sysprep in Windows 10, Windows 7, or Windows 11, you can follow these steps: navigate to the command prompt as an administrator, type `sysprep /oobe /generalize /shutdown /unattended`, and press Enter. This command will start the Sysprep process, which will prepare the system for imaging and generalize the Windows installation, making it suitable for deployment.
Step 4. Capture a Syspreped Windows 10 image.
To use Sysprep for cloning Windows OS over computers, you still need to prepare the image for deployment.
After using Sysprep to generalize the image, the reference device will shut down. When you start it again, it will boot into the Out-of-Box Experience (OOBE) screen, allowing you to set up the device as if it were a brand new one.
📢Note: To avoid having to repeat the Sysprep process, wait until you're ready to capture an image before powering on the reference computer. This ensures that the computer is in a consistent state, making it easier to create a reliable and consistent image for deployment.
To create a system image for deployment, you'll need to follow these steps:
>> To create a bootable WinPE USB drive, which can be used to capture and deploy a Windows image, follow these steps. First, download the Windows Assessment and Deployment Kit (ADK) and the Windows PE (WinPE) add-on from Microsoft's website.
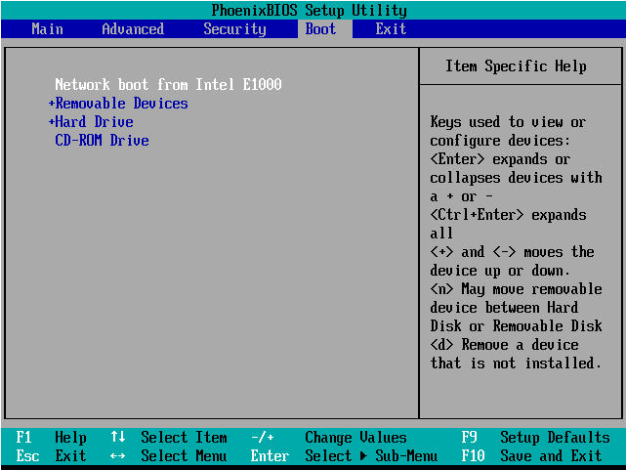
>> To boot the computer from a bootable USB drive, start by booting the computer and immediately enter the BIOS settings by pressing a specific key (such as F2, F12, or Del) during startup. In the BIOS settings, select the USB drive as the first boot option and save the changes. The computer should then be able to boot into WinPE.

>> To capture a Windows 10 image using the Command Prompt in WinPE, you can use the DISM (Deployment Image Servicing and Management) tool. This process involves accessing the Command Prompt from WinPE, and then using DISM commands to capture the image. For example, you can use the command `dism /capture-image /imagefile:C:\capture.
>>To capture an image of the Windows partition, you can use the bootable USB drive to deploy the system image, and then store it on the C: drive. This will allow you to reuse the bootable USB drive for future deployments.
For specific steps, please refer to this Microsoft document.
Frequently asked questions about Sysprep
When using Sysprep, it's essential to be aware of its limitations, which may not be suitable for all scenarios. Some frequently asked questions about Sysprep include considerations for its use.
How many times can you Sysprep Windows 10?
💬On a single system image, you can run Sysprep up to 8 times before needing to recreate the system image.
Why my Windows 10 Sysprep fails?
💬Sysprep may fail if you install or update Microsoft Store apps before generalizing a system image, causing the process to fail.
To prevent Microsoft Store from updating apps, unplug the Internet connection or disable Automatic Updates in Audit mode before creating the image.
What is Audit mode for?
💬This tool allows you to make additional changes to the Windows installation before sending it away or capturing the image for deployment, enabling the installation of drivers, apps, or other updates that require the Windows installation to be running.
To run Sysprep in Audit Mode, type the command "audit" under the Sysprep directory.
sysprep /audit
Sysprep can't create a system image, so you need other tools to capture the prepared Windows OS.
Create and Deploy Windows 10/11 System Image without SID (Easier)
Since Sysprep is only for generalizing images, you still need a tool to capture and deploy system images. While Windows has built-in tools to help with this, the process can be complex and intimidating for beginners.
Therefore, I would like to introduce you an easier way to complete the series of operations - that is using the all round Windows backup & restore utility Qiling Disk Master Technician.
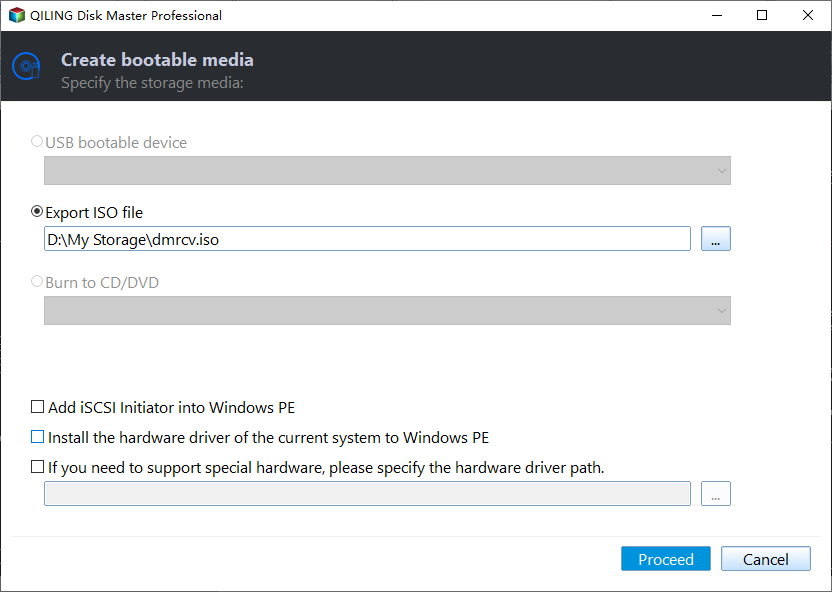
▪ Use the Create Bootable Media tool to prepare a WinPE drive. This tool allows you to create a bootable drive that can be used to boot into a Windows Preinstallation Environment (WinPE) for various purposes such as troubleshooting, recovery, or deployment.
▪ Create a Windows 10/11 image via the System Backup feature.
▪ Deploy a system to unlimited computers over a network using the easy-to-use Image Deploy Tool (AID).
This software is compatible with Windows 11, 10, 8.1, 8, 7, Vista, XP, and various server versions including 2022, 2019, 2016, 2012, 2008, and 2003, covering all editions and bit types (32-bit and 64-bit).
How to capture Windows 10 image using Sysprep
- Ensure that all required computers are on the same network and that all client computers support PXE boot. If any computers do not support PXE boot, exclude them from the process.
- To ensure a successful system migration, the disk sequence numbers for the target computers must match exactly. Remove any extraneous disks and retain only the destination disk, ensuring a precise and identical configuration for a seamless system transfer.
- Launch Qiling Disk Master to mark your partitions, then go to the Tools tab to create a bootable media.
1. To prepare a Windows system for deployment, first, press the Windows key + R to open the Run dialog box, then type "sysprep" in the text box to locate the Sysprep.exe file. Run Sysprep, choose the "Enter System OOBE" option, select the "Generalize" option to remove the system's unique identifier (SID) and prevent potential issues after deployment, and finally choose the "Shutdown" option to power off the system. This process helps ensure a clean and consistent system image for distribution.
2. To shut down the computer and boot into WinPE, click OK, and then use the bootable media to run a full system backup with the Qiling Disk Master.
📢Note: After running sysprep, boot into WinPE to create a new SID. If you don't, the new SID information will not be created.

How to deploy Windows 10 image to multiple computers without SID
1. When the syspreped Windows image is ready, you can deploy it using the Image Deploy Tool, which can be found in the Tools tab.
2. To create a bootable Windows PE ISO, select the "Create WinPE automatically" option in the AID window.
If the drivers are incompatible with your hardware and the WinPE can't start on the client computers, you can also manually create a bootable WinPE ISO and add custom drivers to it.
📢Note: To deploy a system over a network, you need a DHCP server in the LAN. If one is not present, enable the DHCP function.
3. When the tool shows "The service has started, waiting for connect...", it's time to start all the client computers. If all settings are correct, they should boot into AID recovery environment; otherwise, enter BIOS to set the network boot as the first boot option.
4. Here you can see the status for all client computers. Once a computer connects to AID successfully, you will get "Client computers connected". When all the client computers are ready, check I confirm all the... and click Next.
5. To deploy configuration, please refer to the detailed guide on image deployment.
a. Choose Browse to find your system image.
Select the client computers you need or click 'All' to select all connected computers.
Enter the destination disk number, which is usually 0 if all client computers have only one disk reserved.
d. Decide how many computers will be deployed each time.
e. Click Settings to set computer name. Then click OK.
Set IP: click it to preset IP address.
Universal Restore: you can deploy system image to computers with different hardware.
6. After confirming your operations, click Start Deploy. You can then choose whether to shut down or restart the client computers.
Verdict
While Windows users have many tools to remotely deploy system images, they must first prepare the system image using Sysprep in Windows 10. However, this process can be time-consuming and complex for many users, and may even go wrong.
The Image Deploy Tool in Qiling Disk Master offers a solution to the limitations of Sysprep, providing a more efficient alternative to Qiling. This tool allows for the deployment of images without the need for manual configuration, making it a valuable asset for those looking to streamline their imaging processes.
Related Articles
- How to use sysprep to remove SID and delopy image with Qiling Image Deploy?
- Quick Start Guide to Sysprep in Server 2012
- Qiling Image Deploy | SYSPREP Workaround in Windows 7/8/10
- How to Migrate OS to HDD or SSD in Windows 11/10/8/7?
This article tells how to migrate OS to HDD or SSD step by step via using Qiling Disk Master Professional. - [Fixed] Apps and Features Move Greyed Out on Windows 10
When transferring files, you may encounter issues where Apps and features move greyed out. To solve this problem, follow these steps. First, ensure that the destination drive has enough free space to accommodate the files you're trying to transfer. - 3 Ways to Backup C Drive in Windows 10 [Step-by-Step Guide]
How to backup C drive in Windows 10? Click on this post to get 3 ways to backup Windows 10 C drive.