3 Ways to Shrink Volume in Windows 8 or 8.1 to Extend Another Volume
- Why shrink volume in Windows 8 or 8.1?
- Part 1. Shrink a volume via Windows 8 Disk Management
- Part 2. Shrink volume via Windows 8 Command Prompt
- Part 3. Flexibly shrink volume in Windows 8 via freeware
- More info: how to extend another volume after shrinking volume Windows 8
- Summary
Why shrink volume in Windows 8 or 8.1?
Shrinking a volume in Windows 8 or 8.1 creates unallocated space from an existing partition. You can use that space to create a new partition or, when it is adjacent to the target partition, extend another volume.
Part 1. Shrink a volume via Windows 8 Disk Management
Disk Management is a built-in tool in Windows 8/8.1 or Windows 7/10 that helps users manage disk partitions to optimize their computer's performance. It features a "Shrink Volume" option that allows users to reduce the size of an NTFS partition and generate unallocated space, making it easier to manage disk space and optimize computer performance.
Step 1. Right-click the "Computer" icon, select "Manage", and then click "Disk Management" under "Storage". Right-click the volume you want to shrink and choose "Shrink Volume".
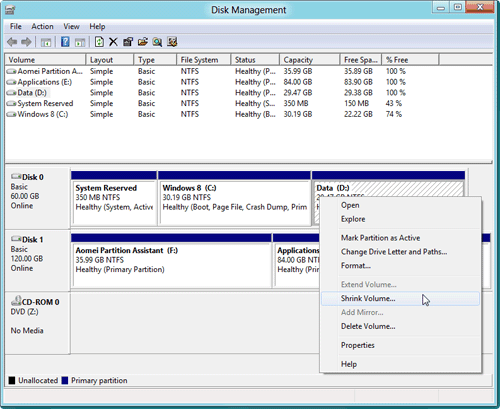
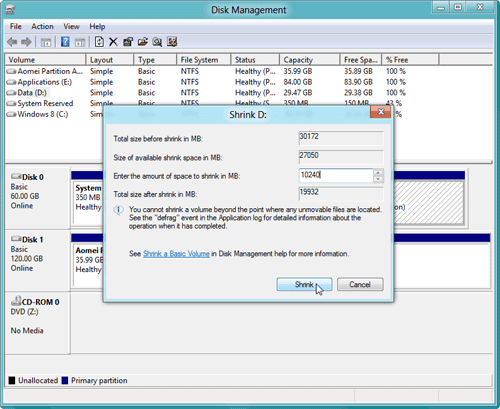
Step 2. In the pop-up window, enter the amount of space to shrink.
You can preview an unallocated space behind D drive, but when you right-click on it, you can only see "New Simple Volume" that allows you to create a new partition.
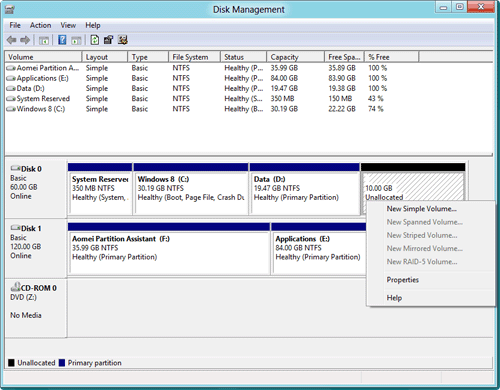
The unallocated space cannot be used to extend another volume, such as the system C: drive, due to limitations in the Windows built-in Disk Management. When you right-click the Windows 8 C: partition, the "Extend Volume" option is disabled and not clickable, preventing you from using the unallocated space to extend the system drive.
1. The "Extend Volume" feature works only when contiguous unallocated space is on the right side of the partition you want to enlarge.
2. The "Shrink Volume" feature creates unallocated space on the right side of the partition being shrunk, and Disk Management cannot move that space to another location.
In Windows 8 or 8.1, you may encounter an error message when trying to shrink a volume, stating that you cannot shrink a volume beyond the point where any unmovable files are located. This is often due to the presence of unmovable files such as Hibernation, Page files, and system protections. To resolve this, you need to disable these unmovable files before attempting to shrink the volume.
Part 2. Shrink volume via Windows 8 Command Prompt
To shrink a basic volume from Command Prompt, use DiskPart instead of the compact command. DiskPart provides the `shrink` command, which works similarly to Disk Management and creates unallocated space after the selected volume.
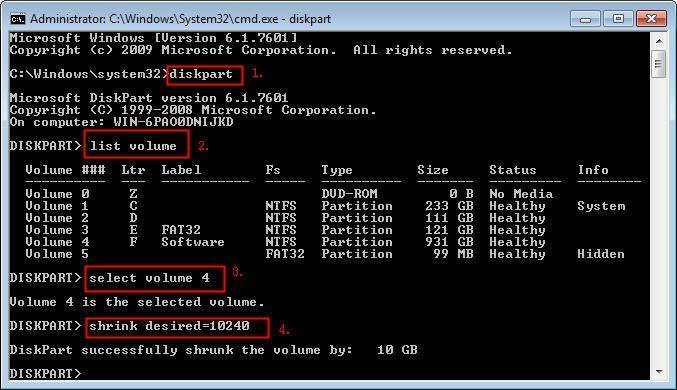
1. To run the Command Prompt as an administrator, type "cmd" in the search box, find the CMD program, right-click on it, and select "Run as Administrator".
2. In the Command Prompt, type following commands and press Enter after each command.
- diskpart
- list volume
- select volume n (n is the volume you want to shrink)
- shrink desired=10240 (you can replace 10240 with any other size you want)
- exit
The Command Prompt has the same limitations as Disk Management, and attempting to shrink a volume with unmovable files will result in an error message.
Part 3. Flexibly shrink volume in Windows 8 via freeware
If you can't shrink a partition due to unmovable files in the middle or at the end of the target partition, you can use the free partition manager Qiling Disk Master Standard. This software allows you to shrink volumes beyond half, resize or move partitions, including BitLocker partitions, making it a useful tool for managing your disk space. You can download the freeware and follow the steps to achieve your desired partition configuration.
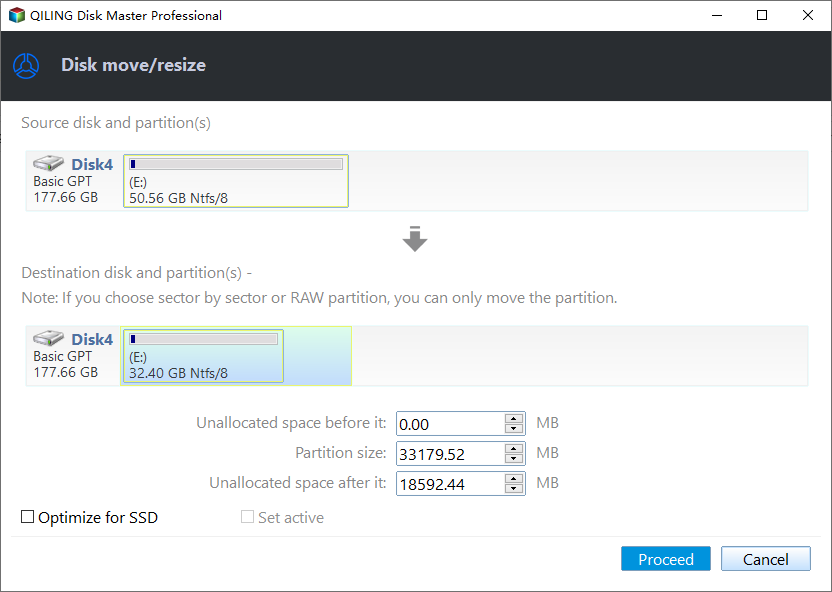
Step 1. Install and run Qiling Disk Master Standard. Right-click the partition you want to shrink and select "Resize Partition".
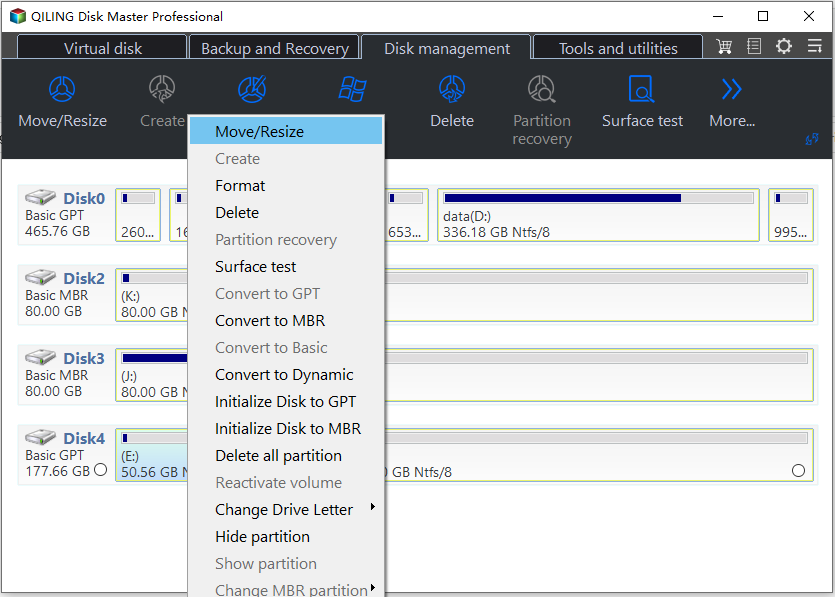
Step 2. In the pop-up window, drag the slider bar to the left side and click "OK".
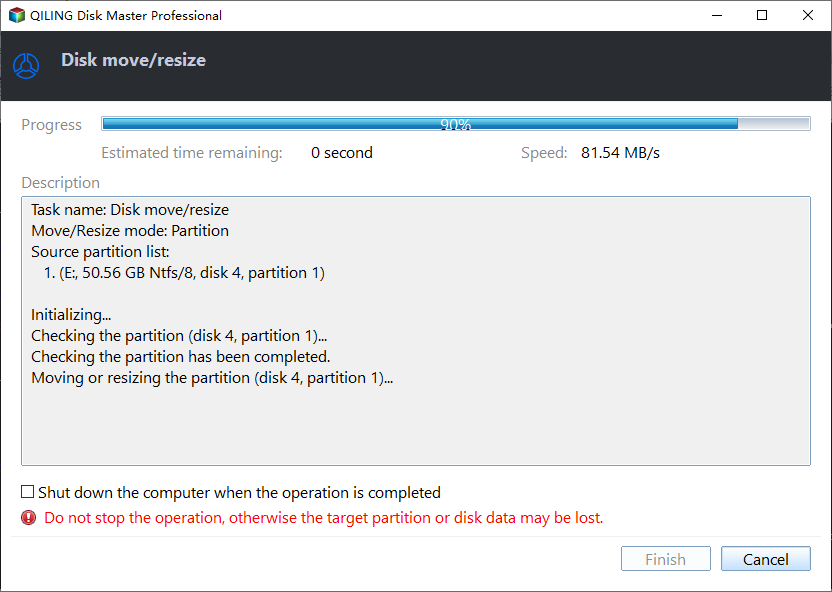
Step 3. Click on "Apply" to commit the pending operation.
More info: how to extend another volume after shrinking volume Windows 8
The new unallocated space generated by shrinking a partition is usually located on the right side of that partition. Disk Management and DiskPart can extend a partition only when the unallocated space is adjacent and on its right side. If the space is not next to the C drive, Qiling Disk Master Standard can help move or merge partitions more flexibly.
Before you do:
1. Make sure there is unallocated space on the disk, or shrink another partition first.
2. If applications are using the partition, Qiling Disk Master may ask you to close them or execute the operation in PreOS Mode.
This freeware also features a "Move Partition" feature, which allows users to move a partition to an adjacent unallocated space, making it possible to extend the volume by combining the unallocated space with the to-be-extended partition.
Summary
Windows 8's Disk Management and CMD have limitations, allowing you to shrink a partition to create a new volume, but not add unallocated space to another partition. However, with Qiling Disk Master, you can easily shrink a volume in Windows 8 and add the generated unallocated space to another volume.
This partition software also supports migrating OS to SSD, creating bootable media, wiping partitions, cloning partitions, allocating free space, aligning SSD partitions, securely erasing SSDs, and converting boot disks between MBR and GPT in advanced editions.
Related Articles
- How to Wipe Hard Drive in Windows 8 Permanently?
You can wipe hard drive in Windows 8 from Command Prompt. If the hard drive is with OS installed, you can employ a third-party partition tool, Qiling Disk Master Professional. - Freeware to Format exFAT to FAT32 in Windows 7,8,10
To format exFAT to FAT32 in Windows 7, you can use the Command Prompt, Disk Management, or free software. Using the Command Prompt, open it as an administrator and type "format /fs:fat32 [drive letter]:", replacing [drive letter] with the actual drive letter of the exFAT drive. - How to Format SD Card for Nintendo 3DS (XL) with Freeware?
To format an SD card for 3DS usage, you can use the built-in formatting tool on the device. Simply insert the SD card into the 3DS, go to the Homebrew Launcher, and select the "Format SD Card" option. Follow the on-screen instructions to complete the formatting process. - Best Free Software to Format SD Card to exFAT on Windows
This tutorial shows how to format SD card including micro SD card of Android phone like Galaxy S4 to exFAT file system on Windows 7/8/10 in easy and simple steps. - Clone UEFI GPT Disk to SSD Successfully and Secure Boot
Learn how to clone a UEFI GPT disk to a smaller or larger SSD in Windows 10/8/7 with simple steps and keep the cloned disk bootable. - Fix Cloned Hard Drive Won't Boot in Windows 7 Easily (5 Ways)
If you encounter the problem cloned hard drive won't boot in Windows 7, you can read this article to know the specific reasons and solutions.