Windows Server 2012 End of Life: How to Prepare for It
Things you need to know about Windows 2012 end of support
Microsoft is ending support for Windows Server 2012 and Windows Server 2012 R2 in October 2023, after which they will no longer receive security updates, non-security updates, bug fixes, or technical support.

Windows Server 2012 and 2012 R2 are nearing their end-of-life, with Microsoft no longer pushing official updates. This poses a significant security risk, as new vulnerabilities cannot be fixed. To avoid problems, it's essential to migrate your data as soon as possible. Microsoft recommends either switching to Azure or upgrading to a newer version of Windows Server.
To protect critical data before Windows Server 2012 (R2) end of life, companies and businesses should take necessary steps to safeguard their data. This involves identifying and backing up essential files and databases, implementing robust security measures, and ensuring business continuity through disaster recovery and backup plans. By doing so, organizations can minimize the risk of data loss and ensure a smooth transition to newer operating systems.
Options for you in case of Windows Server 2012 end of life
As operating systems age, they become more vulnerable to cyber threats, making it easier for hackers to exploit them. Eventually, manufacturers may stop providing security updates and patches due to the outdated architecture, leaving users at risk. To safeguard your data, consider exploring alternative options.
You can upgrade your Server to the latest version, run Azure virtual machine on your existing Server computer, or safeguard your critical data by creating a Server backup to cloud or an external hard drive.
#1. Upgrade your Server system to the latest version
To prepare for Windows Server 2012 (R2) end of support, upgrade to a newer version, taking note that Windows Server can be upgraded to a maximum of two versions at a time, with cluster OS rolling upgrade allowing only one version upgrade at a time.
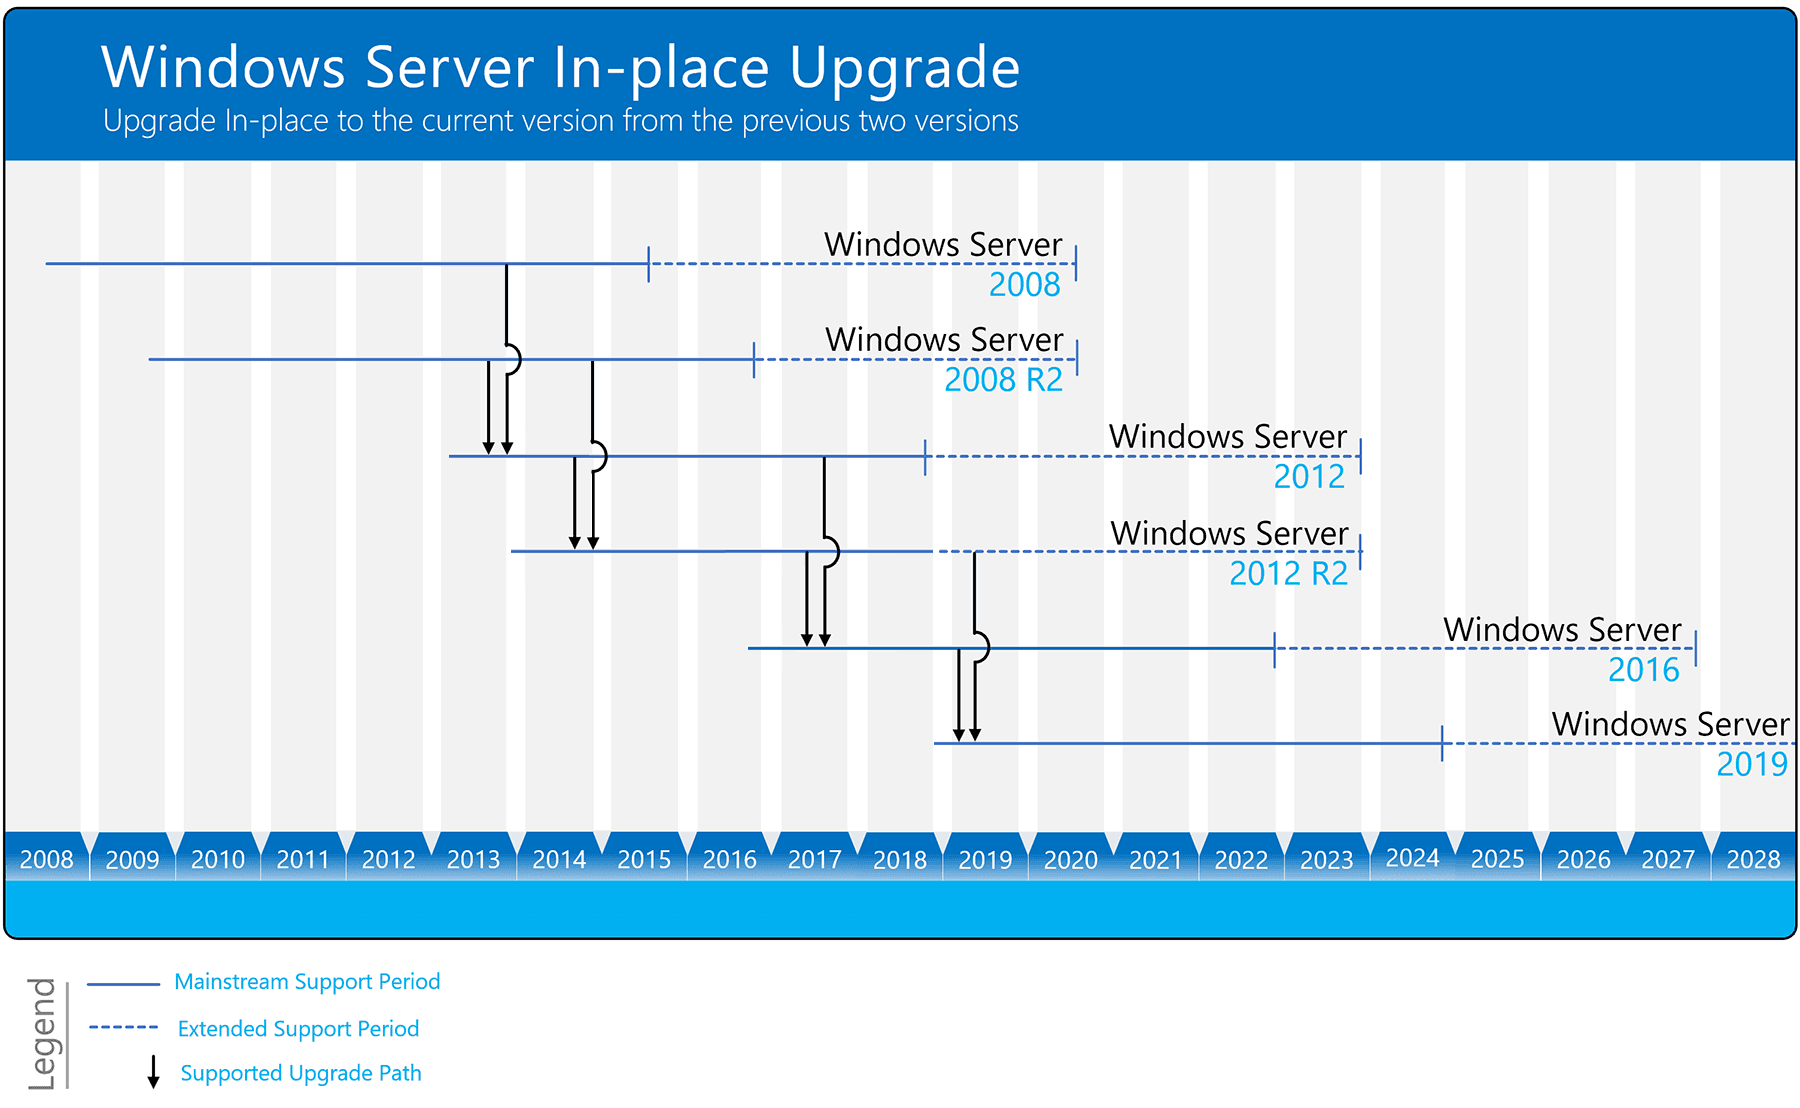
Windows Server 2019 has been designed to work with or in the cloud, making it easier to connect local environments to Microsoft Azure for greater convenience in work or life.
To upgrade Windows Server 2012 R2 to 2019 securely, you have the option to perform an in-place upgrade or a clean install. Upgrading retains all files, accounts, software, and configurations, but may encounter errors like long upgrade times or insufficient storage space, potentially leading to ongoing system problems.
To upgrade Windows Server 2019 to a newer version, you can perform an in-place upgrade, which means upgrading the existing operating system without reinstalling it. This process involves several steps, including preparing the system, installing the upgrade, and configuring the new version.
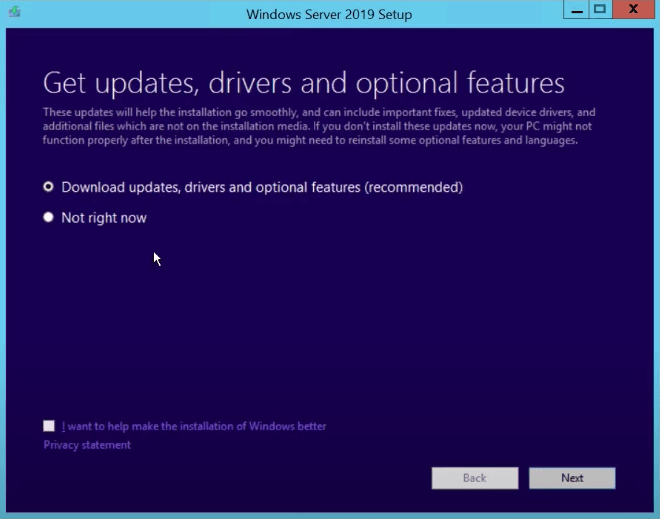
1. To set up Windows Server 2019, locate the setup media and run the setup.exe file directly. This will initiate the installation process.
2. Select "Download updates, drivers and optional features (recommended)" and click "Next". It will take some time to check device configuration, click "Next" when it's done.
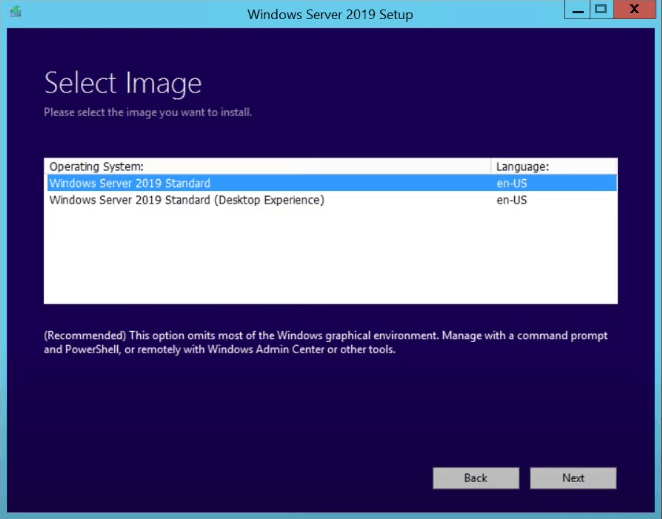
3. Choose an edition of Windows Server 2019 that you want to install, and click Next.
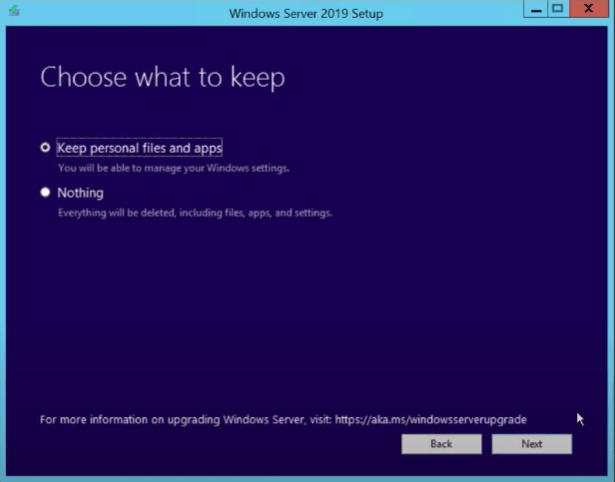
4. Accept the terms, then you can choose whether to keep personal files and apps. Click Next to continue.
5. If there's anything incompatible with Windows Server 2019, it will prompt you to confirm.
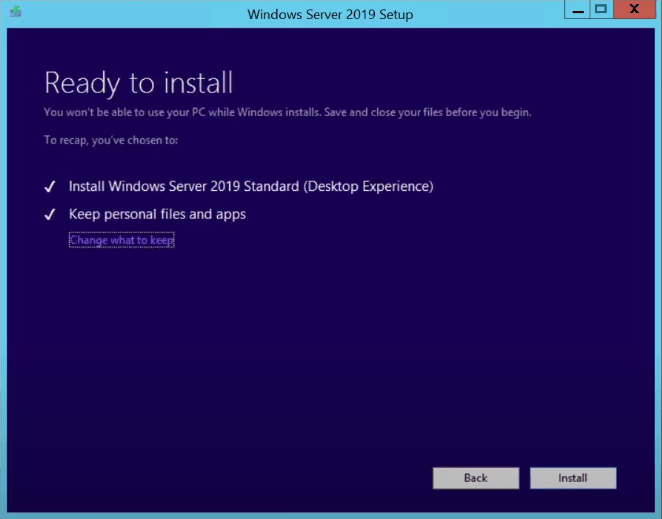
6. Wait for a while and click Install to start upgrading. After finishing, your PC will automatically restart.
#2. Run Azure Virtual Machine on your existing Server computer
If your Server hardware has enough resources, you can create a new virtual Server on your Server system, install the latest compatible version of your application, and transfer your data. This process is the same as installing Windows 11 on VirtualBox, and you can switch between your existing system and the virtual machine at will.
The Microsoft Azure virtual machine offers the advantage of allowing you to experience various server versions without worrying about your computer's upgradability. However, it also has a disadvantage in that, despite being built on the host computer, it's essentially a program file that can be easily corrupted. To mitigate this, it's essential to backup your virtual machine data.
Follow the steps below to create a Windows virtual machine in the Azure portal that runs Windows Server.
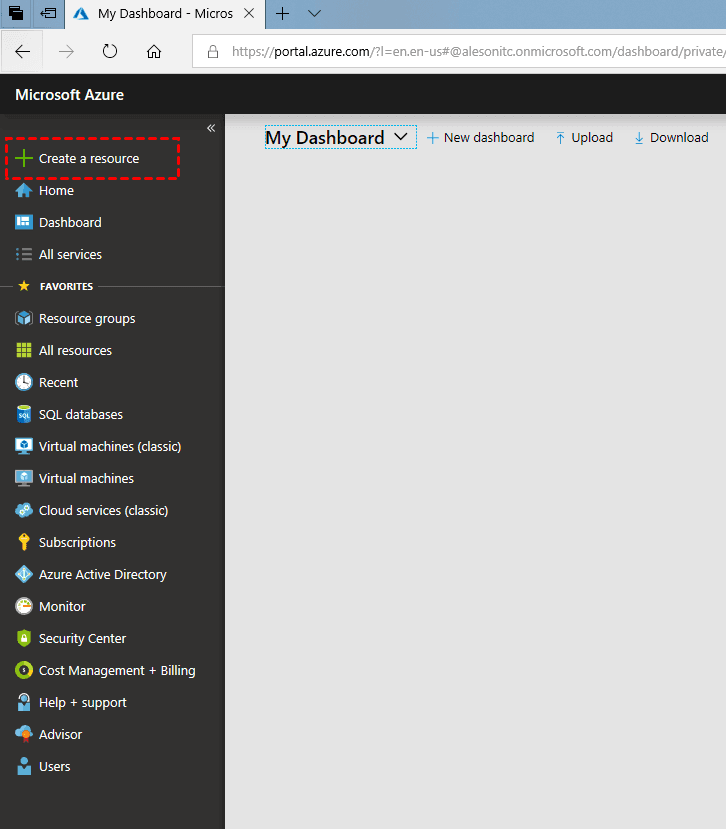
1. To sign in to the Azure portal, go to https://portal.azure.com, and if you don't have an Azure subscription, create a free account before proceeding.
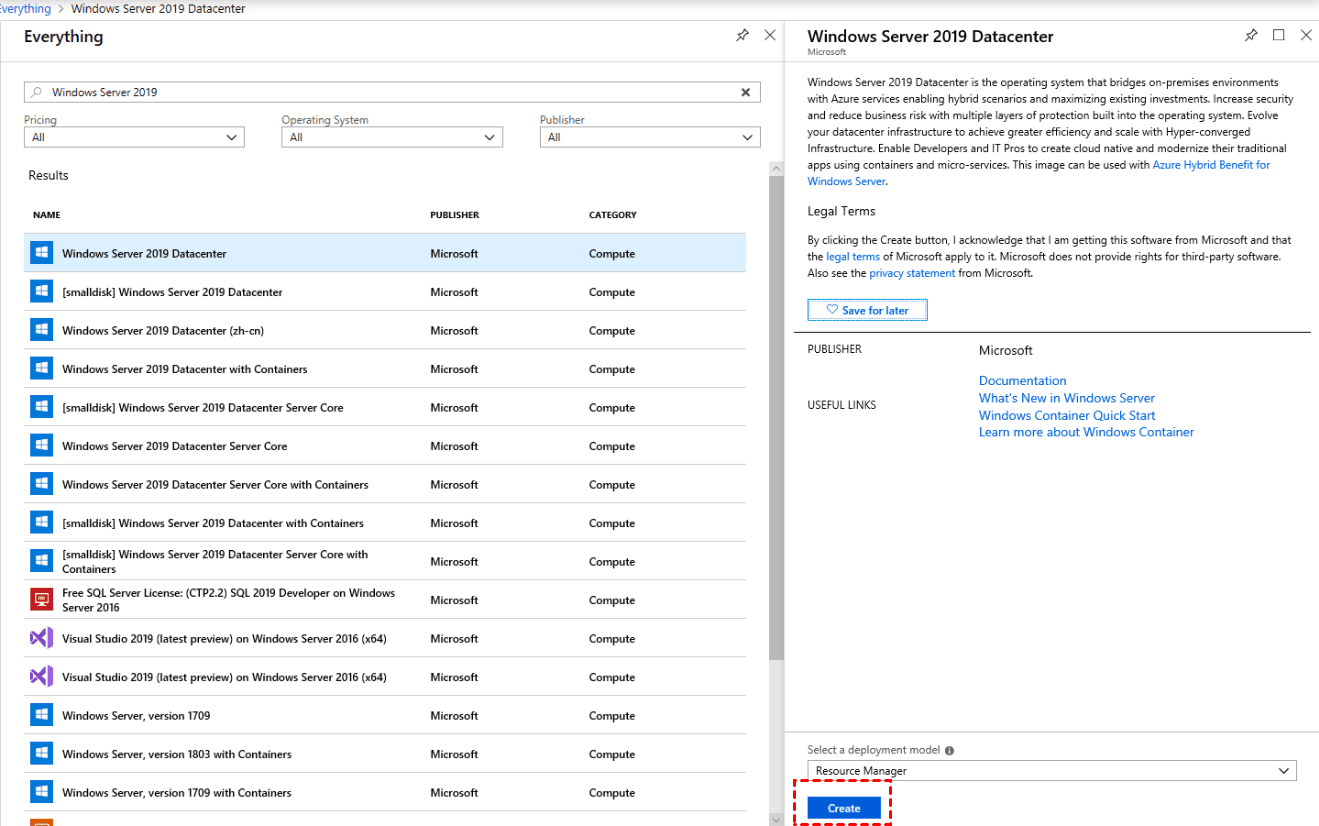
2. To create a resource in Azure, go to the Azure portal, click on the selection menu, and select "Create a resource". This will open a tab where you can specify the resource you want to create.
3. Once we've chosen the right resources, we'll click on "Create" in the lower left corner to start creating the virtual machine.
Bonus tip: Backup your entire Server to keep data safe
Seeking reliable backup software for your Server's important files can save your computer from disaster in a timely and effective manner. Qiling Disk Master Server is a top-notch option that can help you achieve this, allowing you to create a backup image of your Server system and restore it in case of a disaster, even after Windows Server 2012 R2 reaches its end of life without technical support.
As a reliable backup and restore solution for all Windows operating systems, including Windows 11, 10, 8, 7, XP, Vista, and Windows Server, Qiling Disk Master Server can safeguard your computer data from loss. Its key features include:
❀ Various backup types and locations: Qiling Disk Master allows you to create scheduled backups of your entire system, individual disks, files, and partitions to various locations, including local disks, external hard drives, network shares, and cloud storage.
❀ 3 backup methods: It allows you to do full backup, and incremental and differential backup are permitted to improve your backup efficiency.
❀ Schedule Backup: This software enables automated backup tasks on various schedules, including daily, weekly, monthly, and event-driven triggers, as well as USB plug-in events.
❀ Bootable rescue media/recovery environment: You can create a recovery environment or a bootable device to recover a crashed system, allowing you to recover your Server in case something goes wrong.
Back up your server with ease, even if you're a novice! Qiling Disk Master Server's user-friendly interface makes it a breeze to manage the backup process. Simply click the button below to download our 30-day free trial and experience the simplicity for yourself!
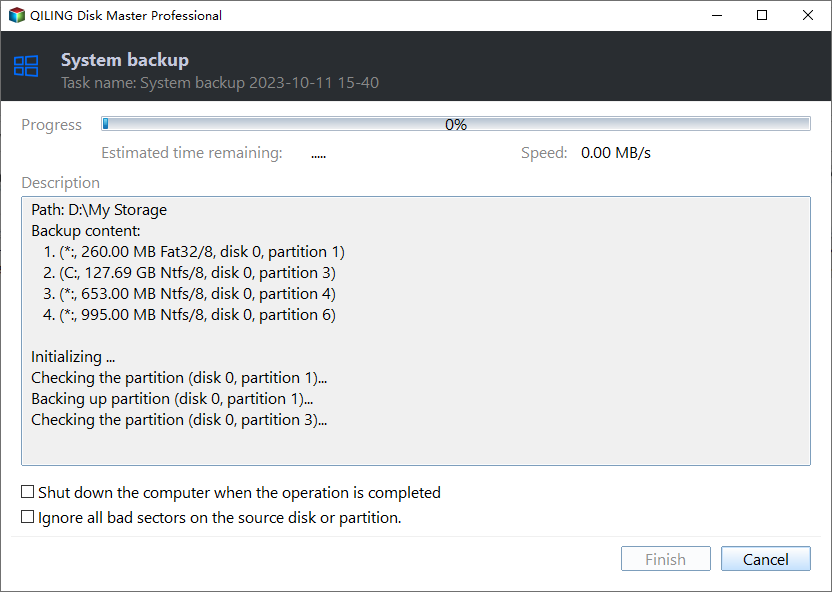
1. Launch Qiling Disk Master, click on Backup and select System Backup.

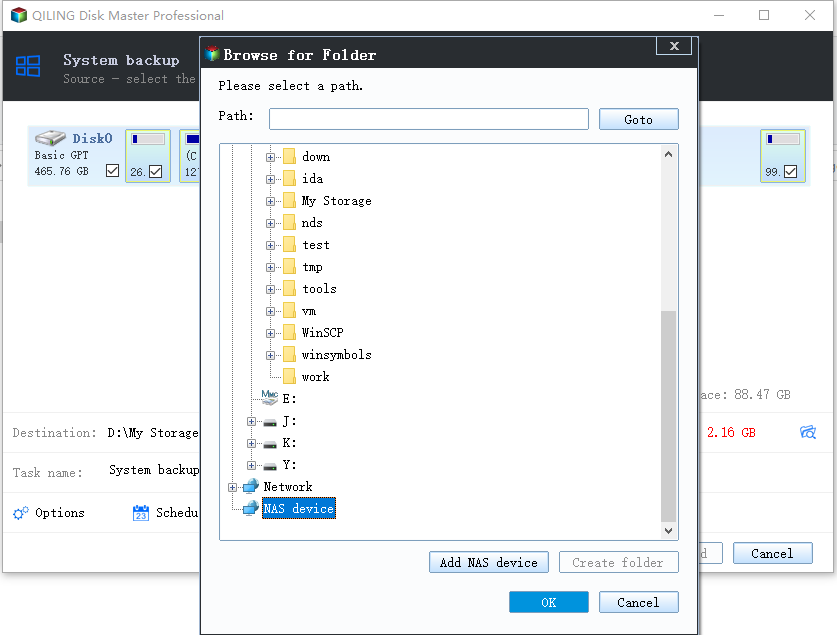
2. The software will automatically select the system partition(s) by default, and you just need to choose a destination path to store the backup files.
💛 Set your customized settings:
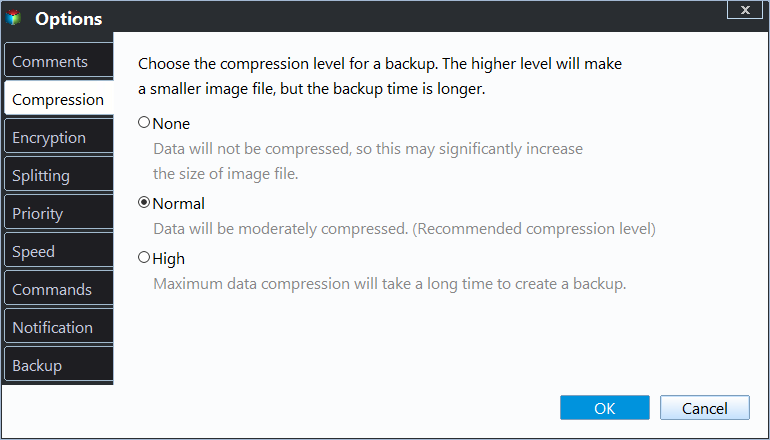
▶Options: You can add comments to your backup image to distinguish it from others, split images into smaller files, and even encrypt images for added security.
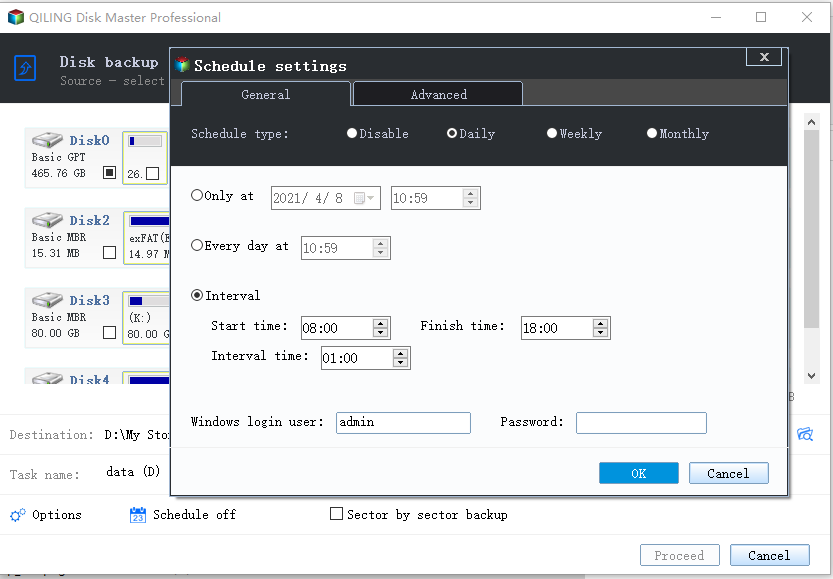
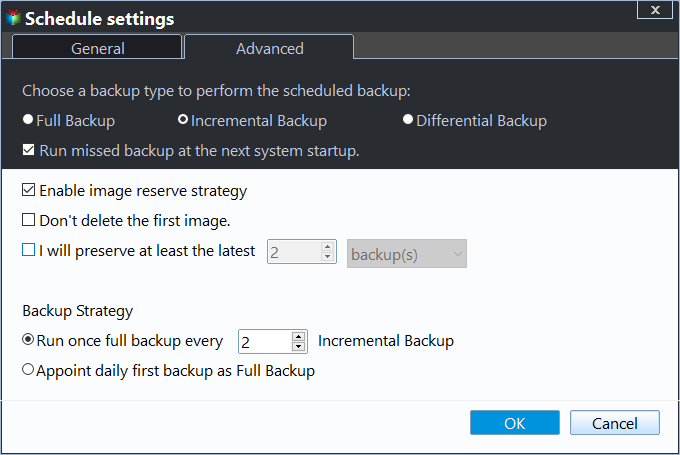
▶To schedule a system backup, click on the "Schedule Backup" button located in the lower left corner of the screen, and then select the "Enable Schedule Backup" option to specify the desired frequency of the backups.
▶Backup Scheme: To enable automatic backup cleanup, click the "Enable Automatic Backup Cleanup" option, which allows you to delete old backups automatically. This can be set to delete by quantity, time, daily, weekly, monthly, or by the available space.
3. Confirm the operations and click Proceed to backup Windows Server 2012.
Summary
With Windows Server 2012 reaching its end of life, you need to take swift action. You can either upgrade to the latest version or run a virtual machine on your existing Server computer, which is a convenient option if your computer isn't suitable for upgrading. However, the most critical step is to create backups, which will serve as a safety net in case of data loss or corruption due to system failure.
Qiling Disk Master is the best backup & restore solution for Windows Server, offering high compatibility and comprehensive features. It allows easy creation of a full backup of Windows 11, enabling restoration in case of issues. Additionally, it serves as the best disk wipe tool, securely wiping free space on Windows 11 and preventing recovery of deleted data. This tool keeps data safer, making it a valuable assistant for protecting data security.
Related Articles
- How to Image Windows Server 2012 (R2) to New Hard Drive
Want to learn how to image Windows Server 2012 to new hard drive? This article provides you 2 efficient ways. If you are interested, please continue reading. - Windows Server 2012 (R2) Shadow Copy Best Practices
You will learn the Windows Server 2012 (R2) shadow copy best practices as well as more safer way to backup files. Anyway, check out these useful ways first. - NTBackup Server 2012: How to Back up Files in Windows Server
In this post, you will learn how to back up files through NTBackup Server 2012. Besides, we will also share another better backup tool to back up anything more easily in Windows Server 2003, 2008 (R2), 2012 (R2), 2016, 2019 and 2022. - How to Clone Windows Server 2012 (R2) Hard Drive | 2 Ways
This paper shows how to clone Windows Server 2012 (r2), 2008(r2) or 2003 hard drive with secure boot under the help of the best disk clone software and Windows Server Backup. - Best Way to Backup Data to Synology NAS (2024 Choice)
Are you looking for the best way to back up data to Synology NAS? Well, you are in the right place. This tutorial will walk through the best backup software Qiling Disk Master, as well as the steps to use it to back up Windows data to Synology NAS. - How to Create Image of SD Card on Windows 11/10/8/7 [Step-by-step Guide]
If you need to create an image of an SD card, this article is for you. It will guide you through the process of creating a disk image of an SD card using professional SD card backup software, making it easy and quick to do so.