Automatically Backup and Recover Word Documents in Windows 10
- You need to protect your word documents
- How to backup word documents in Windows 10 automatically
- Way 1: Always create backup copy with Save feature
- Way 2: Backup word documents automatically with AutoRecover feature
- Way 3: Auto backup word documents and keep multiple file versions
- How to recover unsaved or deleted word documents in Windows 10
- Way 1: Recover unsaved word documents using Manage Document
- Way 2: Recover unsaved word documents from AutoRecover
- Way 3: Restore deleted word documents from backup image via Qiling Disk Master
- Summary
You need to protect your word documents
Word documents are closely tied to our daily life, serving as a tool to manage both official work and school work. They can be used to create various types of documents, including resumes, letters, applications, newsletters, forms, brochures, templates, business cards, calendars, reports, and eBooks.
Losing hours or even days of work due to a sudden power outage or getting lost in a document can be frustrating. To prevent this, consider implementing some helpful tips:
- Setting autosave in Word can help minimize data loss by saving your document at regular intervals, such as when you exit the program or power off, reducing the risk of losing unsaved work.
- To ensure your important documents, especially Word documents, are safe, create a backup of them. This will automatically save your work and prevent potential loss in case of a system crash or other issues.
- You can recover unsaved or deleted word documents.
How to backup word documents in Windows 10 automatically
You can automatically create a backup copy of your Word document every time you save it. However, the Save feature and AutoRecover option in Word only retain one backup copy of a document, with the previous one being deleted each time you save the document.
They are good options for emergency situations, but they have limitations, such as only keeping one copy of a document, and not allowing for restoring files to previous versions. This can be frustrating, especially if changes are not saved or if the file is damaged due to hardware or software issues.
If you are concerned about data security and want to keep multiple versions of your files, please find a free backup software and use it to backup files to external hard drive on a regular basis. And I'll introduce you all of them in detail.
Way 1: Always create backup copy with Save feature
1. Click the File tab and select Options > Word Option.
2. In the "Word Options" dialog box, click "Advanced" and select "Always create backup copy" to enable automatic backups of your Word documents. Click "OK" to save these changes.

Notes:
- To create a backup, you need to save your documents more than once before the backup is created.
- The backup copy is saved as a "wbk" file in the same folder as the original document, allowing you to open and edit it like a standard ".doc" or ".docx" file using the World program.
Way 2: Backup word documents automatically with AutoRecover feature
1. To open a Word document, click on the File tab in the top left corner of the screen. Alternatively, if you have an older version of Word, click on the Office Button instead. This will open the File menu, where you can access various options.
2. To set up auto-save on your word documents, go to the backstage screen and click on "Options" from the list of items on the left. From there, click on "Save" and select a time interval, with the minimum being 1 minute.

Notes:
- The AutoRecover file names end in the .asd file name extension.
- If you close a Word document without saving, it will automatically save the last autosaved version, preventing any potential data loss.
- Every time you start a Word document, it will automatically search for AutoRecover files and display all the found documents in the Document Recovery task pane by default.
Way 3: Auto backup word documents and keep multiple file versions
Here you will use Qiling Disk Master Standard to backup word documents automatically. Its File Backup The features allow you to backup all kinds of files, including word documents, excel, ppt, audio, video, and more, giving you a comprehensive backup solution.set daily, weekly, and monthly schedule backup to make this task automatically.
It provides multiple features to minimize backup image size and disk space usage, such as incremental backup, normal or high compression level, and automatic splitting. Additionally, it allows you to backup files to various storage devices, including external hard drives, USB drives, cloud drives, network drives, and NAS, thereby preventing data loss due to computer failure.
If you create a Qiling account, you can also backup files to Qiling Cloud. You can download this software to try it out.
The free version of the software only supports Windows 11/10/8/9/XP/Visa, but for server systems like Server 2016, a different solution, Qiling Disk Master Server, may be necessary to backup and recover unsaved word documents.
1. Install and launch Qiling Disk Master Professional. At the main interface, click Backup, and select File Backup.

2. At the next window, click "Files" or "Folders" to select the Word document you want to backup.

3. Select external drive as the destination path.

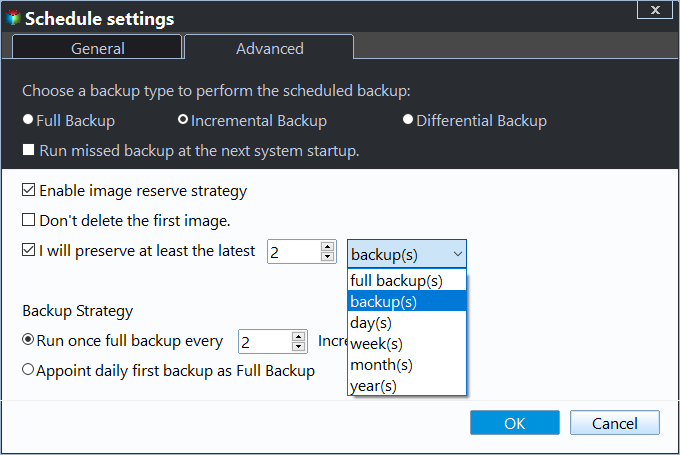
4. To automatically backup Word documents, click on Schedule Backup, then enable Schedule Backup, and select the desired backup frequency, such as daily, weekly, or monthly.

5. After completing the above steps, click Proceed to backup Word documents in Windows 10.
Tips on how to completely prevent backup disk full issues at the beginning:
The word documents are automatically backed up, eliminating the need for human intervention and ensuring data security against various risks.
The default setting helps prevent backup disk full issues from multiple angles, including backing up only changed files with incremental backup, reducing backup image size with normal compression, and automatically splitting backup images into smaller ones.
However, in the long run, it's not enough due to accumulated backups and the disk space is limited, so it's suggested to try the following features on top of the previous ones.
- Replace incremental backup with differential backup. The two backup methods backup only changed files, but the previous method is more demanding on recovery, requiring a full backup and all linked incremental backups.

- Backup files with a certain file extension To backup only Word documents, type the file extension *.doc in File Inclusion Mask. This will backup all files with the .

- Change normal compression to high compression. The high compression level compresses the backup image to a smaller size.
- Customize the size of splitting instead of automatic. The customize splitting feature allows you to split large files into smaller sizes, making the most of your disk space, especially helpful for bigger files.

- Directly delete backup files regularly With the help of automatic backup cleanup methods, such as By quality, By time, and By daily/weekly/monthly, you can efficiently manage and maintain your backups, ensuring they remain organized and up-to-date. These methods enable you to automatically delete or remove unnecessary backups, freeing up storage space and reducing the risk of data loss due to outdated or low-quality backups. By implementing these automated cleanup processes, you can streamline your backup management, save time, and focus on more critical tasks.
How to recover unsaved or deleted word documents in Windows 10
Way 1: Recover unsaved word documents using Manage Document
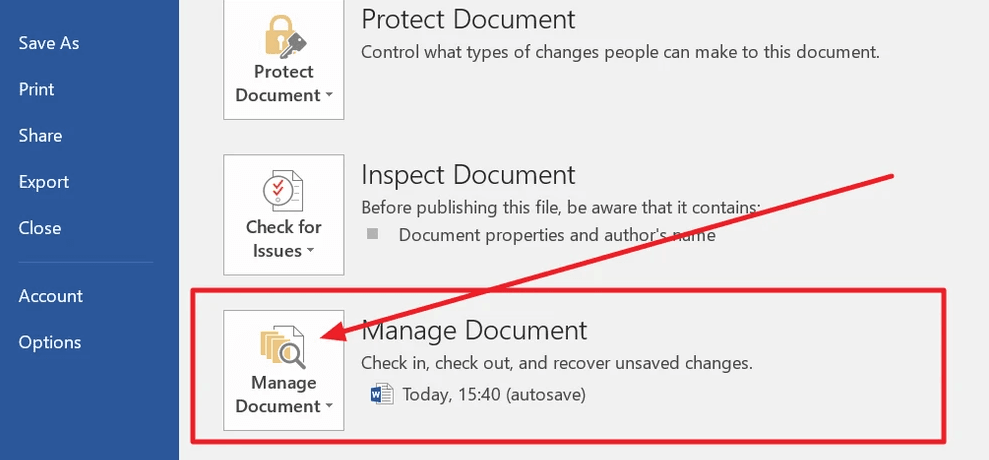
1. Open the Word program, click File in the upper left.
2. Go to the right pane, scroll down to Manage Document and select Recover Unsaved Documents option.
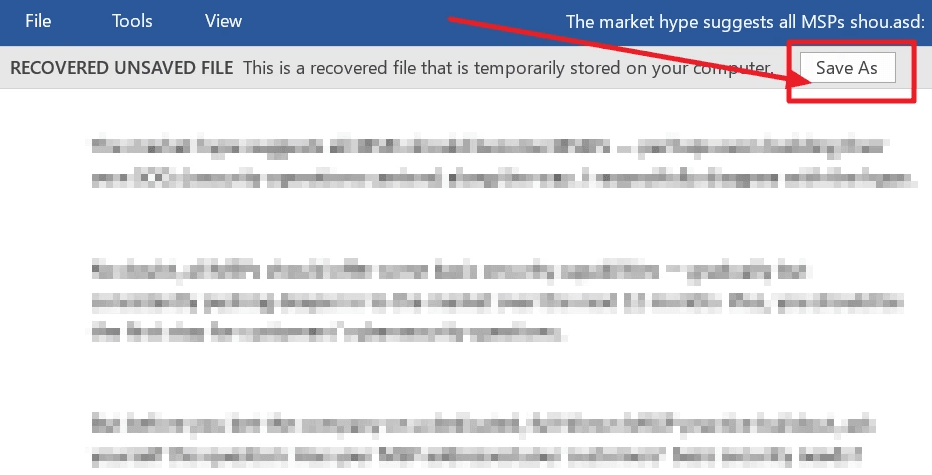
3. To resolve the issue, check or search for the missing files in the dialog box. This will list all recent losses.
4. Open the missing files, click Save As.
Way 2: Recover unsaved word documents from AutoRecover
If you're using Word 2010-2019, try the following steps. This method applies to these versions.
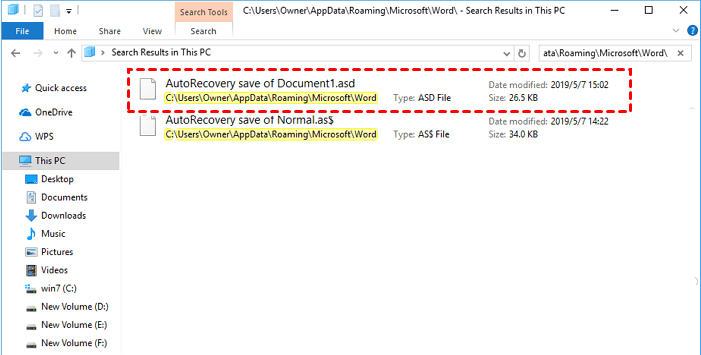
1. To recover unsaved changes, click File > Options > Save, then navigate to the AutoRecover file location, copy the path, and paste it into File Explorer.
2. Find the unsaved word document in the File Explorer, and copy the .asd file.
3. To recover an unsaved Word document, go back to the Word program, click File > Open > Recover Unsaved Documents at the bottom.

4. To open a .asd file in Word, simply paste the contents of the .asd file into the file name box, click the "Open" button, and the Word file will be opened.
Note:
- If the Word program says "Word experienced an error...", repeat the steps and click "Open and Repair" instead of Open.
Way 3: Restore deleted word documents from backup image via Qiling Disk Master
If you created a backup of your Word documents in advance, you can restore them from the file backup. Alternatively, if you didn't have a file backup, you can restore your files from other types of backups, such as system, disk, or partition backups. In total, you have three options to recover your lost files.
#1: Restore word documents from file backup
1. To restore the image file using Open Qiling Disk Master, click on the "Restore" option and then select the "Select Task" option to locate and choose the image file.
2. Select the file backup and the folder containing the backed up word documents.

3. After deleting word documents, select the destination path to receive your word documents, either original location or new location, and click Proceed to restore deleted word documents in Windows 10.
#2: Restore word documents using explore image
1. Switch to Tools and select Explore Image.

2. Select the file backup option, view all the word documents in the image file, click Save As.

#3: Restore files from other backup solutions
1. To access other backup solutions, go to the Open Explore Image feature and select Advanced -> Mount, for instance.

2. Select a backup point and set a drive letter for all the partitions, then click Next to mount them as virtual drives and display them in the File Explorer.

3. In the File Explorer, open the mounted drives, copy the deleted word documents and paste them to another location.
Summary
To prevent data loss, it's essential to backup your Word documents in Windows 10. You can use various methods to achieve this, such as saving your documents to an external hard drive, cloud storage services like OneDrive or Google Drive, or even a USB drive. Additionally, if you've lost or deleted a Word document, you can try recovering it using built-in Windows features like File History or previous versions, or third-party software like Recuva or Deep Data Recovery Wizard. By taking these precautions, you can ensure your important documents are safely protected and easily recoverable if needed.
If you want to use it on unlimited PCs or servers, try using a cloud-based version of the software, which can be accessed from any device with an internet connection. This way, you can use the software without having to install it on each individual PC or server, and you'll only need to pay for the service once.Qiling Disk Master Technician or TechPlus edition. It allows you to create a portable version of this software Having a portable operating system on a removable device allows you to take it anywhere and use it on any computer without installation. This can be especially convenient if you need to install the system on multiple computers, such as 25 or more. Both USB drives and external hard drives support this functionality.deploying system to multiple computers simultaneously, even different hardware.
Related Articles
- How to Automatically Backup Excel File in Different Location
In this essay, you will find two ways to backup excel file in different location easily in Windows 7, 8, 10. Let's see the step-by-step guide to auto backup excel files. - How to Make the Best Use of Windows 10 Previous Versions
Windows 10 Previous Versions allows you to restore files like word documents easily to earlier versions. Learn to configure and restore previous versions. - Windows 7 Incremental Backup - Only Backup Changed Files
You will learn the Windows 7 incremental backup meaning and how to create it step by step, 2 ways in total. - How to Sync OneDrive to Computer in Windows 10/8/7 Flexibly?
To sync OneDrive files to computer in Windows 10/8/7, the desktop app of OneDrive may be the most direct way, but it has some limitations in functionality and application range, so you can also try a more flexible solution. - Sync Files to Google Drive in Windows Server 2008 or Similar Storage
This article introduces you to how to perform Google Drive sync in Windows Server 2008 in different situations. Please click on to learn more about it! - How to Sync Two Folders on Same Computer Easily
This article provides you with 2 reliable sync software and inllustrate how to sync two folders on same computer step by step. Learn more about them below!