Top 3 Best Free Synology Backup Software: Which is Better?
Does Synology NAS come with backup software?
With the increasing practicality of Network-Attached Storage (NAS), it's becoming a popular choice among users. To safeguard their data from loss or damage, many opt for backing up their Windows 11 system to a Synology NAS. Synology offers a range of backup solutions that come bundled with their NAS appliances, allowing for protection across various platforms.
Active Backup for Business: Active Backup for Business (ABB) is a comprehensive data protection solution that centralizes protection for various IT environments, including virtualized systems, physical servers, file servers, and personal computers. It offers a full backup of PC systems with features like incremental backups, which helps save backup space.
Synology Drive: Synology Drive offers a one-stop solution for document management, collaboration, and synchronization and backup, making it easy to keep work documents up-to-date and avoid data loss due to accidental deletion.
Synology Drive and Active Backup for Business are exclusive sync and backup suites that provide a complete full-platform backup, making them a good choice for Synology NAS users.
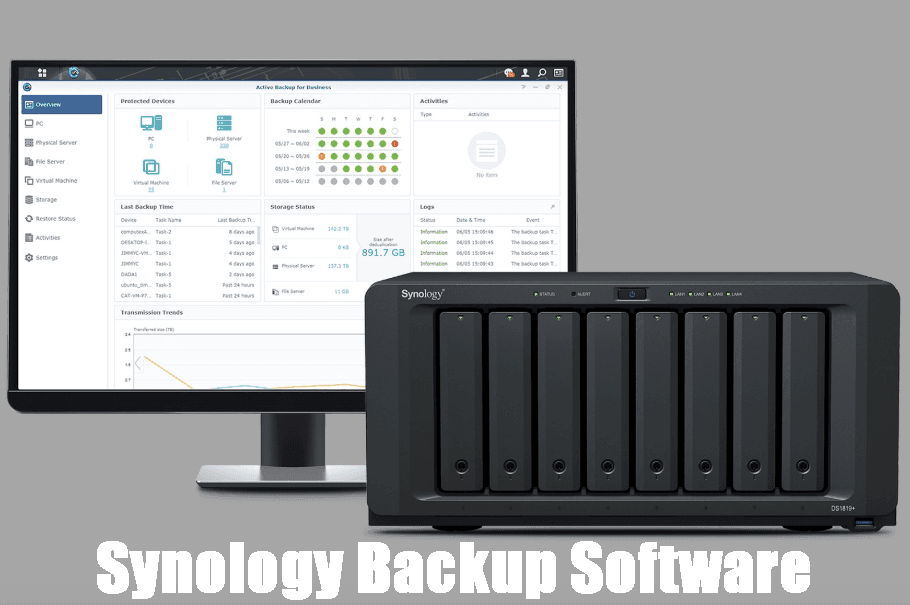
If you have no idea how to utilize the Synology suites to backup computer files or system to NAS, you can keep reading the following contents. I will show you how to use these two tools to backup PC to Synology NAS. Also, you can get an easier Synology backup software to assist you to protect data security.
How to use the embedded tools to backup computer to Synology NAS
Synology provides two suites to backup computer files to Synology NAS with ease, Synology Active Backup for business and Synology Drive, which can be used to master a better Synology backup tool.
#1. Synology Active Backup for business
Installing and using Synology Active Backup for business on a DiskStation Manager is a straightforward process, completed via the Package Center with a quick activation process that requires a free Synology account. To set up a backup task, you can follow the quick guide provided.
Tips: To prepare for backing up a device, ensure that it is compatible with your version of Active Backup for Business. For more information on choosing a suitable NAS, click here.
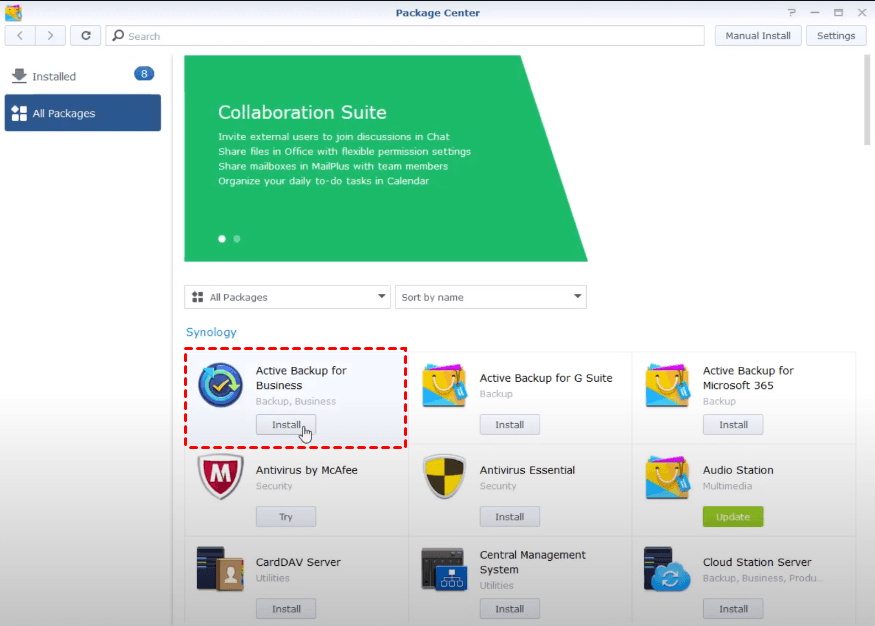
1. To activate the package and latest updates offered by Active Backup for Business, you will need to register for a Synology Account and enter your credentials when activating the package. Click Install in Package Center to start the installation process.
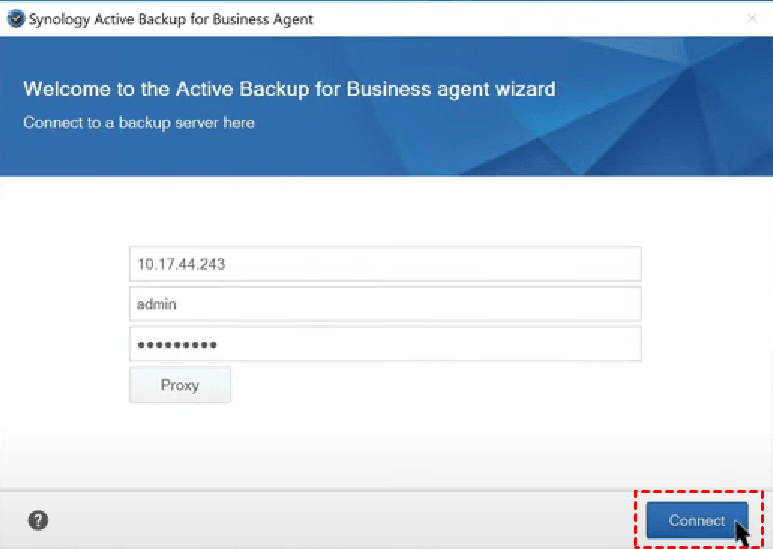
2. Open Synology Active Backup for business, and enter the IP address and credentials of your Synology NAS to connect to a backup server. Click "Connect" to proceed.
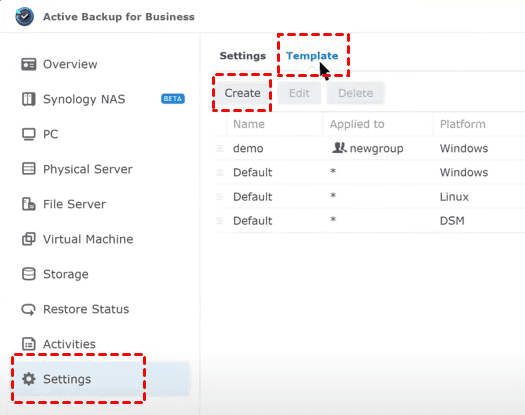
3. To create a backup task, go to Active Backup for Business in DSM, where you can create backup tasks or apply backup tasks to specific users and groups using templates. You can create a template by going to Settings > Template > Create.
4. To create a new backup task, go to PC, select the device, and click Create Task. Follow the on-screen instructions in the wizard to set up the task.
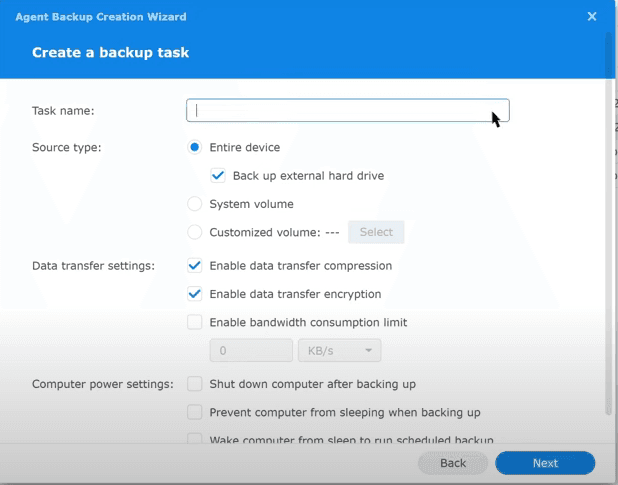
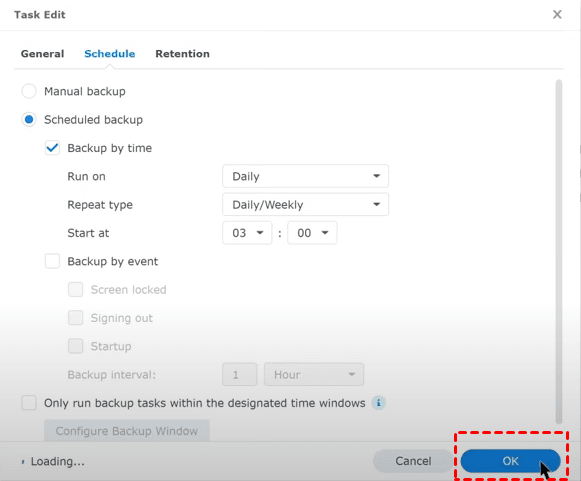
5. Set the desired backup schedule, click OK, and initiate the backup task.
♨ The Active Backup for business has a limitation for PC, physical server, and virtual machines backup tasks, as it does not support encrypted shared folders.
#2. Synology Drive for Windows
To set up Synology Drive on your Synology NAS, start by installing and setting up the Synology Drive Server on your device. Once the server is set up, you can run the Synology Drive Client.
1. To download and install the Synology Drive Client, go to the Synology Download Center, download the client, and install it. Once installed, launch the client and click "Start now".
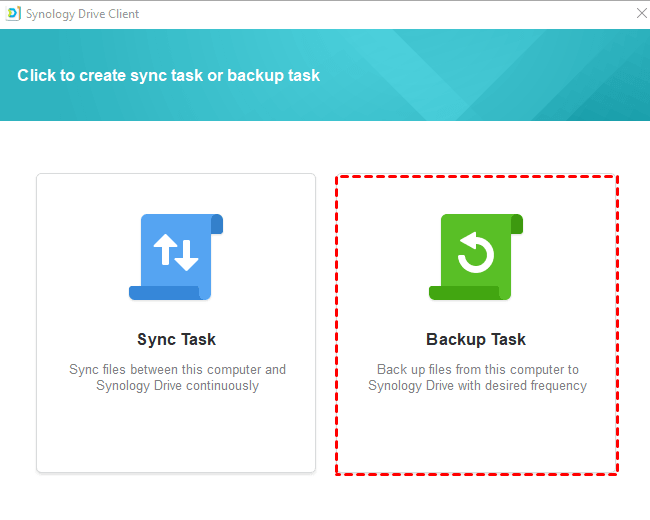
2. In this interface, click the Backup Task part.
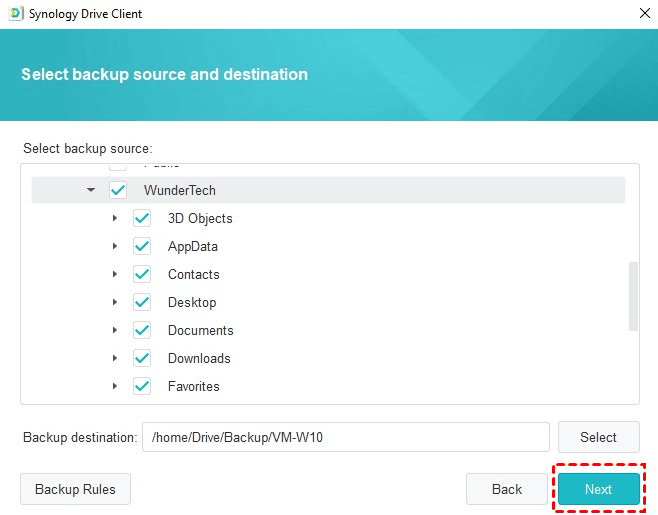
3. Select the files that you'd like to back up, along with the destination where you'd like to store the backup, and click the backup option.Next to continue.
4. The backup mode options are: Quick Backup, Full Backup, and Custom Backup. Please select one of these options and click Next to proceed.
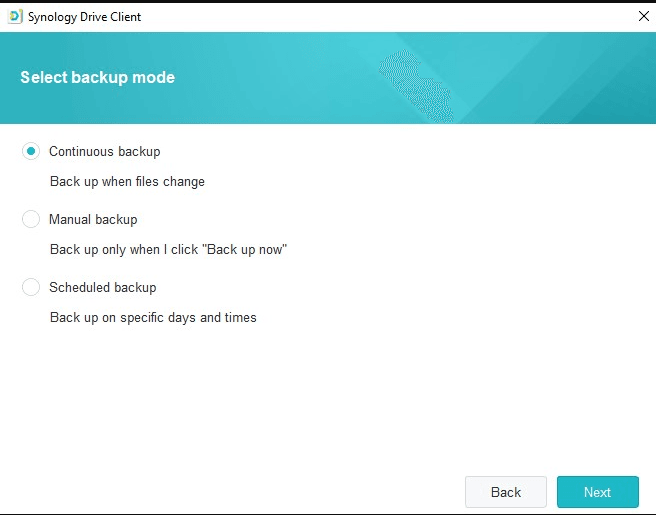
5. When you've checked the backup setting summary, select "Done". Your backup is now configured, and you just need to wait for the backup process to be completed.
Note: This is not a bare-metal backup. The files will automatically back up to your NAS, but you won't be able to do a bare-metal restore, so it's best to only back up your files and exclude the operating system files.
Easiest: Backup PC files to Synology NAS with Qiling Disk Master Standard
The two suites mentioned are sufficient for Synology NAS users, but they have some functional flaws. If you're looking for a more reliable backup software, consider the following recommendation.
When it comes to the best free backup and restore software for Synology NAS, Qiling Disk Master Standard stands out due to its user-friendly interface and professional technical support, offering numerous features that users can benefit from.
◈ Qiling Disk Master allows you to perform various types of backups, including files/folders, system/partition/disk, to any desired location such as NAS devices, local disks, USB flash drives, external hard drives, or cloud drives.
◈ It supports various NAS devices, including Synology, QNAP, WD My Cloud, and others.
◈ With a backup in hand, you can restore your files when something unexpected happens, such as hard drive failure or a virus attack.
◈ Qiling Disk Master Server has great compatibility with various Windows operating systems, including Windows 7, 8, 8.1, 10, 11, XP, Vista, and Windows Server systems 2022, 2019, 2016, 2012, 2008, and 2003.
Download Qiling Disk Master Standard Edition to try it out. Follow the graphical steps to backup your Windows 11/10/8.1/8/7 to Synology NAS with just a few clicks.
Step 1. Open this freeware, click Backup, then choose File Backup.

Step 2. To select files or folders to backup to Synology, click on "Files" or "Folder". You can also rename the task for easier identification.

Step 3. To add a NAS device, select "Add Share or NAS Devices" from the second bar's drop-down menu.
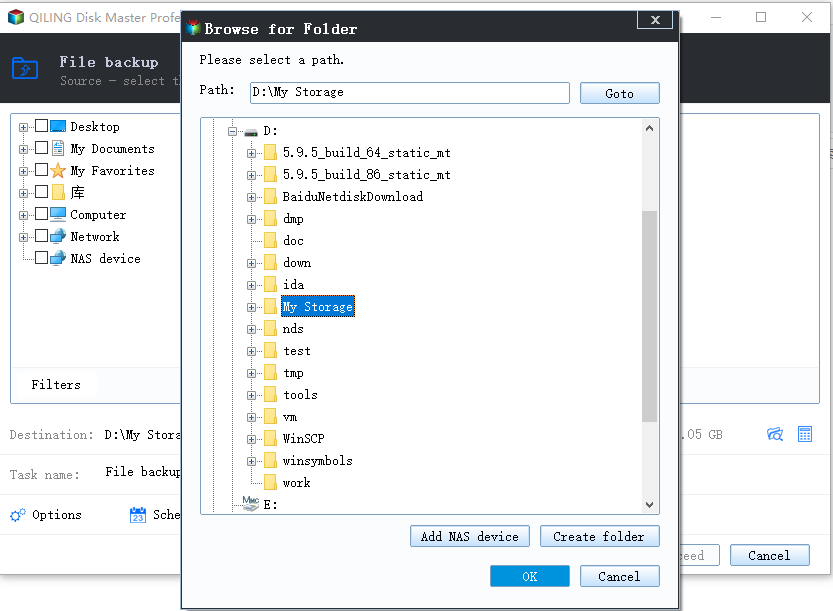
Step 4. To add a Synology NAS device for backup, go to the "Add Share or NAS Devices" window, enter the IP address of the Synology NAS, and select a shared folder on it to store the backup.
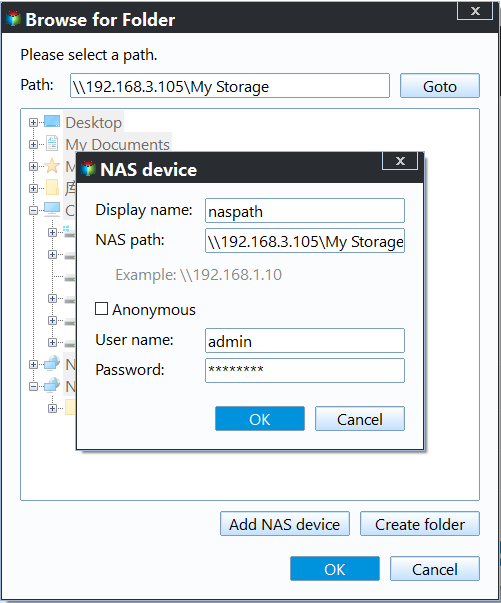
Step 5. To set up backup to Synology, you'll need to create a shared folder and add a user with the necessary permissions. Then, configure the backup settings to specify the source and destination folders, as well as any additional options you'd like to customize. This will allow you to efficiently manage your backups and ensure your data is safely stored on your Synology device.
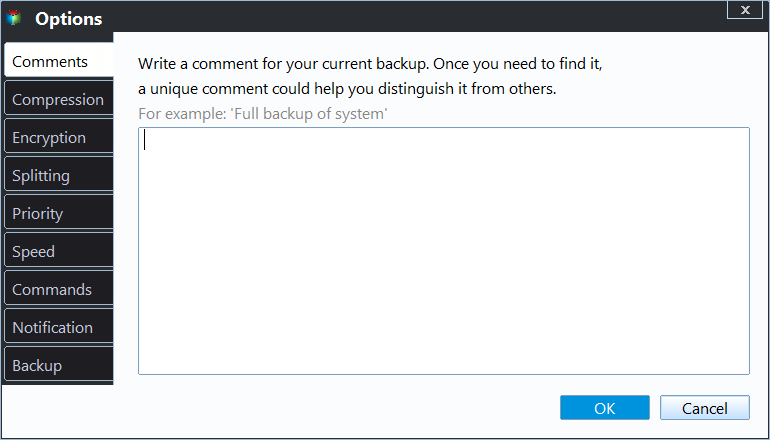
➤Options: You can add a comment to your backup to make it stand out and set up an email notification. If you want to encrypt your backup files, you can enable encryption for backups, which requires upgrading to the Professional edition.
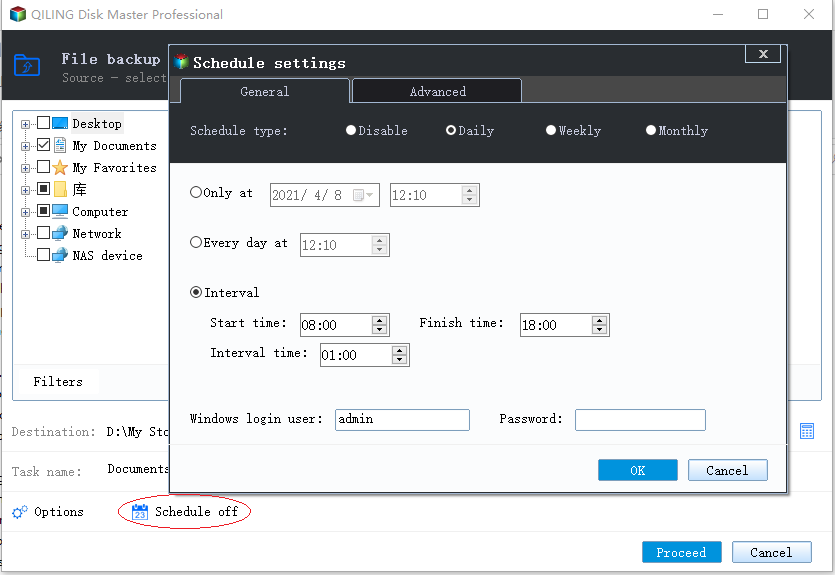
➤ Schedule Backup: To schedule a backup, click on the "Schedule Backup" button at the bottom left of the screen. This will open a settings window where you can choose from various options, such as daily, weekly, or monthly backups, or set up triggers based on specific events, and also select the USB plug-in mode, which is available in the Professional version.
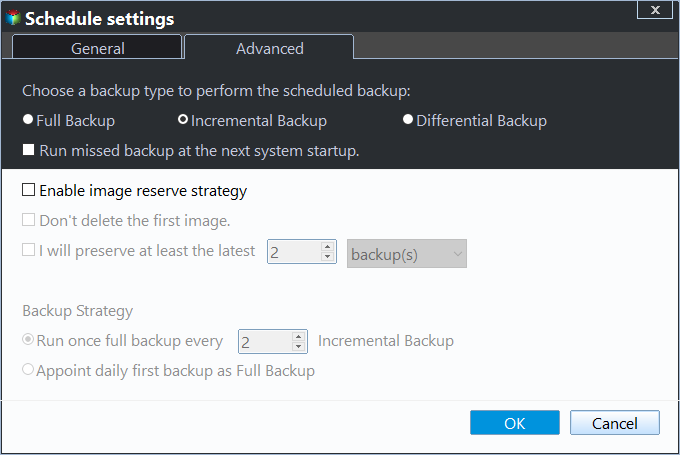
➤Backup Scheme 3 backup methods are available: full, incremental, and differential. Additionally, automatic backup cleanup can be enabled to manage hard disk storage space by deleting old backup images with selected cleanup methods, freeing up space in a scheduled backup task.
Step 6. Confirm your backup task and click Proceed.
👣 How to backup a Synology NAS: With the help of Qiling Disk Master, you can also backup Synology NAS to cloud or other locations such as external hard drive, another NAS, etc.
Conclusion
You can learn the best Synology backup software for Windows from this page to securely backup computer files and system data to your Synology NAS, making your data manageable and stored safely on the NAS. Qiling Disk Master is a reliable option for Synology backup, offering professional technical support.
Qiling Disk Master is an all-in-one solution that not only offers backup and restore functions but also integrates clone, sync, and other tools, making it easy to clone Windows 11 to another hard drive without effort.
Related Articles
- How to Backup Windows 10 to NAS of All Kinds (Synology/QNAP)
With the popularization of NAS device, plenty of people choose to backup Windows to NAS. Learn how to backup Windows 10 PC to Synology, QNAP and other popular NAS easily from this page. - Create NAS to NAS Backup Between Synology or QNAP Easily
You can easily create Synology or QNAP NAS to NAS backup with 2 effective methods. To backup different NAS devices, try the best way below. - How to Backup Photos to pCloud on Various Devices [Solved]🔥
PCloud is an efficient and secure cloud storage service compared to its contemporaries. If you want to know how to back up photos to pCloud on various devices and access from there, here's a detailed guide. Find the step-by-step guides for various devices. - [2 Ways] How to Create Windows 10 Image with Pre-Installed Software
For people eager to know how to create windows 10 iso image with pre-installed software, this article explains it all. From creating an ISO file in 2 ways to creating a bootable media to deploy the system with the pre-installed software on multiple systems in no time. - Use Windows 10 WBadmin to Create System Image Backup
You will learn how to use Windows 10 Wbadmin backup or easier alternative to create system image backup. Learn both software and select one to protect your computer! - Backup Installed Programs in Windows 11 to Avoid Reinstallation
Learn how to Backup Installed Programs in Windows 11 to Avoid Reinstallation with clear steps, key checks, and practical tips.
Products
Articles & Tutorials
- Data Recovery
- Data Backup
- File Recovery
- File Backup
- File synchronize
- System Backup and Restore
- Disk and Partition Clone
- Technical articles
- Disk Master Help
- Windows Deleted File and Disk Recovery Tutorials
- Windows File and Data Recovery Tutorials
- More Windows Tutorials for Install, Security, Files, and PC Tips
- Windows Boot, Repair, and Recovery Environment Tutorials
- Windows Backup Tutorials
- Windows Restore Tutorials
- Windows Clone and Migration Tutorials
- Windows Server Backup, Recovery, and Management Tutorials
- Windows Disk, Partition, and Storage Management Tutorials