How to Clone Hard Drive in Windows 7 without Reinstalling: 4 Steps
🌟 Video Guide: How to Clone Hard Drive in Windows 7
How do I clone a hard drive in Windows 7?
How to transfer Windows 7 to a new hard drive
To transfer your Windows 7 OS to a new hard drive, you'll need to clone the existing drive, which involves creating an exact copy of your current hard drive's contents, including the OS, programs, and settings. This can be done using a cloning software like Qiling Disk Master. You'll also need to deactivate your Windows 7 license and uninstall any programs that aren't compatible with the new drive. Be sure to back up your important files and data before starting the process.
- Question from Microsoft
To clone a hard drive in Windows 7 to a new hard drive, you can use reliable disk cloning software to create an exact copy of the original disk, including the operating system, settings, drivers, programs, and personal data, ensuring no data loss and eliminating the need for program reinstallation.
Why Clone Hard Drive in Windows 7?
You might need to clone a hard drive to an SSD or HDD in Windows 7/8/10/11 in certain situations, such as upgrading to a faster storage device, replacing a failing drive, or migrating to a new PC. In these cases, cloning the existing hard drive to a new SSD or HDD can preserve your files, programs, and settings, making the transition smoother and minimizing downtime.
💜 Insufficient disk space and lower computer performance: As your computer ages and you install more programs and store more files, it can become slower. A simple solution is to clone your smaller disk to a larger one, effectively upgrading your storage capacity and potentially boosting your computer's performance.
💜 Clone Windows 7 to SSD for better performance: For users who can afford it, it's recommended to use an SSD as the primary disk for the operating system and a separate HDD for data storage, prioritizing the faster SSD for the OS.
💜 Clone a hard drive for backup and recovery: Cloning a drive creates an exact copy of the original disk, making it a reliable backup for file or system recovery in case of issues. It's a good idea to clone a disk before making significant changes, such as upgrading to Windows 10 or 11, to ensure a safe and recoverable system.
Best software to clone hard drive in Windows 7
For effective cloning of Windows 7 to a new hard drive, you'll need reliable disk cloning software. I highly recommend Qiling Disk Master Professional, which offers excellent features for a seamless cloning experience.
- Clone all the data disks and system disks (MBR or GPT) with a secure boot.
- Flexible cloning methods: You can clone a hard drive using two methods: Sector by sector clone, which copies all sectors, or Intelligent clone, which only copies used sectors. The latter is particularly useful when cloning a large hard drive to a smaller solid state drive (SSD) to avoid boot issues.
- Boost SSD disk performance: You are able to accelerate the reading and writing speed of SSD disk as well as prolong its lifespan.
- Support all brands of HDD and SSD disk: This software can be used to clone a disk from various brands such as Samsung, WD, HP, SanDisk, Toshiba, and Seagate, regardless of the interface type, including SATA, NVMe, PCIe, and M.2.
To clone a hard drive in Windows 7, download a software that can help you do it easily and safely. For server users, you can try Qiling Disk Master Server.
Clone hard drive in Windows 7 to a new one step by step
To clone a disk on Windows 7, download and install Qiling Disk Master Professional, the best disk cloning software. After installation, launch the software and ensure the following preparations:
|
📱 A new hard drive or SSD |
Use the destination drive as the target to clone the Windows 7 hard drive, ensuring it's large enough to hold all the data from the original drive. |
|
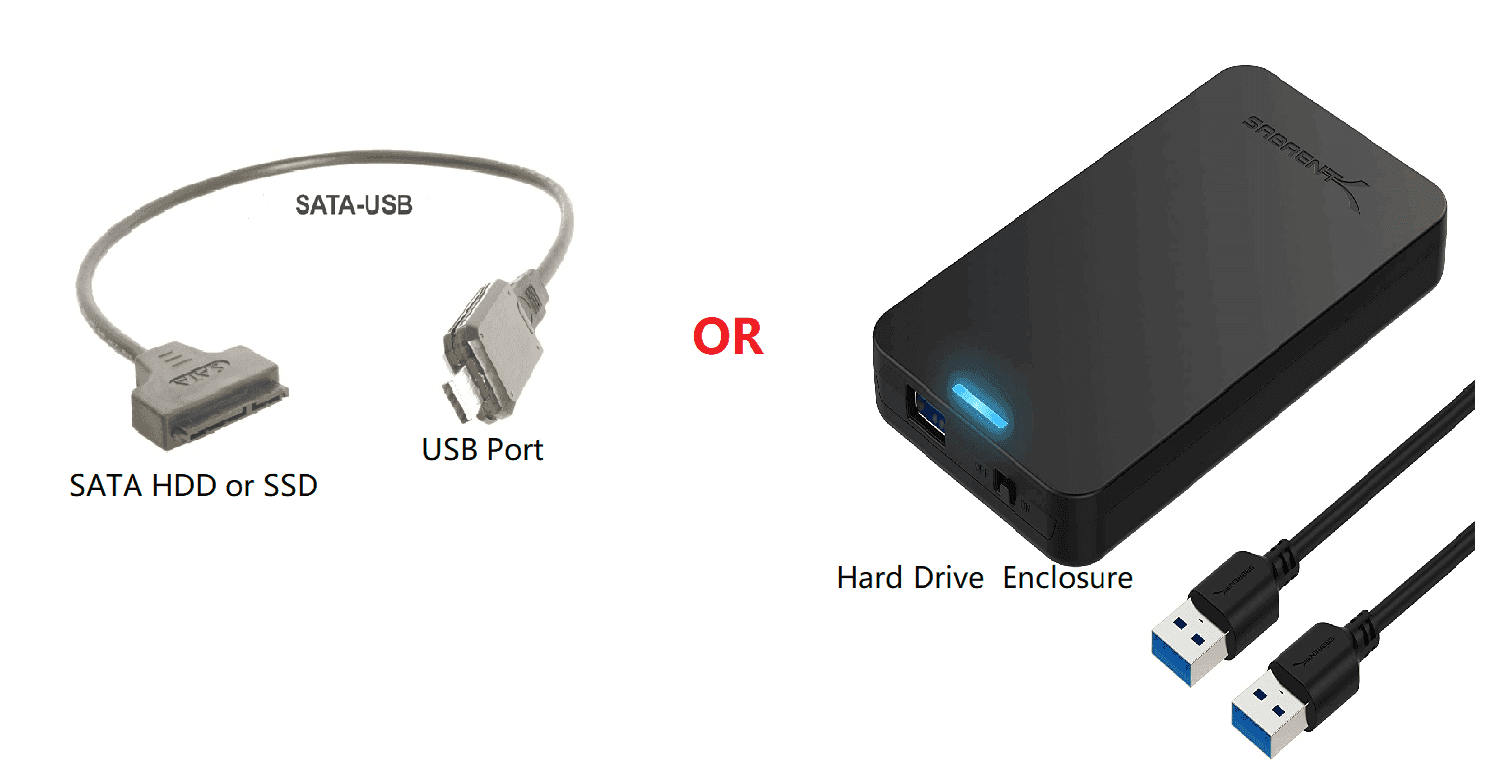
🩺 SATA to USB adapter or enclosure |
To connect a new HDD or SSD externally, you need to connect it with both a power cable and a data cable simultaneously, especially for desktops. |
|
🔧 Screwdriver |
Use to swap hard drive after cloning. |
|
📒 Backup hard drive files |
You should back up your files before the Windows 7 hard drive cloning process, as the destination SSD/HDD will be overwritten. |
To clone a hard drive to an SSD in Windows 7, you can follow these steps. First, you'll need to connect the SSD to your computer, then download and install a cloning software such as Qiling Disk Master. Next, launch the software and select the source drive (the hard drive you want to clone) and the target drive (the SSD).
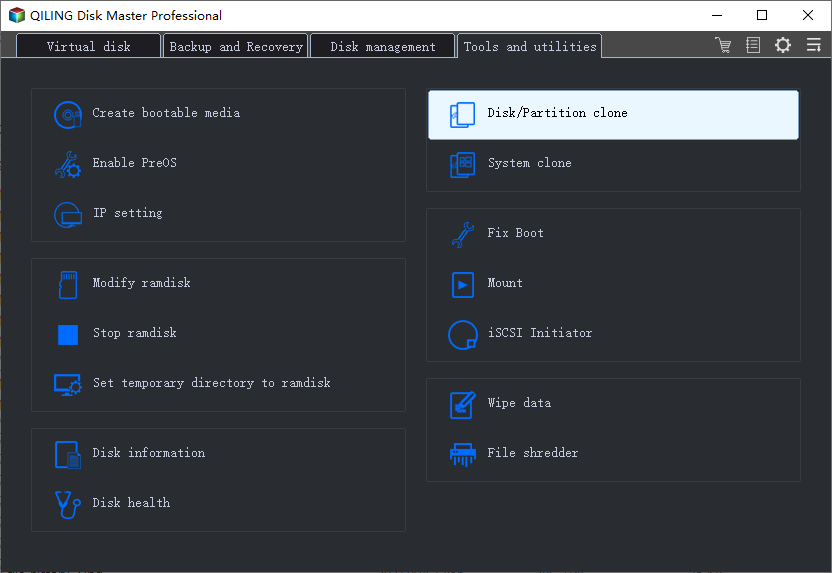
1. Connect the new HDD or SSD to your Windows 7 computer using a host, SATA to USB adapter, or directly via SATA. Ensure the new drive is detected by Windows. Launch Qiling Disk Master, select the Clone tab, and choose the Disk Clone feature from the options.
2. Select the Windows 7 hard drive as the source disk to clone, and then click Next.
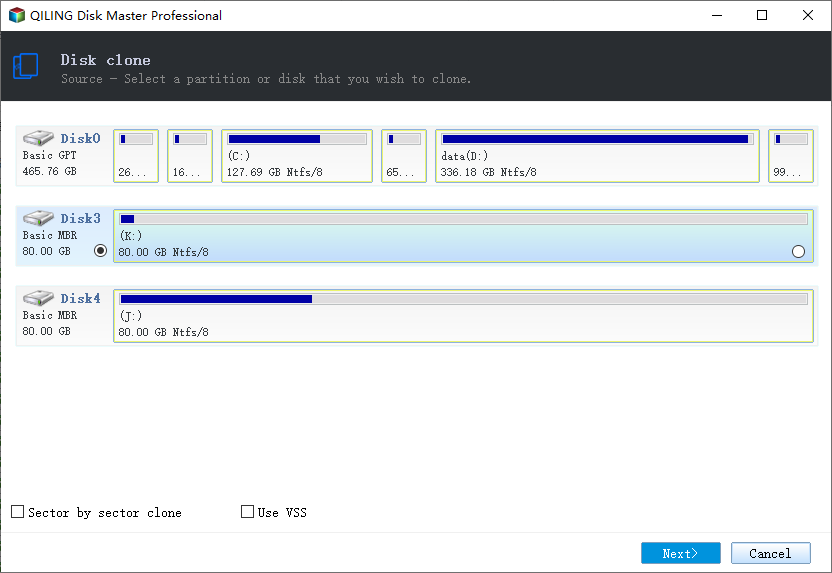
3. To move your operating system to a new SSD, choose it as the destination and press Next. Alternatively, you can clone your disk to a larger SSD if you need more storage space.
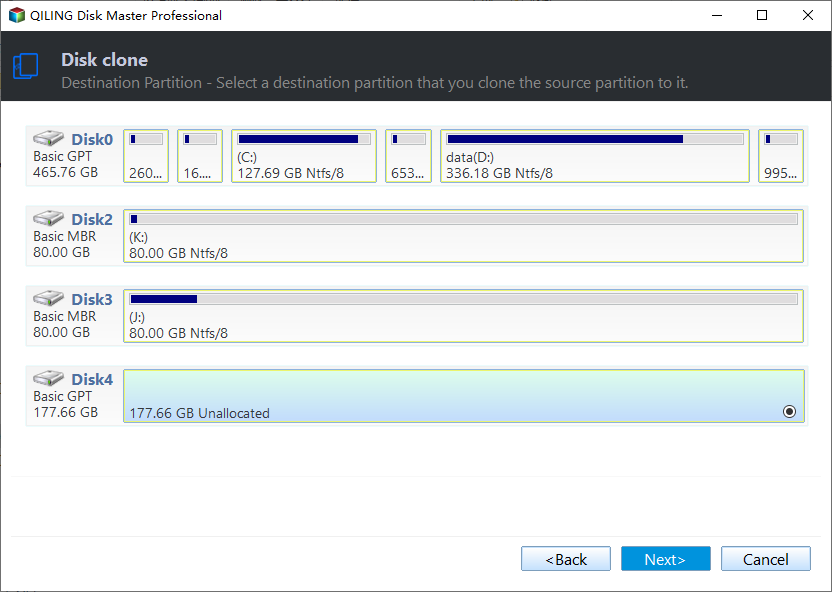
★ Tip: Be prepared to delete or overwrite existing partitions on the SSD, then press OK to proceed, ensuring you've backed up your files beforehand.
4. Check SSD alignment to optimize SSD disk speed, then proceed with cloning HDD to SSD in Windows 7 for easy and safe operation.
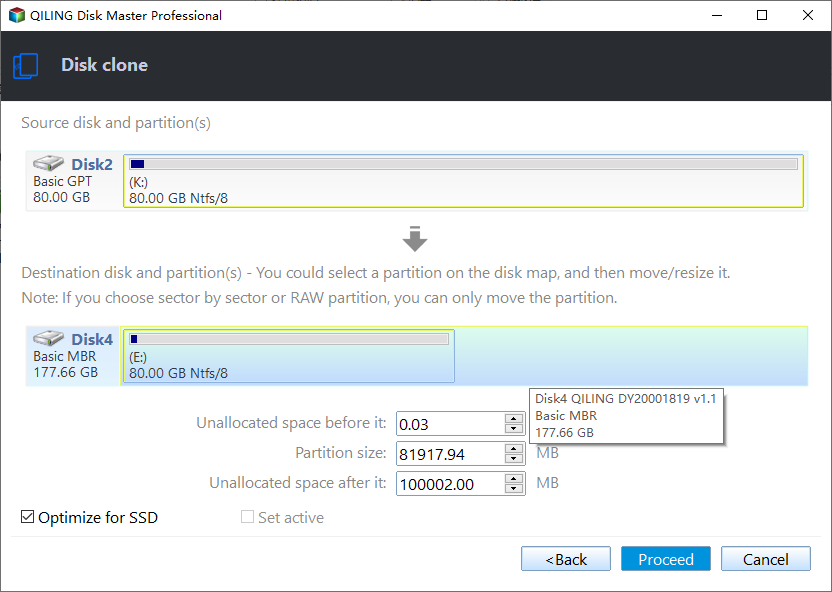
You can use the "Sector by sector clone" option to keep the old partition layout, or the "Edit Partitions" option to adjust the partition size on the destination disk, making it more practical as it resolves two potential issues during the cloning process.
#1: The cloned drive does not show full capacity.
Cloning software typically creates an exact copy of the source disk unless you adjust the partition size during the cloning process. To avoid this from the start, consider the following three options.
👉 Copy without resizing partitions: It will not resize the partition size.
👉 Add unused space to all partitions: It will redistribute any unallocated space to each partition on the target disk, taking into account the target disk's size.
👉 Manually adjust partition size: It allows you to extend unallocated space to any partition on the destination disk you want.
#2: The cloned drive is not bootable after cloning.
The main issue is that the destination and source disks have different partition styles, specifically MBR and GPT, and you haven't converted them to match before cloning. To resolve this, you can check the option to convert the destination disk from MBR to GPT or vice versa, depending on the partition styles of the two disks.
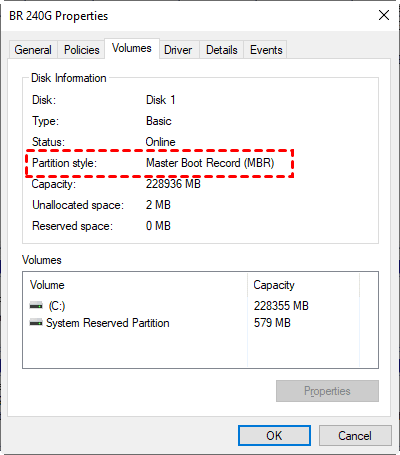
MBR and GPT are two different disk types for data storage. You can check their disk properties in Disk Management. Both types have their own properties and characteristics, and the overall steps for checking them are the same.
- To open the Disk Management window, press Win + R to open the Run window, type diskmgmt.msc and hit OK.
- Then, right-click the disk you want to clone and select Properties in the pop-up window.
- The Properties window should be used to verify the partition style, which can be either MBR (Master Boot Record) or GPT (GUID Partition Table), by selecting the Volume tab.
- To clone a hard drive in Windows 7, first check the disk partition style of the destination disk. If it's still MBR, you can proceed with the clone. However, if it's GPT, you'll need to convert it to MBR first, which can be done using the Edit Partitions feature.
★ Helpful tips:
✍ Qiling Disk Master Professional allows for cloning MBR system disks to MBR or GPT disks, and GPT system disks to GPT or MBR disks. For data disks, the free version, Qiling Disk Master Standard, can be used.
✍Your Windows 7/8/10/11 hard drive may be failing due to bad sectors, and Qiling Disk Master can clone it, skipping bad sectors, to help you recover your data.
✍The steps to clone a hard drive in Windows 10, 8.1, 8, 7, XP, and Vista apply to all editions (32-bit and 64-bit).
The cloning time is dependent on the data size on the source disk, with larger capacities taking longer to clone.
Boot from Cloned HDD or SSD
After completing the disk clone, proceed with the following steps based on your requirements:
If you cloned boot drive in Windows 7:
1. Shutdown your Windows 7 computer.
2. Boot from the cloned SSD/HDD.
For Desktop: Enter the BIOS to set up the cloned SSD/HDD as the first boot device, then restart and boot normally, or swap the original Windows 7 boot drive with the cloned SSD/HDD and boot from the cloned drive.
For Laptop: To upgrade to Windows 10, use screwdrivers to swap out the original Windows 7 boot drive with the cloned SSD or HDD, and restart your computer to boot from the cloned drive. This will allow your computer to run the new operating system.
If you cloned a hard drive with a Master Boot Record (MBR) to a new drive with a GUID Partition Table (GPT), or vice versa, your cloned drive may not boot in Windows. In this case, try changing the boot mode from Legacy to UEFI if you cloned an MBR disk to a GPT disk, or from UEFI to Legacy if you cloned a GPT disk to an MBR disk. This might resolve the issue.
If you cloned data disk in Windows 7:
Since Windows 7 is no longer supported, you can simply remove the data disk and connect it to a new computer to access your data.
If you want to upgrade your Windows 7 hard drive to a larger one, you can clone the original hard drive to the new one, following the same process as cloning a hard drive to another hard drive or solid state drive. Once the cloning is complete, connect the larger disk containing the data you need to your current computer.
Clone Windows 7 to new computer with secure boot
None of the disk cloning software allows you to clone Windows 7 to a new computer, as the hardware in most cases is different between computers. Although you can perform the steps above successfully, your computer will fail to boot.
Yes, you can clone Windows 7 to a new computer using the backup and restore method, which ensures the cloned drive is bootable. To achieve this, you can utilize the Universal Restore feature, which resolves the issue of the cloned drive not booting properly. By following a series of steps, you can successfully clone your Windows 7 operating system to a new computer.
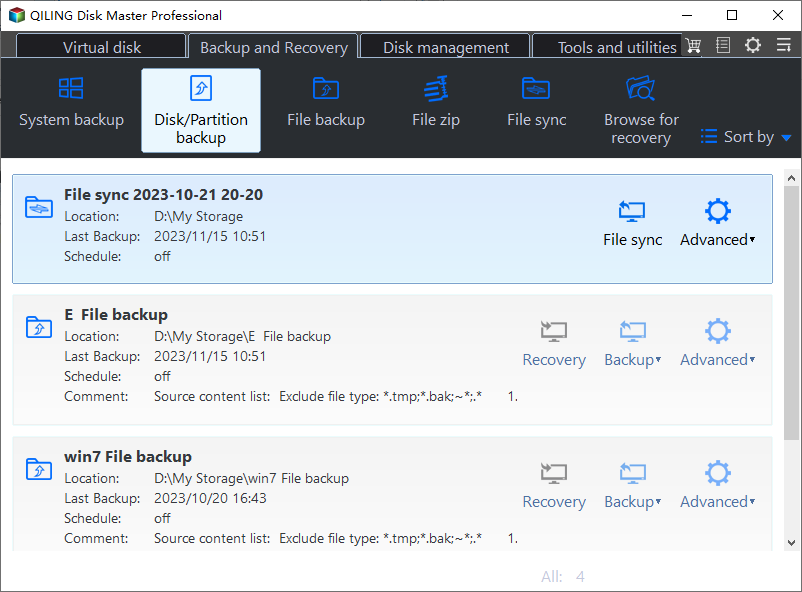
To backup disk in Windows 7:
To create a disk backup, switch to the Backup mode and then select Disk Backup. Choose the source and destination disk, and click Proceed.
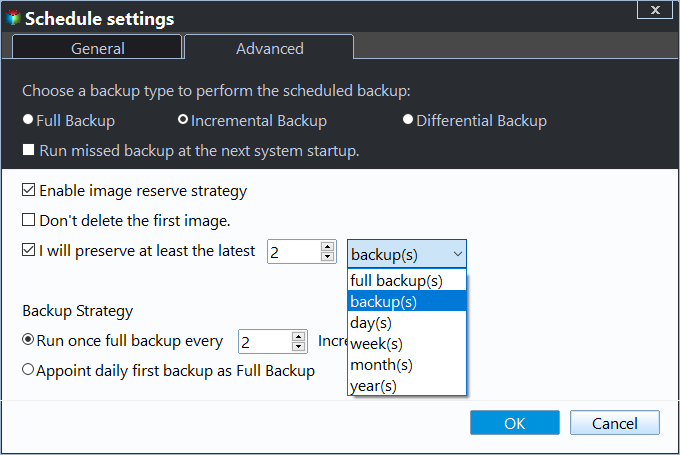
In daily use, you need to set up schedule backup and backup scheme to keep data safe in the long term. This includes setting up backup options to keep data now and later, such as backing up a disk with different frequencies (e.g.
The USB plug in feature is highly recommended if you don't want to keep the backup drive constantly connected. This feature allows automatic backup of the disk when the USB drive is plugged in, as long as the USB drive has enough storage to hold all the data from the old disk.
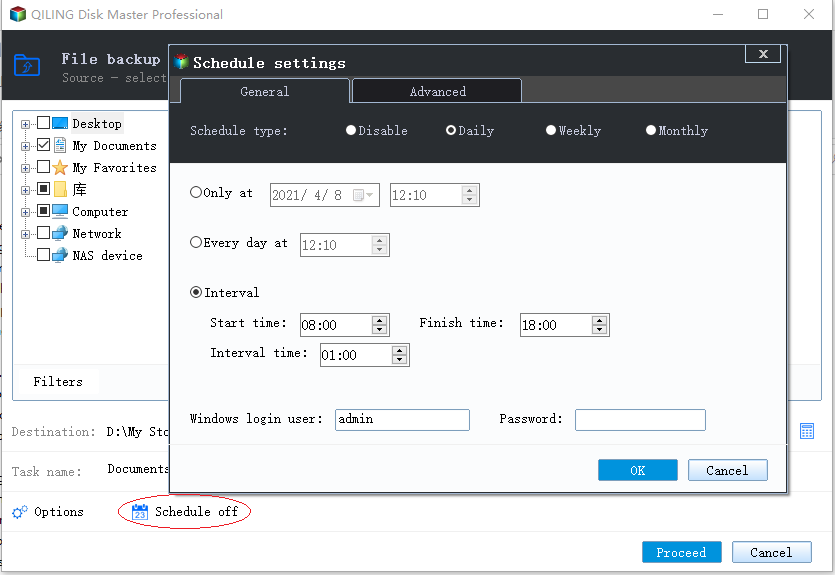
The backup scheme resolves the backup disk full issue caused by scheduled backups by backing up only changed files with incremental or differential backup. Additionally, it allows for automatic backup cleanup and deletion of old backup images with selected methods.
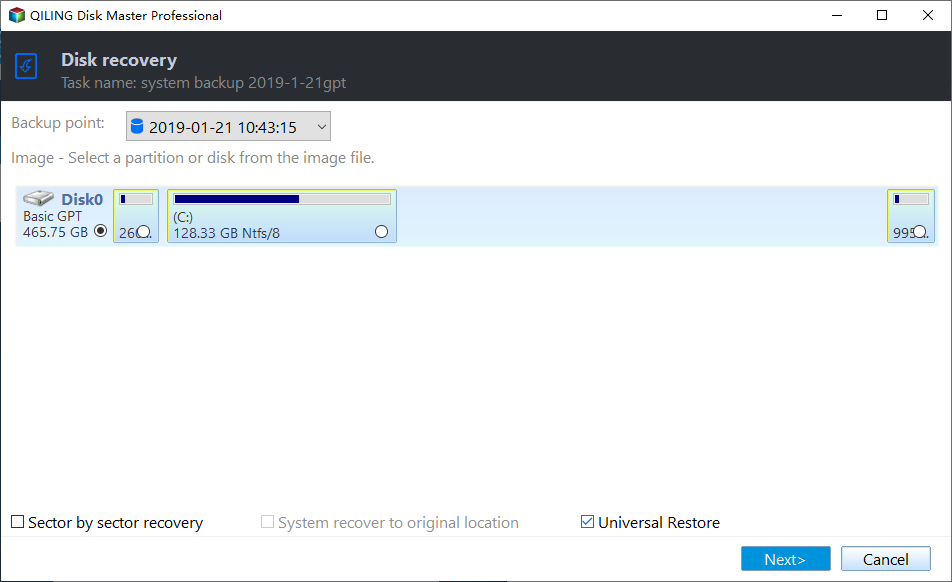
To restore disk image in Windows 7:
To restore your computer, go to the Restore section, choose Select Task or Select Image File, and then select backup image and recovery items. Proceed with the process. If the new computer has different hardware, select Universal Restore to ensure it boots properly after the disk image is restored.
Summary
You can easily clone a hard drive in Windows 7 using Qiling Disk Master Professional, a reliable cloning software that allows you to clone a hard drive to a larger or even a smaller drive, thanks to its intelligent clone method. Additionally, it enables you to align an SSD disk, thereby improving its performance.
If you want to clone Windows 7 to a larger hard drive without reinstalling the operating system or installing programs, you can try using the system clone feature. This allows you to copy the entire system, including Windows and installed programs, to the new hard drive. This can be a convenient option if you want to upgrade to a larger hard drive without having to go through the process of reinstalling everything.
Related Articles
- Quick Way to Clone Windows 7 to New Hard Drive
Want to transfer Windows 7 to a new hard drive? This page introduces 3 simple ways to migrate Windows 7 to new HDD or SSD without reinstalling OS. Find the best solution for you. - 4 Steps to Create Windows 7 Bootable Clone Disk
You will learn how to create Windows 7 bootable clone of hard drive and make it bootable with best disk cloning software - Qiling Disk Master. - How to Clone Windows 7 Partition to the Same Drive
You can easily clone Win 7 partition to the same drive and boot from the cloned partition sucessfully. The best disk clone software - Qiling Disk Master helps. - Can I Still Use Windows 7 After 2020 and Get Security Updates
Can I still use Windows 7 after 2020? Definitely, you could use it as before but you need to do so at your own risk. So please learn more about Windows 7 end of life extended and make your decision. - Full Guide: Migrate Windows/Mac OS from Slow HDD to Fast SSD Drives
Want to speed up your Windows/Mac computer and enjoy better performance? You can start a fresh installation onto SSD drive or directly migrate OS to SSD drive. - How to Mirror a Hard Drive to SSD without Losing Data [2 Ways]
Learn how to mirror a hard drive to external hard drive (HDD or SSD) easily in Windows 7, 8, 8.1, 10, 11 with the best hard disk cloning software - Qiling Disk Master.