Move System Reserved Partition to Another Drive in Windows 10
Quick Navigation:
- Overview of system reserved partition and how it works
- Situations to move system reserved partition to another disk
- Method 1: Move system reserved partition on wrong drive with Disk Management
- Method 2: Move system reserved partition to SSD with System Clone
- Method 3: Move system reserved partition to another drive with Backup and Restore
- Part 1: create a system10image in Windows 10
- Part 2: Restore system image to another drive
- Method 4: Move system reserved partition on second drive with command line
- How to boot from another drive after moving system reserved partition
- More about Windows move system reserved partition
- Wrapping Things up
Overview of system reserved partition and how it works
The system reserved partition on your computer contains essential boot files required to start Windows, and without it, your computer won't boot. To prevent this, you can move the system reserved partition to another drive. This partition holds two critical components necessary for computer startup, making it a crucial part of the boot process.
1. The Boot Manager and Boot Configuration Data.
When your computer boots, the Windows Boot Manager starts up, reads the boot data from the Boot Configuration Data (BCD), and then boots the bootloader from the System Reserved partition, ultimately loading Windows from your system drive.
2. The startup files used for BitLocker Drive Encryption.
If you use BitLocker drive encryption, the System Reserved partition contains the necessary files for starting your computer, which boots the unencrypted partition, then decrypts and boots the encrypted Windows system.
Situations to move system reserved partition to another disk
Moving the system reserved partition in Windows 10, 11, and previous systems is not recommended by default. However, if the system reserved partition is located on the wrong drive or the disk is experiencing SMART errors, it may be necessary to relocate it. In such cases, it's essential to take a closer look at the situation and consider the potential consequences of making such a change.
Situation 1: The system reserved partition on wrong drive
When cloning a disk or installing Windows, it's easy to forget to disconnect an extra hard drive, resulting in the system reserved partition being on a different disk than the C drive. If you remove the disk with the system reserved partition, your computer won't boot. To fix this, you need to merge the system reserved partition with the C drive on the original disk. This ensures your disk can boot properly and prevents errors.
Situation 2: The disk containing system reserved partition is experiencing the smart error
If your computer is experiencing the smart error, you may need to restart it, check for software updates, or run a virus scan to resolve the issue. This error can occur due to various reasons such as outdated software, malware, or hardware issues, and resolving it requires a combination of troubleshooting steps.receive an error message, saying, The hard disk drive, specifically the WD5000BEVP-75A0RT0-(S1), has been predicted to fail. It is crucial to take immediate action to prevent data loss. This can be achieved by backing up all data on the drive and replacing the hard disk drive with a new one. This will ensure the continued integrity and security of your data.A failure may be imminent. Press F1 to Continue. If your system reserved partition is on a failing disk, you should move it to a healthy disk as soon as possible to avoid data loss and system crashes. This will ensure that your system can still boot up even if the original disk fails.
4 ways to safely move system reserved partition to another disk, while creating a system backup or disk backup just in case.
Method 1: Move system reserved partition on wrong drive with Disk Management
To resolve the issue of the boot partition being on the wrong drive, you can use the built-in Disk Management tool. This method allows you to move the boot partition to the correct drive, resolving the problem.
Please note that the following operation may cause unexpected problems, so it's recommended to create a repair disc first. This disc can be used to troubleshoot your computer if it's unable to boot successfully.
Step 1. To create a new simple partition on disk 0 using disk management, note that the System Reserved partition size varies: 100 MB on Windows 7, 350 MB on Windows 8, and 500 MB on Windows 10 or 11.
To open disk management, click "Win+R", type "diskmgmt.msc" in the run box, right-click unallocated space and choose "New Simple Volume", or if no unallocated space exists, shrink the partition first.

Step 2. Assign a drive letter for your newly simple partition (Z:).
Step 3. Copy everything from the system reserved partition to your newly simple partition (Z:), Including Boot folder, bootmgr, BOOTSEC.BAK
Step 4. Remove the drive letter from the system reserved partition on disk 1.
Step 5. Set the new partition as "System Reserved".
Step 6. Remove the drive letter of your new System Reserved partition, then mark it as active.
Step 7. If Windows starts, restart your computer and delete the system reserved partition on disk 1. If Windows doesn't start, start your computer using a repair disc and use the Startup Repair option to repair it.
Method 2: Move system reserved partition to SSD with System Clone
The second method to change system reserved partition is to use the "System Clone" feature in Qiling Disk Master Professional, which is the easiest solution to change system reserved partition in Windows 10 and other systems.
 Qiling Disk Master
- The system partition and system reserved partition should be cloned together to ensure the cloned drive is bootable. This is because these partitions contain the boot loader and other essential files needed to boot the operating system.
- The cloned system's reserved partition will remain as the primary partition and active.
- To prevent accidental deletion of the system reserved partition, you can hide its drive letter. This can be done by running a command in the Command Prompt as an administrator.
- To migrate an operating system from MBR to GPT or vice versa without losing data, you can use a tool like Qiling Partition Master. These tools allow you to convert the disk from MBR to GPT or vice versa, and they will automatically resize the existing partitions to fit the new disk layout.
- The software supports all brands of hard disk drives (HDDs) and solid-state drives (SSDs), including SanDisk, Samsung, WD, Transcend, Toshiba, Seagate, and many others.
Preparations for moving system reserved partition:
🔷🔹 Prepare another drive To receive the system partition and system reserved partition, it can be either a Hard Disk Drive (HDD) or a Solid-State Drive (SSD).
🔷🔹 Prepare a connector If your computer only has one slot, you can use a USB to SATA adapter, M.2 enclosure, or other disk interface adapters to connect multiple disks. This allows you to expand your storage capacity without having to upgrade your computer's hardware.
🔷🔹 Install your new drive. To install a computer hard drive, open the back cover, locate the disk slot, and slide the drive into it, securing it with screws. If the computer has only one slot, connect the drive using a prepared connector.
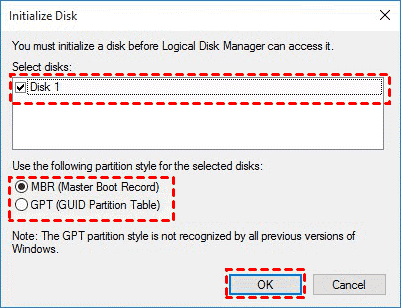
🔷🔹Initialize disk in Disk Management. To replace the old disk, right-click it and select "Initialize Disk". Then, choose the correct disk partition style, either MBR or GPT, based on your old disk's settings, and click "OK". You can verify the disk partition style by checking the "Volume" attribute in the disk's Properties window.
🔷🔹 To merge the system reserved partition with the C drive on a Server 2012/2016/2019/2022, download and install Qiling Disk Master Professional. Alternatively, for server cloning, use Qiling Disk Master Server.
To move the system reserved partition in Windows 10, let's use Qiling Disk Master Professional as an example. Let's start to learn how to move system reserved partition in Windows 10 with Qiling Disk Master Professional.
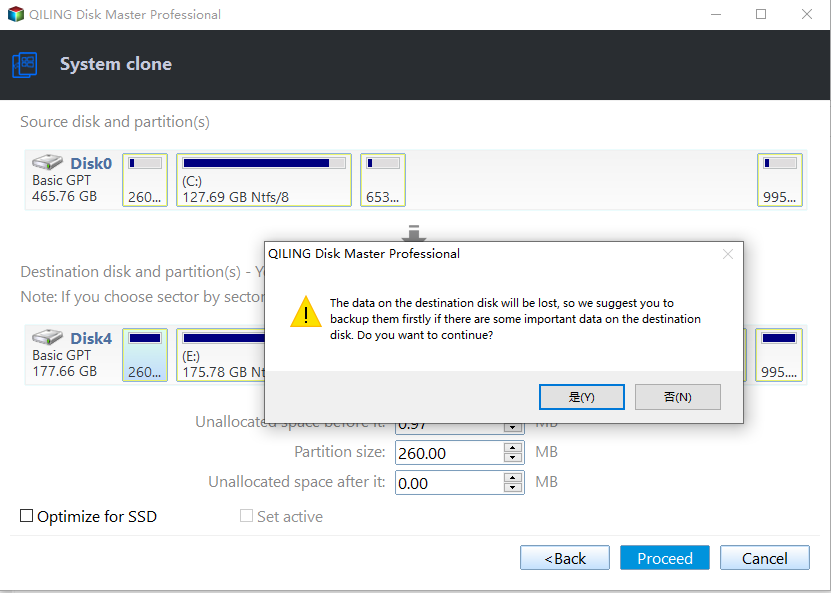
Step 1. On the main page of Qiling Disk Master Professional, select Clone and System Clone, which will automatically select the operating system and system reserved partition required to start Windows.

Note: If you want to include all the content on the hard drive with system reserved partition, consider cloning the hard drive to an SSD or another HDD with Disk Clone feature.
Step 2. Select another drive (or unallocated space) as the destination path, and click Next.

Step 3. To accelerate the writing and reading speed of the SSD and extend its lifespan, enable SSD Alignment. Proceed with the Windows 10 move system reserved partition, and if using the trial version of Qiling Disk Master Professional, you will be prompted to upgrade to the full version.

If the destination SSD is partitioned, you'll receive a prompt reminding you that the partition will be overwritten or deleted. Click OK to continue or click Cancel to back up important data first.
Notes:
❎ Do not check the "Sector by sector clone" feature when cloning a hard drive, as it will copy every sector of the original drive to the new drive, including any existing data, boot sectors, and operating system files. This can lead to issues with the cloned drive's bootability and overall functionality. Instead, select the "Quick Clone" or "Intelligent Clone" option, which will clone only the used sectors of the original drive, preserving the operating system, programs, and data. This approach is generally safer and more efficient.
✅ If the destination partition is larger, you will see an option to make full use of disk space, which allows you to extend the system partition size by using adjacent unallocated space. This option is checked by default.
💖 Tip on how to move system reserved partition without booting Windows
After cloning, it's advisable to create bootable media in advance, so you can boot your computer even if it's not bootable. This can be especially useful if you have multiple computers, where using the PXE boot tool in the Qiling Disk Master Workstation can be a convenient option.

Method 3: Move system reserved partition to another drive with Backup and Restore
You can use "System Backup" and "System Restore" to move the system reserved partition to a different drive, except for System Clone in Qiling Disk Master.
To avoid doing a double workload, you can use a backup system that doesn't require an extra drive, such as cloud backup services or a network-attached storage (NAS) device. These options allow you to back up your data to a remote location or a centralized storage device, eliminating the need for an extra drive. This can be a more efficient and convenient way to manage your backups, especially if you have a large amount of data to back up.
Part 1: create a system10image in Windows 10
Launch Qiling Disk Master, click Backup, select System Backup, choose a destination path, then click Proceed.

Part 2: Restore system image to another drive
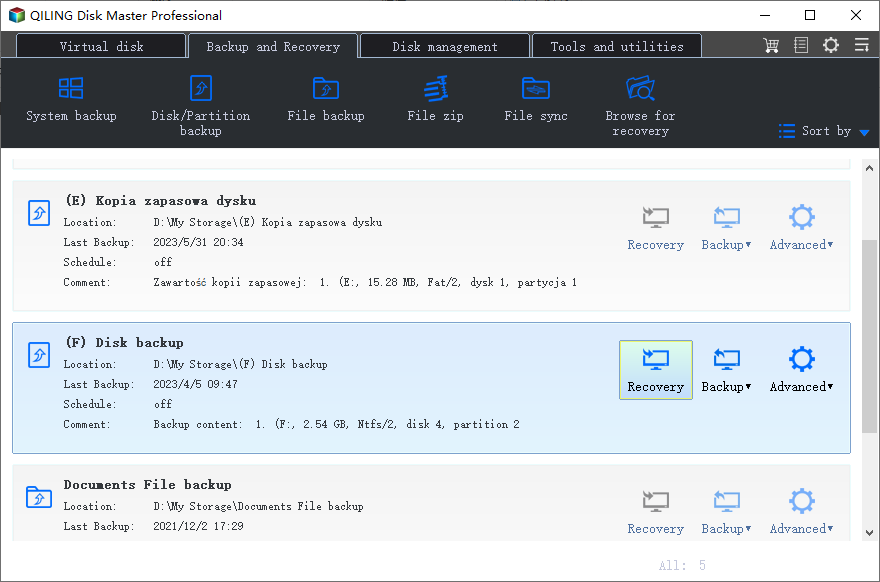
After backing up your Windows system, you can use this software to restore the system image to another drive. Please plug it in and get started.
Step 1. To recover data, click on the "Recovery" option on the main page of the software and select "Select Image File" to locate the image on your external drive.
Step 2. Tick Restore this system backup and Restore system to other location. Then, click Next to continue.
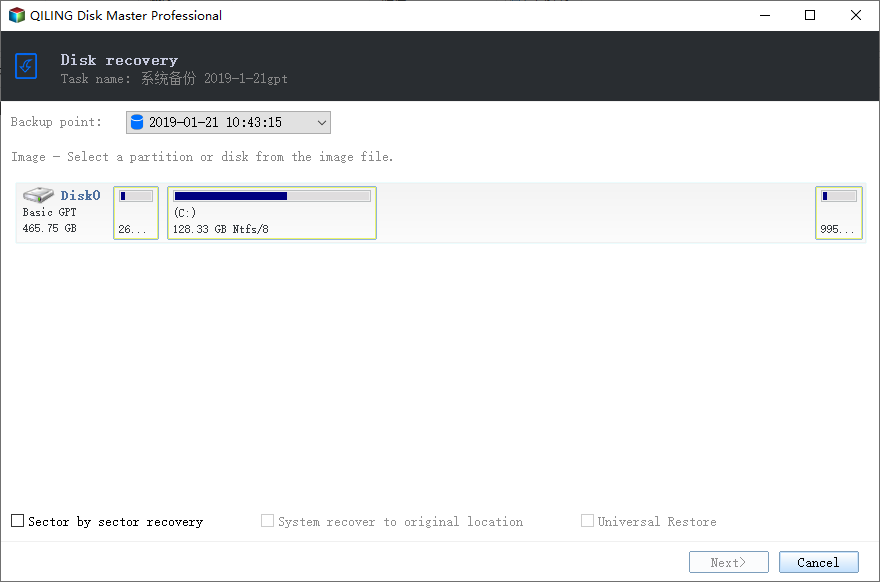
Note: This software automatically selects the latest system image based on its backup time. If the selected image is damaged, it allows you to choose a previous backup image by selecting a different time point.
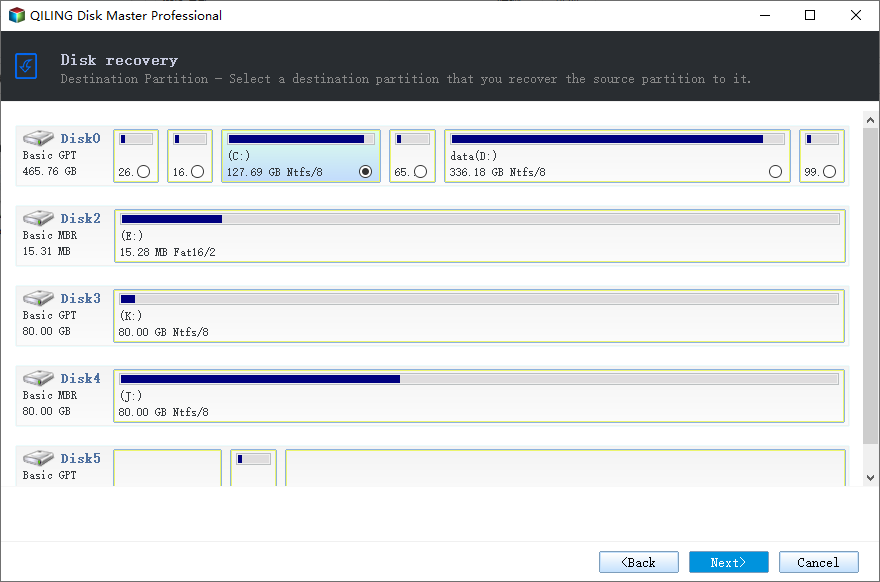
Step 3. Select a destination partition on the new drive. For safety, it's suggested to select the first partition. Then, click Next.
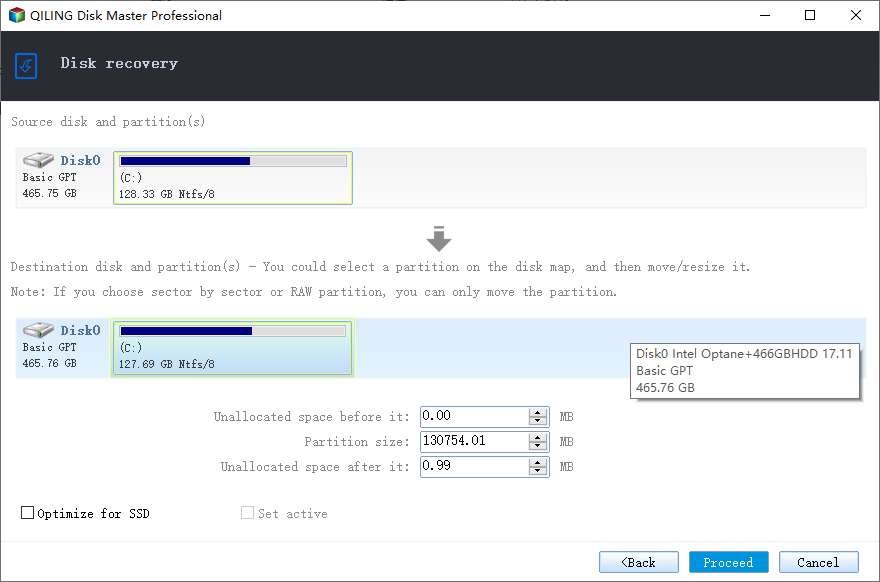
Step 4. Click Proceed to move the system partition and system reserved partition to another disk.
Tips:
✅ If you want to back up and restore a system image to a new computer, it's recommended to select the "Universal Restore" option. This feature ensures that all necessary drivers are installed to boot Windows on the new computer.
✅ If the target disk is an SSD, select the "SSD Alignment" option to improve the writing and reading speed of SSDs using 4k alignment technology.
Method 4: Move system reserved partition on second drive with command line
The built-in command line utility can help you move the system reserved partition to another drive, but this method only works well on Windows 7 and Windows 8. This method is an alternative to Disk Management, and it can be used to change the system reserved partition. However, it's worth noting that this method may not work on other versions of Windows.
Step 1. Open cmd as administrator, type the following command, and hit Enter.
bcdboot C:\windows /s C:

Step 2. Open Disk Management, right-click the C drive, and select "Mark Partition as Active".
Step 3. Select the system reserved partition and tap on "Mark Partition as Inactive ".
Step 4. Restart your computer and confirm it can boot successfully.
Step 5. Right-click the system reserved partition, select "Change Drive Letter and Paths", and follow the on-screen instructions to assign a letter to this partition.
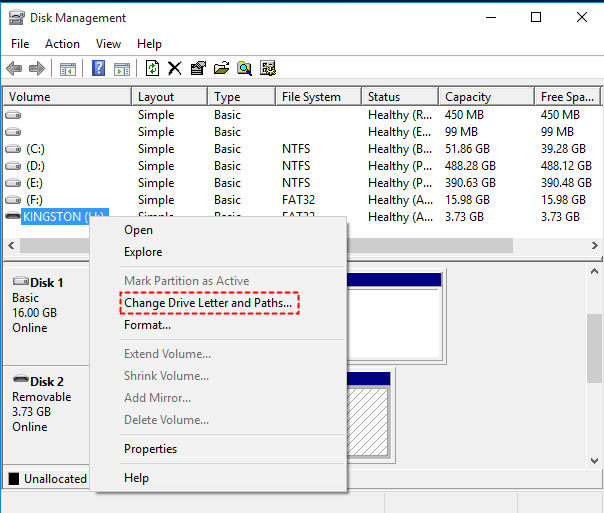
Step 6. Right-click the system reserved partition again and tap on "Delete Volume" to delete system reserved partition.
Note: If you're not familiar with the command line, you may want to consider using Qiling Disk Master Professional or the built-in Disk Management tool instead.
How to boot from another drive after moving system reserved partition
To ensure your computer starts normally from the cloned drive after moving the system reserved partition to another disk, you should perform a few checks. First, ensure that the cloned drive is properly connected and recognized by your system.
- To access the BIOS settings, restart your computer and press the manufacturer key, which is usually F2, F11, or ESC, to go to the BIOS settings.
- Set the cloned SSD as the first boot option in the boot settings.

- Press F10 or another prompted key to reboot. Please wait patiently and see if it can start normally.
- If the operation is successful, it's suggested to delete the system reserved partition on the original drive to free up disk space.
More about Windows move system reserved partition
1. How do I get my system reserved partition back?
If the system reserved partition is on the second drive, you can use a disk cloning software like Qiling Disk Master to clone or backup the entire system, including the system reserved partition, which is usually boot-related.
2. Is the formatting system reserved partition safe?
By default, it's not suggested to format system reserved partition If your computer is working properly, you can move the system reserved partition to a different drive or format it if it's experiencing SMART errors. To do this, you can use one of four methods, which are described in the article, and then format the partition to free up more space.
3. How do I make my system reserved partition bigger?
To make the system reserved partition bigger, you can extend it to unallocated space using Disk Management. Right-click the system reserved partition, select Extend Volume, and follow the on-screen instructions to complete the process.
4. Can I merge the C drive with system reserved partition?
The answer is Yes, but Not recommended. On BIOS systems, the system reserved partition is intended to store both the WinRE (Windows Recovery Environment) and the boot files. In contrast, on UEFI systems, this partition is only meant to house the WinRE. As a result, if the C: partition becomes corrupted, it can also impact the WinRE, making it impossible to boot into the recovery environment to resolve the issue.
Wrapping Things up
You can easily move the system reserved partition to another drive, regardless of your Windows version, by following the steps carefully and removing any extra devices during cloning or installation to avoid the system reserved partition appearing on the wrong drive.
Creating an exact copy of your system by System Clone or System Backup is also a great way to ensure a safe and easy migration, such as migrating Windows 10 to an SSD. This method also offers additional features, including SSD Alignment for enhanced performance and the ability to enlarge your system partition by utilizing disk space more efficiently.
Related Articles
- Copy Boot Drive to Another Drive | Free & Easy
- Can I Move Boot Partition in Windows 10/8/7 without Reinstalling?
- Safely Move Boot Partition in Windows 7 | 3 Simple Steps
- How to Transfer Recovery Partition to New Hard Drive Easily
- How to Move Program Files to Another Drive on Windows 10/8/7
- Seagate DiscWizard Free Alternative | Review and Guide
DiscWizard is a practical cloning tool for Seagate and Maxtor hard drives. But it do have some deficiencies in addition to brand restrictions. So I'd like to share a free alternative to Seagate DiscWizard.