How to Transfer C Drive to SSD in Windows 11, 10, 8, 7 Easily
Quick Navigation:
- Why is SSD Better for C Drive?
- Before You Cloning C Drive to New SSD: 4 Tips
- Step-by-Step: Transfer C Drive to SSD and Ensure Boot
- 1. Clone C Drive to SSD via Cloning Software
- 2. How to Boot from Cloned SSD Step-by-Step
- Move C Drive to SSD without Cloning (Manual Operations)
- FAQs on Transferring C Drive to SSD
- Summary
Why is SSD Better for C Drive?
Many users want to transfer their Windows OS to an SSD due to its advantages over traditional HDDs, which are often pre-installed in computers by OEMs.
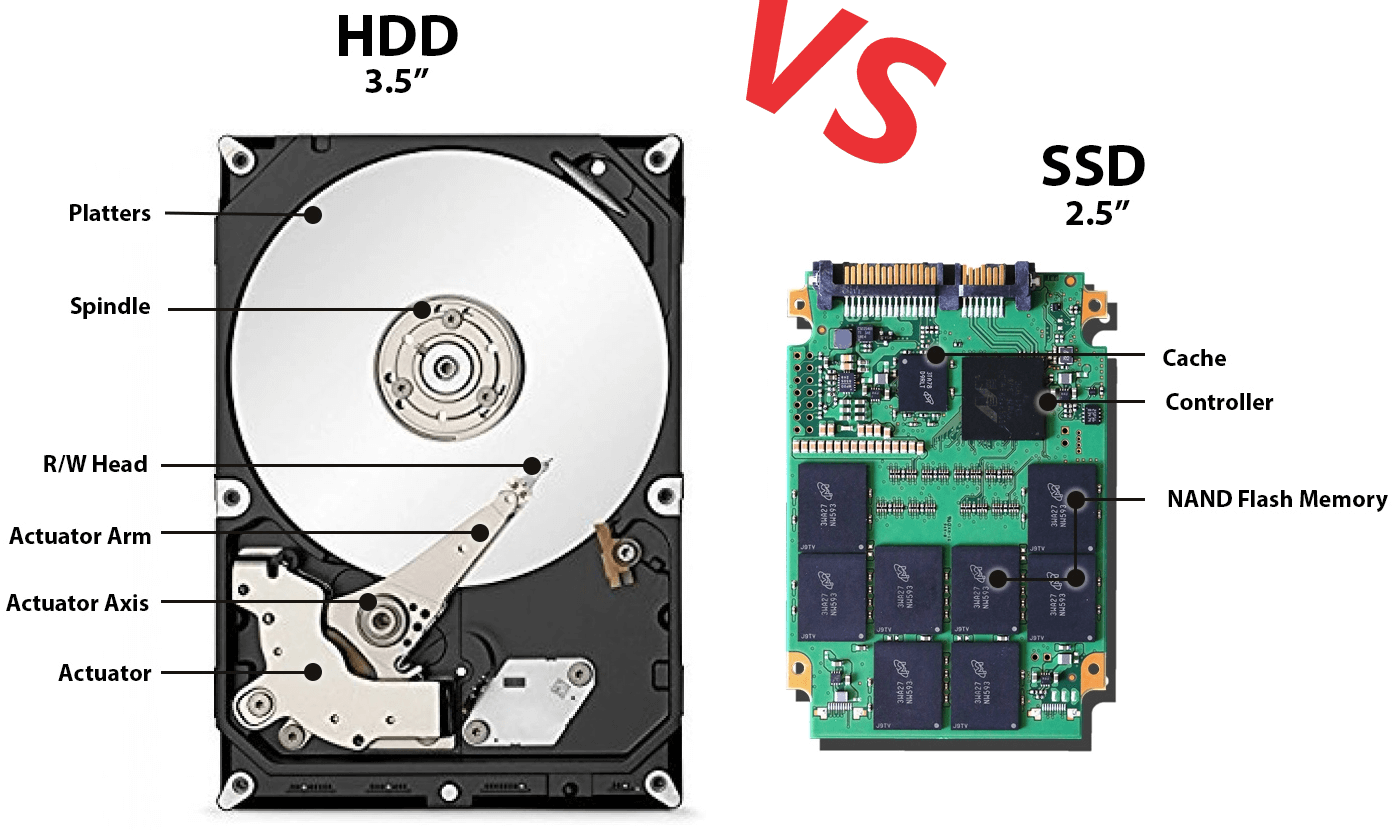
Specifically, SSDs provide the following strengths:
- Faster Read and Write SpeedsSSDs provide faster data access, allowing Windows to boot up more quickly.
- Lower Power Consumption and NoiseSSDs (Solid-State Drives) are more energy-efficient, quieter, and produce less heat than traditional Hard Disk Drives (HDDs).
- Improved Portability and Shock ResistanceSSDs are more portable and shock-resistant, reducing the risk of data loss due to physical disturbances.
Users often choose to use SSDs for their operating system and HDDs for storage, taking advantage of the benefits of both technologies. This approach allows them to utilize the increased storage capacity and lower budget of HDDs while still enjoying the improved performance and reduced read/write limitations of SSDs.
Before You Cloning C Drive to New SSD: 4 Tips
It's important to make some preparations:
👉 1. Backup Your System and Data
To avoid data loss, it's a good idea to back up your C drive and any other important data before transferring your files to a new SSD. If the target SSD already contains data, make sure to back that up too, as it will be overwritten during the transfer. This precaution ensures your files are safe and secure.
👉 2. Choose an SSD with Sufficient Capacity
For desktops, a 60GB SSD is typically sufficient for the Windows 11 OS. However, if you're a frequent traveler with a laptop, a larger SSD (120GB or 250GB) might be a good investment, depending on your budget.
To ensure the Windows OS has enough storage space, check the disk usage in Disk Management. If the space is insufficient, consider uninstalling applications or files to free up space on the C drive.
👉 3. Clean Up Your C Drive
Before cloning, you can free up space on your C drive by removing unnecessary files, temporary data, and applications you no longer need, making the cloning process more efficient and optimizing the new SSD's space.
👉 4. Use a Specialized Migration Tool
To simplify the process of copying your C drive to the new SSD, it's recommended to use third-party OS migration software, such as Qiling Disk Master Professional, which offers three clone options.
- System Clone: You can clone the C drive to an SSD on Windows 11, 10, 8, 7, and previous versions using this method.
- Disk Clone: You can clone an entire disk to another, such as cloning a hard drive to an SSD, cloning an SSD to a larger SSD, cloning NVMe drive to NVMe drive, or copying USB flash drive to another USB flash drive.
- Partition Clone: This feature allows you to clone specific partitions or volumes, including dynamic volumes, for easy duplication and management.
- ★★★ Plus two cloning modes:
- Intelligent Clone: This mode is used most often due to its speed. It's commonly used for cloning a larger drive to a smaller one, such as cloning a larger HDD to a smaller SSD.
- Sector-by-Sector Clone: A bit-by-bit copy, also known as a clone, involves copying all sectors on a hard drive, including blank or logically bad sectors.
This OS migration software offers an SSD Alignment option, which boosts reading and writing speeds and extends the lifespan of the SSD, making it ready for migrating C drive to SSD easily.
Step-by-Step: Transfer C Drive to SSD and Ensure Boot
To move your C drive to a new SSD in Windows 11 or 10, first connect the SSD to your computer using a USB adapter if you have a laptop, and ensure it's detected by Windows. Next, download and run the Qiling Disk Master software, which can clone the entire C drive to the new SSD, including the operating system, programs, and data. Alternatively, you can use the built-in Windows feature, "Disk Management," to clone the C drive to the new SSD.
1. Clone C Drive to SSD via Cloning Software
Download and install Qiling Disk Master Pro on your PC.
Step 1. Select "Clone"-> "System Clone" to migrate C drive to SSD.

Step 2. Choose the new SSD as the destination disk to copy the C drive to, and click "Next".

Step 3. Select the C drive and system reserved by default to ensure normal boot from the SSD. Tick the "SSD Alignment" and "Make full use of disk space" options, then click "Proceed".

Step 4. After cloning your boot drive to an SSD, you should have successfully moved your boot drive to the new drive. Booting from a cloned SSD is generally a straightforward process.
2. How to Boot from Cloned SSD Step-by-Step
1. Physically and properly install the cloned SSD.
2. Access the BIOS/UEFI settings by pressing the key displayed on the screen during startup.
3. Set the cloned SSD as the first boot device and save changes. Then exit.
4. Restart your computer and verify the boot-up. You may check the drive's properties or performance.
- ★Tips:
- Qiling Disk Master can be used for various tasks beyond just transferring the C drive, including cloning a hard drive to a larger drive, migrating Windows 10 to an M.2 SSD, cloning an HDD to an SSD via a USB cable, and cloning Windows 10 to an NVMe SSD.
- Qiling Disk Master Professional allows cloning of both MBR and GPT disks, including system and data disks, and also supports direct cloning from MBR to GPT.
Move C Drive to SSD without Cloning (Manual Operations)
If you want to operate all of this by manual practice, try transferring your system drive to an SSD using Windows tools and some manually practical operations, such as taking Windows 7 for example.
Step 1. Shrink the C drive To make the most of the smaller SSD, consider rewriting the operating system and frequently used programs to fit on the SSD, while keeping less frequently used files and programs on the larger HDD. This approach will allow you to utilize the SSD's speed and efficiency for the most critical tasks, while still having ample storage space on the HDD for less essential files and programs.
Right-To free up space on your C drive, go to the "Computer" section, click on "Manage", then "Disk Management". Right-click on the C drive and select "Shrink Partition". In the "Enter the amount of space to shrink in MB" field, enter a value that's at least 10% smaller than the usable capacity of your SSD.

Step 2. Backup the shrunk C drive and its system reserved partition to another disk.
Head to "Control Panel" -To create a system image, go to "Backup and Restore" in the Control Panel, then click on "Create a system image". This will create a backup of your entire system, which can be used to restore your computer to its current state in case of a problem. After the backup is complete, you will be prompted to create a repair disc. If you have a Windows installation disk, you can click "No" to skip this step. Otherwise, you can click "Yes" to create a repair disc, which will guide you through the process.

Step 3. Install SSD and restore from the backup image.
To repair your Windows 7 PC, open your PC case, disconnect all drives except for the backup disk, and insert the repair disk or Windows 7 installation disk. After the PC boots from the optical disc, select "Repair your computer" -> "System Image Recovery" -> "Use the latest available system image".

To restore a single hard drive, select it and click "Next" then "Finish". Ensure only the desired drive is selected to avoid accidental erasure of other drives. After the process is complete, click "Don't Restart" and then "Shutdown" to safely power down the computer.
Step 4. Plug all the drives back To verify if your computer will boot successfully, you can temporarily remove the original OS drive and see if the computer boots from the new OS drive. Boot your computer and open Disk Management. Right-click the new OS partition and select "Extend Volume" to fill the SSD, using the default value calculated by Windows.
Step 5. To make Windows detect the SSD, Here is a single command to enter in the command prompt in administrator mode: `bcdedit /set {bootmgr} displaybootmenu yes`
Go to "Start" -To enable SSD features in Windows, navigate to the "Accessories" folder in the Start menu. Right-click on "Command Prompt" and select "Run as administrator". Then, type the command "Winsat disk" in the Command Prompt window to enable Windows to detect the new drive as an SSD, unlocking its unique features.
After successfully migrating your data to the cloned SSD, you can wipe the data on the old HDD and use it as secondary storage for your computer, confirming that the SSD works well.
FAQs on Transferring C Drive to SSD
1. Why should I transfer my C drive to an SSD?
Upgrading to a Solid-State Drive (SSD) can significantly boost your computer's performance. SSDs outshine traditional Hard Disk Drives (HDDs) with faster read and write speeds, quicker boot times, lower power consumption, and enhanced reliability. By transferring your C drive to an SSD, you can enjoy a smoother and more efficient computing experience.
2. Can I transfer the C drive to a smaller SSD?
You can transfer your C drive to a smaller SSD if the used space on your C drive is less than the capacity of the smaller SSD, but you may need to resize partitions and remove unnecessary data to fit everything onto the smaller SSD.
3. Will transferring my C drive to an SSD void my warranty?
Transferring the C drive to an SSD typically won't void warranties, but it's best to check the terms and conditions provided by the manufacturers.
4. Can I format C drive after cloning to SSD?
After cloning your C drive to an SSD, you can format the original C drive if you no longer need it, allowing you to repurpose it for other uses.
5. How do I transfer my OS from HDD to SSD without cloning?
Transferring your operating system from an HDD to an SSD can be done using a clean installation method or a restoring image to a new hard drive method, without cloning.
Summary
Transferring your C drive to an SSD can be done in two ways, and you can choose the method that best suits your needs. You can also use Qiling Disk Master to explore further possibilities, such as transferring files from the SSD to an HDD for future backups, and create a bootable rescue media for added security in case of unexpected system failures.
Qiling Disk Master offers a Server edition that enables cloning the system drive to a new hard drive on Windows Server 2008, 2012, 2016, and other supported versions, making it a versatile solution for various migration needs.
Related Articles
- 5 Free Ways to Transfer Files from C Drive to D Drive
- Best Way to Clone C Drive to External Hard Drive in Windows
- Safely Move a Windows 10, 11 Hard Drive to a New Computer
- Clone Old Computer to New Computer (2 Easy Ways)
- How to Make New SSD C Drive on Windows Laptop/PC🔥
When your old SSD C drive runs out of space, you can create a new SSD C drive by using a disk cloning tool like Qiling Disk Copy. This tool allows you to make a copy of your old drive, effectively creating a new SSD C drive with the same contents and settings, giving you more storage space. - How to Replace HDD with SSD on Desktop (Without Reinstalling OS)🔥
Replacing a desktop hard drive with an SSD can be done with the help of cloning software, such as Qiling Disk Copy, making the process straightforward and efficient.