How to Fix IRQL_Not_Less_OR_EQUAL Error in Windows 11
When you encounter an IRQL_Not_Less_OR_EQUAL error on your Windows 11, it typically indicates an issue with your device's memory, antivirus software, or a device driver. This error can be caused by a malfunctioning device driver, memory corruption, or a problem with your antivirus software.
The error code is a common issue in Windows, and resolving it requires understanding the possible triggers. The error could be caused by various reasons, including software conflicts, hardware issues, or system file corruption. To find the best solution and prevent future occurrences, it's essential to identify the root cause of the error. Once the trigger is identified, you can take the necessary steps to resolve the issue and get your system running smoothly again.
- Faulty hardware
- Registry issues
- Disk fragmentation
- Poor installation of device driver
- Device drivers' incompatibility
- Malware and virus attack
To fix the IRQL_Not_Less_OR_EQUAL error in Windows 11, there are several solutions you can try, regardless of the trigger. These include running a System File Checker scan to replace any corrupted system files, checking for malware and viruses using a reliable antivirus program, and updating your Windows 11 installation to ensure you have the latest security patches and bug fixes.
- Part 1. How to Fix IRQL_Not_Less_OR_EQUAL Error in Windows 11
- Part 2. How to Update Windows 11 without Losing Data
Part 1. How to Fix IRQL_Not_Less_OR_EQUAL Error in Windows 11
If you are experiencing this BSOD, try the four solutions below to identify and fix the cause. Work through them in order, starting with system file checks and Safe Mode if Windows cannot start normally.
Solution 1: Check Memory and Hardware Issues
If the problem is caused by a memory or hardware-related issue, running Windows Memory diagnostics to scan the computer is the best way to resolve it.
1. To run the Memory Diagnostics, search for "Memory Diagnostics" in the Start menu, and click to open it.
2. The Windows Memory Diagnostics will present two options: "Restart now & check for problems" and "Check for problems the next time I start my computer".
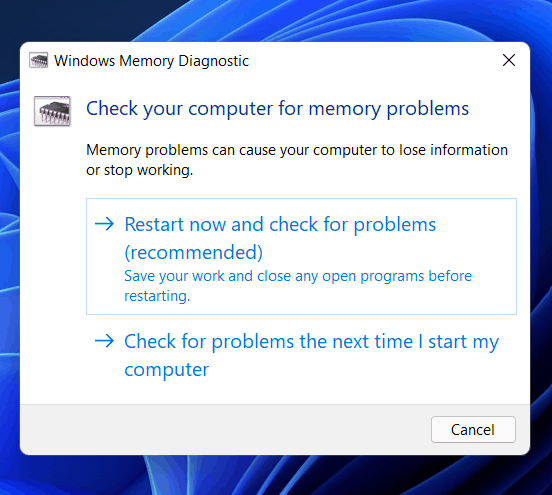
3. After scanning the memory, you will see a list of all problematic errors that are detected while scanning. This allows you to choose one of the options to know the cause of the problem.
4. If faulty hardware is detected, you'll need to replace it and then reboot your system to resolve the issue.
If the error is caused by a memory issue, this process will return the error and fix it. However, if you still cannot fix the IRQL_Not_Less_OR_EQUAL error code, you can proceed to the second solution. The second solution is to check for any hardware issues, such as a faulty RAM or a malfunctioning hard drive, and replace them if necessary.
Solution 2: Update, Uninstall, or Rollback Your Driver
A device driver issue can also cause the error code to appear. If that's the case, you may need to update, uninstall, or roll back the driver.
1. To access the System Properties, go to the Control Panel, then double-click on the System icon, and click on the "System Properties" option.
2. To access the Device Manager, click the "Hardware" tab and then click on "Device Manager". Look for the recently installed device and double-click on it.
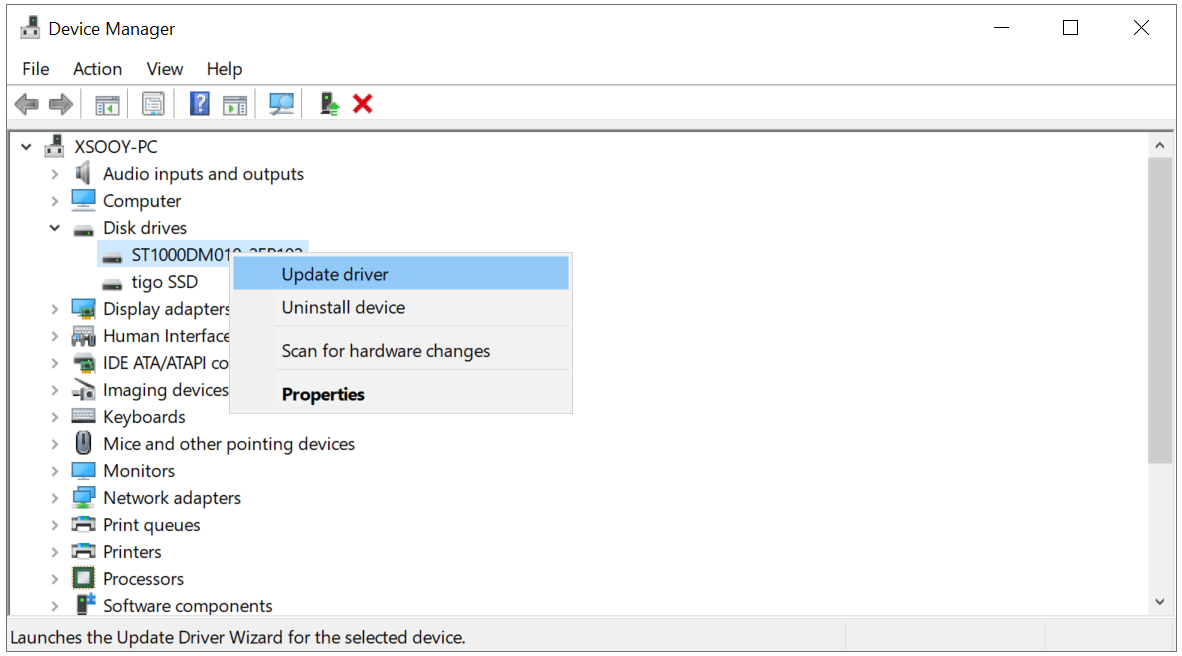
3. Click on the driver tab, then click on the roll back driver button.
If the issue is not resolved, you may have to update it.
1. To start, click the "Start" button, which is typically located at the bottom left corner of the screen, and then click on the "Settings" button, which is usually found in the Start menu.
2. Click on "Update & Security" and then "Windows Update".
3. Look for any updates and click to update.
4. To restart your device, click on the "Power" icon and then select "Restart" from the menu. This will shut down your device and then turn it back on.
If the device has been updated after the reboot and the issue persists, the driver may be the cause of the IRQL_Not_Less_OR_EQUAL Windows 11 error. In this case, uninstalling the driver and reinstalling it again may resolve the issue. If the problem continues, proceed to the next solution.
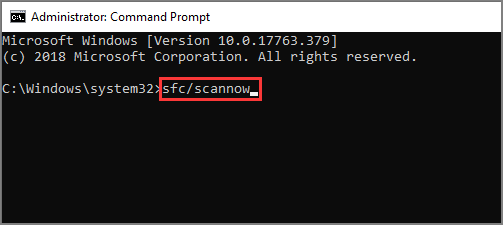
Solution 3: Run an SFC Scan
Running the System File Checker (SFC) is a recommended solution when you encounter error code 0x80070005, as it can scan for and fix corrupted system files that are causing the issue. To run the SFC scan, follow these steps:
1. To open the Command Prompt, search for "CMD" in the Start menu, right-click on the "Command Prompt" result, and select "Open as administrator" from the context menu. This will open a new Command Prompt window with administrator privileges.
2. To run the System File Checker (SFC) tool as an administrator, right-click on the Command Prompt icon and select "Run as Administrator". Then, in the command prompt window, type the command "SFC/scannow" and press the "Enter" button to execute the scan. This will check for and repair any corrupted system files.
3. Once you have installed the software, you need to scan your computer for malware and viruses. To do this, run a full system scan with your antivirus software.
After completing the process, check the system to see if the error has been resolved. If the issue persists, you can try the next troubleshooting step to resolve the problem.
Solution 4: Perform a System Restore
If you're still experiencing the IRQL_Not_Less_OR_EQUAL error code after trying the previous solutions, a system restore might be the best option. This solution requires a System Restore point to be created beforehand. To perform a system restore, follow these steps:
1. To create a restore point, click on the Start menu and type "Create a Restore Point" in the search bar, then click on the result to open it.
2. To access the System Properties window, open the Start menu, click on "Settings," and then select "System." In the System window, click on "About" on the left side, and then click on the "System Protection" tab. This will open a new dialogue box where you can manage system protection settings.
3. From here, click on the "System Restore" option, and in the next window.
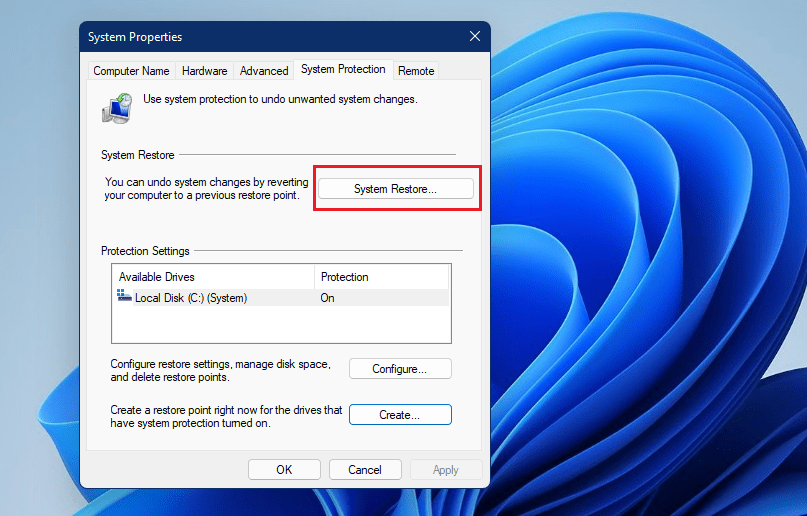
4. Choose the restore point and then click on "Next".
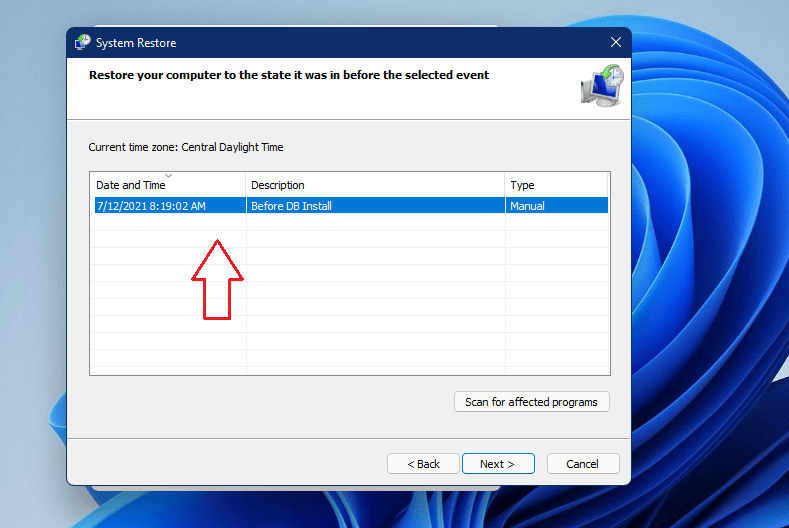
5. Follow the on-screen prompts to restore your system.
Part 2. How to Update Windows 11 without Losing Data
Before updating to Windows 11, it's essential to back up your data using the Windows built-in backup feature to ensure your files are safe.
To access backup options, select the "Start" button and then choose "Settings". Next, click on "System" > "Storage" > "Advanced storage settings" > "Backup options".
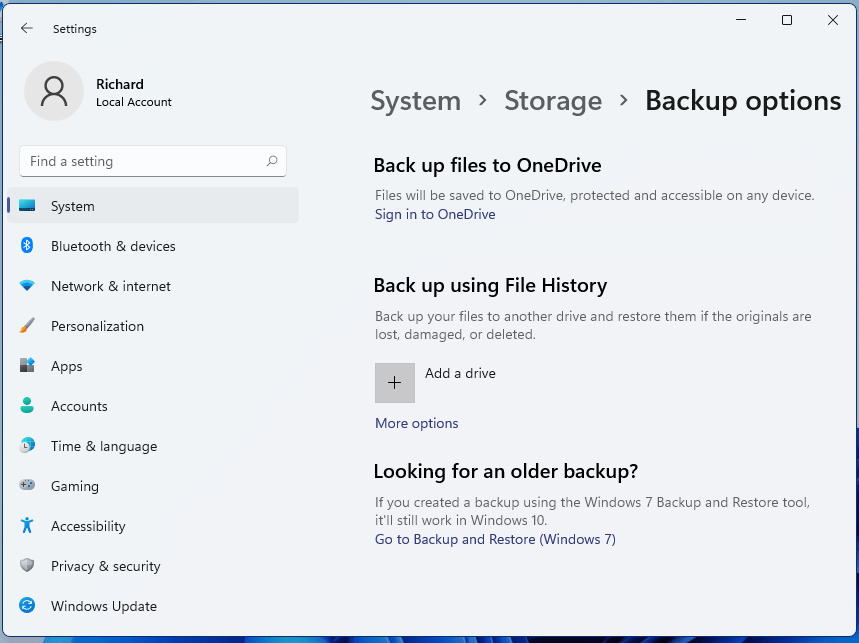
- Back up files to OneDrive If you choose to save files to OneDrive, not only will they be saved there, but you'll also have the option to restore them to other PCs.
- Back up using File History If this is the option, you'll need to prepare an external drive to save the backup image, which can selectively back up the files you need, and you can also choose to manually create a new backup if you've already created one before.
- Looking for an older backup? If you've never used Windows Backup before or have recently upgraded your Windows version, it will backup your entire Windows 11 system. To do this, click "Go to Backup and Restore (Windows 7)" and follow the on-screen instructions in the wizard.
To protect your files from unauthorized access, install Windows on one hard disk and back up files on a different one. We suggest using Qiling Disk Master for an effective backup process.
What is Qiling Disk Master?
The Qiling data backup and drive clone tool provides comprehensive protection for files, folders, disks, partitions, and the entire operating system, allowing for quick and easy restoration in case of a disaster, such as a system crash or virus attack, and offers features like multiple backup modes and scheduled backups.
Simple Guide to use Qiling Disk Master to Backup Data
The comprehensive professional backup and recovery tool has a built-in navigation feature that simplifies the backup process. To use it, follow these easy steps:
1. Select a backup mode, such as "File Backup", "System Backup", or "Driver Backup".

2. To initiate a backup, select the desired system, driver, or file, and set a backup time. Then, click the "Start" button to begin the backup process.
3. When the backup process is complete, you can edit the displayed backup image and restore the specific data that you need.
After completing the backup process, you can proceed with updating Windows 11 on your PC. Follow the prompts to complete the update, and keep the backup available in case you need to restore your data.
However, you may still lose recently changed files if the backup was created before the latest updates or before important data was saved. Check your backup date and recover missing files as soon as possible.
How to Recover Data after Windows 11 Update
You can recover lost data while updating Windows 11 with Deep Data Recovery.
Deep Data Recovery is a data recovery tool that can help recover deleted or lost data from PCs, memory cards, RAW drives, and other storage devices through a simple scan and recovery process.
Your Best Windows 11 Data Recovery Software
- This software recovers lost, deleted, and formatted files, providing a reliable solution for retrieving data from damaged or inaccessible storage devices.
- It recovers partition loss caused by deletion or lost
- This software recovers lost data due to various causes such as virus attacks, software/hard drive/system crash, or Windows reinstallation.
- It supports various file types, including documents, videos, audio, images, archives, and other files.
Experiencing the IRQL_Not_Less_OR_EQUAL error code can be frustrating, especially if you're new to it. However, it's a common issue with Windows 11, and fortunately, there are ways to fix it. In this post, we've explored five different methods to resolve the IRQL_Not_Less_OR_EQUAL error on Windows 11, providing a helpful guide for those seeking a solution.
We have also looked at how to update Windows 11 without losing data. If you don't back up data properly, you can lose data, but you can use the Deep Data Recovery tool to recover lost files after the upgrade to Windows 11.
Related Articles
- How to Fix a Windows 11 Installation Error 0x8007007f
- Free Data Recovery Software for Windows 11
- Recover Permanently Deleted Files in Windows 11
- How to Fix 'Error 0xc1900101' on Windows 11 Installation Assistant
- [Solved] Photos Cannot Open in Windows 11/10
- How to Reinstall macOS on MacBook/iMac
- How to Fix 0x80240fff Windows 10 Update Error