10 Ways to Fix M.2 Drive Not Showing up in Windows 10 or 11
The issue: M.2 drive not showing up in Windows 10 or 11
M.2 is a standard for internally mounted computer expansion cards and connectors, formerly known as Next Generation Form Factor (NGFF). Its physical specification allows for different module widths and lengths, but you may still encounter issues like an M.2 drive not showing up in Windows 10 or 11.
The user's M.2 drive is not showing up in Disk Management, which is preventing them from migrating their Windows 10 installation to the new drive. The user ordered the M.2 drive to address their increasing storage needs due to larger game files. They need assistance in resolving the issue so they can use the new drive.
To resolve the issue of the M.2 drive not showing up during Windows 11 installation, try booting from the installation media in UEFI mode, as the BIOS settings may not be sufficient. Ensure the M.2 drive is properly seated and connected. You can also try disabling Secure Boot in the UEFI settings, as some systems may have issues with this feature. If the issue persists, check the UEFI settings for any specific settings related to the M.2 drive. If none of these steps work, consider resetting the UEFI settings to their default values. If you're still having trouble, it might be worth checking the drive's compatibility with Windows 11 or attempting a different installation method.
Part 1: Possible causes of M.2 SSD drive not showing up
Before attempting to troubleshoot the issue of your M.2 drive not showing up in the BIOS or Disk Management utility, let's first try to determine why it's not being recognized. This could be due to a faulty M.
- Shared bandwidth with other ports.
- M.2 drive is not properly connected to your PC.
- M.2 drive is not enabled in BIOS.
- Incorrect BIOS settings related to the M.2 SSD.
- Missing or conflicting drive numbers.
- M.2 SSD drives are obsolete.
- The M.2 SSD's file system is not compatible with your Windows OS, making it unable to read or write data to the drive. This incompatibility prevents the Windows operating system from properly accessing the drive, resulting in an inability to use the M.
- M.2 SSD is not initialized.
Part 2. How to recover data from M.2 SSD drive
If your M.2 SSD is not new, you may lose data during the repair process. To recover deleted files, use a reputable data recovery software like Deep Data Recovery.
- The software features two advanced scanning methods, Quick Scan and Deep Scan, which quickly and thoroughly scan M.2 SSD drives to locate deleted or lost files.
- Recover deleted or lost data from M.2 SSD drives, including Word, Excel, PPT, PDF, JPG/JPEG, MP4, WMV, ZIP, and over 200 other file types.
- Keep the recovered files with their original path, name, format, and quality. You can also filter them by type, date modified, and size for more specific files.
- The program supports NTFS, exFAT, FAT32, and ReFS file systems and is compatible with Windows 7, 8, 10, 11, and other operating systems.
Download Deep Data Recovery on your computer!
To disable the TRIM feature on an M.2 SSD, you can type "fustil behavior query disabledeletenotify" in the window to check its status. If it's not disabled, type "fustilybehavior query disabledeletenotify 0" to turn it off. This will ensure that deleted files or folders are not erased completely, preserving your data.
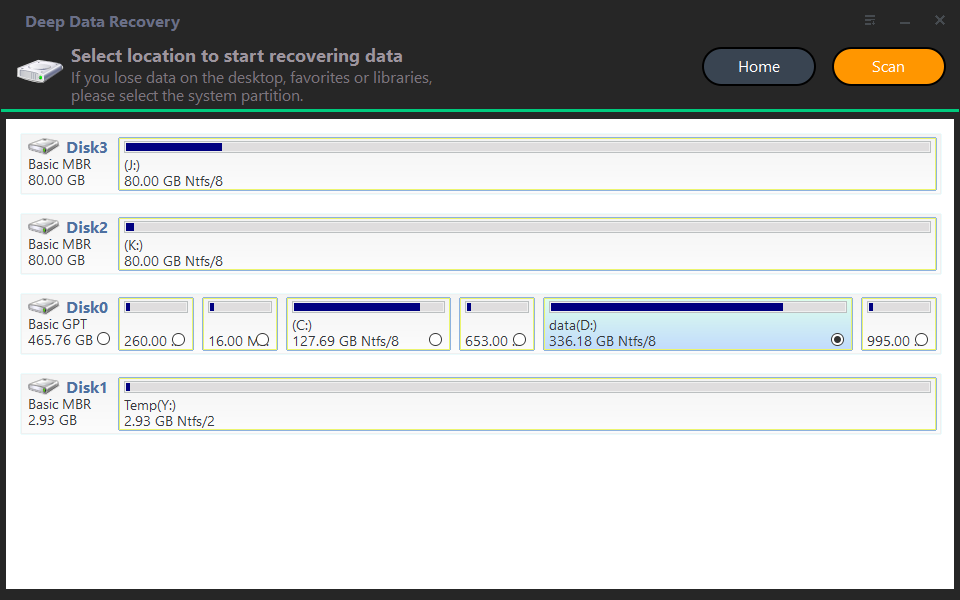
Step 1. Install the software, connect the M.2 SSD to the computer, and run the tool. Select your drive and click the "Scan" button.
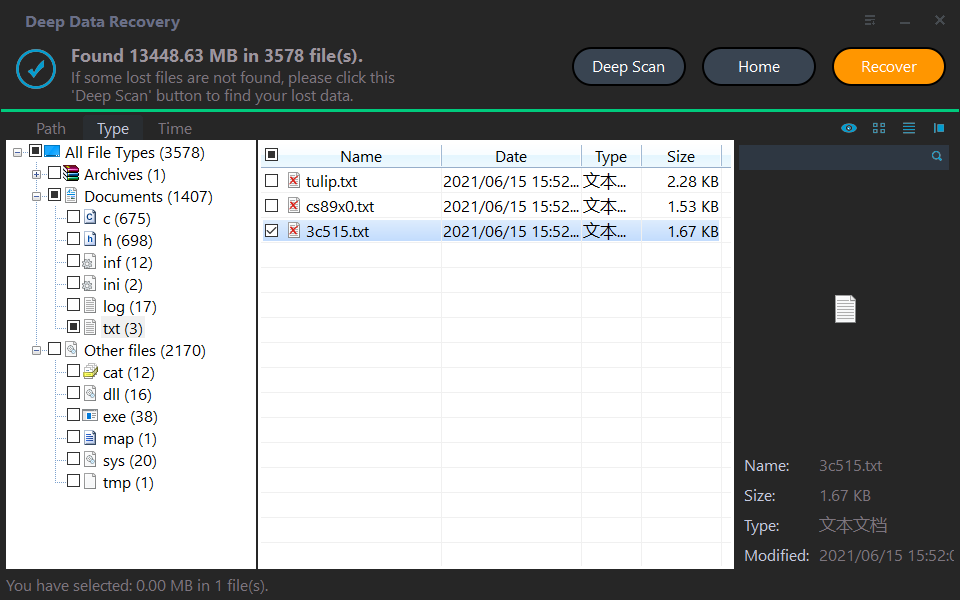
Step 2. You can search or wait to see all the deleted files and Raw files based on your needs.
Step 3. Select all the deleted files on the M.2 SSD drive, click "Recover" and save them in a new location after recovery.
- Restoring files to their original location may overwrite data on the M.2 SSD drive and make them difficult to recover.
- Deep Data Recovery offers a free version for recovering data from M.2 SSDs up to 30MB, and users can upgrade to a paid version for unlimited data recovery.
- Deep Data Recovery can be used to recover deleted files in Windows 11 or from external storage devices, such as a flash drive.
Part 3. How to fix the M.2 drive not showing up in BIOS
For PCs, the BIOS (Basic Input/Output System) is firmware that performs runtime services for the operating system and programs, as well as hardware installation, during the boot process. It also initializes and tests system hardware components and loads a boot loader from a mass storage device.
You'd expect to see your M.2 SSD in the BIOS after installing it, but in reality, it might not show up. This discrepancy between theory and practice can be frustrating, especially if you're trying to troubleshoot issues with your M.2 drive.
Fix 1. Configure your M.2 SSD drive
If your M.2 drive is not showing up in Windows 10/11, you should check if it's enabled in the BIOS settings. To do this, restart your computer and enter the BIOS settings. The keys to press may vary depending on your computer model, so check your manual or online documentation. Once in the BIOS settings, look for the M.
Step 1. To access the BIOS settings, you need to restart your computer and press either the F2 or Delete key, depending on your system's configuration, to enter the BIOS setup screen.
Step 2. After entering the BIOS, expand SATA Configuration and select Configure SATA as "IDE" mode.
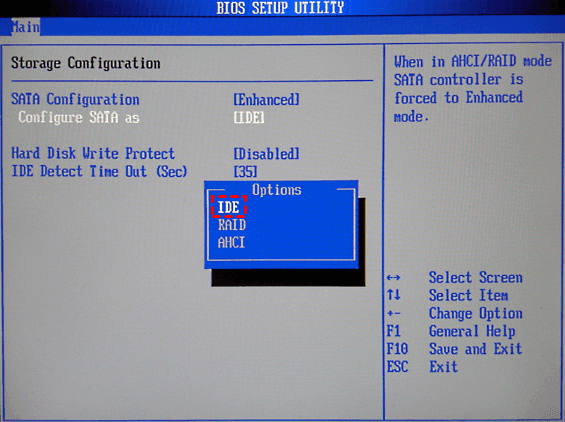
Step 3. To save changes made in the BIOS, press the F8 key, then reboot your PC to see if the M.2 drive is visible in the BIOS.
Fix 2. Reinstall M.2 SSD drive
If your M.2 drive isn't showing up in BIOS, it might be due to incorrect installation. To resolve this, start by disconnecting your desktop or laptop from all connections, then you're ready to reinstall your M.2 SSD drive.
Fix 3. Disable Secure Boot in BIOS
To fix your M.2 drive not showing up, you can try deactivating Secure Boot in your BIOS settings. This may resolve the issue by allowing your system to recognize and access the M.2 drive.
Step 1. To access the BIOS settings, restart your computer and press F2 or Delete to enter the BIOS.
Step 2. Go to the Security interface and click the "Secure Boot" button.
Step 3. Set "Secure Boot Control" to Disabled.
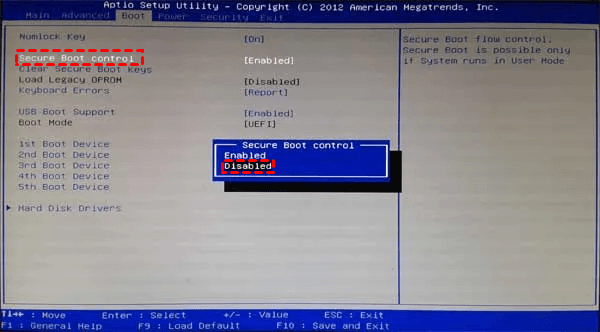
Step 4. Save the BIOS changes, then reboot your PC to verify if the M.2 drive appears.
Fix 4. Update BIOS
When you connect a modern device to your motherboard, an outdated BIOS might fail to recognize the new technology, which can cause issues like a non-detected M.2 SSD in Windows 10/11.
Updating the BIOS is a good method to accept and adapt to these changes. Please don't interrupt the update and avoid any power failure to damage the motherboard during the update.
Step 1. To update the BIOS, download the BIOS update file from the official website of your Windows PC's motherboard manufacturer.
Step 2. Insert the USB flash drive into your computer, load all the updated files, and then reboot your computer.
Step 3. To begin, connect your USB drive to your computer using a USB port. Next, restart your PC and enter the BIOS interface, which is usually done by pressing a specific key such as F2, F12, or Del, depending on your computer model, as soon as the boot process starts.
Step 4. In the BIOS interface, select the "Update BIOS From Drive" option and then select the BIOS update file downloaded from the USB stick.
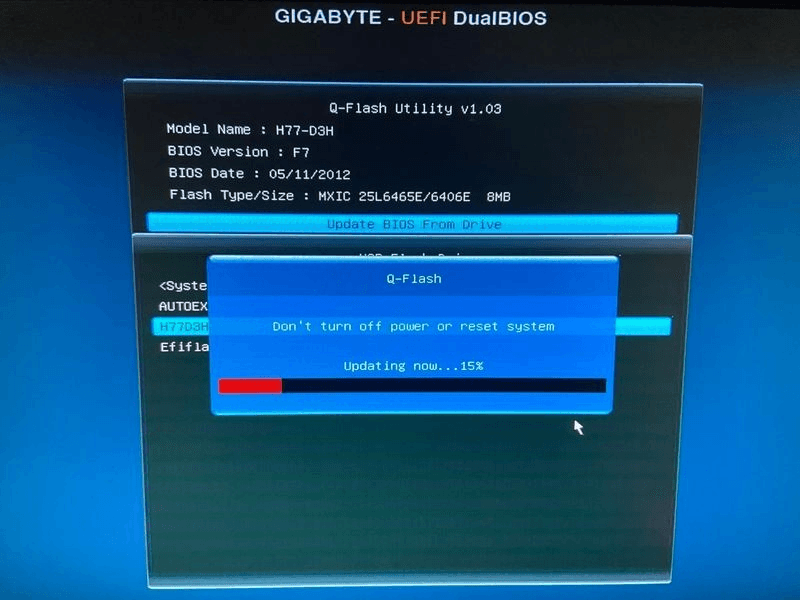
Please confirm this operation and wait for the update process to complete.
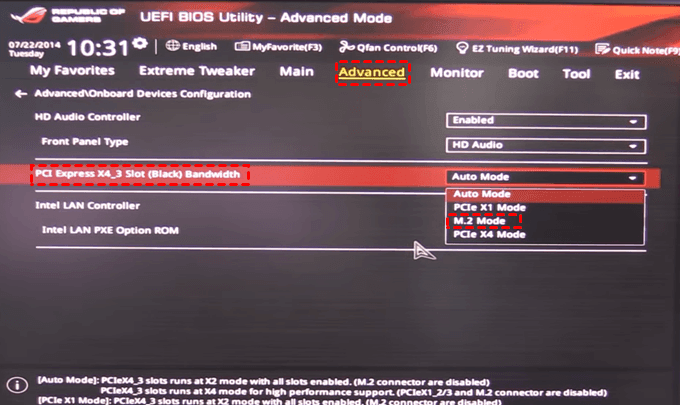
Fix 5. Check M.2 Settings in BIOS
If your M.2 SSD isn't showing up, it's often due to incorrect BIOS settings, which can be easily fixed by checking the M.2 settings in the BIOS. Modern motherboards and laptops usually have two M.2 SSD slots, so it's essential to verify that everything is properly configured to ensure smooth operation.
Step 1. To access the BIOS, restart your computer and press the F2 or Delete key.
Step 2. Click the "Advanced" settings tab > Onboard Devices Configuration.
Step 3. To enable M.2 mode, tap on the menu next to PCI Express X4_3 Slot (Black) Bandwidth and click the "M.2 mode" button.
After exiting the BIOS, you can restart your PC and enter the BIOS again to verify that your M.2 drive is recognized and configured correctly.
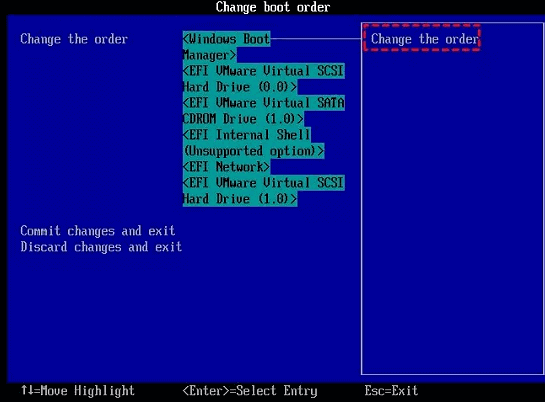
Fix 6. Change boot priority to M.2
If Windows can't detect your M.2 drive, try changing the boot order in your BIOS to prioritize the M.2 drive, as a faulty boot order may prevent it from being detected and loaded.
Step 1. To restart your computer and enter the BIOS, simply shut down your computer, wait for a few seconds, and then press the "F2" or "Delete" key as soon as the computer starts booting up again. This will take you directly to the BIOS settings, where you can make any necessary adjustments.
Step 2. Go to the BIOS interface, navigate to the Boot tab, and locate the Boot priority order.
Step 3. Move your M.2 drive to the first position in the boot order and set it as the primary boot device. This will allow your system to boot from the M.2 drive instead of the traditional hard drive or SSD.
Step 4. Press F7 to save these changes.
Part 4. How to fix M.2 drive not showing up in Disk Management?
If the M.2 drive is not showing up in Disk Management, you can try the following fixes: running the Disk Management tool as an administrator, checking for driver updates, enabling the M.2 drive in the BIOS, and using the built-in Disk Management utility to initialize the drive.
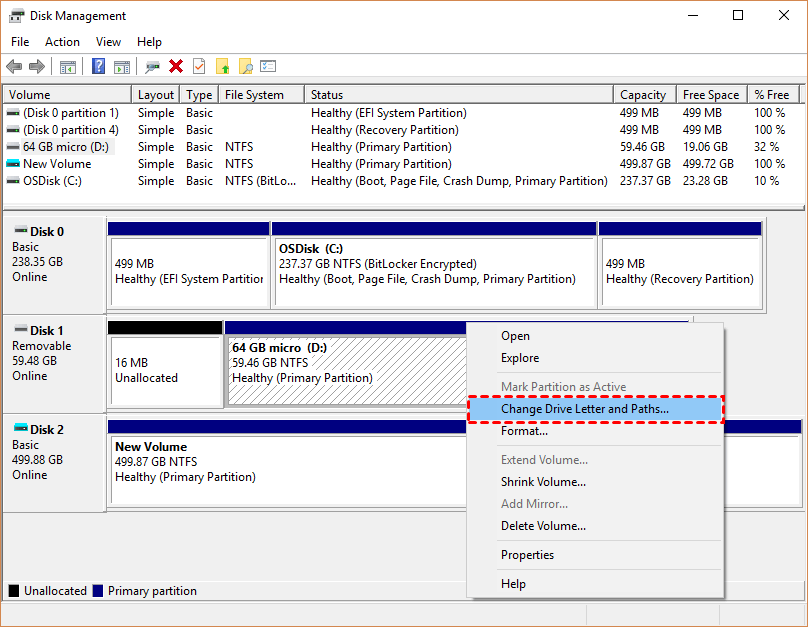
Fix 1. Assign a drive letter to your M.2 drive
In computing, Windows can't recognize an unlettered M.2 drive due to its drive letter assignment being an identification. To resolve this, assign a drive letter to the M.2 drive, and you can also follow steps to recover hidden partitions on Windows 7, 8, 10, or 11 computers.
Step 1. Connect your M.2 drive to your PC. Then, press "Win + R" to open the Run box and type "diskmgmt.msc" in the window, and hit "Enter" or press "OK" to open Disk Management.
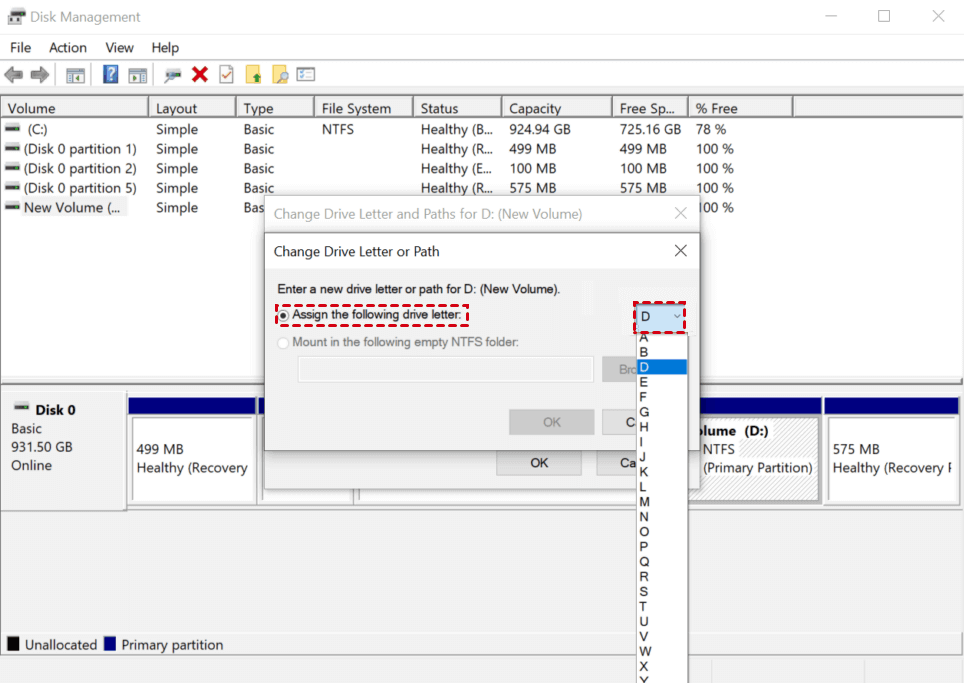
Step 2. To change the drive letter and path of your M.2 SSD drive, right-click on it after viewing all the partitions, and select the "Change Drive Letter and Paths" option.
Step 3. To add a drive letter for your M.2 drive, select the "Add" option.
Step 4. Select the "Assign the following drive letter" option and choose a unique letter for the drive letter, making sure it doesn't match any existing drive letters.
Fix 2. Update M.2 SSD driver in Device Manager
Updating the M.2 SSD driver in Device Manager can resolve the issue of an M.2 drive not showing up. This involves checking for and installing any available updates for the M.2 SSD driver, which may be outdated and causing the problem. By following these steps, users can troubleshoot and potentially resolve the issue.
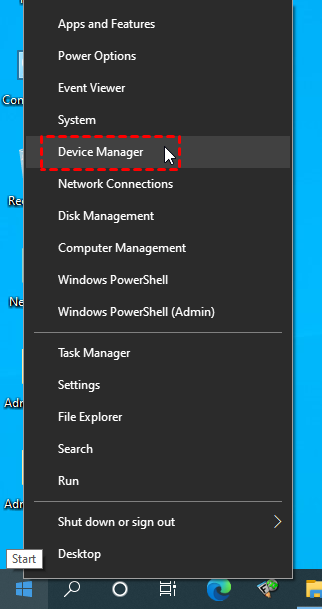
Step 1. To access your M.2 drive, connect it to your computer and open the Device Manager by typing it in the search bar on your PC.
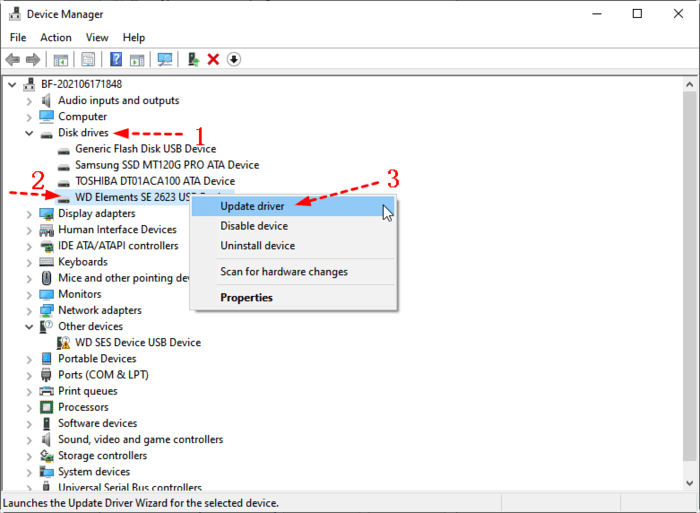
Step 2. To update the driver for your M.2 drive, go to Disk Drives, right-click on the connected M.2 drive, and select the "Update Driver" option.
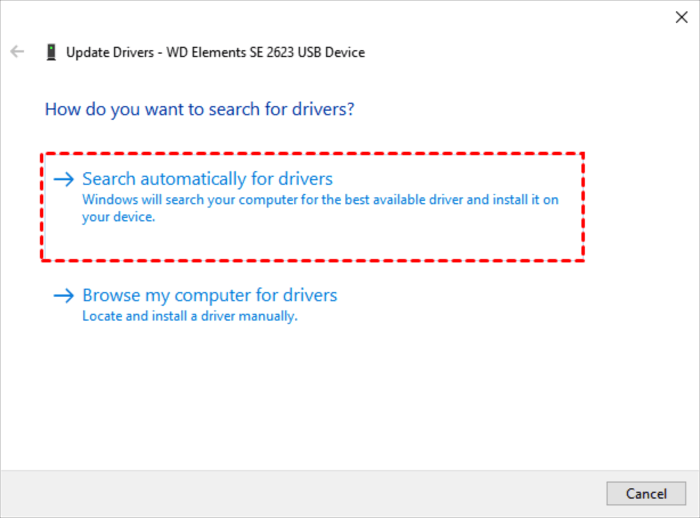
Step 3. Select the "Search automatically for drivers" option. Please wait patiently.
Fix 3. Run hardware and devices troubleshooter
Running a hardware and devices troubleshooter is a practical way to fix detected errors on the M.2 drive, which can also help resolve errors like "this device cannot start code 10".
Step 1. To open Windows Settings, press the Windows key and the letter "I" at the same time, then click on "Update & Security" from the list of options, followed by "Troubleshoot".
Step 2. Under the "Hardware and Devices" tab, click the "Run the troubleshooter" button.

Fix 4. Initialize your M.2 SSD drive
If an M.2 SSD drive is not initialized, it may not show up in Disk Management, requiring initialization to resolve the issue.
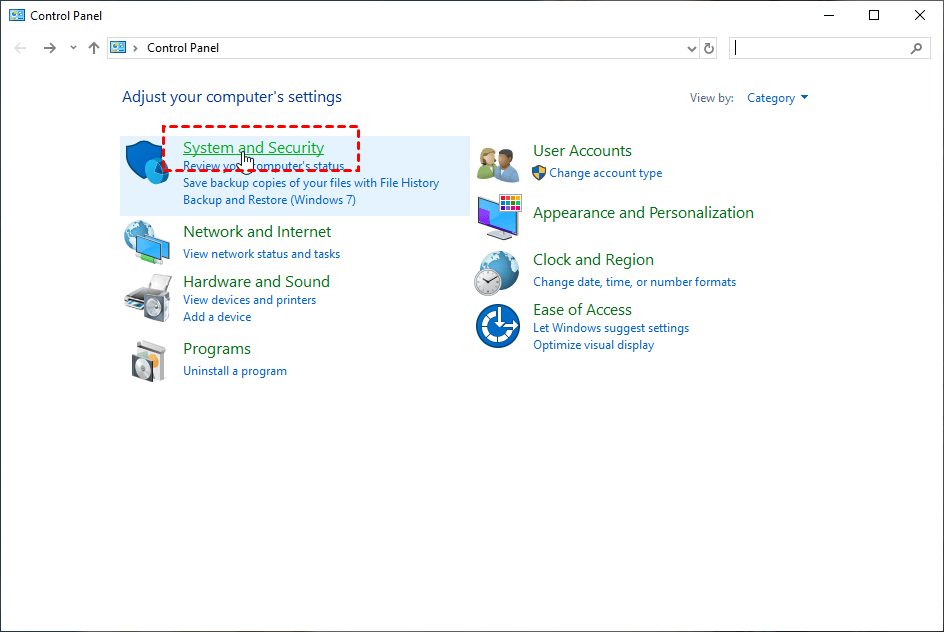
Step 1. Connect the M.2 drive to your computer. Go to the Control Panel, then to System and Security.
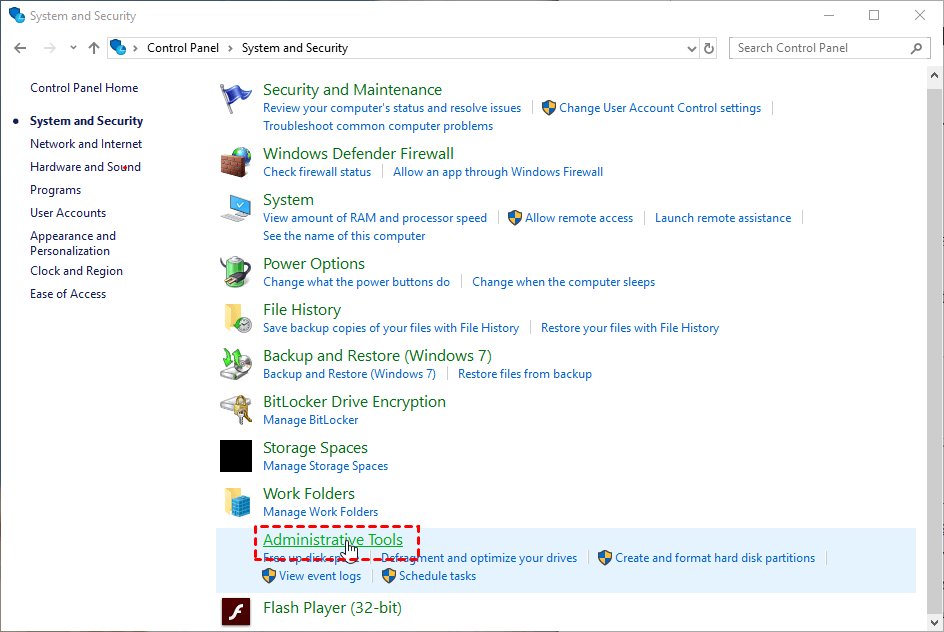
Step 2. Click the "Administrative Tools" button.
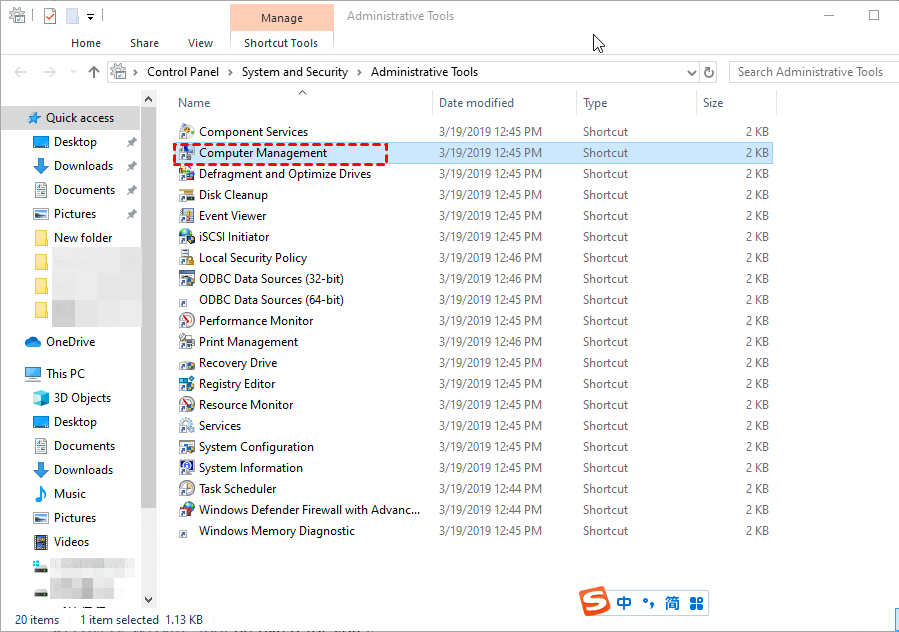
Step 3. Click the "Computer Management" button.
Step 4. Click "Disk Management" on the left.
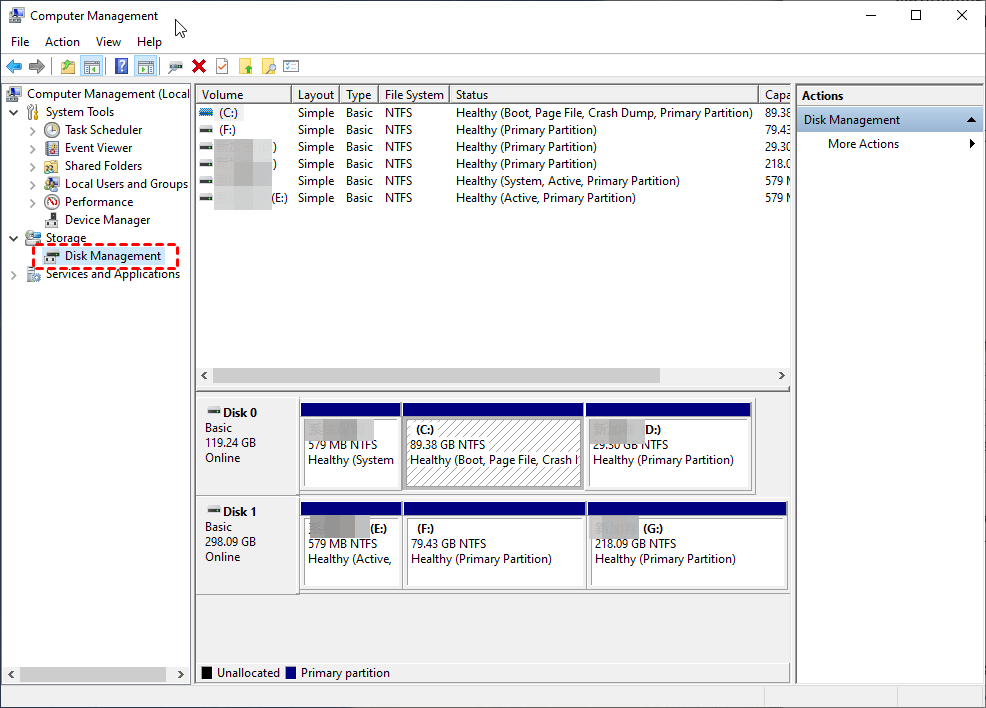
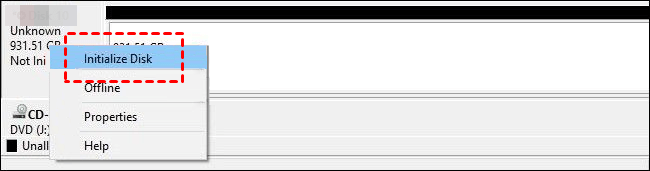
Step 5. To initialize your M.2 drive, right-click on it and select the "Initialize Disk" option from the context menu. This will erase all data on the drive and prepare it for use.
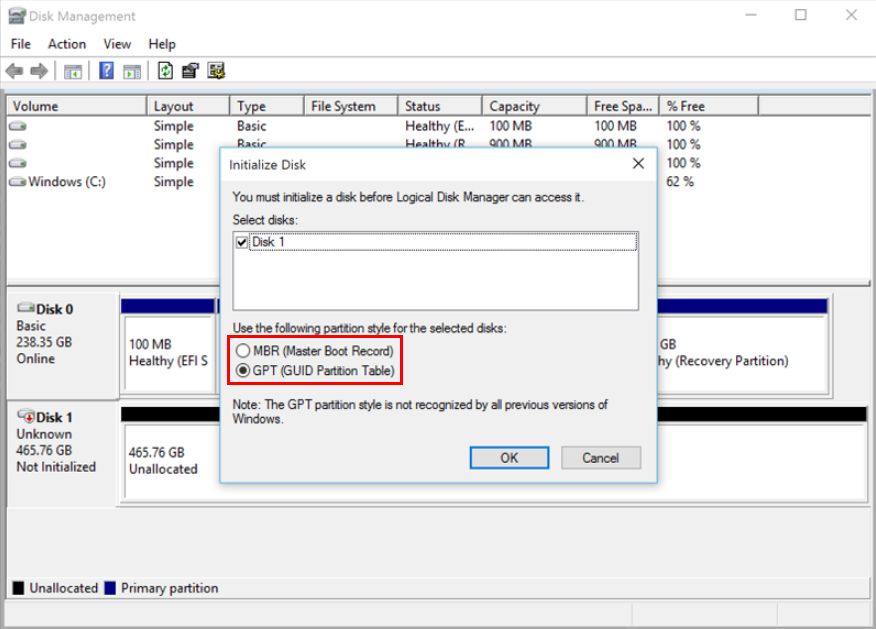
Step 6. Select the desired partition scheme (MBR or GPT) in the Initialize window based on the capacity of your M.2 drive, and then click the "OK" button.
Step 7. After initialization, right-click on the unallocated space of your M.2 drive and select the "New Simple Volume" option.

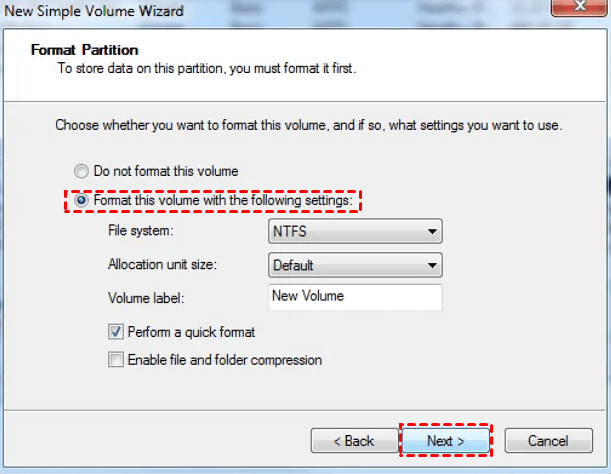
Step 8. After setting the partition size and new drive letter of your M.2, click "Format this volume with the following settings" and then "Next". Make sure the file system is set to NTFS.
Step 9. To close the last window and go back to the main interface of the Disk Management utility, click "Finish" after completing the steps.
FAQs about M.2 SSD
1. Why my SSD show up in BIOS but not Windows?
2. How do I initialize my M.2 SSD?
- Connect your M.2 SSD To use a M.2 NVMe SSD with a USB adapter, you'll need to connect the M.2 drive to the adapter, then plug the adapter into a USB port on your computer.
- To initialize an M.2 SSD, go to Disk Management by typing "diskmgmt.msc" and pressing Enter. Then, right-click the M.2 SSD and select "Initialize Disk".
- In the pop-up window, select the MBR or GPT partition style and click OK, with GPT being the recommended option.
3. Do I need to format a new M 2 SSD?
Related suggestions
If your M.2 drive isn't showing up in BIOS or Disk Management, it might be due to a faulty drive, incorrect BIOS settings, or a driver issue. To troubleshoot, check your BIOS settings and ensure the drive is enabled. If it still doesn't show up, try using a different port or checking for loose connections. If the drive is recognized but not showing up in Disk Management, it could be due to a driver issue, so try updating your drivers or reinstalling them.
The M.2 drive not showing up in BIOS or Disk Management can be caused by several factors, including a faulty M.2 drive, a loose connection, or a compatibility issue with the motherboard.
If you've deleted files from your SSD, you can try restoring them from backups or use reliable data recovery software like Deep Data Recovery. To avoid losing important files in the future, it's a good idea to create regular backups using free backup software like Qiling Disk Master Standard. This will ensure that your data is safe and can be recovered if needed.
If you accidentally deleted partitions from an SSD, you can recover them using the Qiling Partition Recovery Wizard, a highly-praised partition recovery software.
Related Articles
- 8 Fixes | Windows Text Not Showing up!
Learn how to fix Windows text not showing up via eight solutions and how to retrieve deleted texts via Windows features or data recovery software on this page. - 6 Ways to Solve Desktop icon Reappears after Delete
Desktop icon reappears after delete? This post lists six feasible fixes for you to delete shortcuts from desktop. Besides, you can restore desktop icons/files Windows 10 and get relevant desktop data recovery tips. - 5 Ways to Fix External Hard Drive Access Denied
External hard drive access denied? Get five solutions to fix this issue on this page. Besides, you can get related tips about external hard drive data/partition recovery. - Comprehensive Guide: How to Recover Permanently Deleted Photos Free?
Learn how to recover permanently deleted photos free via Windows features or photo recovery tools on this page. Moreover, you can get other relevant tips about photo recovery. - How to Recover Deleted Video Files from Hard Drive
If you lost video files from your hard drive, follow these steps to scan for recoverable files. - How to Recover Deleted WhatsApp Audio
Here is a step-by-step guide to recover deleted WhatsApp audio files from PC, Mac, and iPhone.